Adaptive Cruise Control, Calibrating Before starting a calibration check if the vehicle is equipped with an infrared system. If this is the case depending on the damage claim the night vision system camera must be calibrated first. Conditions – The distance regulation control module must be calibrated during the following conditions: The Distance Regulation Control Module -J428-/Distance Regulation Control Module 2 -J850- was be replaced. The Distance Regulation Control Module -J428-/Distance Regulation Control Module 2 -J850- was be removed and installed. The front bumper was damaged. The front bumper was loosened, adjusted, or removed and installed. The rear axle toe was adjusted. The adjustment angle is greater than –0.8° to +0.8°. Too large of a vertical adjustment for the distance regulation control module (leads to a blind spot deactivation). Functional limitations emerge due to limited sensor sight, which is not the result of a dirty sensor or inclement weather conditions (for example, heavy rain-/snowfall, iced over sensor, etc.). The DTC “no or incorrect basic setting/adaptation” is stored in the DTC memory. Additional procedures. Refer o → Suspension, Wheels, Steering; Rep. Gr.44; Adaptive Cruise Control; Adaptive Cruise Control, Calibrating. Page 1 of 1 Adaptive Cruise Control, Calibrating 9/20/2016 vw-wi://rl/A.en-US.A00.5A80.15.wi::85031706.xml?xsl=3
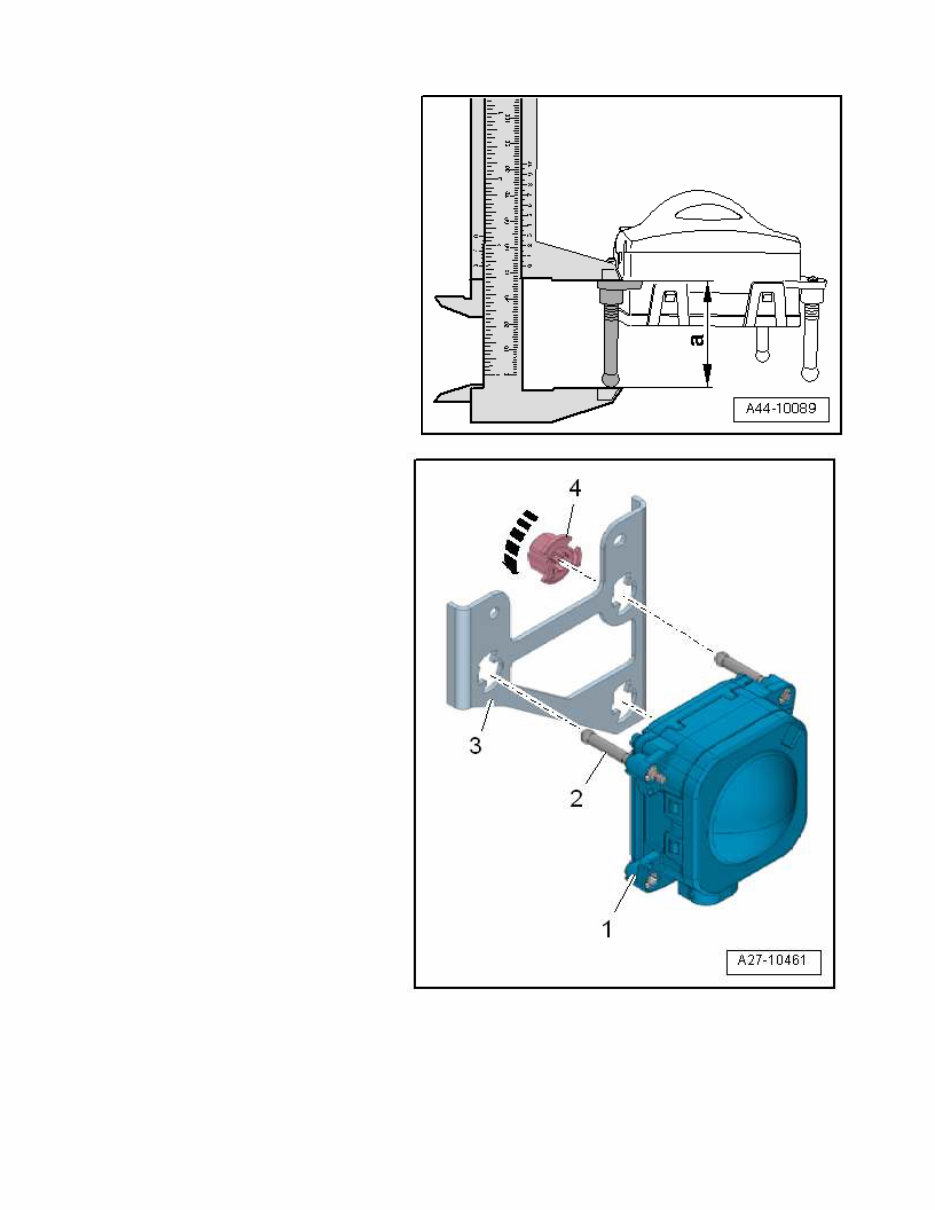
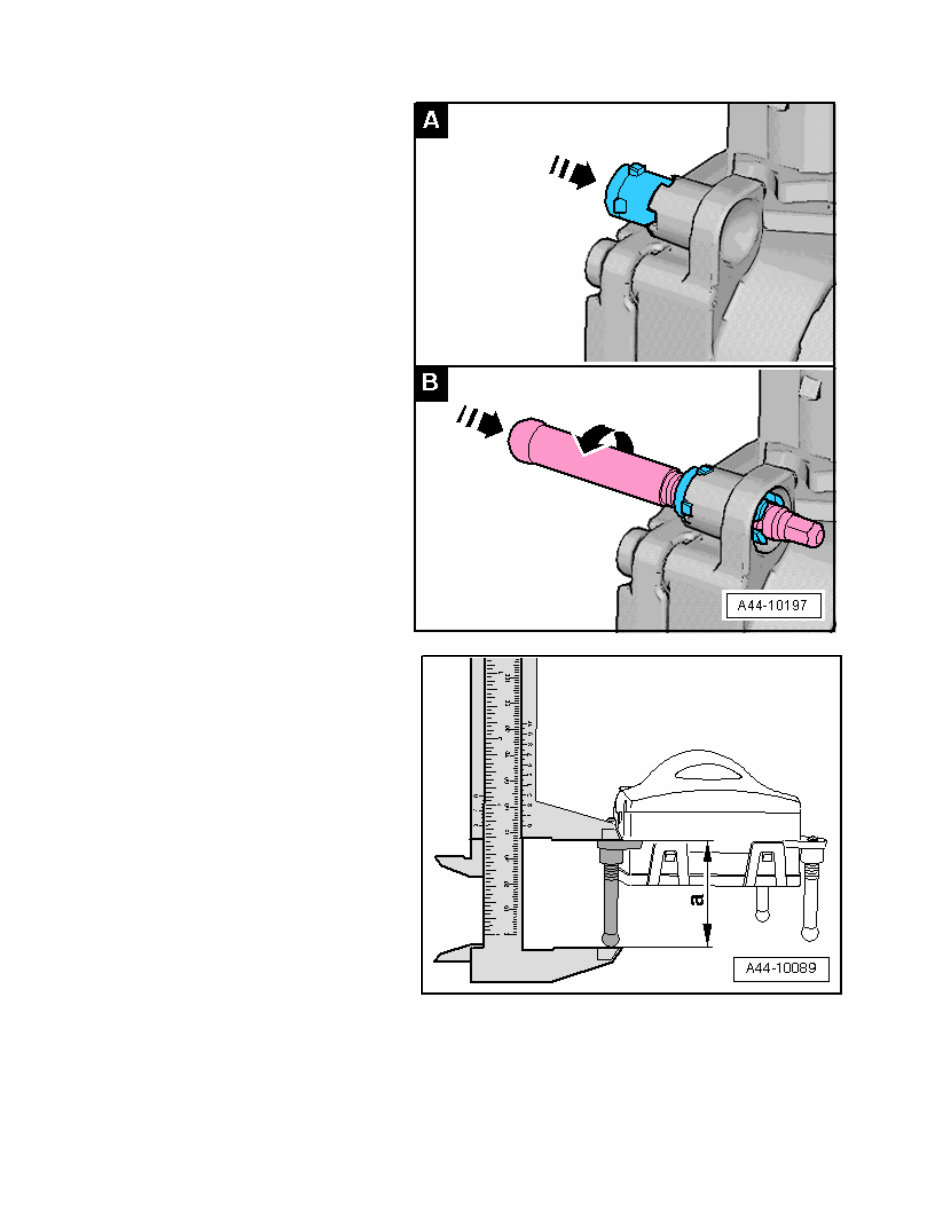
Distance Regulation Control Module -J428- /Distance Regulation Control Module 2 -J850- Retaining Plate, Removing and Installing Special tools and workshop equipment required Digital Caliper -VAS6335- Removing – Remove the distance regulation control module. Refer o → Chapter „Distance Regulation Control Module -J428- /Distance Regulation Control Module 2 -J850-, Removing and Installing“. – Turn the quick release -1- counterclockwise. – Remove the quick release from the stud bolts. – Remove the retaining plate -2- from the distance regulation control module -3-. Installing Install in the reverse order of removal. Note the following: Note Replace the quick release. The stud bolts in the bracket are pre-set. If necessary, correct the setting. If the stud bolts were removed, then the clips on the distance regulation control module must be replaced. Refer o → Chapter „Distance Regulation Control Module -J428-/Distance Regulation Control Module 2 -J850- Clip, Replacing“. – Place the control module on a soft and clean surface. Page 1 of 2 Distance Regulation Control Module J428/Distance Regulation Control Module 2 J850 R... 9/20/2016 vw-wi://rl/A.en-US.A00.5A80.15.wi::85031704.xml?xsl=3
– Measure the dimension -a- at all stud bolts using the Digital Caliper -VAS6335- and correct if necessary. Dimension -a- = 43.3 mm. – Position the retaining plate -3- onto the distance regulation control module -1-. – Carefully press the new quick release -4- onto the stud bolt -2-. – Turn the quick release clockwise onto the retaining plate to the stop -arrow-. Page 2 of 2 Distance Regulation Control Module J428/Distance Regulation Control Module 2 J850 R... 9/20/2016 vw-wi://rl/A.en-US.A00.5A80.15.wi::85031704.xml?xsl=3
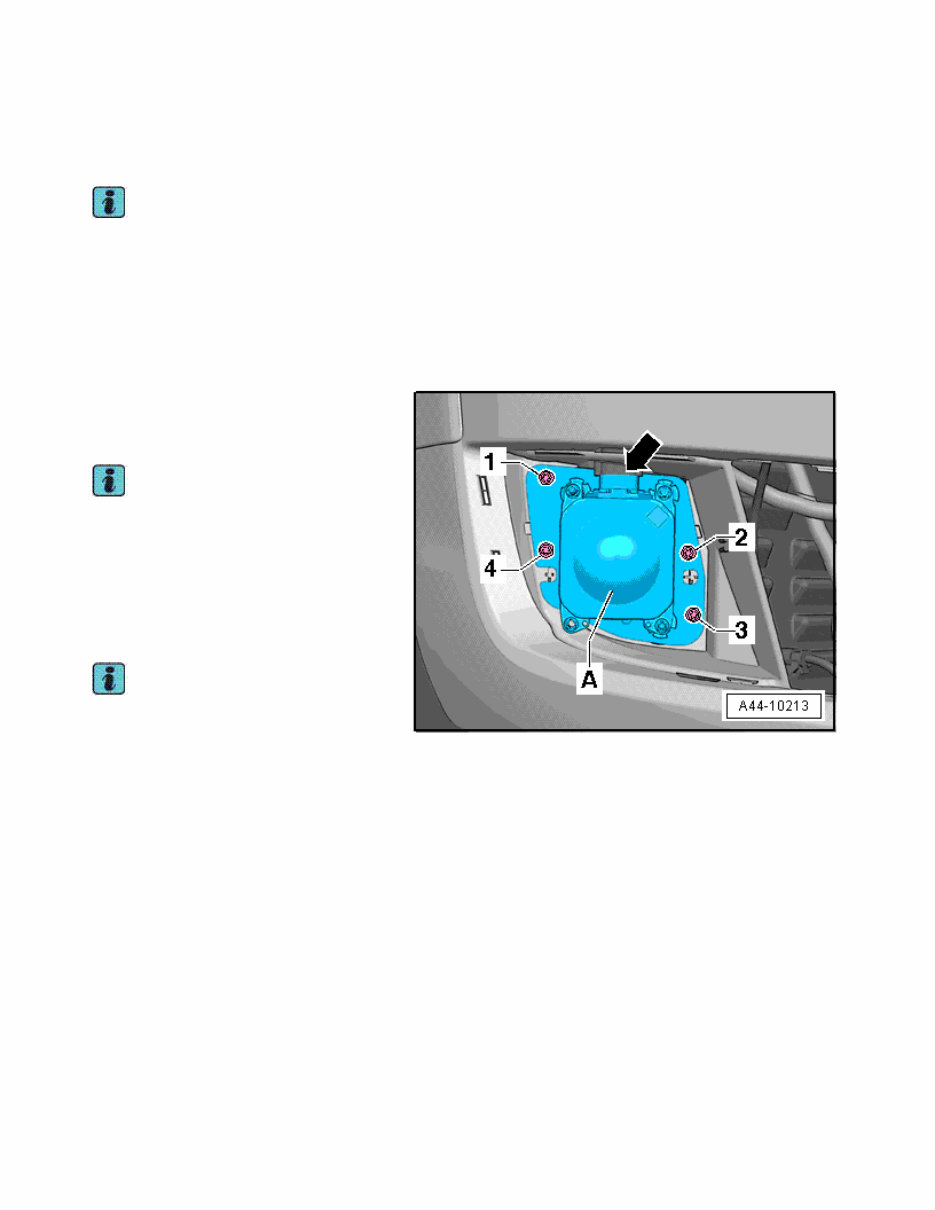
Distance Regulation Control Module -J428- /Distance Regulation Control Module 2 -J850-, Removing and Installing Note If replacing the control module, select the “Replace Control Module” function using the Vehicle Diagnostic Tester. Removing – Remove the air intake grille. Refer o → Body Exterior; Rep. Gr.63; Front Bumper; Attachment, Removing and Installing. – Unclip the cover. – Remove the bolts -1 to 4-. – Remove the distance regulation control module -A- from the bumper cover. Note Clean and dry the area around the control module connector. – Disconnect the connector -arrow-. Installing Install in the reverse order of removal. Note the following: Note Check the connector for damage, contact corrosion and water ingress, and service if necessary. Refer o → Electrical Equipment General Information; Rep. Gr.97; Wring Harness and Connector Repair. – Calibrate the adaptive cruise control. Refer o → Chapter „Adaptive Cruise Control, Calibrating“. Tightening Specifications Refer to → Chapter „Overview - Adaptive Cruise Control Component Location“. Page 1 of 1 Distance Regulation Control Module J428/Distance Regulation Control Module 2 J850, R... 9/20/2016 vw-wi://rl/A.en-US.A00.5A80.15.wi::85031703.xml?xsl=3
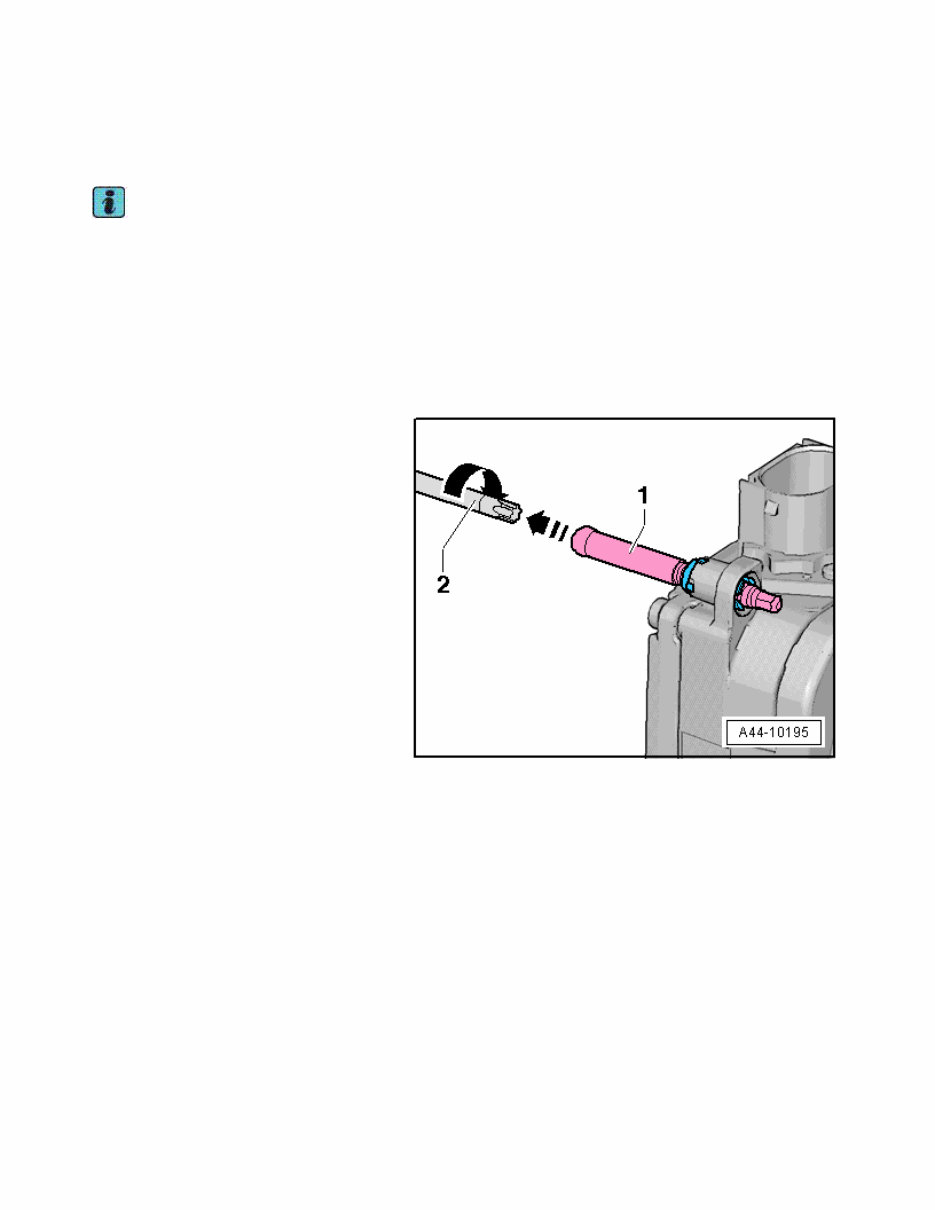
Distance Regulation Control Module -J428- /Distance Regulation Control Module 2 -J850- Clip, Replacing Note If the stud bolts were removed, then the clips on the distance regulation control module must be replaced. The clips cannot be removed without being damaged. Procedure – Remove the distance regulation control module retaining plate. Refer o → Chapter „Distance Regulation Control Module -J428-/Distance Regulation Control Module 2 -J850- Retaining Plate, Removing and Installing“. – Remove the stud bolt -1- using a suitable tool -2-. Page 1 of 3 Distance Regulation Control Module J428/Distance Regulation Control Module 2 J850 Cl... 9/20/2016 vw-wi://rl/A.en-US.A00.5A80.15.wi::85031705.xml?xsl=3
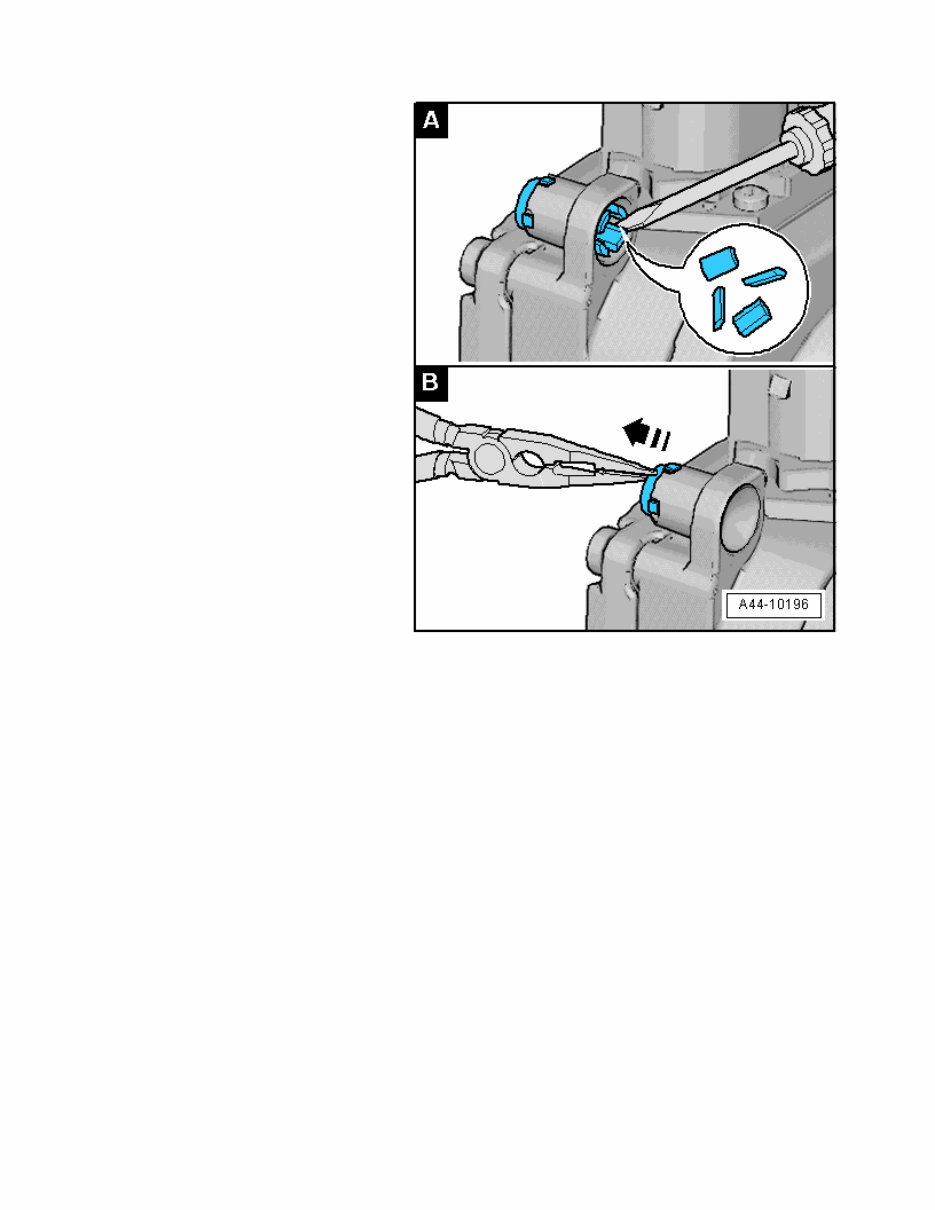
– Place a screwdriver between the hook and the housing. – Bend every hook all the way around with the screwdriver until it audibly breaks off. – To prevent the broken hook from getting caught on the housing, remove it from the inside of the clip using needle nose pliers. Page 2 of 3 Distance Regulation Control Module J428/Distance Regulation Control Module 2 J850 Cl ... 9/20/2016 vw-wi://rl/A.en-US.A00.5A80.15.wi::85031705.xml?xsl=3
– Insert the new clip into the hole in the housing from the left and then press on it by hand until it clicks into place. The tabs on the clip must sit correctly in the recesses. – Install the stud bolt. The stud bolt must be parallel inside the hole and correctly aligned to the clip. – Turn the stud bolt into the distance regulation control module up to the dimension -a-. Dimension -a- = 43.3 mm. – Repeat this procedure on all the other clips, if necessary. Page 3 of 3 Distance Regulation Control Module J428/Distance Regulation Control Module 2 J850 Cl ... 9/20/2016 vw-wi://rl/A.en-US.A00.5A80.15.wi::85031705.xml?xsl=3
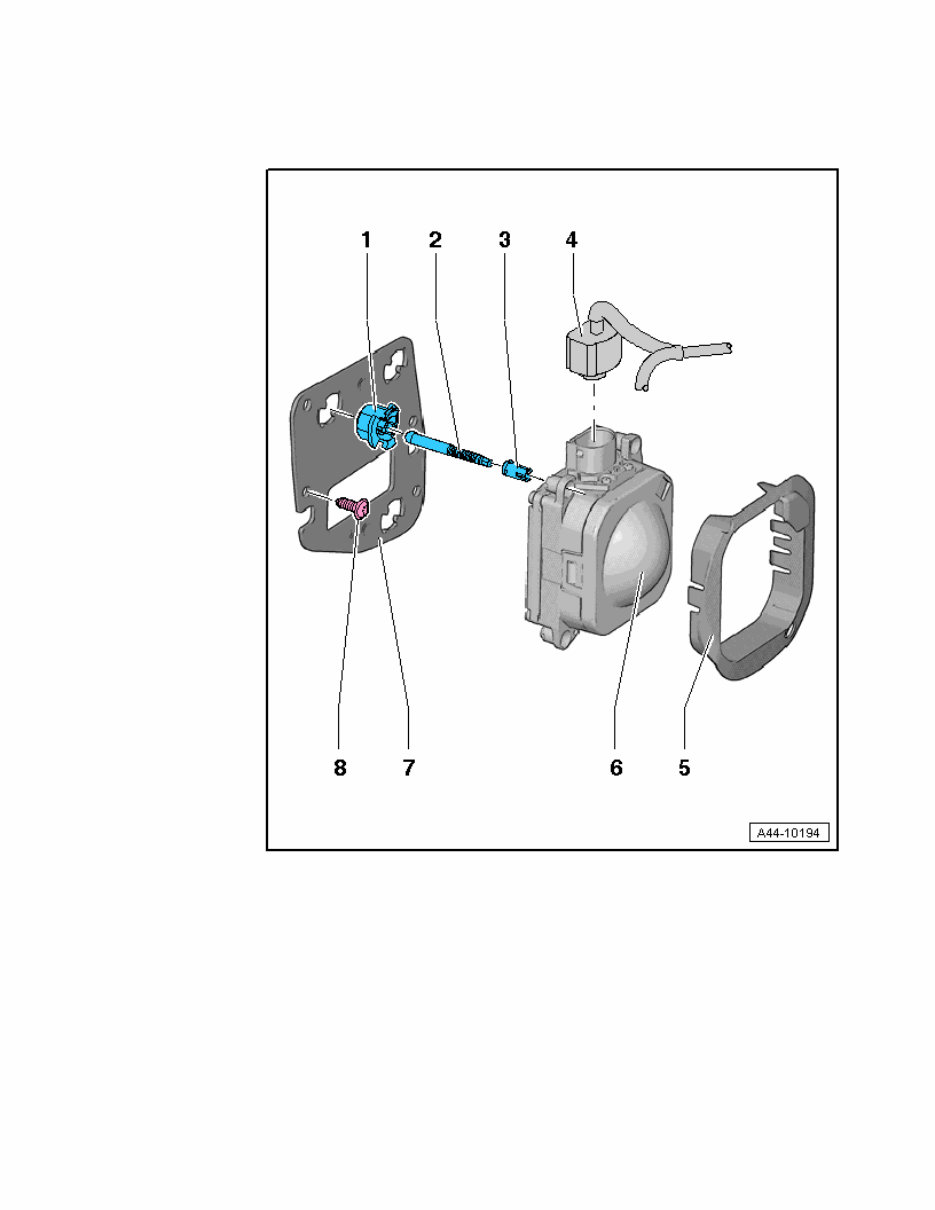
Overview - Adaptive Cruise Control Component Location 1 - Nut 2 - Stud Bolt Note the adjustment dimension. Refer o → Anchor 3 - Clip Must always be replaced if the stud bolt -2- was removed. Replacing. Refer o → Chapter „Distance Regulation Control Module - J428- /Distance Regulation Control Module 2 - J850- Clip, Replacing“ 4 - Connector Check for damage, contact corrosion and water ingress, and service if necessary. Refer o → Electrical Equipment General Information; Rep. Gr.97; Wring Harness and Connector Repair. 5 - Cover 6 - Distance Regulation Control Module Right: Distance Regulation Control Module -J428- Left: Distance Regulation Control Module 2 -J850- Removing and installing. Refer o → Chapter „Distance Regulation Control Module -J428-/Distance Regulation Control Module 2 -J850-, Removing and Installing“. 7 - Bracket 8 - Bolt Page 1 of 2 Overview - Adaptive Cruise Control Component Location 9/20/2016 vw-wi://rl/A.en-US.A00.5A80.15.wi::85031701.xml?xsl=3
2.5 Nm Quantity: 4 Page 2 of 2 Overview - Adaptive Cruise Control Component Location 9/20/2016 vw-wi://rl/A.en-US.A00.5A80.15.wi::85031701.xml?xsl=3
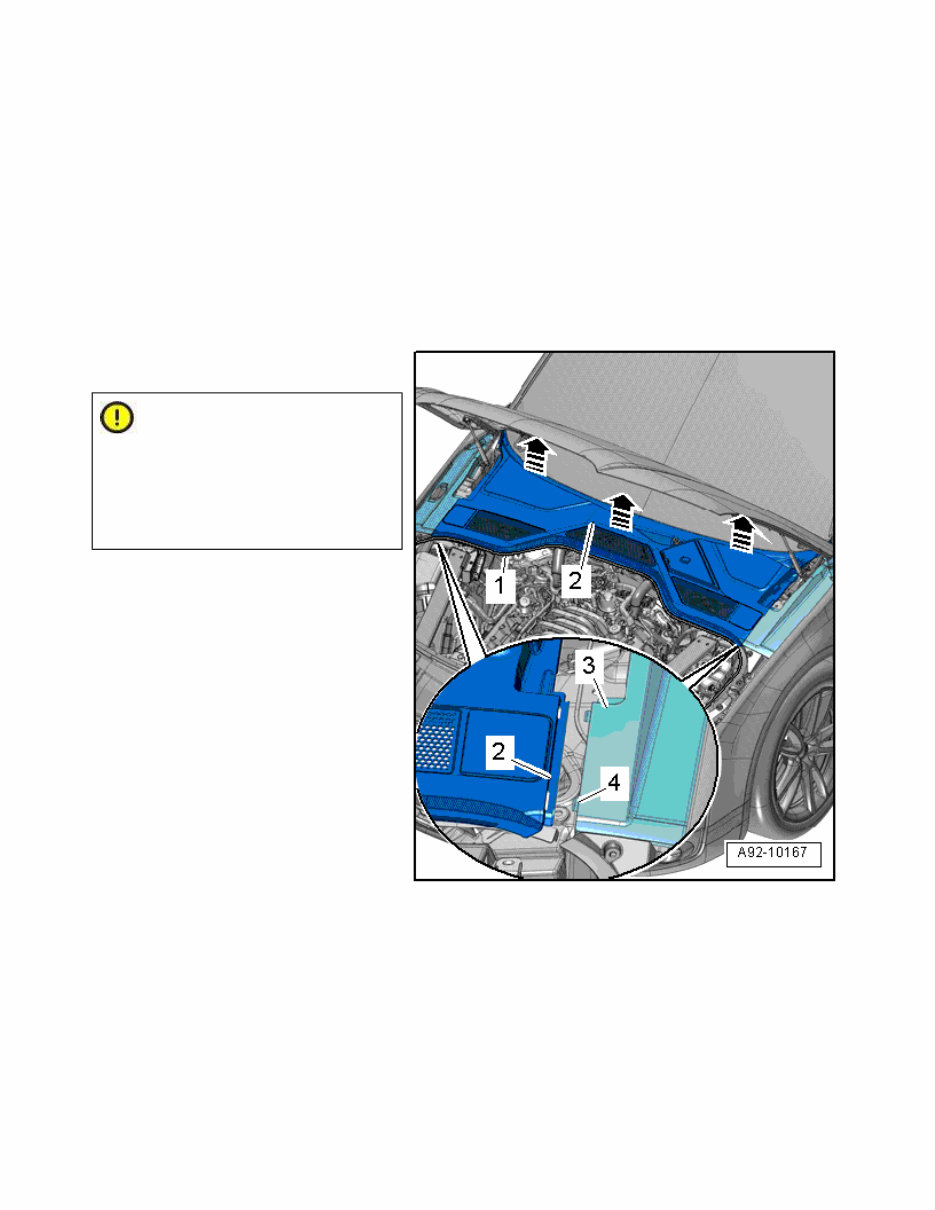
Jump Start Point, Removing and Installing Removing – Turn off the ignition and disconnect the ground cable from the battery; vehicles without high voltage system. Refer o → Chapter „Battery, Disconnecting and Connecting, Vehicles without High Voltage System“, vehicles with high voltage system. Refer o → Chapter „Battery -A- and Auxiliary Battery - A1-, Disconnecting and Connecting“. – Remove the windshield wiper arms. Refer o → Chapter „Windshield Wiper Arms, Removing and Installing“. – Remove the seal -1- near the plenum chamber cover. Caution Danger of damaging the plenum chamber cover. Coat the space between the windshield and the plenum chamber cover with some soapy water. – Carefully remove the plenum chamber cover -2- starting at the edge of the glass vertically from the windshield -arrows B-. – Disengage the plenum chamber cover on the outside of the cover -3-. To do this, lift the cover in the center and disengage it from the guides -4-. Page 1 of 5 Jump Start Point, Removing and Installing 9/20/2016 vw-wi://rl/A.en-US.A00.5A80.15.wi::85031674.xml?xsl=3
Fixing problems in your 2012 Audi A8 (D4) is a do-it-yourself approach with the 2012 Audi A8 (D4) Service & Repair Manual. This manual contains comprehensive instructions and procedures on how to repair and maintain this specific model, making it an essential guide for both professional mechanics and DIY enthusiasts. The durability of your Audi A8 is unquestionable, but even the toughest vehicles experience wear and tear over time. When components begin to deteriorate, the manual will guide you through the process of replacing or repairing them. With clear illustrations, technical diagrams, and a complete list of car parts, even the most novice mechanic can confidently tackle repairs and maintenance tasks.
The information contained in this repair manual is the very same used by the engineers at Audi. The manual covers all these sections and contains hundreds of detailed photos and more:
Maintenance
Engine
Control System
Mechanical
Fuel Service Specifications
Emission Control
Intake Exhaust Cooling
Lube
Ignition Starting Charging
Auto Transmission Clutch
Manual Transmission
Transfer Propeller Shaft
Drive Shaft
Differential
Axle Suspension
Tire & Wheel
Brake Control
Brake
Parking Brake
Steering Column
Power Steering
Air Condition
Suppression Restraint System
Seat Belt
Engine Immobilizer
Cruise Control
Wiper & Washer
Door Lock
Meter Audio/Visual
Horn
Windshield/Glass Mirror
Instrument Panel
Seat
Engine Hood/Door
Exterior & Interior
Electrical
Multiplex/Can Communication
And much more...
Additional information about this service repair manual:
Compatible: All Versions of Windows and Mac
Printable: Yes
Language: English
Requirements: Adobe Reader and Windows (free and available online)
The 2012 Audi A8 (D4) Service & Repair Manual is designed to save you time and expense. Complete with all the essential technical data and step-by-step guides, you will enjoy learning how to repair and maintain your Audi A8 without always having to rely on a mechanic. You can print off the pages you need and refer to them directly in your garage or workshop, keeping your manual safe on your PC and easily accessible at all times.