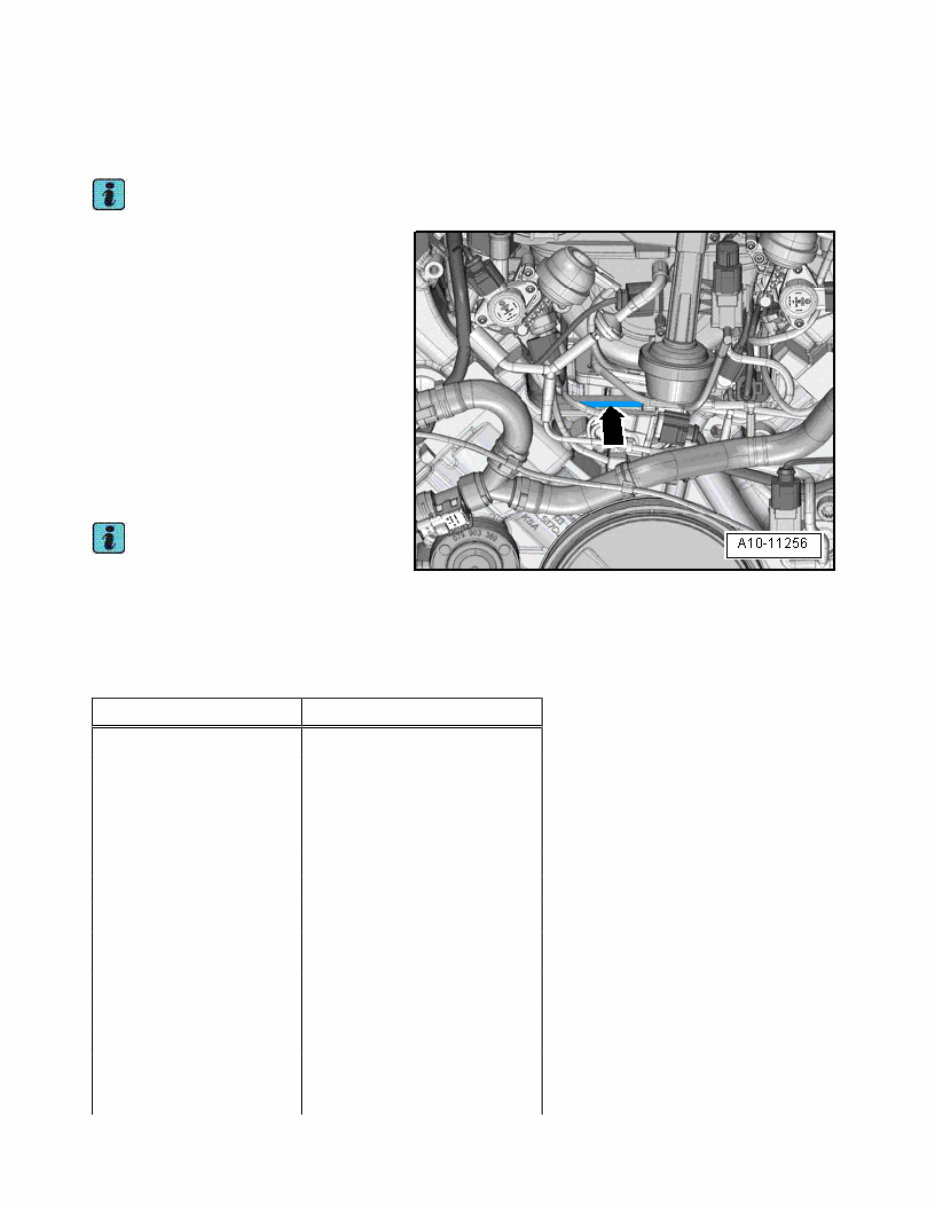
Engine Number/Engine Characteristics Engine Number Note The engine number only visible with the engine removed. Engine number (“engine code” and “serial number”) is located at front on cylinder block at top -arrow-. Engine codes beginning with “C” are four- digit. The first three digits of the engine code stand for displacement and the mechanical structure of the engine. They are stamped in the cylinder block, including the serial number. The 4th digit describes the engine output and torque and depends on the engine control module. Note The four digit engine code is on the type plate, vehicle data label and engine control module. For the location of the type plate and vehicle data label. Refer to → . Engine Data Code letters CDRA Displacement liter 4.163 Output kW at RPM 273/6800 Torque Nm at RPM 445/3500 Bore diameter in mm 84.5 Stroke mm 92.8 Compression ratio 12.5 RON at least 98 1) Fuel injection and ignition system Bosch Motronic Ignition sequence 1-5-4-8-6-3-7-2 Turbocharger no Knock control 4 sensors Oxygen sensor regulation 2 sensors before catalytic converter 2 sensors after catalytic converter Page 1 of 2 Engine Number/Engine Characteristics 9/27/2016 vw-wi://rl/A.en-US.A00.5A80.06.wi::79516132.xml?xsl=3
Variable valve timing Intake Exhaust Variable intake manifold yes Secondary Air Injection (AIR) System yes Valve per cylinder 4 1) Super unleaded Research Octane Number (RON) 95 is permissible, although with reduced power. Page 2 of 2 Engine Number/Engine Characteristics 9/27/2016 vw-wi://rl/A.en-US.A00.5A80.06.wi::79516132.xml?xsl=3
Clean Working Conditions Even a little contamination can lead to faults. When working on the fuel supply and on the fuel injection system, observe the following guidelines for a clean working environment: Before loosening, connections and surrounding areas must be cleaned thoroughly with engine or brake cleaner, and then cleaned area must be dried completely. Seal off any open lines and connections immediately with plugs, for example, take from Engine Bung Set -VAS6122-. Place removed parts on a clean surface and cover them with lint-free cloths. Carefully cover or seal opened components if repairs are not performed immediately. Install only clean parts: remove the replacement parts from their packaging just before installing them. Do not use parts that have been stored out of their original packaging (for example, in tool boxes etc.). If system is open, do not work with compressed air and do not move the vehicle. Make sure no fuel gets onto the fuel hoses. If necessary, wipe off the fuel hoses immediately. Protect the disconnected connectors from dirt and moisture and only connect when they are dry. Page 1 of 1 Clean Working Conditions 9/27/2016 vw-wi://rl/A.en-US.A00.5A80.06.wi::79516141.xml?xsl=3
Contact Corrosion Contact corrosion can occur if incorrect fasteners (bolts, nuts, washers, etc.) are used. For this reason, only connecting elements with a special surface coating are installed. In addition, rubber or plastic parts and adhesive are made of materials that do not conduct electricity. If there are doubts about whether the parts are suitable, then use new parts. Refer to the Parts Catalog. Note Only original replacement parts are recommended, they are checked and compatible with aluminum. It is recommended to use Audi accessories. Damage resulting from contact corrosion is not covered by the warranty. Page 1 of 1 Contact Corrosion 9/27/2016 vw-wi://rl/A.en-US.A00.5A80.06.wi::79516143.xml?xsl=3
Cooler and Condenser Assembly When assembled correctly, the radiator, condenser and turbocharger may have slight impressions on their fins. It is not damage. Do no replace the cooler, condenser or turbocharger because of impressions like that. Page 1 of 1 Cooler and Condenser Assembly 9/27/2016 vw-wi://rl/A.en-US.A00.5A80.06.wi::79516145.xml?xsl=3
Engine Contaminants To prevent foreign objects from entering when working on the engine, seal open intake and exhaust channels with suitable plugs, for example from the Engine Bung Set -VAS6122-. If mechanical damage to a cylinder bank is found, check the intake and exhaust tract and the combustion chambers in the opposite cylinder back for foreign objects to prevent further damage. Page 1 of 1 Engine Contaminants 9/27/2016 vw-wi://rl/A.en-US.A00.5A80.06.wi::79516142.xml?xsl=3
Routing and Securing Lines Mark the individual fuel, and vacuum lines for the Evaporative Emission (EVAP) canister system as well as the electrical wires before disconnecting and/or removing them. This will prevent a mix-up when reconnecting them. If necessary, draw sketches or take pictures. Due to the limited space inside the engine compartment, be especially careful when working near moving or hot parts to avoid damaging the lines. Page 1 of 1 Routing and Securing Lines 9/27/2016 vw-wi://rl/A.en-US.A00.5A80.06.wi::79516144.xml?xsl=3
Cooling System Safety Precautions Note the following when working on the cooling system: WARNING Risk of scalding due to hot steam and hot coolant. The coolant system is under pressure when the engine is warm. Cover the coolant reservoir cap with a cloth and then open it slowly to release the pressure. Danger of personal injury due to the coolant fan turning on by itself. Disconnect the connectors before working near the fan shroud. Caution The vehicle could overheat if the cap is installed incorrectly. The cap must click tight when closing it. Page 1 of 1 Cooling System Safety Precautions 9/27/2016 vw-wi://rl/A.en-US.A00.5A80.06.wi::79516138.xml?xsl=3
Fuel Supply System Safety Precautions Note the following when working on the fuel supply: WARNING There is a risk of injury because the fuel is under very high pressure. Reduce the fuel pressure down to residual pressure before opening high pressure area of the fuel injection system. Refer to → Chapter „Releasing Pressure in High Pressure Area“. To reduce remaining residual pressure, place clean cloth around the connector and carefully loosen connector. Danger due to leaking fuel. Because the Transfer Fuel Pump -G6- runs briefly when the battery is connected and the driver's door is opened, the voltage supply to the Transfer Fuel Pump - G6- must be disconnected before opening the fuel system. Disconnect the power supply by removing the fuse for the Fuel Pump Control Module -J538- / fuel delivery unit. Refer to → Wiring diagrams, Troubleshooting & Component locations, or disconnect the battery. To prevent personal injury and damage to the injection and ignition system, observe the following: The ignition must be switched off before connecting or disconnecting injection and ignition system wiring or tester cables. Wash the engine only when the ignition is turned off. Delete any Diagnostic Trouble Code (DTC) memory entries that occurred during testing or assembly. Refer to Vehicle Diagnostic Tester, Check DTC Memory , and then Generate Readiness Code . Caution Risk of damaging electronic components when disconnecting the battery. Complete the steps for disconnecting the battery. Disconnect the battery only when the ignition is turned off. Refer to → Electrical Equipment; Rep. Gr.27; Battery; Battery, Disconnecting and Connecting. Page 1 of 1 Fuel Supply System Safety Precautions 9/27/2016 vw-wi://rl/A.en-US.A00.5A80.06.wi::79516134.xml?xsl=3
Ignition System Safety Precautions To reduce the risk of personal injury and/or damage to the fuel injection and ignition system, always observe the following: Individuals with a pacemaker must not stay in the danger area of high voltage systems, for example ignition systems, xenon light. The ignition must be switched off before connecting or disconnecting injection and ignition system wiring or tester cables. Delete any Diagnostic Trouble Code (DTC) memory entries that occurred during testing or assembly see Vehicle Diagnostic Tester, Check DTC Memory , and then Generate Readiness Code . Cleaning the engine should only be performed with ignition switched off. The Battery must only be disconnected and connected with the ignition switched off, since the Engine Control Module (ECM) can otherwise be damaged. Disconnect the ignition coil connectors if the engine is supposed to be driven by the cranking speed so that the engine cannot start (for example, when performing a compression test). Remove the additional fuse for the Fuel Pump Control Module -J538- / fuel delivery unit; fuse assignment. Refer to → Wiring diagrams, Troubleshooting & Component locations. Caution Risk of damaging electronic components when disconnecting the battery. Complete the steps for disconnecting the battery. Disconnect the battery only when the ignition is turned off. Refer to → Electrical Equipment; Rep. Gr.27; Battery; Battery, Disconnecting and Connecting. Page 1 of 1 Ignition System Safety Precautions 9/27/2016 vw-wi://rl/A.en-US.A00.5A80.06.wi::79516139.xml?xsl=3
Get your hands on the 2011 Audi A8 Service and Repair Manual, your go-to resource for fixing vehicle issues. Whether you're a professional mechanic or a DIY enthusiast, these auto repair manuals provide comprehensive instructions and procedures to help you tackle car problems with ease.
With customer support available over email, you can ensure that you fix your car right the first time. The manual covers all models and repairs A-Z, offering detailed technical data, diagrams, a complete list of car parts, and images. It's designed to be user-friendly, allowing even novice car mechanics to follow step-by-step guides effortlessly.
These manuals are not just for immediate repairs; they also provide valuable insights into maintaining and enhancing your vehicle's performance. From engine and mechanical details to electrical and interior components, the manual contains everything you need to service and repair your vehicle effectively.
Whether it's for maintenance, engine, control system, fuel service specifications, or any other aspect, this manual provides complete instructions, wiring schematics, and specifications to simplify the repair process. It's compatible with Windows Vista, XP, ME, 98, NT, 2000, and Mac, ensuring accessibility for a wide range of users.
By having a trusty repair manual, you not only save money but also gain the satisfaction of engaging in do-it-yourself projects. The manual is printable, allowing you to take the required pages with you to your vehicle or workshop. This means no more flipping through books or dealing with greasy and torn paper manuals.
These manuals are compatible with all versions of Windows and Mac, and they are printable. By having this resource at your disposal, you can stay up-to-date and gain more knowledge about your vehicle, reducing your reliance on mechanics for simple repairs.
Don't miss out on the opportunity to explore the realm of your car and take charge of its maintenance and repair. Invest in the 2011 Audi A8 Service and Repair Manual to keep your vehicle in top condition.
Maintenance
Engine
Control System
Mechanical
Fuel Service Specifications
Emission Control
Intake Exhaust Cooling
Lube
Ignition Starting Charging
Auto Transmission Clutch
Manual Transmission
Transfer Propeller Shaft
Drive Shaft
Differential
Axle Suspension
Tire & Wheel
Brake Control
Brake
Parking Brake
Steering Column
Power Steering
Air Condition
Suppl Restraint System
Seat Belt
Engine Immobilizer
Cruise Control
Wiper & Washer
Door Lock
Meter Audio/Visual
Horn
Windshield/Glass Mirror
Instrument Panel
Seat
Engine Hood/ Door
Exterior & Interior
Electrical
Multiplex/ Can Communication
And much more...
Language: English
Requirements: Adobe Reader and Win (they are free online)
Don't miss out on the opportunity to explore the realm of your car and take charge of its maintenance and repair. Invest in the 2011 Audi A8 Service and Repair Manual to keep your vehicle in top condition.