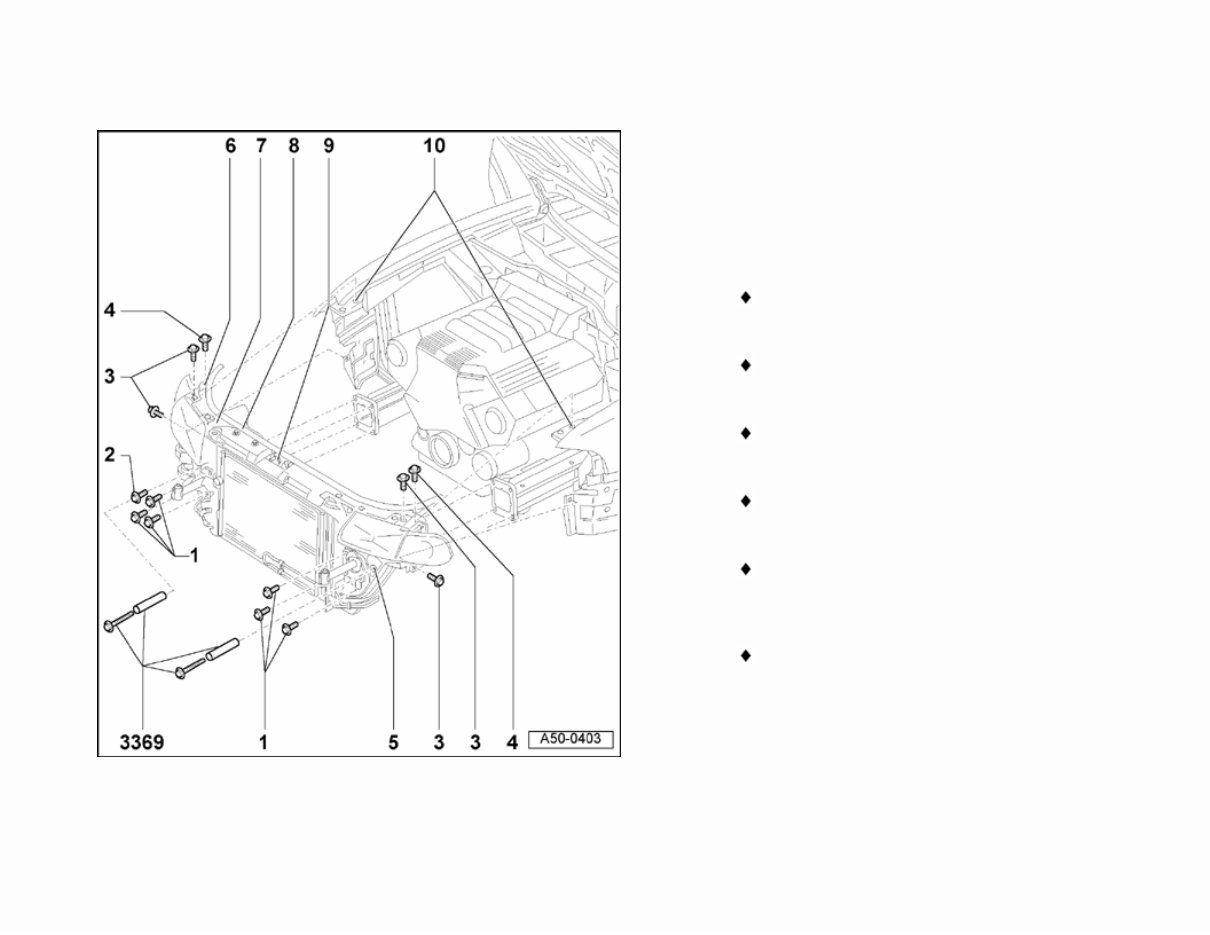
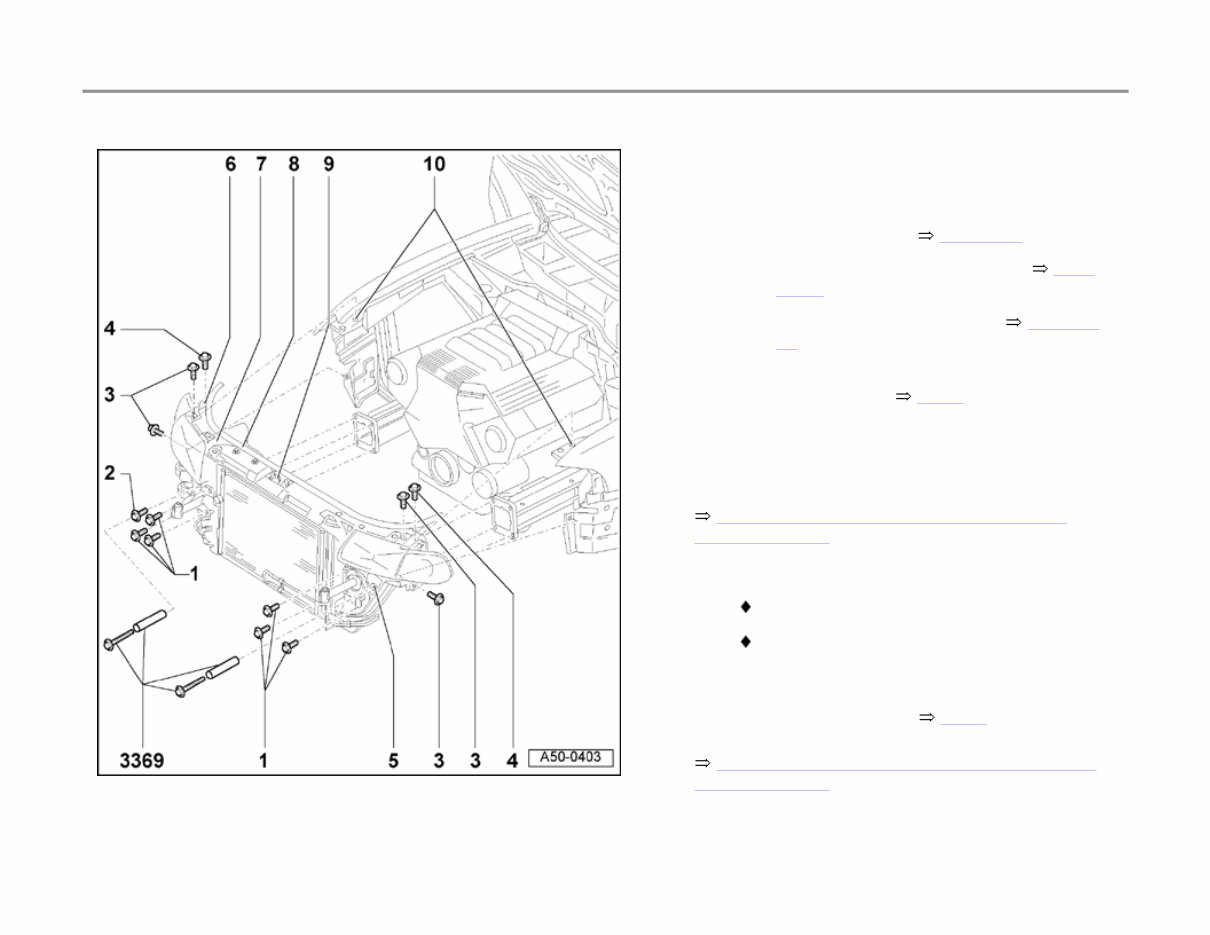
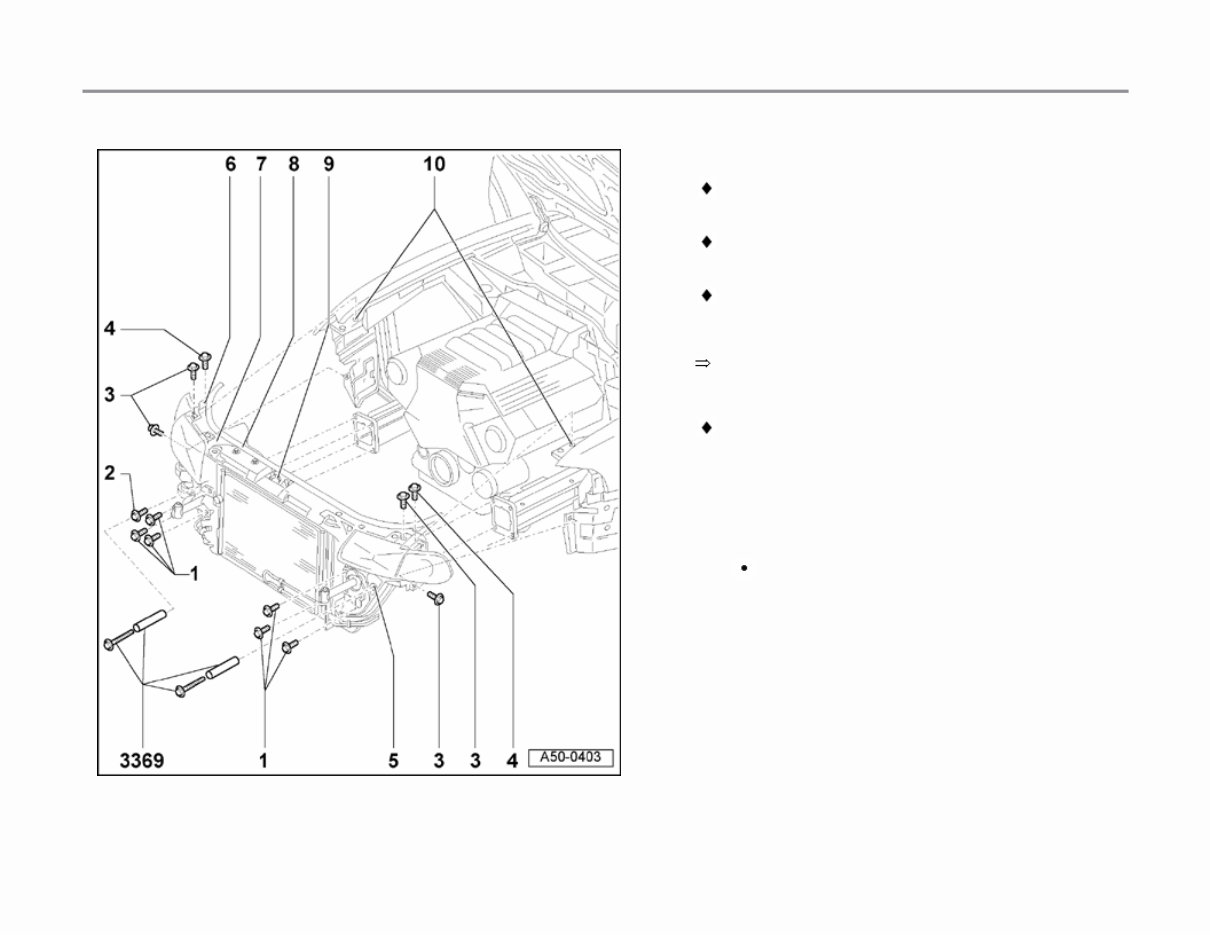
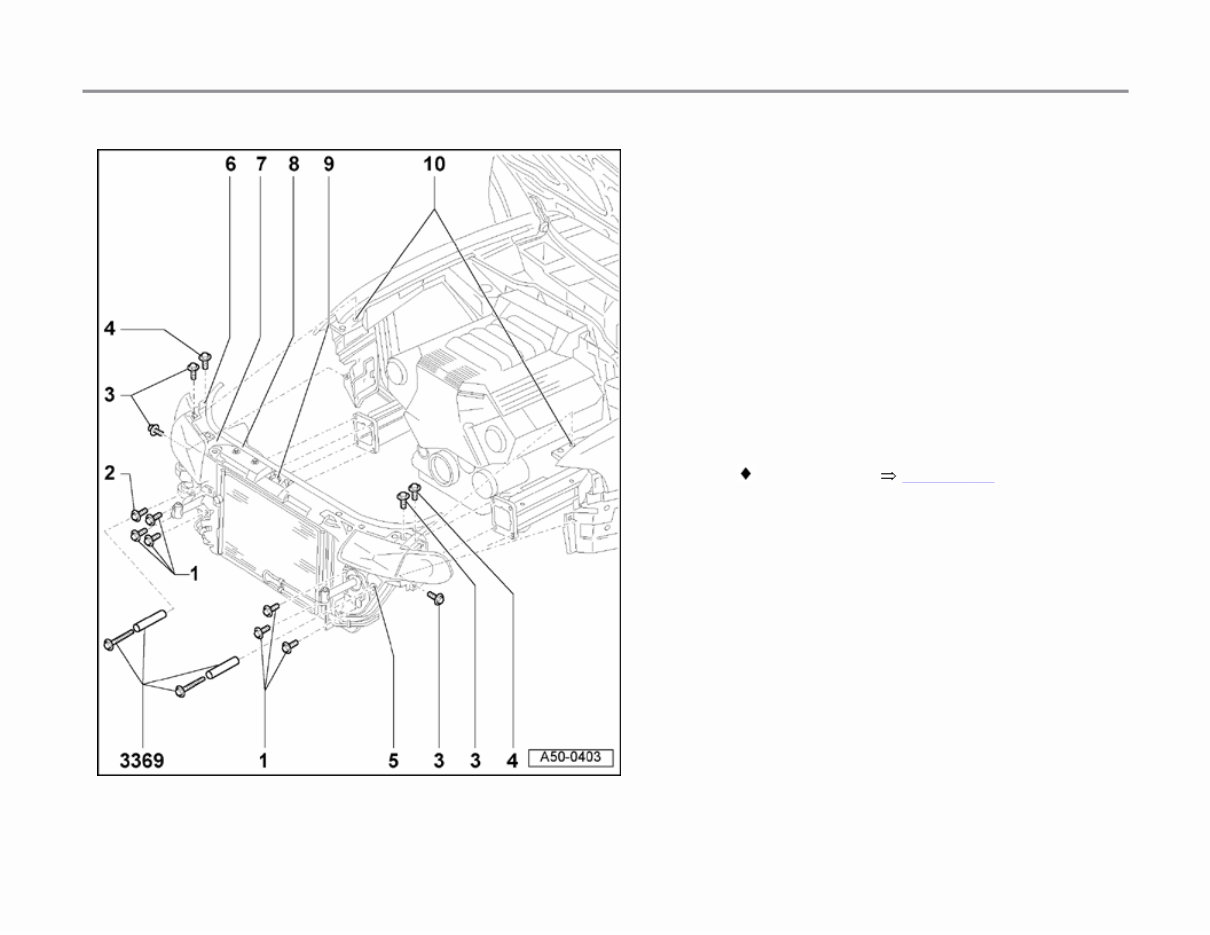
50-1 Body, front Lock carrier with attachments, removing and installing 1 - Hex bolt (6x) 45 Nm (33 ft lb) 2 - Hex bolt 45 Nm (33 ft lb) 3 - Hex bolt (4x) 10 Nm (7 ft lb) 4 - Hex bolts (2x) 10 Nm (7 ft lb) 5 - Access hole for special tool For service position, attach special tool 3369 here 6 - Cowl attachment hole Attachment for service position Page 1 of 19 Body, front 11/20/2002 http://127.0.0.1:8080/audi/servlet/Display?action=Goto&type=repair&id=AUDI.B5.BD01.50.1
50-2 Repair Manual, Heating & Air Conditioning, Repair Group 87 Notes: Repair Manual, Suspension, Wheels, Steering, Repair Group 48 7 - Lock carrier Removing: - Remove bumper page 63 - 1 . - Remove noise insulation panel page 50 - 18 . - Disconnect hood lock cable page 55 - 10 . - Drain engine coolant and disconnect coolant hoses Fig. 2 . - Disconnect condenser from lock carrier only (do not disconnect any lines) and secure with wire (e.g. at front wheel). Do not suspend condenser by its lines. Condenser lines must not be bent or kinked under any circumstances. - Remove hydraulic oil cooler only (do not disconnect lines) Fig. 1 . Page 2 of 19 Body, front 11/20/2002 http://127.0.0.1:8080/audi/servlet/Display?action=Goto&type=repair&id=AUDI.B5.BD01.50.1
50-3 Notes: Repair Manual, Automatic Transmission, Repair Group 37 Do not suspend hydraulic fluid cooler by its lines. Hydraulic fluid cooler must not be bent or kinked under any circumstances On vehicles with automatic transmission, remove ATF cooler On vehicles with charge air cooler, remove intake air duct - Loosen seal for hood -8- at left and right where fender meets lock carrier -7-. - Remove bolts -3- and -4-. A second mechanic is needed to support lock carrier -7- - Remove bolts -1- and -2-. Page 3 of 19 Body, front 11/20/2002 http://127.0.0.1:8080/audi/servlet/Display?action=Goto&type=repair&id=AUDI.B5.BD01.50.1
50-4 Installing: - Install in reverse order of removal. - Adjust headlights. Adjusting: - Center lock carrier -7- between fenders. - If fenders and hood are also being replaced, center them in relation to one another before adjusting lock carrier. 8 - Hood seal 9 - Hood lock cable Disconnecting page 55 - 10 10 - Hole in side panel Page 4 of 19 Body, front 11/20/2002 http://127.0.0.1:8080/audi/servlet/Display?action=Goto&type=repair&id=AUDI.B5.BD01.50.1
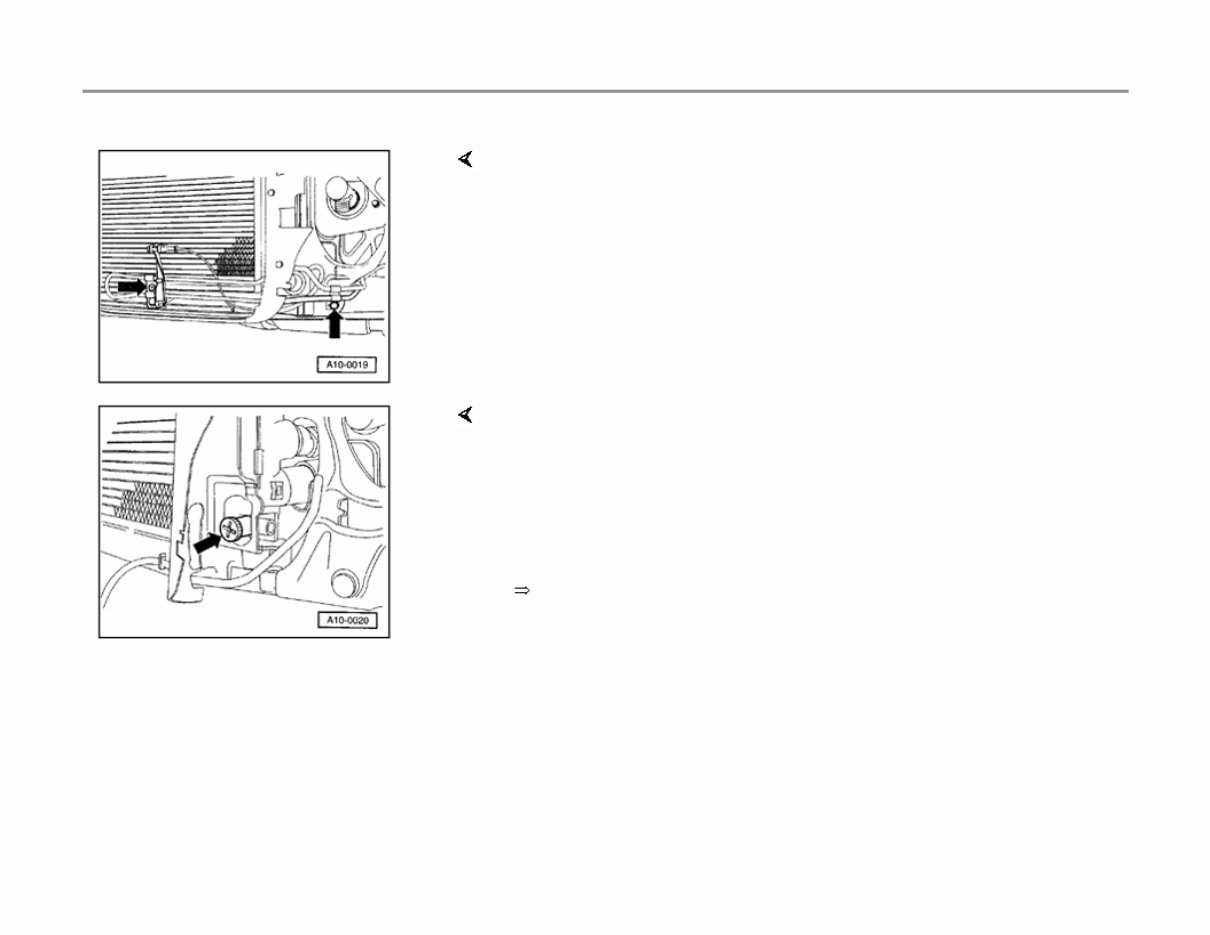
50-5 Fig. 1 Disconnecting hydraulic fluid cooler - Remove screws for cooling line (for power steering) at engine support and transmission. Repair Manual, General, Engine, Repair Group 19 Fig. 2 Disconnecting coolant hose - Drain coolant from radiator. - Pull out locking element for coolant line connecting flange at bottom of radiator and remove connecting flange. - Bleed coolant system. Page 5 of 19 Body, front 11/20/2002 http://127.0.0.1:8080/audi/servlet/Display?action=Goto&type=repair&id=AUDI.B5.BD01.50.1
The Audi A4 B5 Service Manuals 1997-2001 are essential resources for anyone who owns or works on these specific Audi models. These detailed and comprehensive manuals provide step-by-step instructions, diagrams, and illustrations to assist with all aspects of maintenance, repairs, and troubleshooting.
Whether you are a seasoned mechanic or a DIY enthusiast, these service manuals offer a wealth of valuable information. From basic tasks such as oil changes and tire rotations to more complex procedures like engine overhaul and electrical system diagnostics, these manuals cover it all.
The Audi A4 B5 Service Manuals 1997-2001 cover the following models:
Audi A4 B5 Sedan 1997
Audi A4 B5 Sedan 1998
Audi A4 B5 Sedan 1999
Audi A4 B5 Sedan 2000
Audi A4 B5 Sedan 2001
Audi A4 B5 Avant 1997
Audi A4 B5 Avant 1998
Audi A4 B5 Avant 1999
Audi A4 B5 Avant 2000
Audi A4 B5 Avant 2001
No matter the specific model or year of your Audi A4 B5, these service manuals have you covered. With their comprehensive instructions, clear diagrams, and useful tips, you'll have the confidence to tackle any repair or maintenance task with ease.
Invest in the Audi A4 B5 Service Manuals 1997-2001 and ensure that your beloved Audi is always in top-notch condition.


 Lifetime Access




