
 Service & Repair Manual")
2003-2012 Audi A3 (Typ 8p/8P1/8PA) Service & Repair Manual
What's Included?
Fast Download Speeds
Online & Offline Access
Access PDF Contents & Bookmarks
Full Search Facility
Print one or all pages of your manual
Protected by copyright. Copying for private or commercial purposes, in part or in whole, is not
permitted unless authorised by AUDI AG. AUDI AG does not guarantee or accept any liability
with respect to the correctness of information in this document. Copyright by AUDI AG.
Workshop Manual
Audi A3 2004 ➤
4-cylinder direct injection engine (1.2 ltr. 2-valve TFSI),
mechanics
Engine ID
CBZ
B
Edition 04.2015
Service
Service Department. Technical Information

Protected by copyright. Copying for private or commercial purposes, in part or in whole, is not
permitted unless authorised by AUDI AG. AUDI AG does not guarantee or accept any liability
with respect to the correctness of information in this document. Copyright by AUDI AG.
List of Workshop Manual Repair Groups
Repair Group
00 - Technical data
10 - Removing and installing engine
13 - Crankshaft group
15 - Cylinder head, valve gear
17 - Lubrication
19 - Cooling
21 - Turbocharging/supercharging
26 - Exhaust system
Technical information should always be available to the foremen and mechanics, because their
careful and constant adherence to the instructions is essential to ensure vehicle road-worthiness and
safety. In addition, the normal basic safety precautions for working on motor vehicles must, as a
matter of course, be observed.
Service
All rights reserved.
No reproduction without prior agreement from publisher.
Copyright © 2015 Audi AG, Ingolstadt D3E8024FF43
Protected by copyright. Copying for private or commercial purposes, in part or in whole, is not
permitted unless authorised by AUDI AG. AUDI AG does not guarantee or accept any liability
with respect to the correctness of information in this document. Copyright by AUDI AG.
Contents
00 - Technical data . . . . . . . . . . . . . . . . . . . . . . . . . . . . . . . . . . . . . . . . . . . . . . . . . . . . 1
1 Engine number . . . . . . . . . . . . . . . . . . . . . . . . . . . . . . . . . . . . . . . . . . . . . . . . . . . . . . . . . . 1
2 Safety precautions . . . . . . . . . . . . . . . . . . . . . . . . . . . . . . . . . . . . . . . . . . . . . . . . . . . . . . . . 2
2.1 Working on the fuel system . . . . . . . . . . . . . . . . . . . . . . . . . . . . . . . . . . . . . . . . . . . . . . . . 2
2.2 Safety precautions when working on the ignition system . . . . . . . . . . . . . . . . . . . . . . . . . . 2
2.3 Working on the cooling system . . . . . . . . . . . . . . . . . . . . . . . . . . . . . . . . . . . . . . . . . . . . . . 3
2.4 Working on vehicles with start/stop system . . . . . . . . . . . . . . . . . . . . . . . . . . . . . . . . . . . . 3
2.5 Using testers and measuring instruments during a road test . . . . . . . . . . . . . . . . . . . . . . . . 3
2.6 Working on the exhaust system . . . . . . . . . . . . . . . . . . . . . . . . . . . . . . . . . . . . . . . . . . . . . . 4
3 General repair instructions . . . . . . . . . . . . . . . . . . . . . . . . . . . . . . . . . . . . . . . . . . . . . . . . . . 5
3.1 Rules for cleanliness when working on fuel supply system, injection system and
turbocharger . . . . . . . . . . . . . . . . . . . . . . . . . . . . . . . . . . . . . . . . . . . . . . . . . . . . . . . . . . . . 5
3.2 Checking fuel system for leaks . . . . . . . . . . . . . . . . . . . . . . . . . . . . . . . . . . . . . . . . . . . . . . 5
3.3 Foreign particles in engine . . . . . . . . . . . . . . . . . . . . . . . . . . . . . . . . . . . . . . . . . . . . . . . . . . 6
3.4 Contact corrosion! . . . . . . . . . . . . . . . . . . . . . . . . . . . . . . . . . . . . . . . . . . . . . . . . . . . . . . . . 6
3.5 Routing and attachment of pipes, hoses and wiring . . . . . . . . . . . . . . . . . . . . . . . . . . . . . . 6
3.6 Installing radiators, condensers and charge air coolers . . . . . . . . . . . . . . . . . . . . . . . . . . . . 6
3.7 Checking vacuum system . . . . . . . . . . . . . . . . . . . . . . . . . . . . . . . . . . . . . . . . . . . . . . . . . . 6
10 - Removing and installing engine . . . . . . . . . . . . . . . . . . . . . . . . . . . . . . . . . . . . . . 8
1 Removing engine . . . . . . . . . . . . . . . . . . . . . . . . . . . . . . . . . . . . . . . . . . . . . . . . . . . . . . . . 8
2 Separating engine and manual gearbox . . . . . . . . . . . . . . . . . . . . . . . . . . . . . . . . . . . . . . 26
3 Separating engine and dual clutch gearbox . . . . . . . . . . . . . . . . . . . . . . . . . . . . . . . . . . . . 28
4 Securing engine to engine and gearbox support . . . . . . . . . . . . . . . . . . . . . . . . . . . . . . . . 30
5 Installing engine . . . . . . . . . . . . . . . . . . . . . . . . . . . . . . . . . . . . . . . . . . . . . . . . . . . . . . . . . . 32
6 Assembly mountings . . . . . . . . . . . . . . . . . . . . . . . . . . . . . . . . . . . . . . . . . . . . . . . . . . . . . . 37
6.1 Exploded view - assembly mountings . . . . . . . . . . . . . . . . . . . . . . . . . . . . . . . . . . . . . . . . 37
6.2 Removing and installing engine mountings . . . . . . . . . . . . . . . . . . . . . . . . . . . . . . . . . . . . 38
6.3 Checking adjustment of assembly mountings (engine/gearbox mountings) . . . . . . . . . . . . 40
6.4 Adjusting assembly mountings . . . . . . . . . . . . . . . . . . . . . . . . . . . . . . . . . . . . . . . . . . . . . . 41
13 - Crankshaft group . . . . . . . . . . . . . . . . . . . . . . . . . . . . . . . . . . . . . . . . . . . . . . . . . . 45
1 Cylinder block (pulley end) . . . . . . . . . . . . . . . . . . . . . . . . . . . . . . . . . . . . . . . . . . . . . . . . . . 45
1.1 Exploded view - poly V-belt drive . . . . . . . . . . . . . . . . . . . . . . . . . . . . . . . . . . . . . . . . . . . . 45
1.2 Removing and installing poly V-belt . . . . . . . . . . . . . . . . . . . . . . . . . . . . . . . . . . . . . . . . . . 47
1.3 Removing and installing idler roller for poly V-belt . . . . . . . . . . . . . . . . . . . . . . . . . . . . . . . . 48
1.4 Poly V-belt tensioner . . . . . . . . . . . . . . . . . . . . . . . . . . . . . . . . . . . . . . . . . . . . . . . . . . . . . . 48
1.5 Removing and installing poly V-belt pulley for crankshaft . . . . . . . . . . . . . . . . . . . . . . . . . . 49
1.6 Removing and installing bracket for ancillaries . . . . . . . . . . . . . . . . . . . . . . . . . . . . . . . . . . 52
2 Cylinder block (gearbox end) . . . . . . . . . . . . . . . . . . . . . . . . . . . . . . . . . . . . . . . . . . . . . . . . 53
2.1 Exploded view - flywheel and sealing flange . . . . . . . . . . . . . . . . . . . . . . . . . . . . . . . . . . . . 53
2.2 Removing and installing flywheel . . . . . . . . . . . . . . . . . . . . . . . . . . . . . . . . . . . . . . . . . . . . 54
2.3 Renewing sealing flange . . . . . . . . . . . . . . . . . . . . . . . . . . . . . . . . . . . . . . . . . . . . . . . . . . 55
3 Crankshaft . . . . . . . . . . . . . . . . . . . . . . . . . . . . . . . . . . . . . . . . . . . . . . . . . . . . . . . . . . . . . . 63
3.1 Extracting and driving in needle bearing for crankshaft - vehicles with dual clutch gearbox
. . . . . . . . . . . . . . . . . . . . . . . . . . . . . . . . . . . . . . . . . . . . . . . . . . . . . . . . . . . . . . . . . . . . . . . . 63
4 Pistons and conrods . . . . . . . . . . . . . . . . . . . . . . . . . . . . . . . . . . . . . . . . . . . . . . . . . . . . . . 65
4.1 Exploded view - pistons and conrods . . . . . . . . . . . . . . . . . . . . . . . . . . . . . . . . . . . . . . . . . . 65
4.2 Removing and installing pistons . . . . . . . . . . . . . . . . . . . . . . . . . . . . . . . . . . . . . . . . . . . . . . 67
4.3 Measuring radial clearance of conrods . . . . . . . . . . . . . . . . . . . . . . . . . . . . . . . . . . . . . . . . 68
4.4 Checking pistons and cylinder bores . . . . . . . . . . . . . . . . . . . . . . . . . . . . . . . . . . . . . . . . . . 69
Audi A3 2004 ➤
4-cylinder direct injection engine (1.2 ltr. 2-valve TFSI), mechanics - Edition 04.2015
Contents i
Protected by copyright. Copying for private or commercial purposes, in part or in whole, is not
permitted unless authorised by AUDI AG. AUDI AG does not guarantee or accept any liability
with respect to the correctness of information in this document. Copyright by AUDI AG.
15 - Cylinder head, valve gear . . . . . . . . . . . . . . . . . . . . . . . . . . . . . . . . . . . . . . . . . . 71
1 Chain drive . . . . . . . . . . . . . . . . . . . . . . . . . . . . . . . . . . . . . . . . . . . . . . . . . . . . . . . . . . . . . . 71
1.1 Timing chain covers - exploded view . . . . . . . . . . . . . . . . . . . . . . . . . . . . . . . . . . . . . . . . . . 71
1.2 Renewing crankshaft oil seal . . . . . . . . . . . . . . . . . . . . . . . . . . . . . . . . . . . . . . . . . . . . . . . . 73
1.3 Removing and installing timing chain cover (top) . . . . . . . . . . . . . . . . . . . . . . . . . . . . . . . . 75
1.4 Removing and installing timing chain cover (bottom) . . . . . . . . . . . . . . . . . . . . . . . . . . . . . . 77
1.5 Exploded view - camshaft timing chain . . . . . . . . . . . . . . . . . . . . . . . . . . . . . . . . . . . . . . . . 80
1.6 Checking valve timing . . . . . . . . . . . . . . . . . . . . . . . . . . . . . . . . . . . . . . . . . . . . . . . . . . . . 81
1.7 Detaching camshaft timing chain from camshaft sprocket . . . . . . . . . . . . . . . . . . . . . . . . . . 83
1.8 Removing and installing camshaft timing chain . . . . . . . . . . . . . . . . . . . . . . . . . . . . . . . . . . 90
1.9 Checking timing chain . . . . . . . . . . . . . . . . . . . . . . . . . . . . . . . . . . . . . . . . . . . . . . . . . . . . 97
2 Cylinder head . . . . . . . . . . . . . . . . . . . . . . . . . . . . . . . . . . . . . . . . . . . . . . . . . . . . . . . . . . . . 102
2.1 Exploded view - cylinder head . . . . . . . . . . . . . . . . . . . . . . . . . . . . . . . . . . . . . . . . . . . . . . 102
2.2 Removing and installing cylinder head . . . . . . . . . . . . . . . . . . . . . . . . . . . . . . . . . . . . . . . . 104
2.3 Checking compression . . . . . . . . . . . . . . . . . . . . . . . . . . . . . . . . . . . . . . . . . . . . . . . . . . . . 111
3 Valve gear . . . . . . . . . . . . . . . . . . . . . . . . . . . . . . . . . . . . . . . . . . . . . . . . . . . . . . . . . . . . . . 114
3.1 Exploded view - camshaft housing . . . . . . . . . . . . . . . . . . . . . . . . . . . . . . . . . . . . . . . . . . . . 114
3.2 Checking axial clearance of camshaft . . . . . . . . . . . . . . . . . . . . . . . . . . . . . . . . . . . . . . . . 116
3.3 Removing and installing camshaft housing . . . . . . . . . . . . . . . . . . . . . . . . . . . . . . . . . . . . 116
3.4 Removing and installing camshaft . . . . . . . . . . . . . . . . . . . . . . . . . . . . . . . . . . . . . . . . . . . . 122
3.5 Renewing valve stem oil seals with cylinder head installed . . . . . . . . . . . . . . . . . . . . . . . . 123
3.6 Renewing valve stem oil seals with cylinder head removed . . . . . . . . . . . . . . . . . . . . . . . . 125
3.7 Valve dimensions . . . . . . . . . . . . . . . . . . . . . . . . . . . . . . . . . . . . . . . . . . . . . . . . . . . . . . . . 129
3.8 Checking valve guides . . . . . . . . . . . . . . . . . . . . . . . . . . . . . . . . . . . . . . . . . . . . . . . . . . . . 129
3.9 Checking valves . . . . . . . . . . . . . . . . . . . . . . . . . . . . . . . . . . . . . . . . . . . . . . . . . . . . . . . . . . 130
17 - Lubrication . . . . . . . . . . . . . . . . . . . . . . . . . . . . . . . . . . . . . . . . . . . . . . . . . . . . . . 131
1 Sump and oil pump . . . . . . . . . . . . . . . . . . . . . . . . . . . . . . . . . . . . . . . . . . . . . . . . . . . . . . 131
1.1 Exploded view - sump, oil pump . . . . . . . . . . . . . . . . . . . . . . . . . . . . . . . . . . . . . . . . . . . . . . 131
1.2 Removing and installing oil level and oil temperature sender G266 . . . . . . . . . . . . . . . . . . 133
1.3 Removing and installing sump . . . . . . . . . . . . . . . . . . . . . . . . . . . . . . . . . . . . . . . . . . . . . . 133
1.4 Removing and installing drive chain for oil pump . . . . . . . . . . . . . . . . . . . . . . . . . . . . . . . . 136
1.5 Removing and installing oil pump . . . . . . . . . . . . . . . . . . . . . . . . . . . . . . . . . . . . . . . . . . . . 137
1.6 Removing and installing non-return valve . . . . . . . . . . . . . . . . . . . . . . . . . . . . . . . . . . . . . . 139
2 Oil filter bracket and engine oil cooler . . . . . . . . . . . . . . . . . . . . . . . . . . . . . . . . . . . . . . . . 141
2.1 Oil filter bracket and engine oil cooler - exploded view . . . . . . . . . . . . . . . . . . . . . . . . . . . . 141
2.2 Removing and installing oil filter bracket . . . . . . . . . . . . . . . . . . . . . . . . . . . . . . . . . . . . . . 142
2.3 Removing and installing engine oil cooler . . . . . . . . . . . . . . . . . . . . . . . . . . . . . . . . . . . . . . 143
2.4 Removing and installing oil pressure switch F1 . . . . . . . . . . . . . . . . . . . . . . . . . . . . . . . . 144
2.5 Checking oil pressure switch F1 and oil pressure . . . . . . . . . . . . . . . . . . . . . . . . . . . . . . . . 145
2.6 Oil separator - exploded view . . . . . . . . . . . . . . . . . . . . . . . . . . . . . . . . . . . . . . . . . . . . . . . . 147
2.7 Removing and installing oil separator . . . . . . . . . . . . . . . . . . . . . . . . . . . . . . . . . . . . . . . . 148
2.8 Engine oil . . . . . . . . . . . . . . . . . . . . . . . . . . . . . . . . . . . . . . . . . . . . . . . . . . . . . . . . . . . . . . 150
2.9 Checking oil level . . . . . . . . . . . . . . . . . . . . . . . . . . . . . . . . . . . . . . . . . . . . . . . . . . . . . . . . 150
19 - Cooling . . . . . . . . . . . . . . . . . . . . . . . . . . . . . . . . . . . . . . . . . . . . . . . . . . . . . . . . . . 151
1 Cooling system . . . . . . . . . . . . . . . . . . . . . . . . . . . . . . . . . . . . . . . . . . . . . . . . . . . . . . . . . . 151
1.1 Connection diagram - coolant hoses . . . . . . . . . . . . . . . . . . . . . . . . . . . . . . . . . . . . . . . . . . 151
1.2 Draining and filling cooling system . . . . . . . . . . . . . . . . . . . . . . . . . . . . . . . . . . . . . . . . . . . . 153
1.3 Checking cooling system for leaks . . . . . . . . . . . . . . . . . . . . . . . . . . . . . . . . . . . . . . . . . . . . 158
2 Coolant pump and thermostat . . . . . . . . . . . . . . . . . . . . . . . . . . . . . . . . . . . . . . . . . . . . . . 160
2.1 Exploded view - coolant pump . . . . . . . . . . . . . . . . . . . . . . . . . . . . . . . . . . . . . . . . . . . . . . 160
2.2 Removing and installing coolant pump pulley . . . . . . . . . . . . . . . . . . . . . . . . . . . . . . . . . . 161
2.3 Removing and installing coolant pump . . . . . . . . . . . . . . . . . . . . . . . . . . . . . . . . . . . . . . . . 162
Audi A3 2004 ➤
4-cylinder direct injection engine (1.2 ltr. 2-valve TFSI), mechanics - Edition 04.2015
ii Contents
Protected by copyright. Copying for private or commercial purposes, in part or in whole, is not
permitted unless authorised by AUDI AG. AUDI AG does not guarantee or accept any liability
with respect to the correctness of information in this document. Copyright by AUDI AG.
2.4 Removing and installing coolant circulation pump V50 . . . . . . . . . . . . . . . . . . . . . . . . . . . . 162
2.5 Housing for thermostat with rear coolant pipe - exploded view . . . . . . . . . . . . . . . . . . . . . . 163
2.6 Removing and installing coolant temperature sender G62 . . . . . . . . . . . . . . . . . . . . . . . . 165
2.7 Removing and installing radiator outlet coolant temperature sender G83 . . . . . . . . . . . . 166
2.8 Removing and installing thermostat housing and coolant pipe (rear) . . . . . . . . . . . . . . . . 167
2.9 Removing and installing coolant pipe (right-side) . . . . . . . . . . . . . . . . . . . . . . . . . . . . . . . . 168
3 Radiator and radiator fan . . . . . . . . . . . . . . . . . . . . . . . . . . . . . . . . . . . . . . . . . . . . . . . . . . 171
3.1 Exploded view - radiator and radiator fan . . . . . . . . . . . . . . . . . . . . . . . . . . . . . . . . . . . . . . 171
3.2 Removing and installing radiator cowl . . . . . . . . . . . . . . . . . . . . . . . . . . . . . . . . . . . . . . . . 172
3.3 Removing and installing radiator fan V7 with radiator fan control unit J293 . . . . . . . . . . . . 173
3.4 Removing and installing radiator . . . . . . . . . . . . . . . . . . . . . . . . . . . . . . . . . . . . . . . . . . . . 173
21 - Turbocharging/supercharging . . . . . . . . . . . . . . . . . . . . . . . . . . . . . . . . . . . . . . . . 178
1 Turbocharger . . . . . . . . . . . . . . . . . . . . . . . . . . . . . . . . . . . . . . . . . . . . . . . . . . . . . . . . . . . . 178
1.1 Exploded view - turbocharger . . . . . . . . . . . . . . . . . . . . . . . . . . . . . . . . . . . . . . . . . . . . . . . . 178
1.2 Removing and installing turbocharger . . . . . . . . . . . . . . . . . . . . . . . . . . . . . . . . . . . . . . . . 179
1.3 Removing and installing charge pressure positioner V465 . . . . . . . . . . . . . . . . . . . . . . . . 183
2 Charge air cooler . . . . . . . . . . . . . . . . . . . . . . . . . . . . . . . . . . . . . . . . . . . . . . . . . . . . . . . . 185
2.1 Exploded view - charge air cooler . . . . . . . . . . . . . . . . . . . . . . . . . . . . . . . . . . . . . . . . . . . . 185
2.2 Removing and installing charge pressure sender G31 / intake air temperature sender 2 G299
. . . . . . . . . . . . . . . . . . . . . . . . . . . . . . . . . . . . . . . . . . . . . . . . . . . . . . . . . . . . . . . . . . . . . . 186
2.3 Removing and installing charge air cooler . . . . . . . . . . . . . . . . . . . . . . . . . . . . . . . . . . . . . . 186
2.4 Checking charge air system for leaks . . . . . . . . . . . . . . . . . . . . . . . . . . . . . . . . . . . . . . . . 187
26 - Exhaust system . . . . . . . . . . . . . . . . . . . . . . . . . . . . . . . . . . . . . . . . . . . . . . . . . . 190
1 Silencers . . . . . . . . . . . . . . . . . . . . . . . . . . . . . . . . . . . . . . . . . . . . . . . . . . . . . . . . . . . . . . . . 190
1.1 Exploded view - silencers . . . . . . . . . . . . . . . . . . . . . . . . . . . . . . . . . . . . . . . . . . . . . . . . . . 190
1.2 Removing and installing front exhaust pipe . . . . . . . . . . . . . . . . . . . . . . . . . . . . . . . . . . . . 193
1.3 Removing and installing catalytic converter . . . . . . . . . . . . . . . . . . . . . . . . . . . . . . . . . . . . 194
1.4 Separating centre and rear silencers . . . . . . . . . . . . . . . . . . . . . . . . . . . . . . . . . . . . . . . . . . 196
1.5 Stress-free alignment of exhaust system . . . . . . . . . . . . . . . . . . . . . . . . . . . . . . . . . . . . . . 197
1.6 Checking exhaust system for leaks . . . . . . . . . . . . . . . . . . . . . . . . . . . . . . . . . . . . . . . . . . 198
2 Exhaust manifold . . . . . . . . . . . . . . . . . . . . . . . . . . . . . . . . . . . . . . . . . . . . . . . . . . . . . . . . 199
Audi A3 2004 ➤
4-cylinder direct injection engine (1.2 ltr. 2-valve TFSI), mechanics - Edition 04.2015
Contents iii
Protected by copyright. Copying for private or commercial purposes, in part or in whole, is not
permitted unless authorised by AUDI AG. AUDI AG does not guarantee or accept any liability
with respect to the correctness of information in this document. Copyright by AUDI AG.
Audi A3 2004 ➤
4-cylinder direct injection engine (1.2 ltr. 2-valve TFSI), mechanics - Edition 04.2015
iv Contents
Protected by copyright. Copying for private or commercial purposes, in part or in whole, is not
permitted unless authorised by AUDI AG. AUDI AG does not guarantee or accept any liability
with respect to the correctness of information in this document. Copyright by AUDI AG.
00 – Technical data
1 Engine number
(ARL004233; Edition 04.2015)
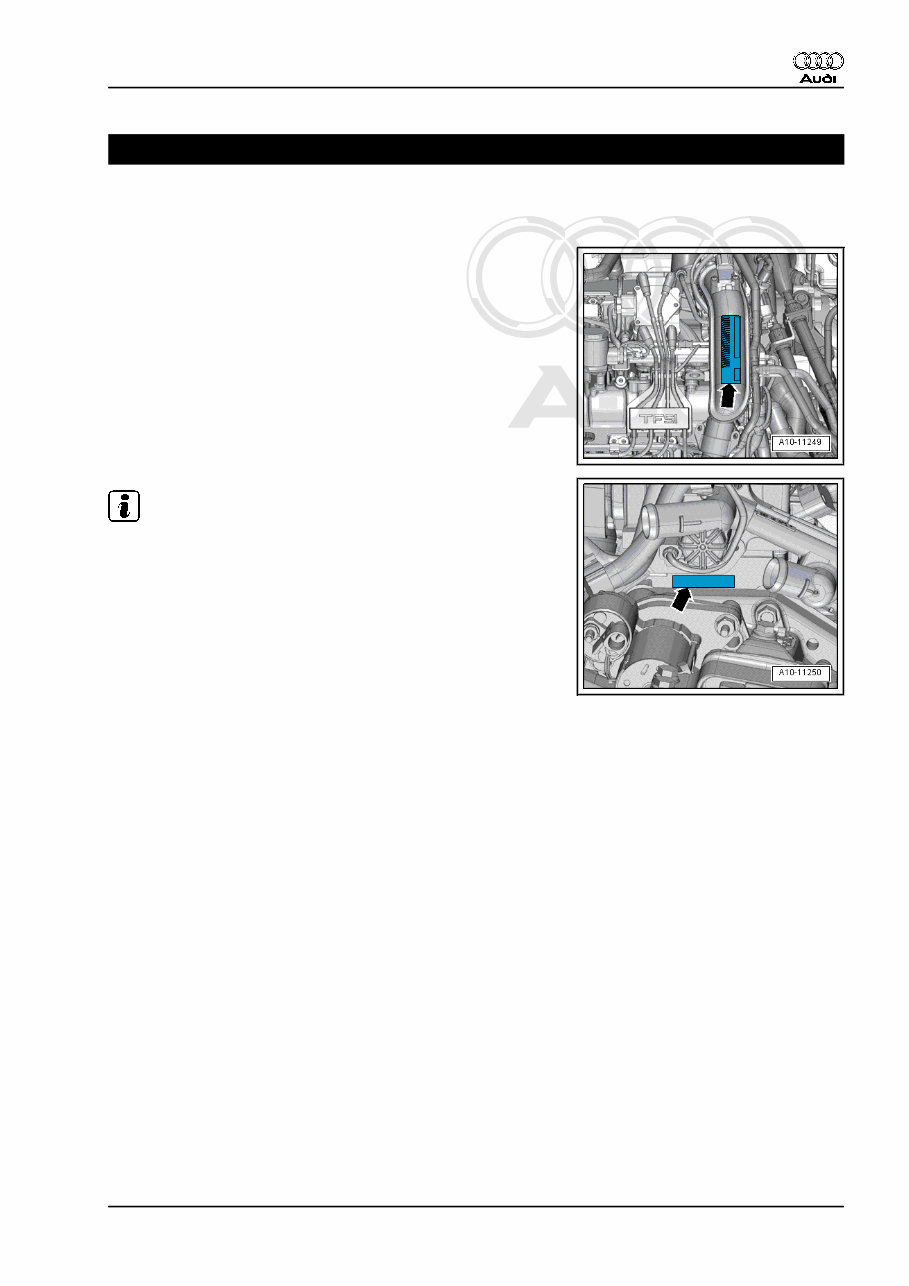
♦ There is a sticker on the air pipe showing the “engine code”
and “serial number” -arrow-.
♦ Starting with the letter “C”, the engine codes consist of 4 let‐
ters.
♦ The first 3 characters of the engine code stand for the engine
capacity and the mechanical construction and design. They
are stamped on the cylinder block, together with the serial
number.
♦ The 4th character indicates the power output and torque of the
engine, and is determined by the engine control unit.
Note
♦ The 4-character engine code can be found on the type plate
(in versions for some countries only) and on the vehicle data
sticker and the engine control unit.
♦ Fitting locations of the type plate (certain countries only) and
the vehicle data sticker ⇒ Maintenance ; Booklet 808 .
♦ If the sticker is missing, use a mirror and a torch to read off the
“Engine code” and the “Serial number”:
♦ Read off the engine code and serial number on the left-side of
the cylinder block -arrow-.
Audi A3 2004 ➤
4-cylinder direct injection engine (1.2 ltr. 2-valve TFSI), mechanics - Edition 04.2015
1. Engine number 1
Protected by copyright. Copying for private or commercial purposes, in part or in whole, is not
permitted unless authorised by AUDI AG. AUDI AG does not guarantee or accept any liability
with respect to the correctness of information in this document. Copyright by AUDI AG.
2 Safety precautions
Overview
♦ ⇒ “2.1 Working on the fuel system”, page 2
♦ ⇒ “2.2 Safety precautions when working on the ignition sys‐
tem”, page 2
♦ ⇒ “2.3 Working on the cooling system”, page 3
♦ ⇒ “2.4 Working on vehicles with start/stop system”,
page 3
♦ ⇒ “2.5 Using testers and measuring instruments during a road
test”, page 3
♦ ⇒ “2.6 Working on the exhaust system”, page 4
2.1 Working on the fuel system
Risk of injury - fuel system operates under high pressure
The fuel system is pressurised. There is a risk of injury as fuel
may spray out.
Before opening the fuel system:
– Put on safety goggles.
– Put on protective gloves.
– Release pressure (wrap clean cloth around connection and
open connection carefully).
Risk of fire due to escaping fuel
If the battery is connected, the door contact switch activates the
fuel pump when the driver's door is opened. Escaping fuel may
ignite, causing a fire.
– Before opening the fuel system, disconnect power supply to
fuel pump.
2.2 Safety precautions when working on the ignition system
Risk of injury caused by electric shock
When the engine is running, there are high voltage levels in the
ignition system. There is a risk of electric shock when touching
the ignition system!
– Never touch or disconnect ignition wiring when the engine is
running or being turned at cranking speed.
Risk of damage to components
Washing the engine or connecting/disconnecting electrical wiring
may result in components being damaged if the engine is running.
Audi A3 2004 ➤
4-cylinder direct injection engine (1.2 ltr. 2-valve TFSI), mechanics - Edition 04.2015
2 Rep. gr.00 - Technical data
Protected by copyright. Copying for private or commercial purposes, in part or in whole, is not
permitted unless authorised by AUDI AG. AUDI AG does not guarantee or accept any liability
with respect to the correctness of information in this document. Copyright by AUDI AG.
– Switch off ignition before connecting/disconnecting electrical
wiring.
– Switch off ignition before washing engine.
2.3 Working on the cooling system
Risk of scalding as hot coolant can escape
The cooling system is under pressure when the engine is hot. Hot
steam/hot coolant can escape - risk of scalding.
– Wear protective gloves.
– Wear safety goggles.
– Release pressure (cover filler cap on coolant expansion tank
with a cloth and open carefully).
2.4 Working on vehicles with start/stop system
Risk of injury - engine may start unexpectedly
On vehicles with the start/stop system activated, the engine may
start unexpectedly. If the start/stop system is activated, this is in‐
dicated by a message on the dash panel insert.
– Deactivate start/stop system by switching off ignition.
2.5 Using testers and measuring instruments during a road test
Risk of injury if test equipment is not secured
If an accident occurs and the front passenger's airbag is triggered,
test equipment which is not secured adequately may be catapul‐
ted through the vehicle with potentially serious consequences.
– Secure test equipment on the rear seat with a strap.
Or
– Have a second mechanic operate test equipment on the rear
seat.
Audi A3 2004 ➤
4-cylinder direct injection engine (1.2 ltr. 2-valve TFSI), mechanics - Edition 04.2015
2. Safety precautions 3
Protected by copyright. Copying for private or commercial purposes, in part or in whole, is not
permitted unless authorised by AUDI AG. AUDI AG does not guarantee or accept any liability
with respect to the correctness of information in this document. Copyright by AUDI AG.
2.6 Working on the exhaust system
When working on the exhaust system please note the following:
Caution
Risk of damage to flexible joint.
♦ Do not bend flexible joint more than 10°.
♦ Install flexible joint so that it is not under tension.
♦ Take care not to damage wire mesh on flexible joint.
Audi A3 2004 ➤
4-cylinder direct injection engine (1.2 ltr. 2-valve TFSI), mechanics - Edition 04.2015
4 Rep. gr.00 - Technical data
You're Reading a Preview
What's Included?
Fast Download Speeds
Online & Offline Access
Access PDF Contents & Bookmarks
Full Search Facility
Print one or all pages of your manual
$41.99
Viewed 12 Times Today


Secure transaction
What's Included?
Fast Download Speeds
Online & Offline Access
Access PDF Contents & Bookmarks
Full Search Facility
Print one or all pages of your manual
$41.99
The 2003-2012 Audi A3 (Typ 8P/8P1/8PA) Service & Repair Manual is a comprehensive guide to maintaining and fixing your Audi A3 model from the years 2003 to 2012. Whether you are a professional mechanic or a DIY enthusiast, this manual provides you with all the necessary details and instructions to keep your Audi A3 running smoothly.
Key features of the manual:
- Detailed service and repair instructions for the Audi A3 models (Typ 8P/8P1/8PA) from 2003 to 2012.
- Covers all major components and systems, including the engine, transmission, brakes, suspension, and electrical system.
- Step-by-step procedures and diagrams for easy understanding and implementation.
- Comprehensive troubleshooting guides to help you identify and fix common issues.
- Includes maintenance schedules and tips to maximize the longevity of your Audi A3.
With the 2003-2012 Audi A3 (Typ 8P/8P1/8PA) Service & Repair Manual, you can save money on costly repairs and confidently tackle any maintenance or repair task. Whether you need to replace a worn-out part or perform routine maintenance, this manual is your go-to resource for all things Audi A3.


