

2011-2015 Audi A1 Service & Repair Manual
What's Included?
Fast Download Speeds
Online & Offline Access
Access PDF Contents & Bookmarks
Full Search Facility
Print one or all pages of your manual

AUDI A1 SERVICE
AND REPAIR MANUAL
A/C Compressor Regulator Valve -N280-, Removing
and Installing
Note
Certain functions on the A/C Compressor
Regulator Valve -N280- (for example, a
stuck valve or a disruption in the coil) can
lead to a complaint regarding the A/C
compressor (A/C system doesn't cool, the
evaporator ices over, etc.). If the cause is
with the A/C Compressor Regulator Valve
-N280- (and not the A/C compressor
itself), the A/C compressor can be
serviced by replacing the A/C
Compressor Regulator Valve -N280--C
and D-.
The A/C Compressor Regulator Valve -
N280--C and D- is not available as a
replacement part for all A/C compressors.
If the A/C Compressor Regulator Valve -
N280- is not available as an individual
A/C compressor part, then the entire A/C
compressor must be replaced. Refer to
the Parts Catalog.
The A/C Compressor Regulator Valve -
N280- is available in different versions
and settings. Refer to the Parts Catalog.
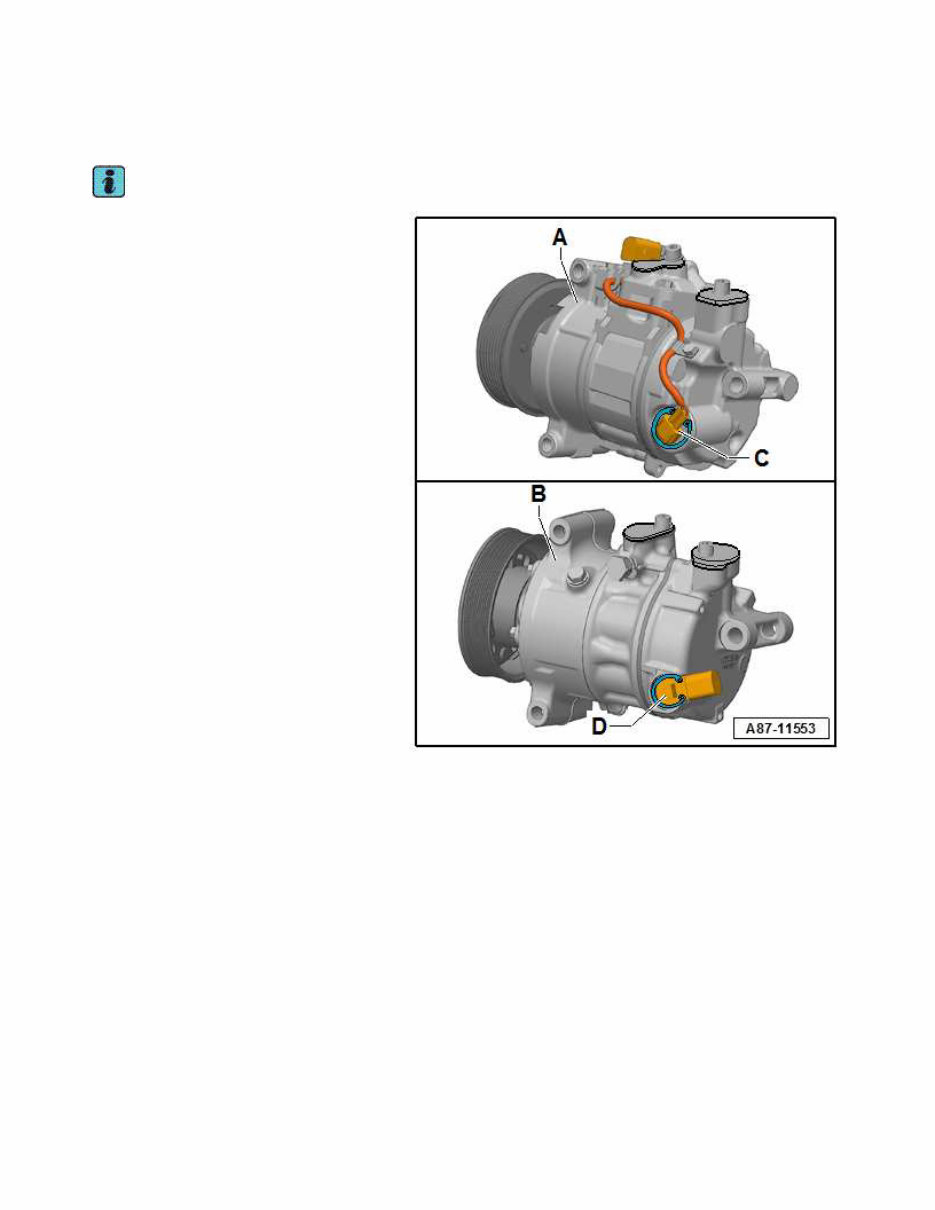
On the A/C compressor -A- (shown is an
A/C compressor manufactured by
“Denso” without an A/C Clutch -N25-), the
connector for the vehicle wiring harness
connection is attached with a short wiring
harness to the A/C Compressor Regulator
Valve -N280--C-. On the A/C compressor
-B- (shown is an A/C compressor
manufactured by “Sanden”), the
connector for the vehicle wiring harness
connection is mounted directly on the A/C
Compressor Regulator Valve -N280--C-.
The removal and installation of the A/C
Compressor Regulator Valve -N280--C
and D- on other A/C compressors (other
type and manufacturer) is basically the
same and only slightly deviates from the
procedure described below.
Page 1 of 8 A/C Compressor Regulator ValveN280, Removing and Installing
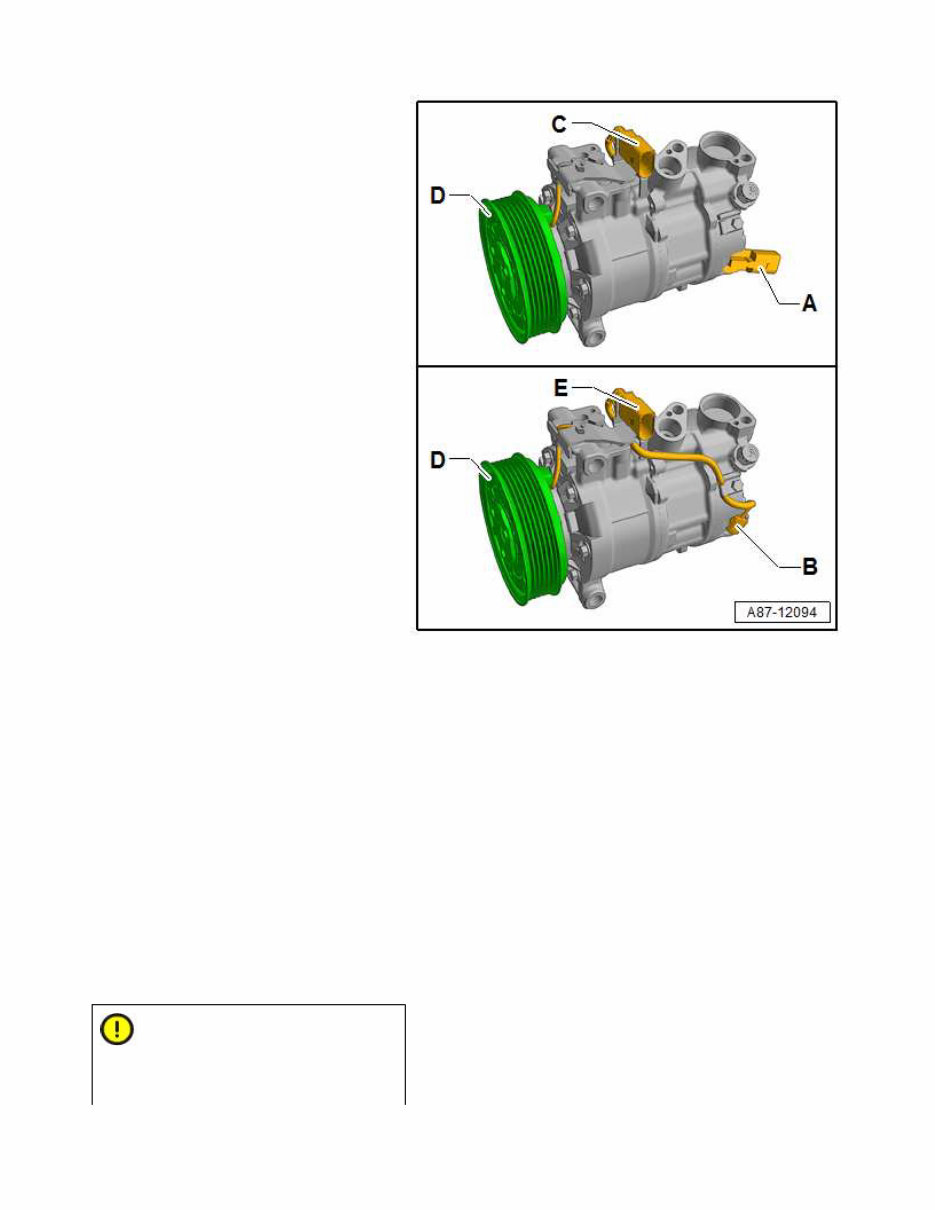
The A/C Compressor Regulator Valve -
N280- is available in different versions
and settings. Refer to the Parts Catalog.
On an A/C Compressor with an A/C
Clutch -N25- (shown is an A/C
compressor manufactured by “Denso”),
the connector for the vehicle wiring
harness connection is mounted directly on
the A/C Compressor Regulator Valve -
N280--A-. On another A/C compressor,
the connector for the vehicle wiring
harness connection is combined in a 3-pin
connector -E- for the A/C Clutch -N25-
and the A/C Compressor Regulator Valve
-N280-.
For version -B- of the A/C Compressor
Regulator Valve -N280-, the wire
connection may be directly connected to
the A/C Compressor Regulator Valve -
N280-, or there is an additional connector
on the A/C Compressor Regulator Valve -
N280-.
Removing and installing the A/C
Compressor Regulator Valve -N280--A
and B- is essentially the same on both
versions. It only deviates slightly from the
procedure described below. On an A/C
compressor with a 3-pin connector -E-,
disconnect the respective wires to the A/C
Compressor Regulator Valve -N280- from
the A/C Compressor Regulator Valve -
N280-, remove from the connector -E- or
cut at a suitable location (and reattach
using wire connectors from the Wiring
Harness Repair Set -VAS1978B-).
If the A/C Compressor Regulator Valve -
N280- malfunction was found to be
caused by dirt, shavings or abraded A/C
compressor material after the removal of
the A/C Compressor Regulator Valve -
N280-, clean the refrigerant circuit and
replace the A/C compressor. Refer to
→ Chapter „Compressor, Replacing on
Account of Leakage or Internal Damage“
and → Chapter „Refrigerant Circuit,
Cleaning (Flushing), with Refrigerant
R134a“.
Removing
– Discharge the refrigerant circuit. Refer to
→ Chapter „Using Service Station“.
Caution
There is a risk of damaging the A/C
compressor if the refrigerant circuit is
empty.
Page 2 of 8 A/C Compressor Regulator ValveN280, Removing and Installing

Do not start the motor if the refrigerant
circuit is empty.
Depending on the version of the A/C
Service Station, the pressure of the
refrigerant circuit may be less than 1
bar (14.5 psi) absolute pressure after
it has been discharged.
Depending on the version of the A/C
compressor, it may be damaged if
the pressure in the refrigerant circuit
is too low.
Do not start the engine while the
refrigerant circuit pressure is less
than the ambient pressure.
– Depending on the vehicle and installed
location of the A/C compressor, remove
the components that prevent access to
the A/C Compressor Regulator Valve -
N280-. Refer to → Heating, Ventilation
and Air Conditioning; Rep. Gr.87; System
Overview - Refrigerant Circuit (vehicle-
specific repair manual).
On vehicles where at least one of the two
refrigerant lines and the A/C Compressor
Regulator Valve -N280- cannot be
disconnected and removed while the A/C
compressor is attached to the engine.
– Remove the A/C compressor. Refer to
→ Heating, Ventilation and Air
Conditioning; Rep. Gr.87; A/C
Compressor (vehicle-specific repair
manual).
Note
A refrigerant line must be removed on an
installed A/C compressor so that it is assured,
that the pressure in the A/C compressor is the
same as the ambient pressure.
On a vehicle, where at least one of the two
refrigerant lines and the A/C Compressor
Regulator Valve -N280- can be
disconnected and removed while the A/C
compressor is attached to the engine (the
A/C compressor is not removed).
WARNING
There is a danger of ice-up.
Before removing the A/C
Compressor Regulator Valve -N280-,
connect the service station and
extract the refrigerant. Refrigerant
Page 3 of 8 A/C Compressor Regulator ValveN280, Removing and Installing

circuit must be empty to avoid
possible injury.
Refrigerant and refrigerant oil will
leak out if the refrigerant circuit is
not discharged.
The refrigerant is extracted before
removing the A/C Compressor
Regulator Valve -N280-. If the A/C
Compressor Regulator Valve -N280-
is not removed within 10 minutes
after extraction, pressure may build
up in the refrigerant circuit by
renewed evaporation. Extract the
refrigerant once more.
– Check the pressure in the refrigerant
circuit once more via the A/C service
station pressure gauge.
If the displayed pressure is larger than the
ambient pressure (larger than
approximately 1 bar (14.5 psi) absolute
pressure), turn on the A/C service station
and extract the refrigerant that is building
up the pressure.
– Disconnect one of the two refrigerant lines
from the A/C compressor. Refer to
→ Heating, Ventilation and Air
Conditioning; Rep. Gr.87; System
Overview - Refrigerant Circuit (vehicle-
specific repair manual).
Note
A refrigerant line must be removed on an
installed A/C compressor so that it is assured,
that the pressure in the A/C compressor is the
same as the ambient pressure.
All vehicles
– Before removing the A/C Compressor
Regulator Valve -N280- check again if the
A/C compressor is actually being driven
by the belt pulley/drive unit. If the belt
pulley or the drive unit overload protection
has triggered, the cause for the fault is not
the regulator valve but rather the A/C
compressor (for example does not move
easily).
Note
Page 4 of 8 A/C Compressor Regulator ValveN280, Removing and Installing
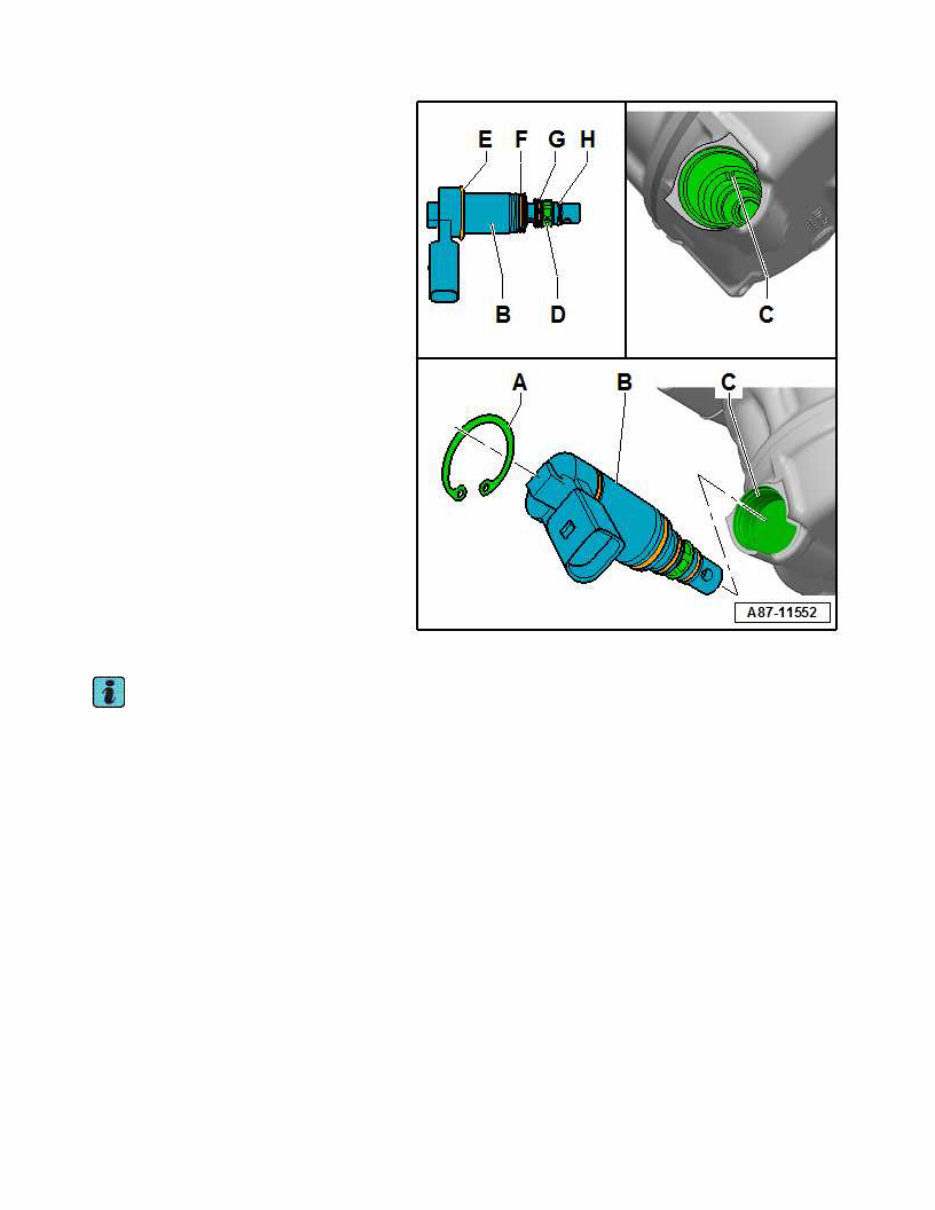
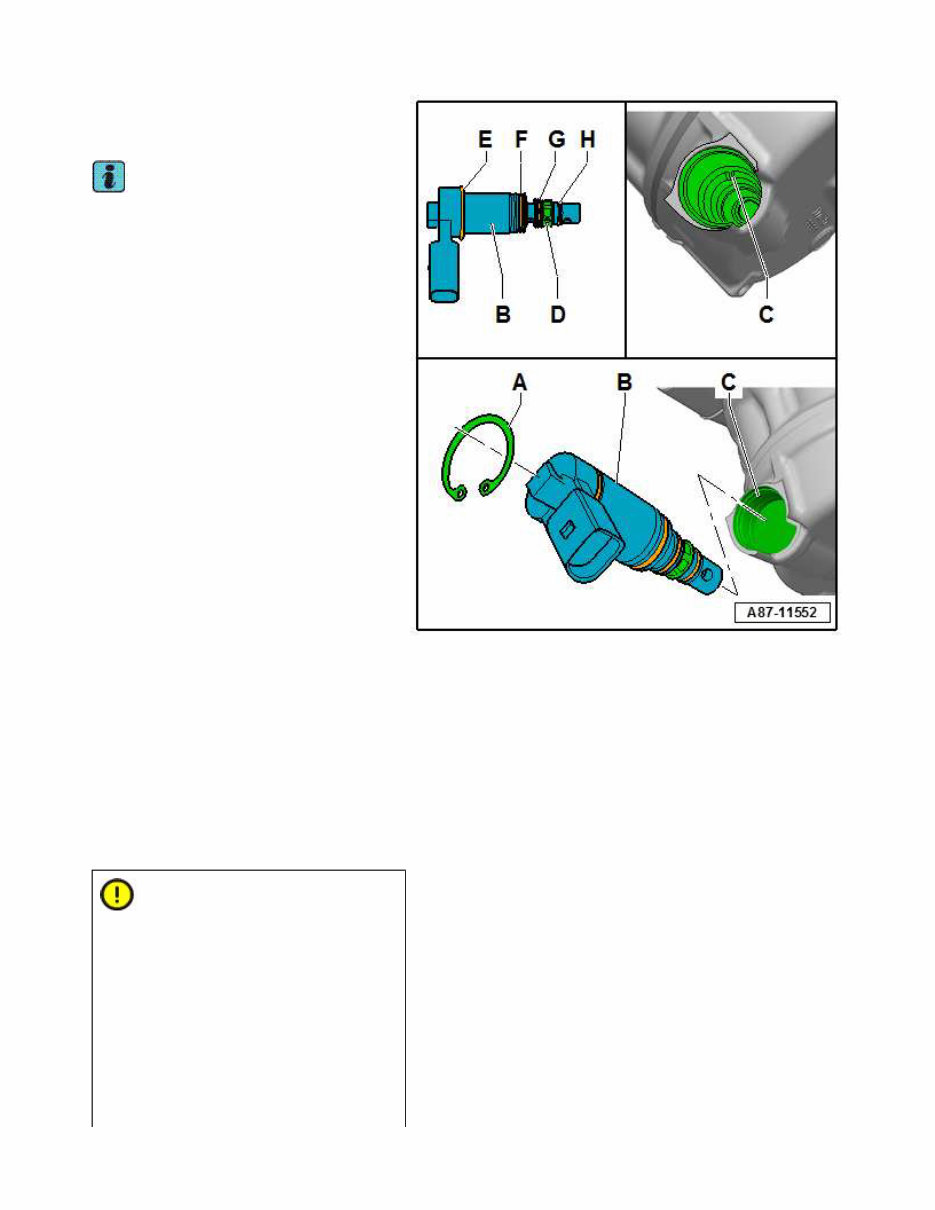
This illustration shows the A/C
Compressor Regulator Valve -N280--B-
on a A/C compressor manufactured by
“Sanden” type “PXE 14”. On these A/C
compressors the connector to the vehicle
wiring harness connection is mounted
directly on the A/C Compressor Regulator
Valve -N280--B-. The removal and
installation of the A/C Compressor
Regulator Valve -N280--B- on other A/C
compressors (other type and
manufacturer, for example “Denso”, the
A/C Compressor Regulator Valve -N280-
with a short wiring harness, for example)
can differ. The procedure for removal and
installation is however the same, as
described in the following for the A/C
compressor manufactured by “Sanden”
type “PXE 14”.
This illustration shows an A/C
Compressor Regulator Valve -N280--B-
with an O-ring -E- (not available on all
versions).
On a A/C Compressor Regulator Valve -
N280--B- without an O-ring -E-, dirt can
penetrate into the A/C Compressor
Regulator Valve -N280--C- mount up to
the O-ring -F-.
– If applicable, loosen the wire connection
from the A/C Compressor Regulator Valve
-N280--B- to the connection to the vehicle
wire harness from the A/C compressor.
Note
On an A/C compressor with an A/C Clutch
-N25- where the A/C Clutch -N25- is
activated via the same connector as the
A/C Compressor Regulator Valve -N280--
B-, remove the applicable wires from the
connector (for example, using an extractor
from the Wiring Harness Repair Set -
VAS1978B-). Refer to → Heating,
Ventilation and Air Conditioning; Rep.
Gr.87; System Overview - Refrigerant
Circuit (vehicle-specific repair manual).
If a connector should be installed on an
A/C compressor with an A/C Clutch -N25-
where the wires cannot be removed, cut
the wires to the A/C Compressor
Regulator Valve -N280- (or to the A/C
Clutch -N25-) at a suitable location and
reattach using wire connectors from the
Wiring Harness Repair Set -VAS1978B-
(or replace the connector itself. Refer to
the Parts Catalog). Refer to → Electrical
Equipment; Rep. Gr.97; Connectors;
Page 5 of 8 A/C Compressor Regulator ValveN280, Removing and Installing

Wiring Harnesses and Connectors,
Repairing.
– Clean the A/C compressor near the circlip
-A- and the A/C Compressor Regulator
Valve -N280--B- thoroughly.
Caution
The pressure in the A/C compressor
must be equal to the ambient pressure.
Refrigerant and refrigerant oil can
leak out if there is excess pressure
in the A/C compressor.
Dirt can be absorbed into the A/C
compressor if there is a vacuum in
the A/C compressor.
Make sure there is pressure
equalization before removing the
A/C Compressor Regulator Valve -
N280--B-.
– Remove the circlip -A-.
– Carefully remove the A/C Compressor
Regulator Valve -N280--B- from the A/C
compressor mount -C-, using a suitable
screwdriver -D-, for example.
Page 6 of 8 A/C Compressor Regulator ValveN280, Removing and Installing
– Check the removed A/C Compressor
Regulator Valve -N280--B- and A/C
compressor mount -C- for dirt.
Note
If the strainer -D-, A/C Compressor
Regulator Valve -N280--B- up to the O-
ring -F- or the A/C compressor mount -C-
are heavily contaminated in this area (with
shavings or dark, sticky abraded material,
for example), this indicates damage on
the A/C compressor. In this case, the
refrigerant circuit is to be cleaned and the
A/C compressor is to be replaced. Refer
to → Chapter „Compressor, Replacing on
Account of Leakage or Internal Damage“
and → Chapter „Refrigerant Circuit,
Cleaning (Flushing), with Refrigerant
R134a“.
If the strainer -D- on the A/C Compressor
Regulator Valve -N280--B- and the A/C
compressor mount -C- up to the O-ring
sealing surface -F- are only lightly
contaminated in this area (with gray
deposits from normal A/C compressor
operation, for example), a malfunction at
the A/C Compressor Regulator Valve -
N280--B- can cause the A/C compressor
malfunctioning.
On an A/C Compressor Regulator Valve -
N280--B- without an O-ring -E-, dirt can
penetrate into the mount -C- up to the O-
ring -E- during operation. Remove the dirt
carefully and completely using, for
example, a lint-free cloth (do not work with
compressed air).
Installing
– Check the A/C compressor mount -C- and
the circlip groove for dirt, and if
necessary, clean them carefully and
thoroughly with a clean, lint-free cloth.
Caution
Danger of another A/C Compressor
Regulator Valve -N280--B- or A/C
compressor failure due to dirt in the A/C
compressor or damage to the sealing
surfaces in the mount.
If necessary, carefully clean the A/C
compressor mount -C- using only a
clean, lint-free cloth (do not use
compressed air).
Make sure while cleaning the mount
-C- that no dirt gets into the area
Page 7 of 8 A/C Compressor Regulator ValveN280, Removing and Installing

underneath the O-ring sealing
surface -F- or the existing channels
and none of the mount sealing
surfaces become damaged.
– Check the A/C compressor mount -C- for
damage (also pay attention to small
scratches on the surface, if there is
damage, replace the A/C compressor).
– Check the O-rings -F,G and H- and -E- (if
applicable) of the A/C Compressor
Regulator Valve -N280--B- for damage.
– Coat the O-rings -F, G and H- and -E- (if
applicable) of the A/C Compressor
Regulator Valve -N280--B- lightly with
refrigerant oil and check for proper
seating.
– Insert the A/C Compressor Regulator
Valve -N280--B- until the stop in the A/C
compressor mount -C-.
– Install the new circlip -A- and check for
proper seating in the groove.
– Install the removed parts in the opposite
order.
– Evacuate and refill the refrigerant circuit.
Refer to → Chapter „Using Service
Station“.
Note
Should refrigerant oil escape with the A/C
Compressor Regulator Valve -N280--B-
removed, add this amount of refrigerant oil
while filling the refrigerant oil with the A/C
service station. Refer to → Chapter „Using
Service Station“.
– Check the A/C function. Refer to
→ Chapter „Pressures, Checking“ and
→ Heating, Ventilation and Air
Conditioning; Rep. Gr.87; System
Overview - Refrigerant Circuit (vehicle-
specific repair manual).
Page 8 of 8 A/C Compressor Regulator ValveN280, Removing and Installing

Acceptable Tread Depth Variance
Note
Observe the acceptable vehicle tread variance in this chapter.
Refer to → Chapter „Acceptable Tread Depth Variance“.
Page 1 of 1 Acceptable Tread Depth Variance
You're Reading a Preview
What's Included?
Fast Download Speeds
Online & Offline Access
Access PDF Contents & Bookmarks
Full Search Facility
Print one or all pages of your manual
$41.99
$54.99
Viewed 72 Times Today


Secure transaction
What's Included?
Fast Download Speeds
Online & Offline Access
Access PDF Contents & Bookmarks
Full Search Facility
Print one or all pages of your manual
$41.99
$54.99
The Audi A1 Complete Workshop Service Repair Manual offers comprehensive guidance for maintaining and repairing your Audi A1. Specifically tailored for the 2011-2015 models, this manual equips you with the necessary instructions, diagrams, and specifications to confidently undertake any repair or maintenance task.
Key features of this manual:
- Step-by-step instructions for all repair and maintenance procedures.
- Detailed diagrams and illustrations for enhanced understanding.
- Clear and concise explanations of technical troubleshooting procedures.
- Complete coverage of mechanical, electrical, and electronic systems.
- Comprehensive information on engine management, fuel system, transmission, suspension, brakes, and more.
- Guidance for proper diagnosis and troubleshooting of common problems.
Whether you are a professional mechanic or a DIY enthusiast, the Audi A1 Complete Workshop Service Repair Manual is an indispensable resource for maintaining and repairing your Audi A1. Adhere to the detailed instructions and specifications provided in this manual to ensure the longevity and optimal performance of your vehicle.


