
 Download Service & Repair Manual")

Protected by copyright. Copying for private or commercial purposes, in part or in whole, is not
permitted unless authorised by AUDI AG. AUDI AG does not guarantee or accept any liability
with respect to the correctness of information in this document. Copyright by AUDI AG.
Audi 100 1991 ➤
4-cylinder Engine (2-valve), Mechanical Components
Engine ID
AAD AAE ABB ABK ADA ADW
Edition 12.1990
Service
Service Department. Technical Information
Protected by copyright. Copying for private or commercial purposes, in part or in whole, is not
permitted unless authorised by AUDI AG. AUDI AG does not guarantee or accept any liability
with respect to the correctness of information in this document. Copyright by AUDI AG.
List of Workshop Manual Repair GroupsList of Workshop Manual
Repair GroupsList of Workshop Manual Repair Groups
Audi 100 1991 ➤
4-cylinder Engine (2-valve), Mechanical Components
Repair Group
00 - Technical data
10 - Removing and installing engine
13 - Crankshaft group
15 - Cylinder head, Valve gear
17 - Lubrication
19 - Cooling system
26 - Exhaust system
Technical information should always be available to the foremen and mechanics, because their careful
and constant adherence to the instructions is essential to ensure vehicle road-worthiness and safety. In
addition, the normal basic safety precautions for working on motor vehicles must, as a matter of course,
be observed.
Service
All rights reserved.
No reproduction without prior agreement from publisher.
Copyright © 2010 Audi AG, Ingolstadt 00052505520
Protected by copyright. Copying for private or commercial purposes, in part or in whole, is not
permitted unless authorised by AUDI AG. AUDI AG does not guarantee or accept any liability
with respect to the correctness of information in this document. Copyright by AUDI AG.
Contents
00 - Technical data . . . . . . . . . . . . . . . . . . . . . . . . . . . . . . . . . . . . . . . . . . . . . . . . . . . .1
1 Technical data . . . . . . . . . . . . . . . . . . . . . . . . . . . . . . . . . . . . . . . . . . . . . . . . . . . . . . . . . . . . 1
1.1 Technical data . . . . . . . . . . . . . . . . . . . . . . . . . . . . . . . . . . . . . . . . . . . . . . . . . . . . . . . . . . . . 1
1.2 Engine number . . . . . . . . . . . . . . . . . . . . . . . . . . . . . . . . . . . . . . . . . . . . . . . . . . . . . . . . . . . .1
1.3 Engine data . . . . . . . . . . . . . . . . . . . . . . . . . . . . . . . . . . . . . . . . . . . . . . . . . . . . . . . . . . . . . .1
10 - Removing and installing engine . . . . . . . . . . . . . . . . . . . . . . . . . . . . . . . . . . . . . . . .3
1 Removing and installing engine . . . . . . . . . . . . . . . . . . . . . . . . . . . . . . . . . . . . . . . . . . . . . .3
1.1 Removing and installing engine . . . . . . . . . . . . . . . . . . . . . . . . . . . . . . . . . . . . . . . . . . . . . .3
1.2 Removing engine -engine code AAE- . . . . . . . . . . . . . . . . . . . . . . . . . . . . . . . . . . . . . . . . . .3
1.3 Removing engine -engine codes AAD, ABB- . . . . . . . . . . . . . . . . . . . . . . . . . . . . . . . . . . . .15
1.4 Removing engine -engine codes ABK, ADA, ADW- . . . . . . . . . . . . . . . . . . . . . . . . . . . . . . . .28
1.5 Attaching engine to repair stand . . . . . . . . . . . . . . . . . . . . . . . . . . . . . . . . . . . . . . . . . . . . . .40
1.6 Installing . . . . . . . . . . . . . . . . . . . . . . . . . . . . . . . . . . . . . . . . . . . . . . . . . . . . . . . . . . . . . . . .41
1.7 Tightening torques . . . . . . . . . . . . . . . . . . . . . . . . . . . . . . . . . . . . . . . . . . . . . . . . . . . . . . . .43
13 - Crankshaft group . . . . . . . . . . . . . . . . . . . . . . . . . . . . . . . . . . . . . . . . . . . . . . . . . .45
1 Dismantling and assembling engine . . . . . . . . . . . . . . . . . . . . . . . . . . . . . . . . . . . . . . . . . . . .45
1.1 Dismantling and assembling engine . . . . . . . . . . . . . . . . . . . . . . . . . . . . . . . . . . . . . . . . . . . .45
1.2 Belt drive for alternator, coolant pump, and vane pump . . . . . . . . . . . . . . . . . . . . . . . . . . . .45
1.3 Removing and installing V-belt for coolant pump and power assisted steering vane pump
. . . . . . . . . . . . . . . . . . . . . . . . . . . . . . . . . . . . . . . . . . . . . . . . . . . . . . . . . . . . . . . . . . . . . . . .50
1.4 Checking V-belt tension for coolant pump and power assisted steering vane pump, tensioning
V-belt . . . . . . . . . . . . . . . . . . . . . . . . . . . . . . . . . . . . . . . . . . . . . . . . . . . . . . . . . . . . . . . . . .51
1.5 Removing and installing V-belt for alternator > 08.91 . . . . . . . . . . . . . . . . . . . . . . . . . . . . . .52
1.6 Checking V-belt tension for alternator, tensioning V-belt . . . . . . . . . . . . . . . . . . . . . . . . . . . .53
1.7 Removing and installing ribbed belt for alternator > 09.91 . . . . . . . . . . . . . . . . . . . . . . . . . .55
1.8 Checking ribbed belt tension for alternator, tensioning ribbed belt . . . . . . . . . . . . . . . . . . . .56
1.9 V-belt drive for air conditioning compressor . . . . . . . . . . . . . . . . . . . . . . . . . . . . . . . . . . . . . .58
1.10 Removing and installing V-belt for air conditioning compressor . . . . . . . . . . . . . . . . . . . . . .60
1.11 Checking V-belt tension for alternator, tensioning V-belt . . . . . . . . . . . . . . . . . . . . . . . . . . . .60
1.12 Toothed belt drive . . . . . . . . . . . . . . . . . . . . . . . . . . . . . . . . . . . . . . . . . . . . . . . . . . . . . . . . . .62
1.13 Removing and installing toothed belt . . . . . . . . . . . . . . . . . . . . . . . . . . . . . . . . . . . . . . . . . .68
1.14 Checking toothed belt tension and thermo tension roller - Vehicles > approx. 12.94 . . . . . .76
1.15 Checking tensioner - Vehicles approx. 12.94 > . . . . . . . . . . . . . . . . . . . . . . . . . . . . . . . . . .77
2 Removing and installing sealing flange and flywheel . . . . . . . . . . . . . . . . . . . . . . . . . . . . . .79
2.1 Removing and installing sealing flange and flywheel . . . . . . . . . . . . . . . . . . . . . . . . . . . . . .79
2.2 Replacing crankshaft oil seal on pulley end . . . . . . . . . . . . . . . . . . . . . . . . . . . . . . . . . . . . . .83
2.3 Removing and installing flywheel/drive plate . . . . . . . . . . . . . . . . . . . . . . . . . . . . . . . . . . . .85
3 Removing and installing crankshaft . . . . . . . . . . . . . . . . . . . . . . . . . . . . . . . . . . . . . . . . . . . .88
3.1 Removing and installing crankshaft . . . . . . . . . . . . . . . . . . . . . . . . . . . . . . . . . . . . . . . . . . . .88
3.2 Removing and installing needle bearing in crankshaft . . . . . . . . . . . . . . . . . . . . . . . . . . . . . .91
3.3 Crankshaft dimensions . . . . . . . . . . . . . . . . . . . . . . . . . . . . . . . . . . . . . . . . . . . . . . . . . . . . . .92
4 Dismantling and assembling pistons and conrods . . . . . . . . . . . . . . . . . . . . . . . . . . . . . . . .93
4.1 Dismantling and assembling pistons and conrods . . . . . . . . . . . . . . . . . . . . . . . . . . . . . . . .93
4.2 Piston and cylinder dimensions . . . . . . . . . . . . . . . . . . . . . . . . . . . . . . . . . . . . . . . . . . . . . .100
4.3 Checking radial play of conrods . . . . . . . . . . . . . . . . . . . . . . . . . . . . . . . . . . . . . . . . . . . . . .100
15 - Cylinder head, Valve gear . . . . . . . . . . . . . . . . . . . . . . . . . . . . . . . . . . . . . . . . . . . .102
1 Removing and installing cylinder head . . . . . . . . . . . . . . . . . . . . . . . . . . . . . . . . . . . . . . . . . .102
1.1 Removing and installing cylinder head . . . . . . . . . . . . . . . . . . . . . . . . . . . . . . . . . . . . . . . . . .102
1.2 Removing and installing intake manifold -engine code AAE- . . . . . . . . . . . . . . . . . . . . . . . .108
1.3 Removing and installing intake manifold -engine codes AAD, ABB- . . . . . . . . . . . . . . . . . .111
1.4 Removing and installing intake manifold -engine codes ABK, ADA, ADW- . . . . . . . . . . . . . .113
Audi 100 1991 ➤
4-cylinder Engine (2-valve), Mechanical Components - Edition 12.1990
Contents i

Protected by copyright. Copying for private or commercial purposes, in part or in whole, is not
permitted unless authorised by AUDI AG. AUDI AG does not guarantee or accept any liability
with respect to the correctness of information in this document. Copyright by AUDI AG.
1.5 Removing and installing cylinder head cover . . . . . . . . . . . . . . . . . . . . . . . . . . . . . . . . . . . .115
1.6 Removing cylinder head -engine code AAE- . . . . . . . . . . . . . . . . . . . . . . . . . . . . . . . . . . . .118
1.7 Removing cylinder head -engine codes AAD, ABB- . . . . . . . . . . . . . . . . . . . . . . . . . . . . . .123
1.8 Removing cylinder head -engine codes ABK, ADA, ADW- . . . . . . . . . . . . . . . . . . . . . . . . . .129
1.9 Installing cylinder head . . . . . . . . . . . . . . . . . . . . . . . . . . . . . . . . . . . . . . . . . . . . . . . . . . . . . .134
1.10 Checking compression . . . . . . . . . . . . . . . . . . . . . . . . . . . . . . . . . . . . . . . . . . . . . . . . . . . . . .137
2 Servicing valve gear . . . . . . . . . . . . . . . . . . . . . . . . . . . . . . . . . . . . . . . . . . . . . . . . . . . . . . . .139
2.1 Servicing valve gear . . . . . . . . . . . . . . . . . . . . . . . . . . . . . . . . . . . . . . . . . . . . . . . . . . . . . . . .139
2.2 Different valve gear designs . . . . . . . . . . . . . . . . . . . . . . . . . . . . . . . . . . . . . . . . . . . . . . . . . .139
2.3 Replacing camshaft oil seal . . . . . . . . . . . . . . . . . . . . . . . . . . . . . . . . . . . . . . . . . . . . . . . . . . 148
2.4 Removing and installing camshaft . . . . . . . . . . . . . . . . . . . . . . . . . . . . . . . . . . . . . . . . . . . .151
2.5 Checking hydraulic bucket tappets . . . . . . . . . . . . . . . . . . . . . . . . . . . . . . . . . . . . . . . . . . . . 155
2.6 Replacing valve stem seals . . . . . . . . . . . . . . . . . . . . . . . . . . . . . . . . . . . . . . . . . . . . . . . . . .156
2.7 Checking valve guides . . . . . . . . . . . . . . . . . . . . . . . . . . . . . . . . . . . . . . . . . . . . . . . . . . . . . .159
2.8 Checking valves . . . . . . . . . . . . . . . . . . . . . . . . . . . . . . . . . . . . . . . . . . . . . . . . . . . . . . . . . .160
2.9 Replacing valve guides . . . . . . . . . . . . . . . . . . . . . . . . . . . . . . . . . . . . . . . . . . . . . . . . . . . .161
2.10 Reworking valve seats . . . . . . . . . . . . . . . . . . . . . . . . . . . . . . . . . . . . . . . . . . . . . . . . . . . . . .163
17 - Lubrication . . . . . . . . . . . . . . . . . . . . . . . . . . . . . . . . . . . . . . . . . . . . . . . . . . . . . . . .166
1 Removing and installing parts of the lubrication system . . . . . . . . . . . . . . . . . . . . . . . . . . . .166
1.1 Removing and installing parts of the lubrication system . . . . . . . . . . . . . . . . . . . . . . . . . . . .166
1.2 Part I . . . . . . . . . . . . . . . . . . . . . . . . . . . . . . . . . . . . . . . . . . . . . . . . . . . . . . . . . . . . . . . . . . . .167
1.3 Part II . . . . . . . . . . . . . . . . . . . . . . . . . . . . . . . . . . . . . . . . . . . . . . . . . . . . . . . . . . . . . . . . . . 171
1.4 Removing and installing oil pan . . . . . . . . . . . . . . . . . . . . . . . . . . . . . . . . . . . . . . . . . . . . . .175
1.5 Removing and installing oil pump . . . . . . . . . . . . . . . . . . . . . . . . . . . . . . . . . . . . . . . . . . . . . .179
1.6 Checking oil pressure and oil pressure switch . . . . . . . . . . . . . . . . . . . . . . . . . . . . . . . . . . . .180
1.7 Engine oil . . . . . . . . . . . . . . . . . . . . . . . . . . . . . . . . . . . . . . . . . . . . . . . . . . . . . . . . . . . . . . . .182
1.8 Checking oil level . . . . . . . . . . . . . . . . . . . . . . . . . . . . . . . . . . . . . . . . . . . . . . . . . . . . . . . . . .182
19 - Cooling system . . . . . . . . . . . . . . . . . . . . . . . . . . . . . . . . . . . . . . . . . . . . . . . . . . . .184
1 Removing and installing parts of the cooling system . . . . . . . . . . . . . . . . . . . . . . . . . . . . . .184
1.1 Removing and installing parts of the cooling system . . . . . . . . . . . . . . . . . . . . . . . . . . . . . .184
1.2 Parts of cooling system . . . . . . . . . . . . . . . . . . . . . . . . . . . . . . . . . . . . . . . . . . . . . . . . . . . .185
1.3 Draining and filling cooling system . . . . . . . . . . . . . . . . . . . . . . . . . . . . . . . . . . . . . . . . . . . .187
1.4 Coolant pump and coolant thermostat - Exploded view . . . . . . . . . . . . . . . . . . . . . . . . . . . .190
1.5 Removing and installing coolant pump . . . . . . . . . . . . . . . . . . . . . . . . . . . . . . . . . . . . . . . . . .192
1.6 Removing, installing and checking coolant thermostat . . . . . . . . . . . . . . . . . . . . . . . . . . . .194
1.7 Removing and installing radiator . . . . . . . . . . . . . . . . . . . . . . . . . . . . . . . . . . . . . . . . . . . . . .195
1.8 Checking cooling system for leaks . . . . . . . . . . . . . . . . . . . . . . . . . . . . . . . . . . . . . . . . . . . .199
26 - Exhaust system . . . . . . . . . . . . . . . . . . . . . . . . . . . . . . . . . . . . . . . . . . . . . . . . . . . .201
1 Removing and installing parts of exhaust system . . . . . . . . . . . . . . . . . . . . . . . . . . . . . . . .201
1.1 Removing and installing parts of exhaust system . . . . . . . . . . . . . . . . . . . . . . . . . . . . . . . .201
1.2 Vehicles with front-wheel drive without catalytic converter . . . . . . . . . . . . . . . . . . . . . . . . . .201
1.3 Vehicles with front-wheel drive with catalytic converter . . . . . . . . . . . . . . . . . . . . . . . . . . . .205
1.4 Vehicles with four-wheel drive . . . . . . . . . . . . . . . . . . . . . . . . . . . . . . . . . . . . . . . . . . . . . . . .212
1.5 Separating centre and rear silencers . . . . . . . . . . . . . . . . . . . . . . . . . . . . . . . . . . . . . . . . . .219
1.6 Exhaust manifold - Overview . . . . . . . . . . . . . . . . . . . . . . . . . . . . . . . . . . . . . . . . . . . . . . . .220
1.7 Removing and installing exhaust manifold . . . . . . . . . . . . . . . . . . . . . . . . . . . . . . . . . . . . . .222
1.8 Stress free alignment of exhaust system . . . . . . . . . . . . . . . . . . . . . . . . . . . . . . . . . . . . . . . .225
1.9 Checking exhaust system for leaks . . . . . . . . . . . . . . . . . . . . . . . . . . . . . . . . . . . . . . . . . . . . 227
Audi 100 1991 ➤
4-cylinder Engine (2-valve), Mechanical Components - Edition 12.1990
ii Contents
Protected by copyright. Copying for private or commercial purposes, in part or in whole, is not
permitted unless authorised by AUDI AG. AUDI AG does not guarantee or accept any liability
with respect to the correctness of information in this document. Copyright by AUDI AG.
00 - Technical data
1 - Technical data
1.1 - Technical data
1.2 - Engine number
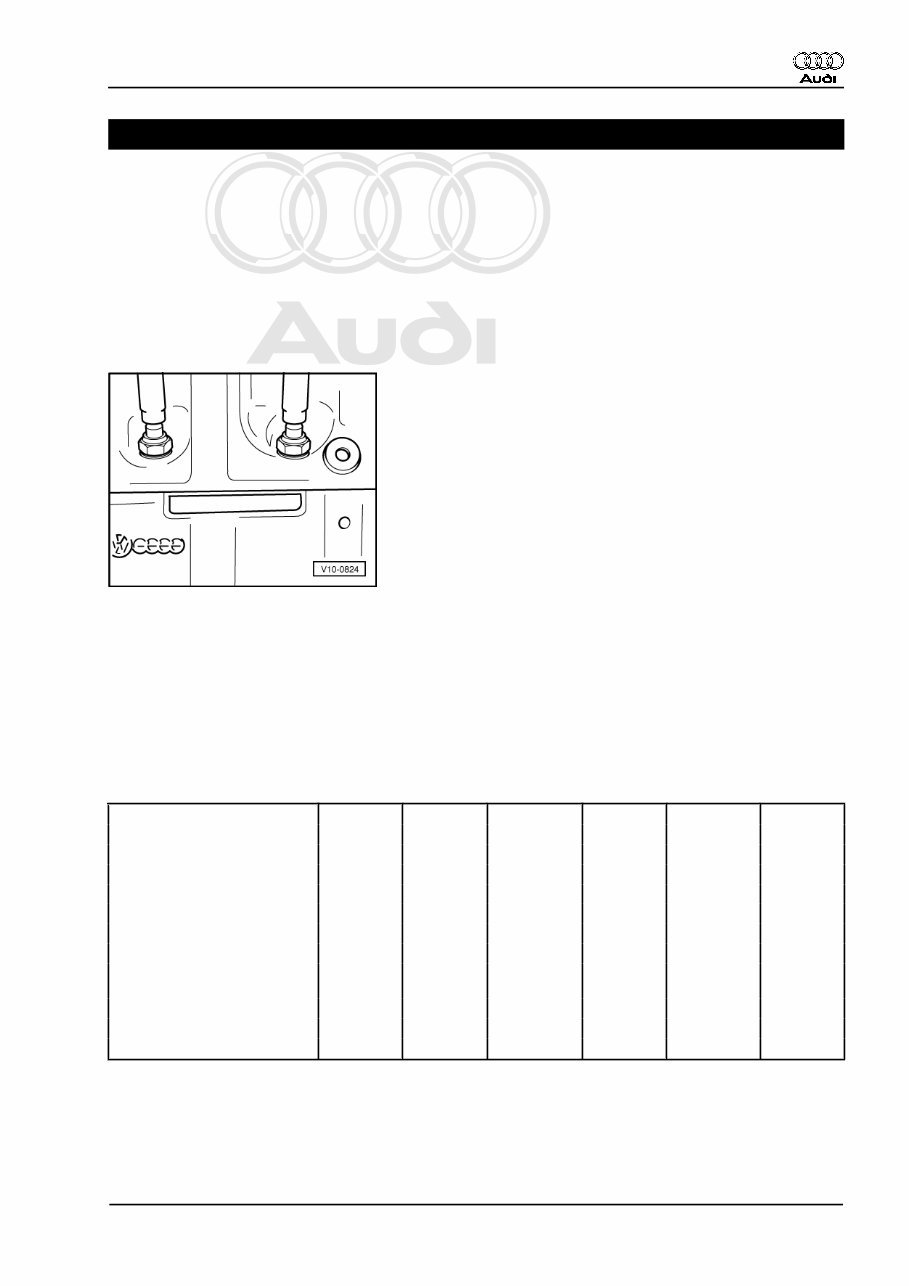
-> The engine number ("engine code" and "serial number") can be found on the left of the cylinder block.
There is also a label on the rear cylinder head cover indicating the "engine code" and "serial number".
The engine code is also included on the vehicle data sticker.
1.3 - Engine data
Code AAD AAE ABB ABK ADA ADW
Capacity l 2.0 2.0 1.6 2.0 1.6 2.0
Output kW at rpm 85/5400 74/5500 75/6100 85/5400 74/6000 79/5300
Torque Nm at rpm 168/3200 157/2750 127/3700 166/3200 130/3200 160/3200
Bore øin mm 82.5 82.5 81.0 82.5 81.0 82.5
Stroke mm 92.8 92.8 77.4 92.8 77.4 92.8
Compression 10.4 9.0 10.0 10.5 10.5 9.0
RON at least 95 1) 91 98 2) 95 1) 95 1) 91
Injection-/Ignition system KE-
Motronic
Mono-
Motronic
K-Jetronic/
TSZ-H
Digifant Multi Point
Injection
Digifant
Knock control yes no no yes yes yes
Self-diagnosis yes yes no yes yes yes
Lambda control yes yes no yes yes yes
Audi 100 1991 ➤
4-cylinder Engine (2-valve), Mechanical Components - Edition 12.1990
1.1 - Technical data 1
Protected by copyright. Copying for private or commercial purposes, in part or in whole, is not
permitted unless authorised by AUDI AG. AUDI AG does not guarantee or accept any liability
with respect to the correctness of information in this document. Copyright by AUDI AG.
Code AAD AAE ABB ABK ADA ADW
Catalytic converter yes/-3) yes no yes/-3) yes/-3) no
1) Regular unleaded petrol RON 91 can be used but will cause a slight loss of power.
2) When using Premium unleaded petrol 95 RON, adjust ignition timing to 3 ± 1° before TDC.
3) Optional in some countries.
Code AAD AAE ABB ABK ADA ADW
Valve timing
at 1 mm valve lift and 0 mm valve clearance
Inlet opens after TDC 6° 11° 6° 6° 6° 11°
Inlet closes after BDC 45° 50° 45° 45.0° 45° 50°
Exhaust opens before BDC 42° 37° 42° 42.0° 42° 37°
Exhaust closes before TDC 4° 2° 4° 4.0° 4° 2°
Audi 100 1991 ➤
4-cylinder Engine (2-valve), Mechanical Components - Edition 12.1990
2 00 - Technical data
Protected by copyright. Copying for private or commercial purposes, in part or in whole, is not
permitted unless authorised by AUDI AG. AUDI AG does not guarantee or accept any liability
with respect to the correctness of information in this document. Copyright by AUDI AG.
10 - Removing and installing engine
1 - Removing and installing engine
1.1 - Removing and installing engine
Notes:
◆ Renew all cut and defective cable ties. Refit cable ties in the same position when installing the engine.
◆ Remove engine upwards without gearbox.
◆ Collect drained coolant in a clean container for re use or disposal.
1.2 - Removing engine -engine code AAE-
Audi 100 1991 ➤
4-cylinder Engine (2-valve), Mechanical Components - Edition 12.1990
1.1 - Removing and installing engine 3

Protected by copyright. Copying for private or commercial purposes, in part or in whole, is not
permitted unless authorised by AUDI AG. AUDI AG does not guarantee or accept any liability
with respect to the correctness of information in this document. Copyright by AUDI AG.
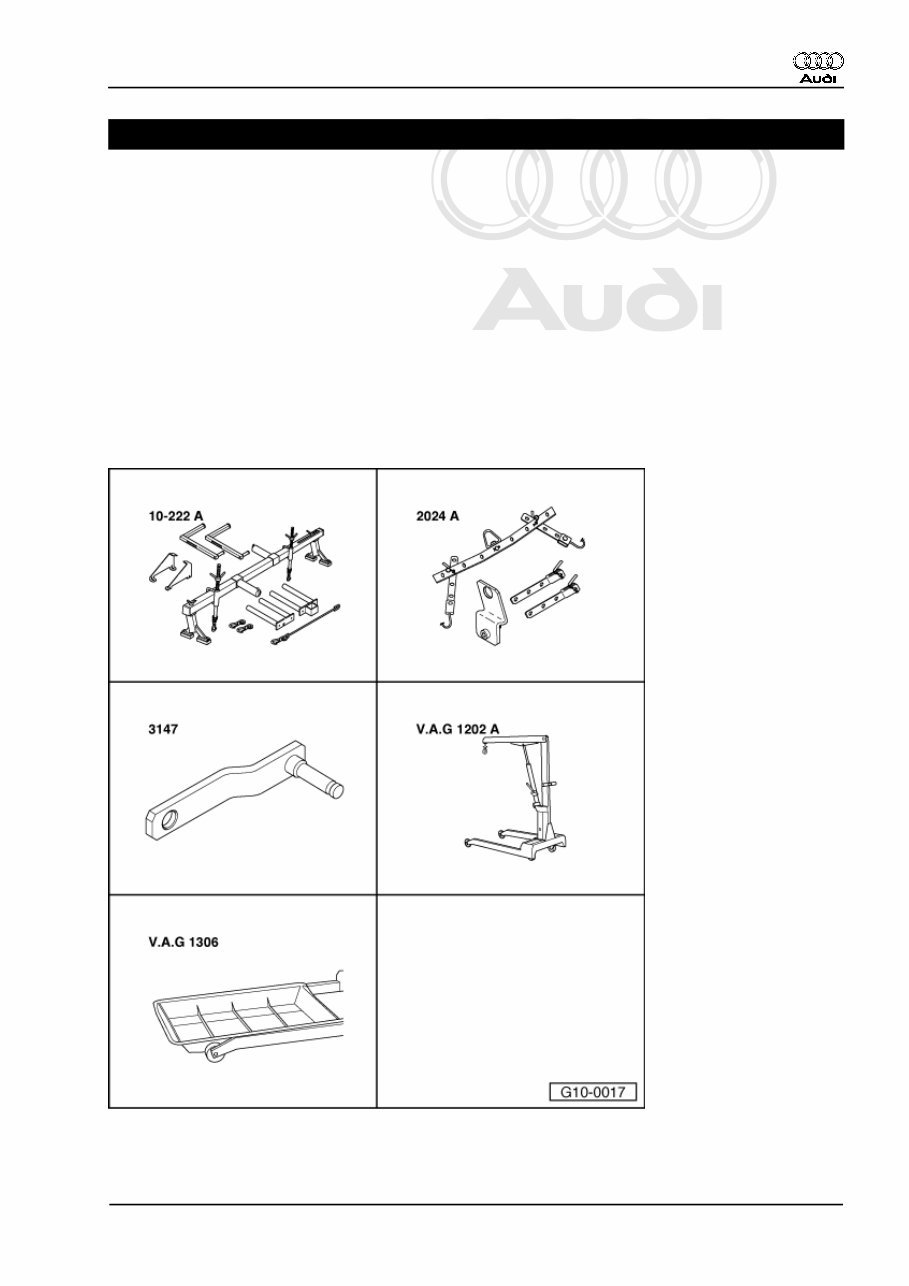
Special tools and workshop equipment required
◆ Support bar 10-222 A with 10-222 A/2
◆ Lifting tackle 2024 A
◆ Gearbox support 3147
◆ V.A.G 1202 A
or
◆ Workshop crane VAS 6100
◆ Drip tray V.A.G 1306
Procedure
- Observe or obtain radio code on vehicles with coded radio.
- Disconnect earthing strap at battery with ignition switched off.
Important
Hot steam or hot coolant can escape when opening expansion tank. Cover cap with a cloth and open carefully.
- Open the cover of the coolant expansion tank.
Vehicles with air conditioner:
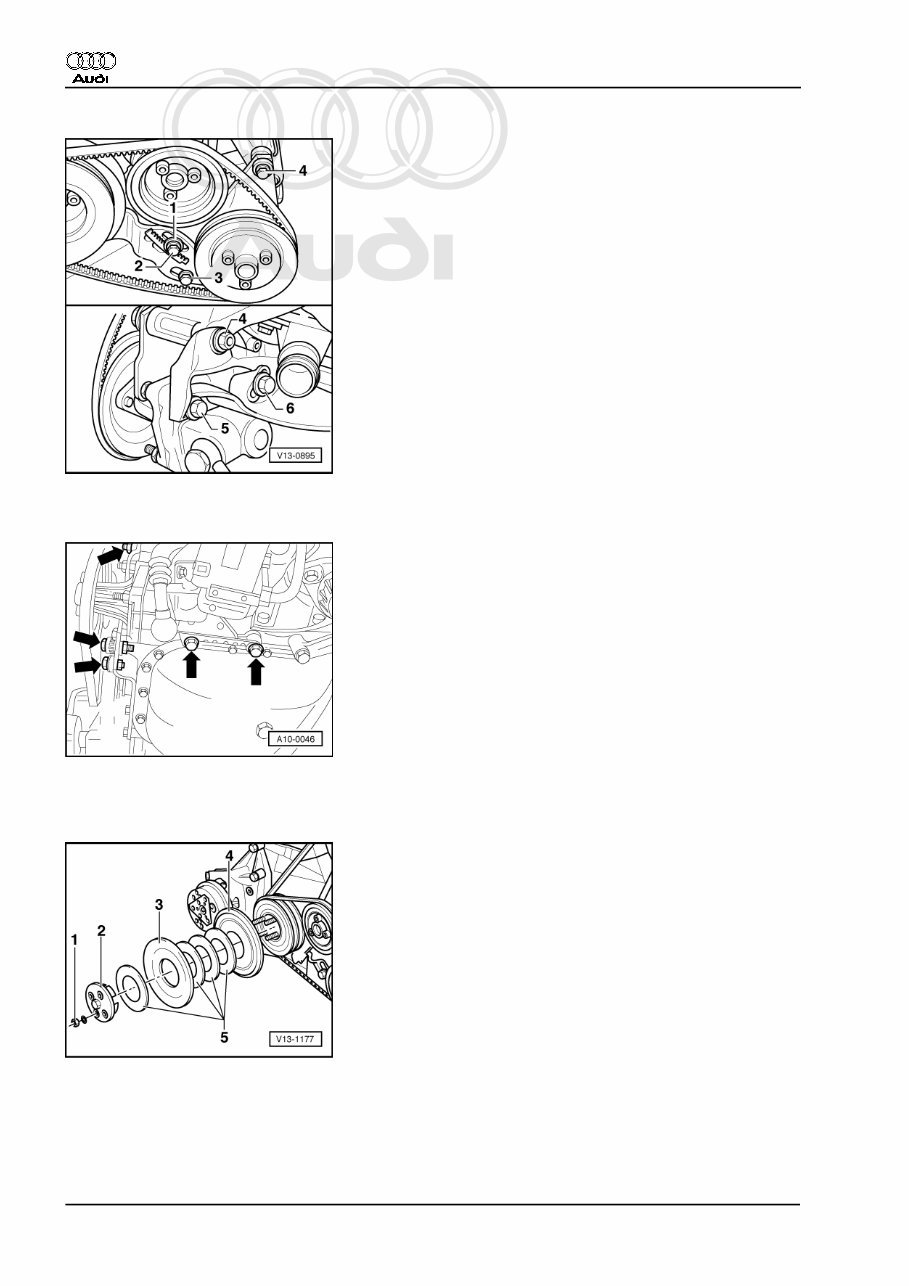
Note:
Mark the ribbed belt running direction with chalk or a felt-tipped pen before removing the ribbed belt (on vehicles
starting approx. 09.91). If the belt runs in the opposite direction when it is refitted, this can cause breakage.
- -> Loosen bolts -1-, -2- and -4- at least one turn - bolt -1- can be reached from above via a hole in toothed
belt guard.
- Release belt tension on V-belt or ribbed belt with tensioner nut -3-.
- Remove V-belt or ribbed belt from alternator belt pulley.
Audi 100 1991 ➤
4-cylinder Engine (2-valve), Mechanical Components - Edition 12.1990
4 10 - Removing and installing engine
Protected by copyright. Copying for private or commercial purposes, in part or in whole, is not
permitted unless authorised by AUDI AG. AUDI AG does not guarantee or accept any liability
with respect to the correctness of information in this document. Copyright by AUDI AG.
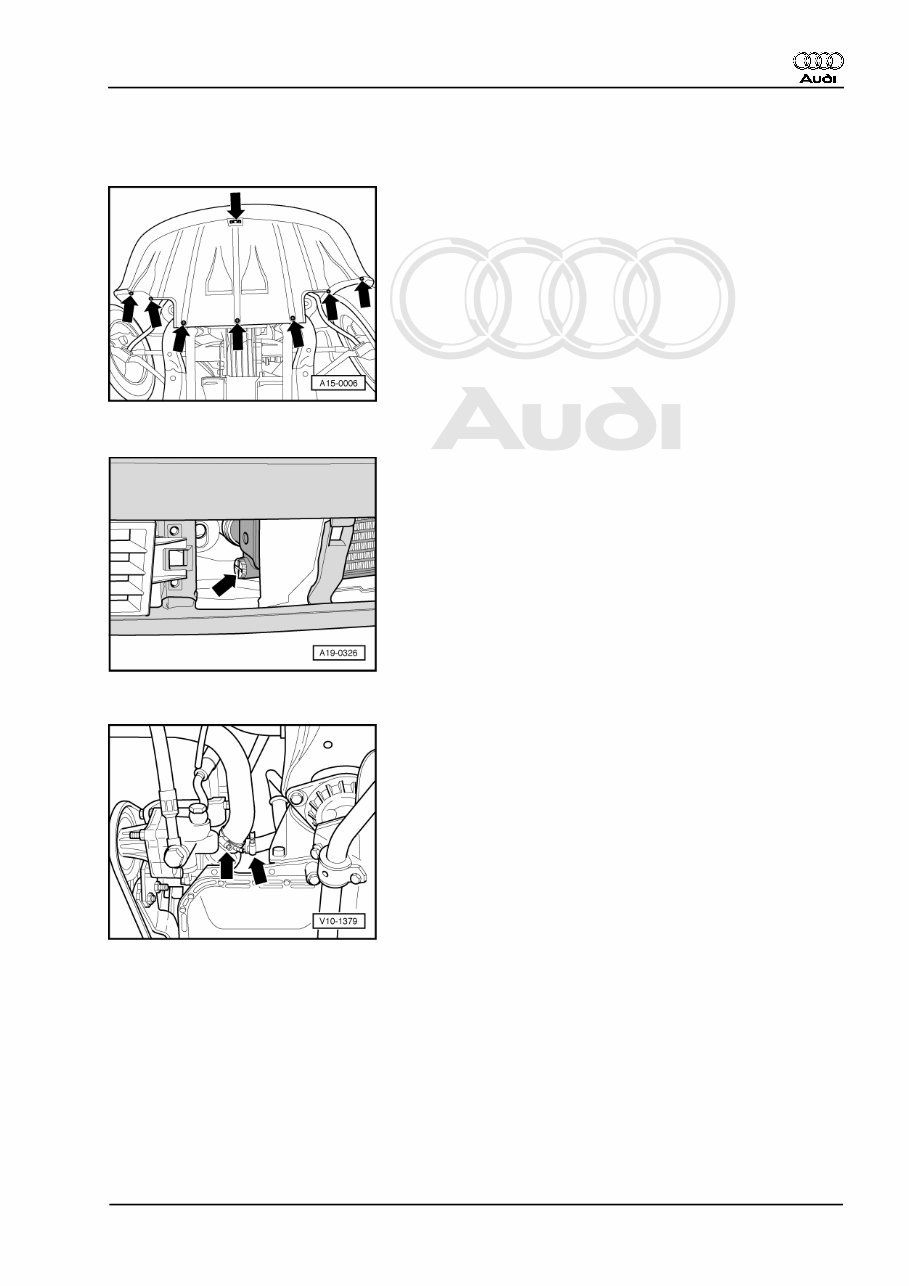
All models:
- -> Unclip the air intake grille to the lower right of the bumper -arrows-.
- -> Remove the noise insulation -arrows-.
- Place drip tray V.A.G 1306 below engine.
- -> Turn drain plug -arrow- on radiator anti-clockwise. If necessary, fit drain hose on connection.
- -> Disconnect coolant hoses -arrows- to drain off remaining coolant.
Audi 100 1991 ➤
4-cylinder Engine (2-valve), Mechanical Components - Edition 12.1990
1.2 - Removing engine -engine code AAE- 5
Protected by copyright. Copying for private or commercial purposes, in part or in whole, is not
permitted unless authorised by AUDI AG. AUDI AG does not guarantee or accept any liability
with respect to the correctness of information in this document. Copyright by AUDI AG.
- -> Loosen bolts 2...6.
- Release belt tension on V-belt with tensioner nut -1-.
- Remove V-belt for coolant pump and power assisted steering vane pump.
- -> Detach vane pump of power assisted steering with rear holder -arrows-. Do not detach hydraulic con‐
nections.
- Suspend vane pump from the body using wire so as to prevent placing load on the lines.
Vehicles with air conditioner:
- -> Unscrew the 4 nuts -1-.
- Detach hub -2- from belt pulley.
Audi 100 1991 ➤
4-cylinder Engine (2-valve), Mechanical Components - Edition 12.1990
6 10 - Removing and installing engine
You're Reading a Preview
What's Included?
Fast Download Speeds
Online & Offline Access
Access PDF Contents & Bookmarks
Full Search Facility
Print one or all pages of your manual
$52.99
1994 Audi 100 (C4) Download Service & Repair Manual
Viewed 86 Times Today

What's Included?
Fast Download Speeds
Online & Offline Access
Access PDF Contents & Bookmarks
Full Search Facility
Print one or all pages of your manual
$52.99

Secure transaction
What's Included?
Fast Download Speeds
Online & Offline Access
Access PDF Contents & Bookmarks
Full Search Facility
Print one or all pages of your manual
Description
This product is a service and repair manual for the 1994 Audi 100 (C4) model.
- Provides detailed information about servicing and repairing the 1994 Audi 100 (C4)
- Includes step-by-step instructions for various maintenance procedures
- Covers a wide range of topics, including engine, transmission, brakes, electrical system, and more
- Contains valuable diagrams, illustrations, and specifications
- A reliable resource for both experienced mechanics and Audi enthusiasts


