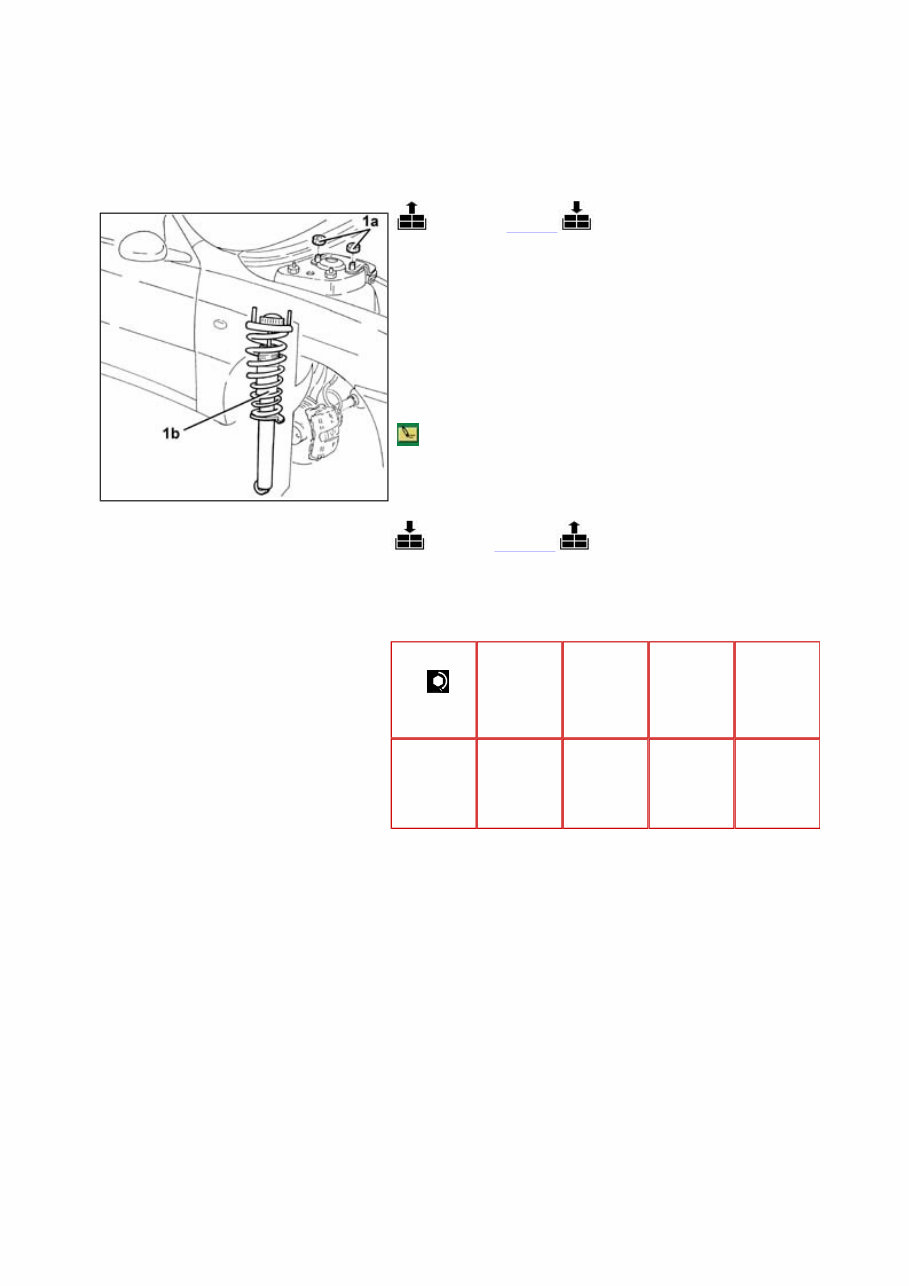
147 l/h or r/h front suspension spring/damper unit (one) - r+r - check wheel geometry separately if necessary 4410A10 Removing ( Refitting ) Position the vehicle on the ramp. Proceed with the removal - 4450B10 Front WHEEL (one) - R.R. . Proceed with the removal - 4410A80 damper lower fork - r r . 1. Undo the nuts (1a) and remove the spring/shock absorber assembly for the front suspension (1b). The above nuts also secure the front suspension upper wishbone and the bracket to the body for the reaction link. Refitting ( Removing ) Replace the spring/shock absorber assembly for the front suspension back in its housing and fix it tightening the nuts to the recommended torque. Proceed with the refitting - 4410A80 damper lower fork - r r . Proceed with the refitting - 4450B10 Front WHEEL (one) - R.R. . Remove the car from the ramp. It is advisable to check wheel geometry - 4450A10 front wheel geometry - check using optical equipment - includes front wheel tow-in adjustment if necessary . Fastening Component Ø Value (daNm) - Nut FRONT DAMPER M12 (Bodyshell side) 4.2 ÷ 5.2 Page 1 of 1 - Contents 7/29/2024 html 2024 Kia Soul 2024 Kia Soul
147 steering wheel - r+r for replacement or check for versions with air bag 4110A11 Removing ( Refitting ) Place the steering wheel in the centred position with the wheels straight. Proceed with removal - 5580C18 air bag module - r+r . Disconnect the electrical connection for the horn. 1. Undo the nut (1a) and remove the steering wheel (1b). Closely observe the safety regulations established for this operation. If necessary, use a suitable rubber hammer. Refitting ( Removing ) 1. Refit steering wheel (1a) in its seat so that references (1b) stamped on the steering wheel and steering column are aligned. 2. Tighten the fixing nuts to the recommended torque. Connect the electrical connection for the horn. Fastening Component Ø Value (daNm) 2 Nut STEERING WHEEL M16 5.0 Proceed with refitting - 5580C18 air bag module - r+r . Page 1 of 1 - Contents 7/29/2024 html 2024 Kia Soul 2024 Kia Soul
147 1.6 TS FRONT BRAKE CALIPER (one) - R.R. 3310A30 back to FRONT BRAKE CALIPERS - R.R. Removing ( Refitting ) Position the vehicle on the ramp. Ensure that the ignition key is in the OFF position, then disconnect the negative battery terminal (-). Proceed with removal - 4450B10 Front WHEEL (one) - R.R. . Proceed with removal - 3330E10 FLEXIBLE PIPE (one), left or right, to front brake calipers - R.R . . 1. Remove the clip securing the brake caliper to the bracket. 2. Disconnect the electrical connections for the brake pad wear cable. 3. Remove the protective plugs (3a), undo the bolts (3b), then remove the front brake caliper (3c) with the pads. Name Connector - Battery A1B Name Connector 2 Left brake pad wear sensor (switch) K20 Refitting ( Removing ) . When fitting a new brake caliper, the latter is supplied to Parts with no brake fluid; it is therefore necessary to operate as follows: - slacken the bleed screw; - insert the end of a transparent tube in the hole on the bleed screw; - using a normal container with recommended brake fluid, insert brake fluid into the caliper until air bubbles emerge from the threaded hole where the hose is connected; Page 1 of 2 - Contents 7/29/2024 html 2024 Kia Soul 2024 Kia Soul
Refit the front brake caliper complete with pads in its seating, tighten the bolts to the specified torque and fit the protective plugs. Connect the electrical connection for the brake pad wear cable. Refit in its seating the clip securing the brake caliper to the bracket. Proceed with refitting - 3330E10 FLEXIBLE PIPE (one), left or right, to front brake calipers - R.R . . Bleed the air from the hydraulic braking system - 3330A14 HYDRAULIC BRAKING SYSTEM - Bleed air . Proceed with refitting - 4450B10 Front WHEEL (one) - R.R. . Connect the negative (-) battery terminal. - tighten the bleed screw. Fastening Component Ø Value (daNm) - Bolt FRONT BRAKE CALIPER ASSEMBLY M12 (Bracket side) 11.7 Page 2 of 2 - Contents 7/29/2024 html 2024 Kia Soul 2024 Kia Soul
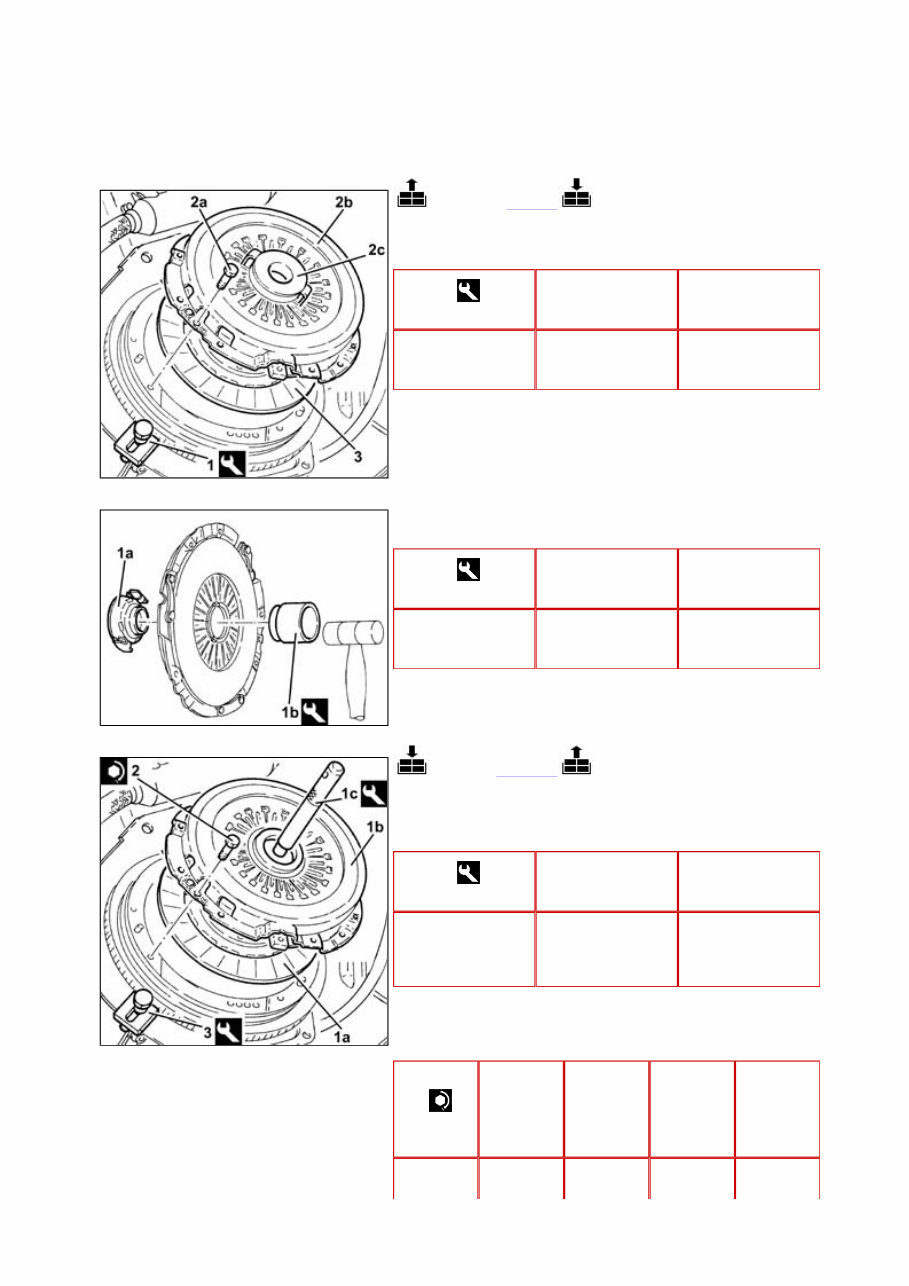
147 1.6 TS clutch - r + r with gearbox removed 1810A24 Removing ( Refitting ) 1. Fit the flywheel lock. 2. Undo the bolts (2a) and remove the clutch cover (2b) complete with thrust bearing (2c). 3. Remove the clutch disc. Name Country 1 Counter-torque 1.860.846.001 1. At the bench, remove the clutch release bearing (1a) from the clutch cover using the tool (1b). Name Country 1b Extractor 1.821.215.000 Refitting ( Removing ) 1. Place the clutch disc (1a) and the clutch cage (1b) back in its housing using the centring tool (1c). 2. Tighten the bolts fixing the clutch drip tray to the recommended torque. Name Country 1c Tool for centering clutch 1.870.081.000 Fastening Component Ø Value (daNm) Page 1 of 2 - Contents 7/29/2024 html 2024 Kia Soul 2024 Kia Soul
3. Remove the flywheel lock. 2 Bolt CLUTCH ASSEMBLY M8 (Flywheel side) 2.5 - 3.1 Name Country 3 Counter-torque 1.860.846.001 . The thrust bearing is fitted together with the manual gearbox and differential - 2110A10 manual gearbox and differential - r + r . Page 2 of 2 - Contents 7/29/2024 html 2024 Kia Soul 2024 Kia Soul
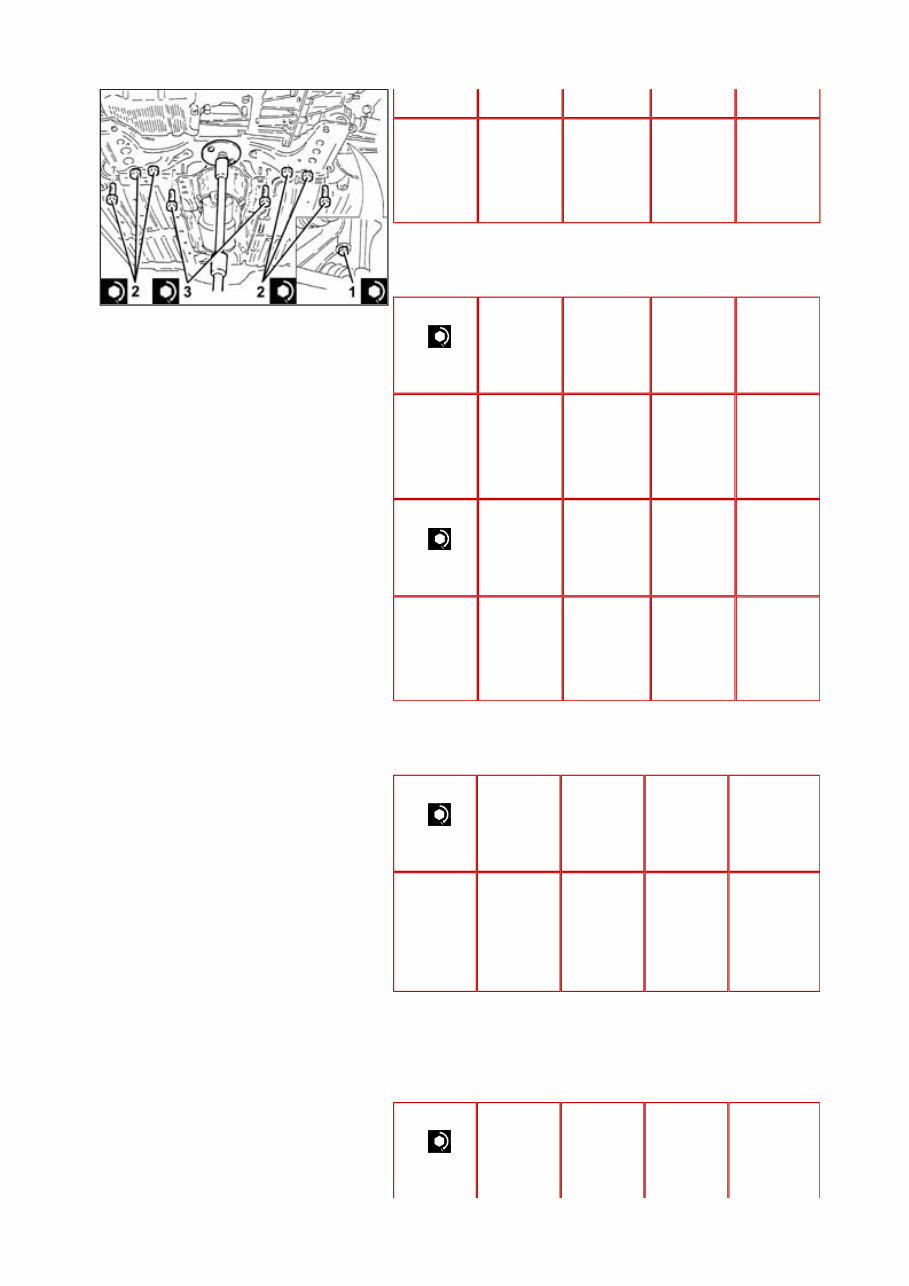
147 1.6 TS power steering box - r+r - check tow-in if necessary separately - includes bleeding 4130A10 Removing ( Refitting ) Position the vehicle on the ramp. Draw off the fluid from the power assisted steering reservoir using a suitable syringe. Proceed with removal - 5530B10 battery - r+r . Proceed with removal - 5530B52 Battery DRIP TRAY/SUPPORT - R.R. . 1. Undo the bolt (1a) and disconnect the steering column (1b) from the power assisted steering box pinion. The bolt is pretreated and cannot therefore be refitted. Proceed with removal - 4450B12 front or rear wheels (two) - r+r . Proceed with removal - 7055B65 Engine compartment DUST PROTECTION in left front wheel arch - R.R. . Proceed with removal - 7055B66 Engine compartment DUST SHIELD protection in right front wheel arch - R.R. . Proceed with removal - 7055B54 under-engine guard - r r . Proceed with removal - 1076B50 exhaust pipe attachment to engine - r + r . Proceed with removal - 1076B70 exhaust pipe between pre- catalytic converter and catalytic converter - r r . 1. Undo the nuts (1a) and disconnect the track rods (1b) from the steering knuckles using the tool (1c). Name Country 1c Extractor 1.821.169.000 1. Undo the connector (1a) and disconnect the delivery pipe from pump to power steering box (1b), steering box side. 2. Undo the connector (2a) and disconnect the return pipe from power steering box to heat exchanger (2b), power steering box side, then disengage from the collar (2c). 3. Release the supply pipe from the pump to the steering box from the retaining band on the power steering box. Page 1 of 7 - Contents 7/29/2024 html 2024 Kia Soul 2024 Kia Soul
4. Undo the nuts (4a) and remove the bracket (4b) from the power steering box. Proceed with removal - 1008A44 rear rigid mount - r r . Undo the bolts and remove the flexible mounting for the power unit rear support. 1. Fit the tool (1a) on the hydraulic jack (1b) to support the front suspension frame. 2. Undo the bolts securing the power steering box to the front suspension crossmember. 3. Undo the rear bolts fixing the front suspension crossmember to the bodyshell. 4. Undo the side bolts fixing the front suspension crossmember to the bodyshell. Name Country 1a Flange 1.860.978.000 1. Undo the nuts (1a) and disconnect the front anti-roll bar joints (1b) from the front damper forks. 1. Undo front bolts (1a) and nuts (1b) fixing the manual gear lever mounting. 2. Recover the plates. 3. Slacken the rear bolts fixing the manual gear lever mounting. Page 2 of 7 - Contents 7/29/2024 html 2024 Kia Soul 2024 Kia Soul
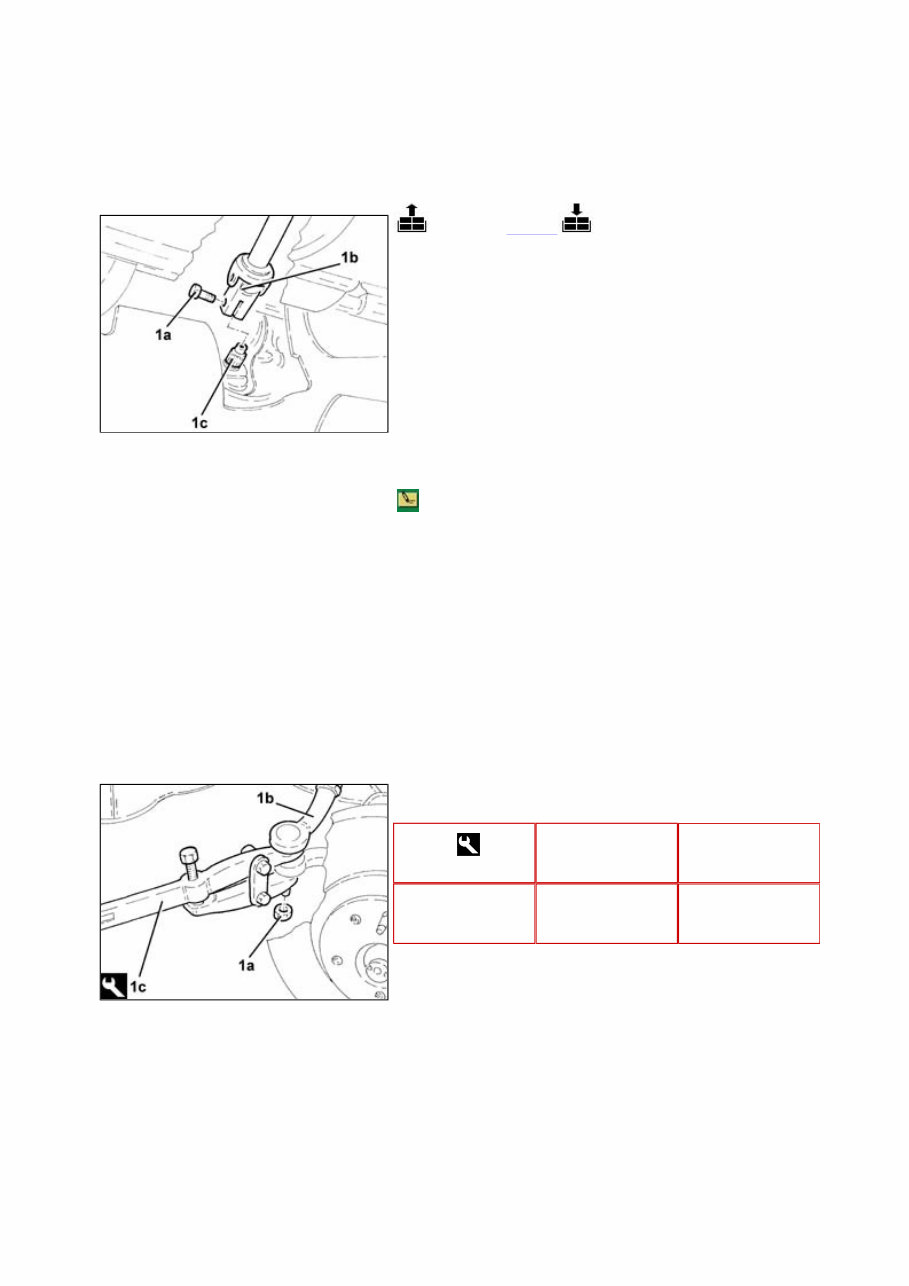
4. Lower the manual gear lever mounting at the front. Release the power steering pipes from the front suspension beam. Lower the front suspension beam using the hydraulic jack as necessary. 1. Remove the power steering box by withdrawing from the left front wheel-arch.. Refitting ( Removing ) Refit the power steering box through the front left wheel arch. Replace the front suspension crossmember using the hydraulic jack. Tighten the power assisted steering pipes to the front suspension crossmember. Refit the handbrake control mount and secure with bolts and nuts. 1. Connect the front anti-roll bar joints (1a) to the front damper brackets and secure them by tightening the nuts (1b) to the specified torque. Fastening Component Ø Value (daNm) 1b Nut FRONT ANTI-ROLL BAR JOINTS M10 (Front shock absorber fork side) 4.1 ÷ 5.0 1. Tighten the side bolts securing the front suspension crossmember to the bodyshell to the recommended torque. Value Page 3 of 7 - Contents 7/29/2024 html 2024 Kia Soul 2024 Kia Soul
2. Tighten the rear bolts securing the front suspension crossmember to the bodyshell to the recommended torque. 3. Tighten the bolts securing the power steering box to the front suspension crossmember to the specified torque. Fastening Component Ø (daNm) 1 Side bolt ENGINE OR ROD ANCHORAGE BEAM M12 (Bodyshell side) 10.8 ÷ 13.2 Fastening Component Ø Value (daNm) 2 Side bolt ENGINE OR ROD ANCHORAGE BEAM M12 (Bodyshell side) 10.8 ÷ 13.2 Fastening Component Ø Value (daNm) 2 Side bolt ENGINE OR ROD ANCHORAGE BEAM M12 (Bodyshell side) 10.8 ÷ 13.2 Fastening Component Ø Value (daNm) 3 Bolt POWER STEERING BOX M14 (Front suspension crossmember side) 11.7 ÷ 14.3 Remove the hydraulic jack with mounting tool from the front suspension beam. Fit the flexible mounting for the power unit rear support and fix it tightening the bolts to the recommended torque. Fastening Component Ø Value Page 4 of 7 - Contents 7/29/2024 html 2024 Kia Soul 2024 Kia Soul
Get ready to tackle vehicle issues with the 1994-1997 Alfa Romeo 164 Service & Repair Manual. This comprehensive manual equips both professional mechanics and DIY enthusiasts with manufacturer-provided troubleshooting and replacement procedures. It includes step-by-step instructions, clear images, and exploded-view illustrations to guide you through the repair process.
While your vehicle boasts durability, regular maintenance is essential. Over time, certain parts will wear out, necessitating replacements. This manual proves invaluable by offering the manufacturer's recommended troubleshooting charts and replacement procedures, ultimately saving you on repairs and enhancing your vehicle's reliability.
Forget about sifting through numerous pages or dealing with greasy, torn, or lost pages. This digital manual allows for easy navigation, searchability, and bookmarking, making it a superior alternative to traditional bound manuals. Additionally, it is printable if you prefer a physical copy.
Printable: Yes
Language: English
Compatibility: Works on various electronic devices, including PC, Mac, Android, and Apple smartphones and tablets