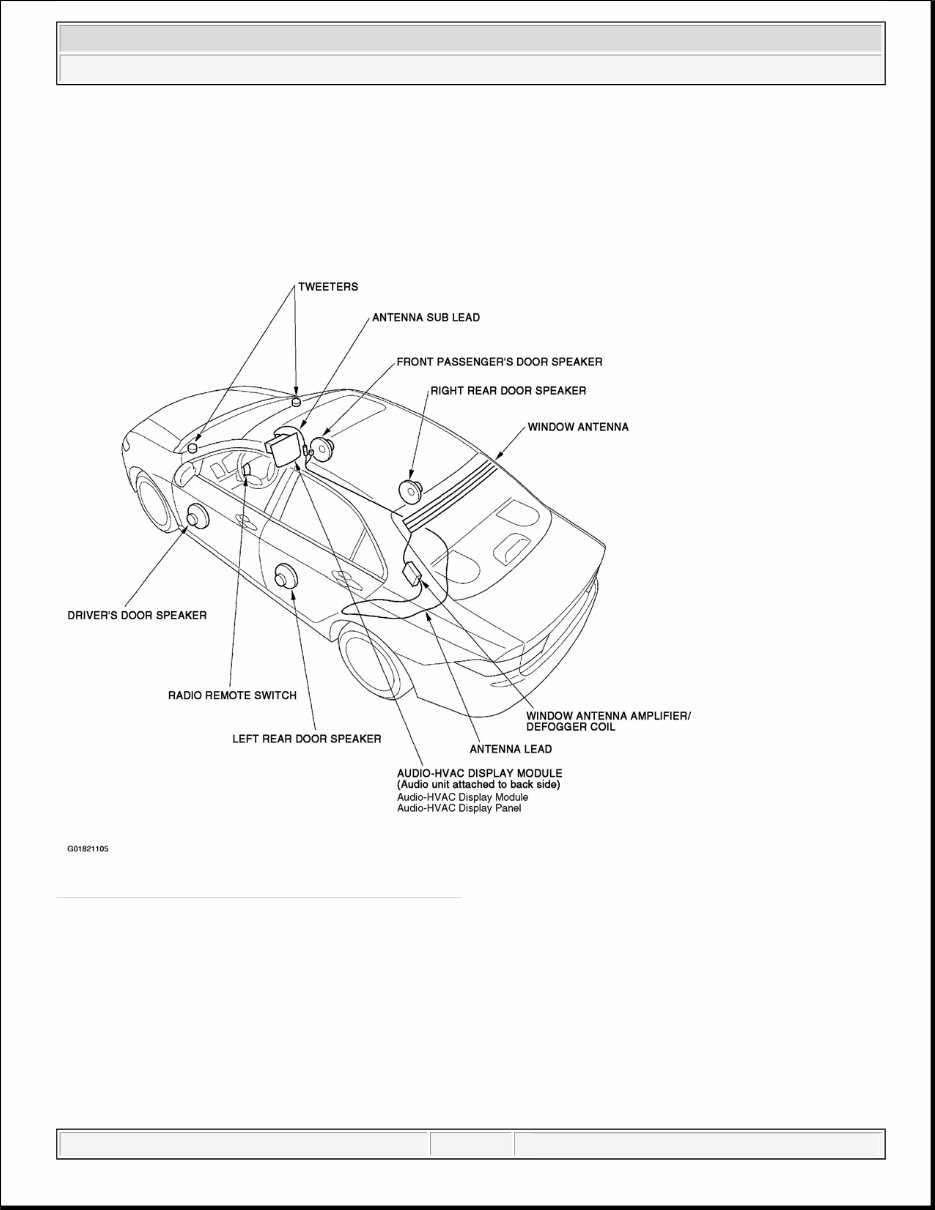
2004 ACCESSORIES & EQUIPMENT Audio System - TSX COMPONENT LOCATION INDEX Fig. 1: Locating Audio System Components (1 Of 2) 2004 Acura TSX 2004 ACCESSORIES & EQUIPMENT Audio System - TSX 2004 Acura TSX 2004 ACCESSORIES & EQUIPMENT Audio System - TSX Tuesday, March 11, 2008 3:35:47 PM Page 1 Tuesday, March 11, 2008 3:35:51 PM Page 1
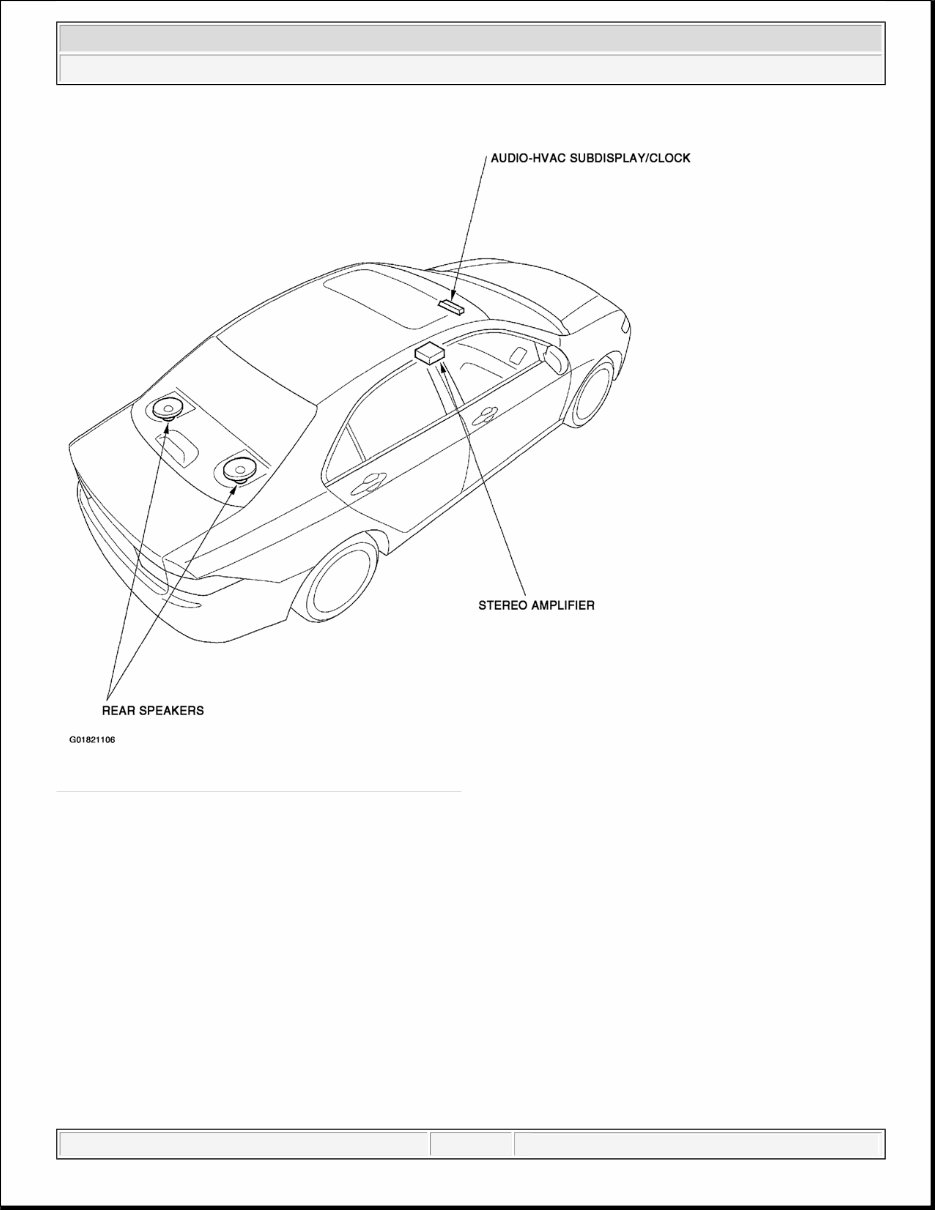
Fig. 2: Locating Audio System Components (2 Of 2) CIRCUIT DIAGRAM 2004 Acura TSX 2004 ACCESSORIES & EQUIPMENT Audio System - TSX Tuesday, March 11, 2008 3:35:47 PM Page 2
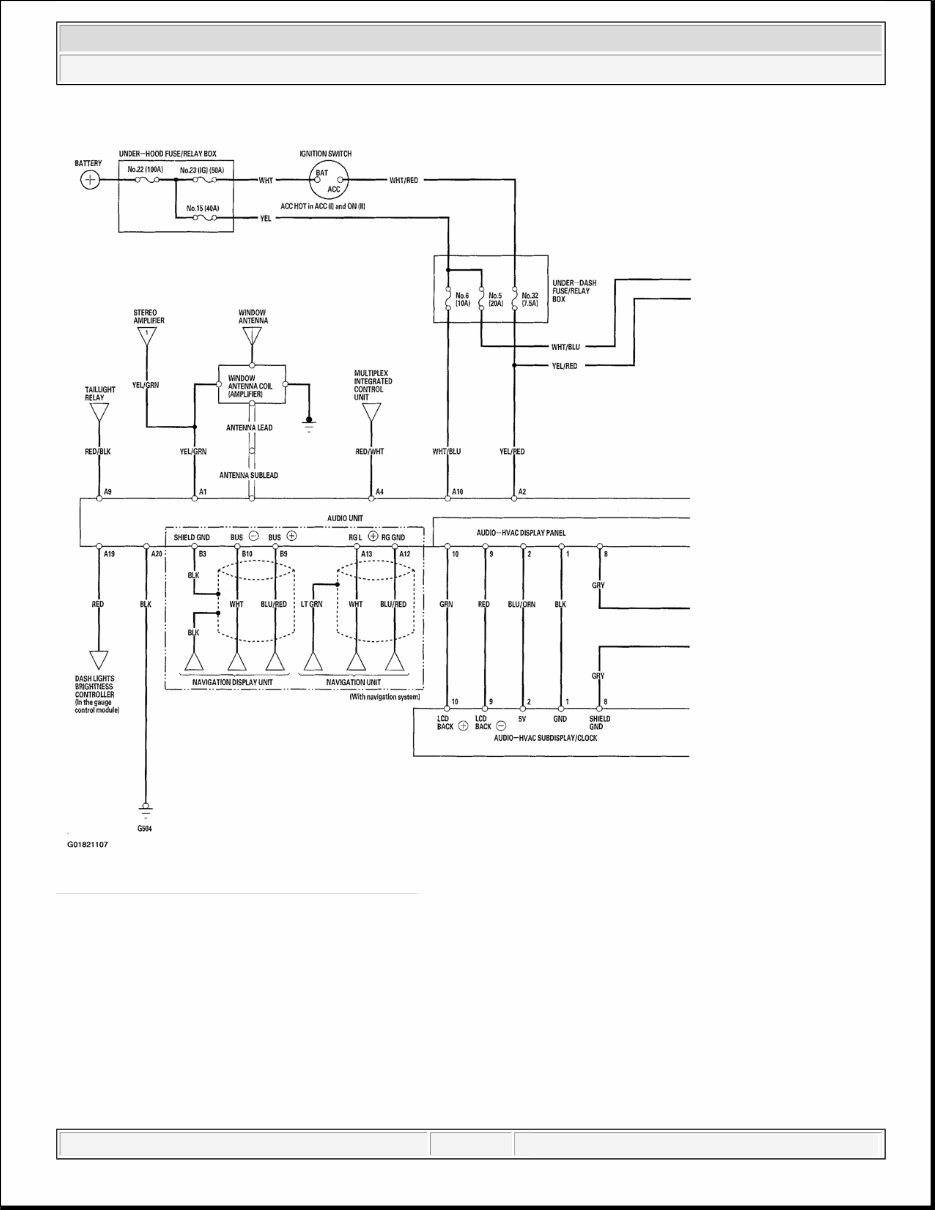
Fig. 3: Audio System Wiring Diagram (1 Of 2) 2004 Acura TSX 2004 ACCESSORIES & EQUIPMENT Audio System - TSX Tuesday, March 11, 2008 3:35:47 PM Page 3
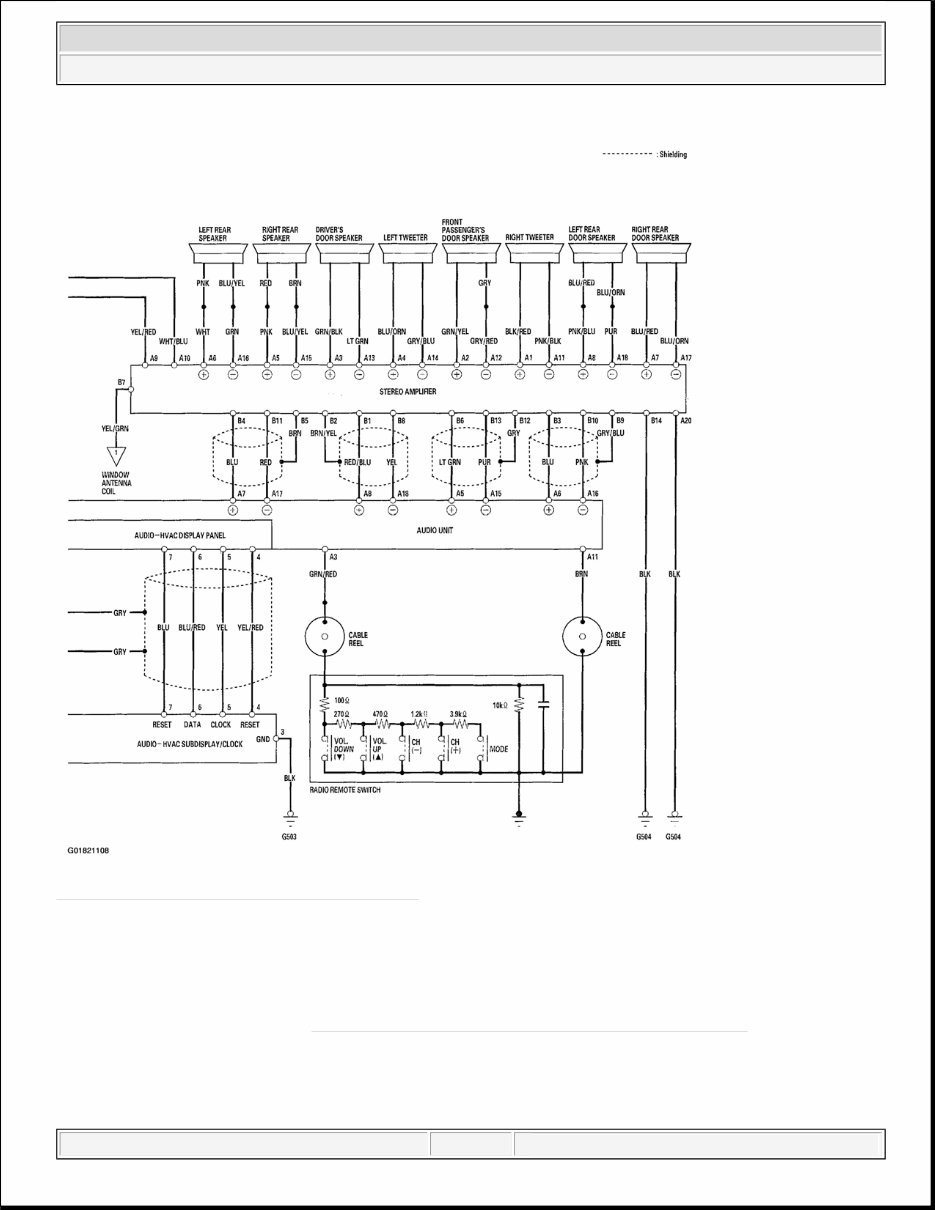
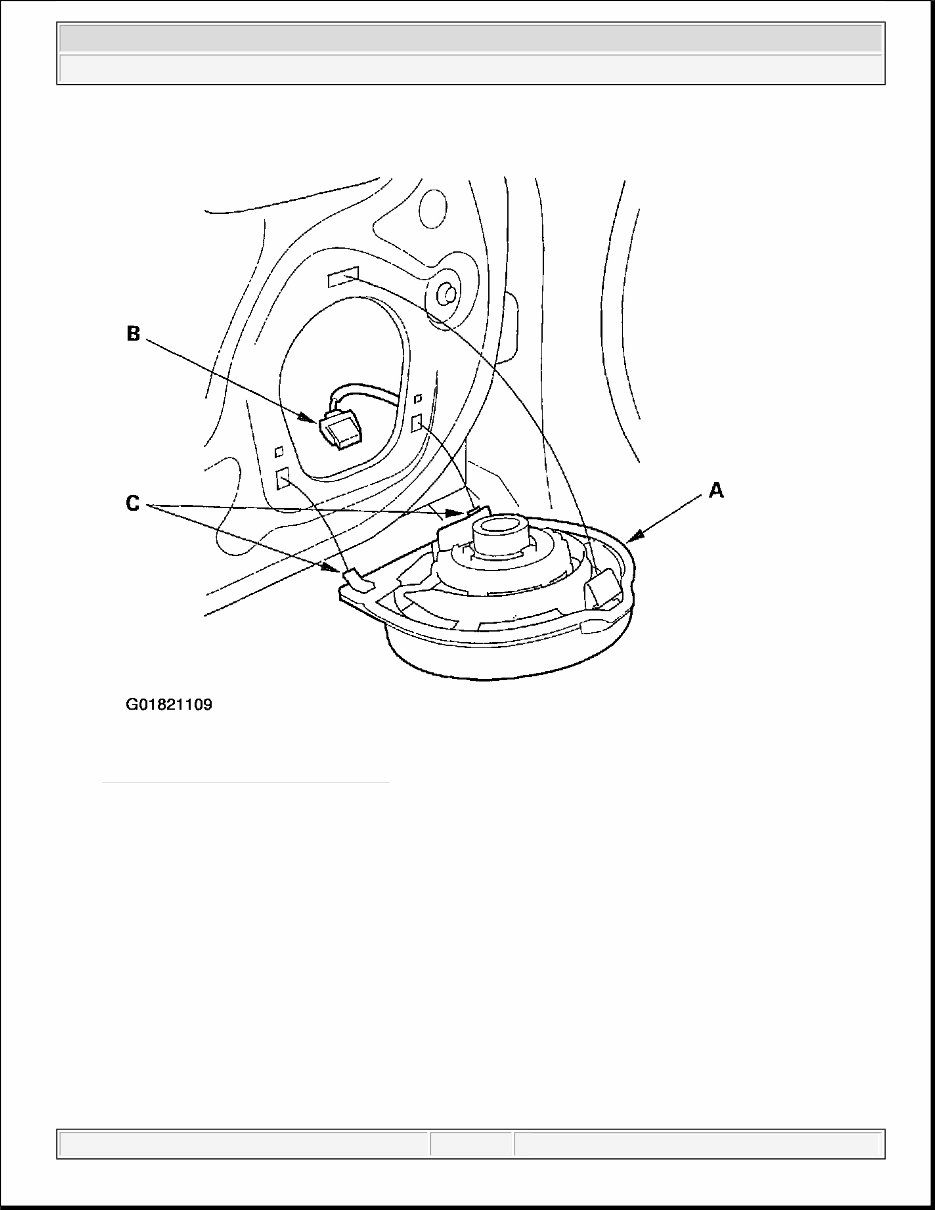
Fig. 4: Audio System Wiring Diagram (2 Of 2) SPEAKER REPLACEMENT FRONT SPEAKER 1. Remove the door panel (see FRONT DOOR PANEL REMOVAL/INSTALLATION ). NOTE: If you pull the speaker out too far from the door, you will damage the lower clips (C). 2004 Acura TSX 2004 ACCESSORIES & EQUIPMENT Audio System - TSX Tuesday, March 11, 2008 3:35:47 PM Page 4
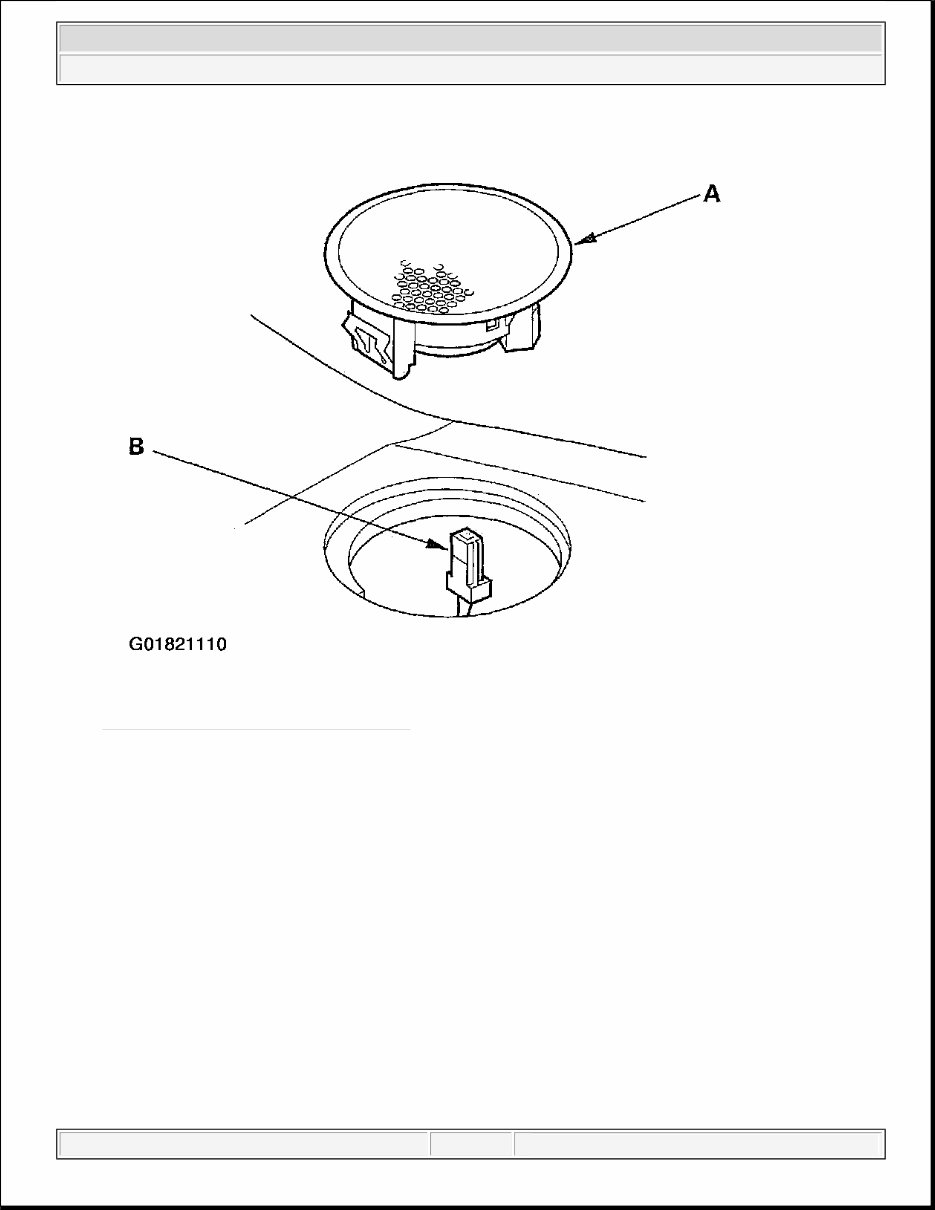
Fig. 5: Removing The Front Speaker 2. Pull the speaker (A) straight out, just enough to release the upper clips. Then lift the speaker straight up to release the lower clips (C). 3. Disconnect the 2P connector (B), and remove the speaker. TWEETER 1. Remove the tweeter speaker grille and tweeter (A). 2004 Acura TSX 2004 ACCESSORIES & EQUIPMENT Audio System - TSX Tuesday, March 11, 2008 3:35:47 PM Page 5
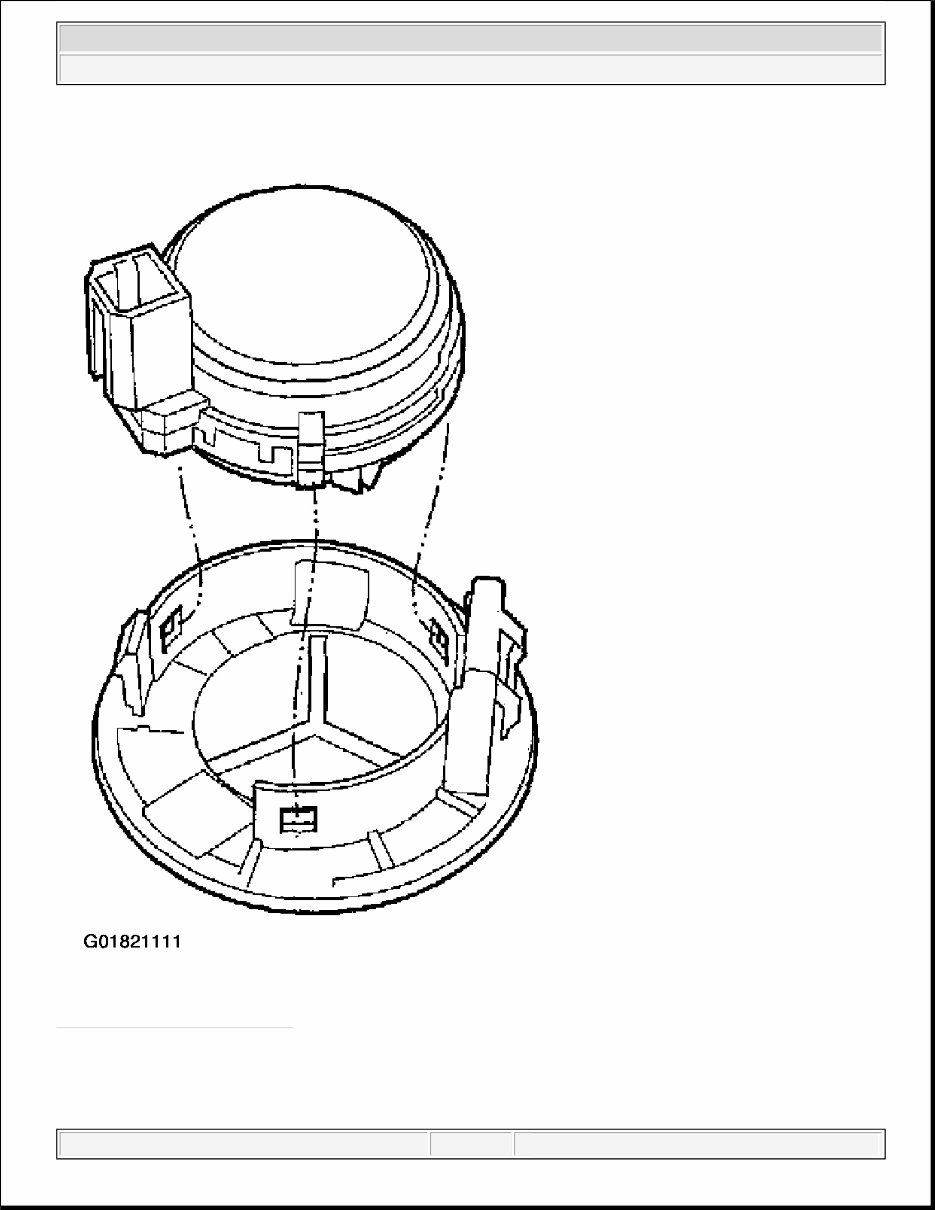
Fig. 6: Removing The Tweeter & Grille 2. Disconnect the 2P connector (B) from the tweeter. 3. Remove the tweeter speaker grille from the tweeter. 2004 Acura TSX 2004 ACCESSORIES & EQUIPMENT Audio System - TSX Tuesday, March 11, 2008 3:35:47 PM Page 6
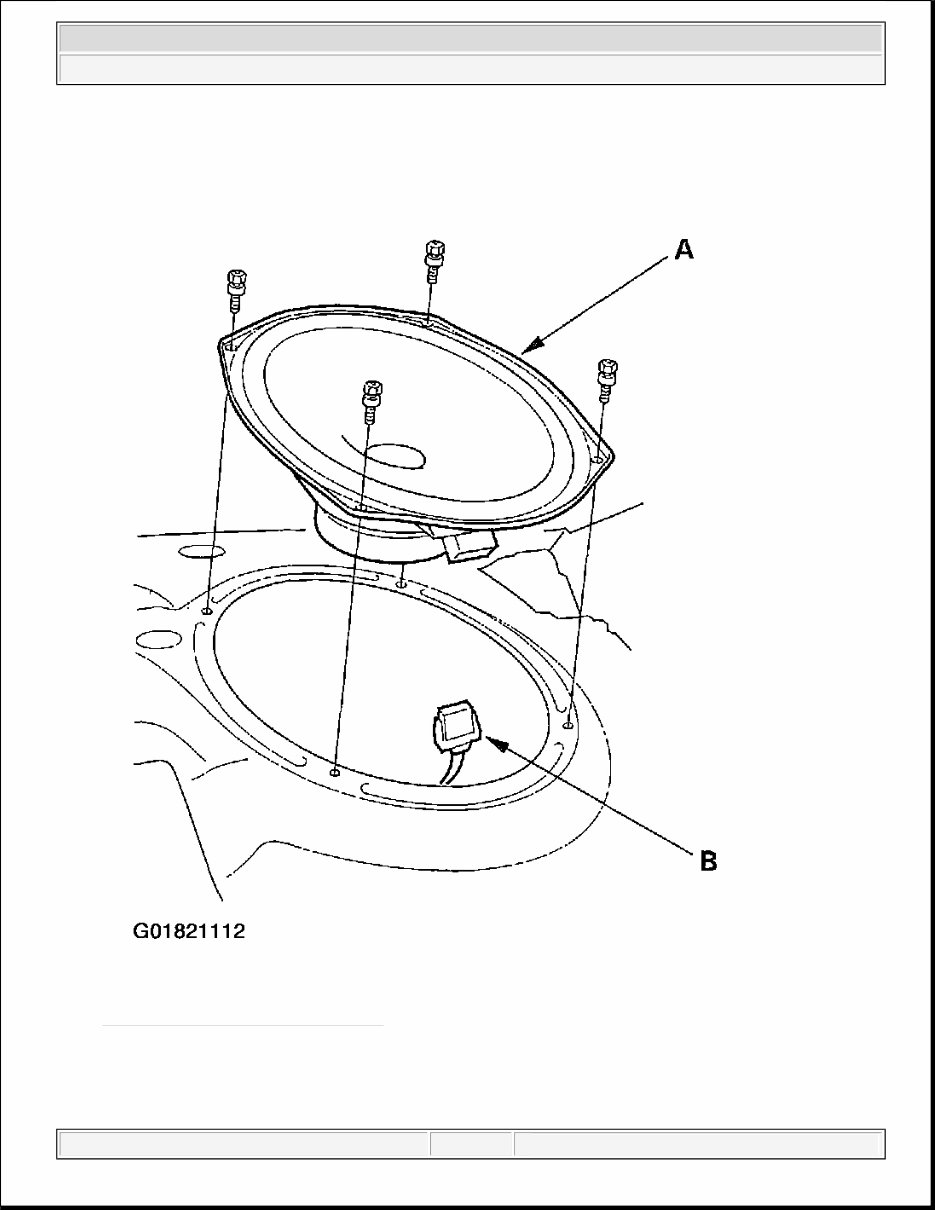
Fig. 7: Removing The Tweeter REAR SPEAKER 1. Remove the rear speaker cover by prying straight up to release the clips. 2004 Acura TSX 2004 ACCESSORIES & EQUIPMENT Audio System - TSX Tuesday, March 11, 2008 3:35:47 PM Page 7
2. Remove the four mounting bolts from the rear speaker (A). Fig. 8: Removing The Rear Speaker 3. Disconnect the 2P connector (B), and remove the speaker. 2004 Acura TSX 2004 ACCESSORIES & EQUIPMENT Audio System - TSX Tuesday, March 11, 2008 3:35:47 PM Page 8
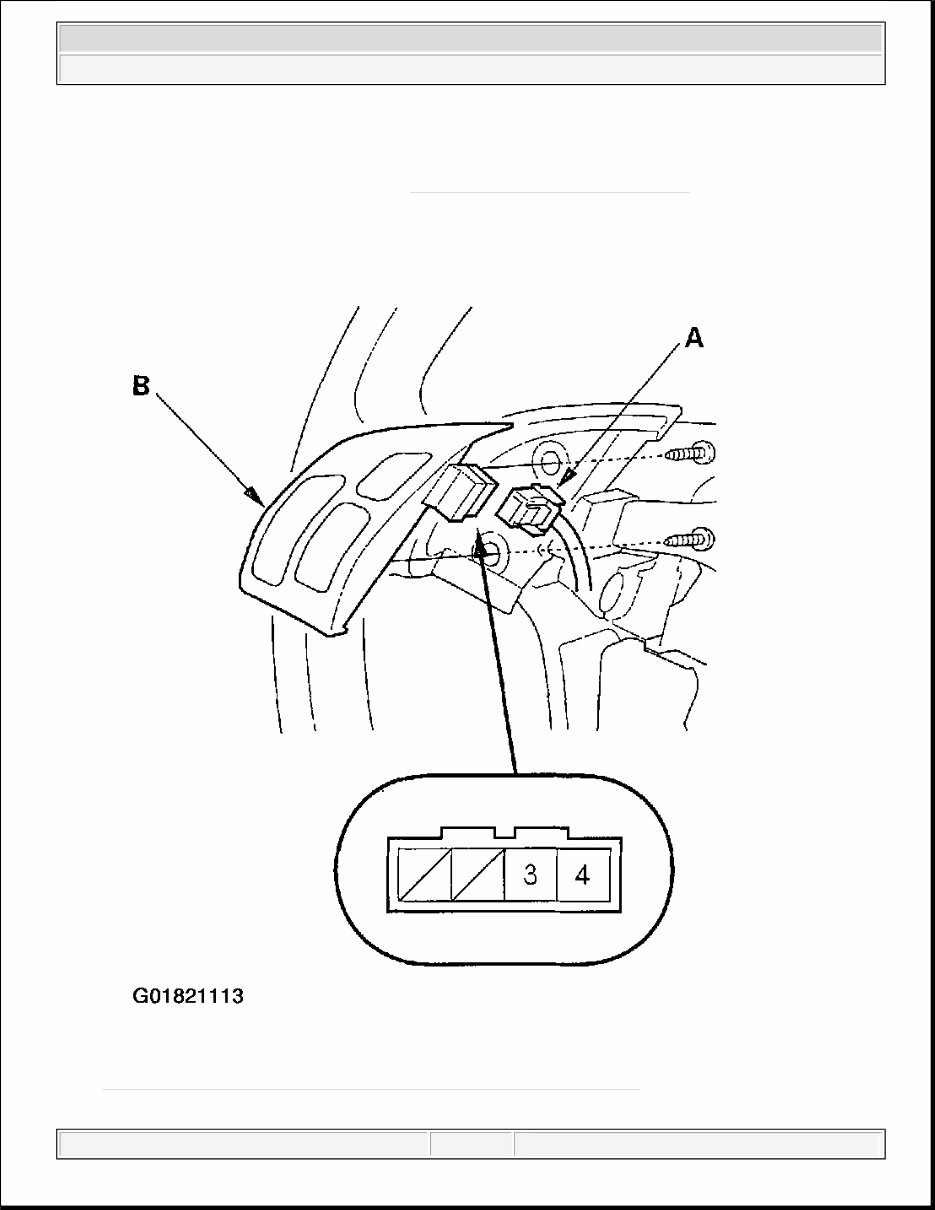
RADIO REMOTE SWITCH TEST 1. Remove the driver's airbag assembly (see AIR BAG RESTRAINT SYSTEMS ). 2. Remove the 4P connector (A) from the radio remote switch (B). Fig. 9: Removing The 4P Connector From The Radio Remote Switch 2004 Acura TSX 2004 ACCESSORIES & EQUIPMENT Audio System - TSX Tuesday, March 11, 2008 3:35:47 PM Page 9
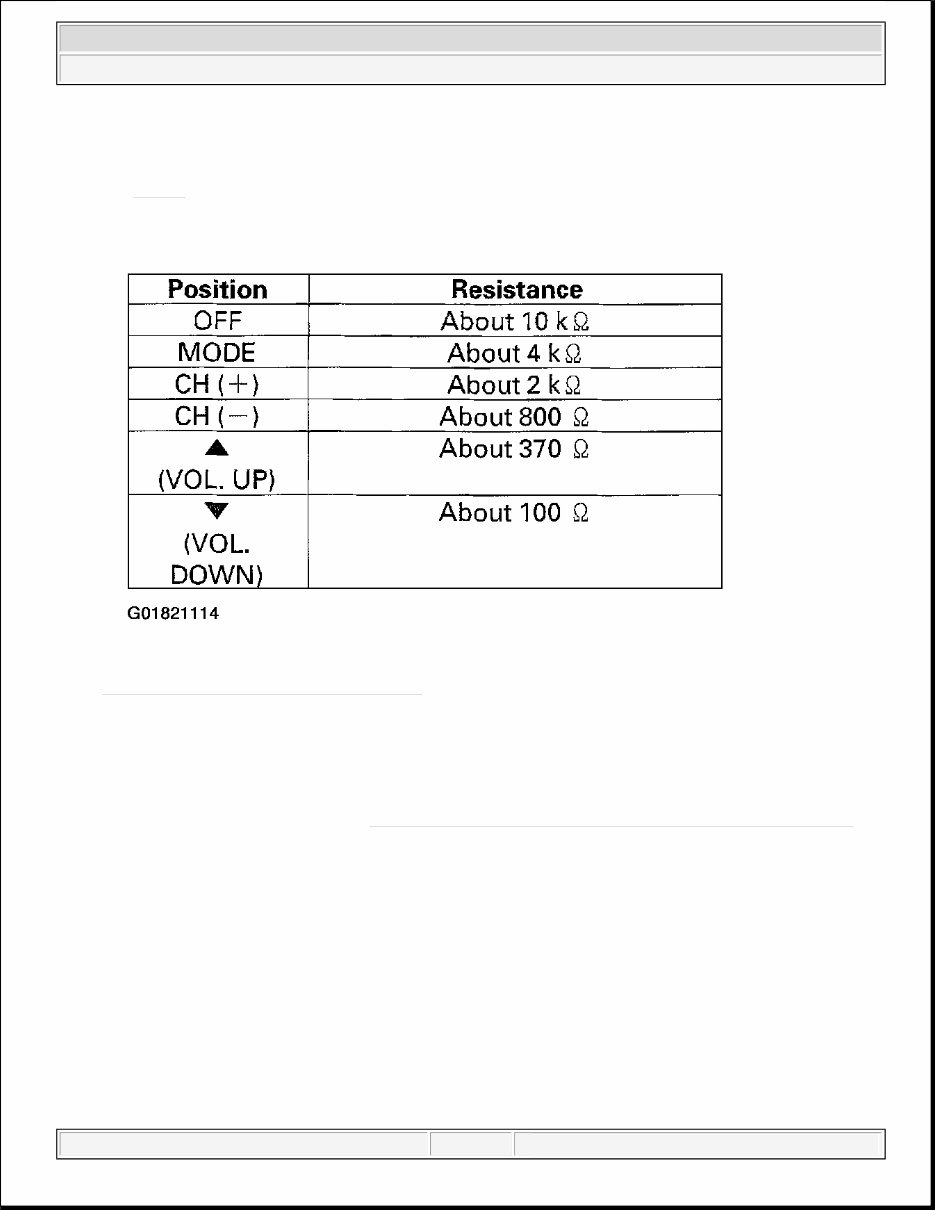
3. Remove the two mounting screws and the switch. 4. Measure resistance between the No. 3 and No. 4 terminals in each switch position according to the table. See Fig. 10 . Fig. 10: Radio Remote Switch Test Table 5. If the resistance is not as specified, replace the remote switch. WINDOW ANTENNA AMPLIFIER/DEFOGGER COIL REPLACEMENT 1. Remove the left rear pillar trim (see TRIM REMOVAL/INSTALLATION - REAR SHELF AREA ). 2. Disconnect the 1P connectors (A) the antenna cable (B), from the window antenna coil (C). 2004 Acura TSX 2004 ACCESSORIES & EQUIPMENT Audio System - TSX Tuesday, March 11, 2008 3:35:47 PM Page 10
If you are in need of a repair manual for your 2006 Acura TSX, look no further. Our accessible repair manual software is perfect for both professional mechanics and DIY enthusiasts. In the past, traditional service manuals in book format were costly and inconvenient. Our repair manual software provides the same information at a lower cost and with greater convenience.
Whether you need to fix the brakes, replace suspension components, get the engine running, or perform standard maintenance, this manual has you covered. It includes comprehensive service information for the brakes, engine, suspension, steering, drivetrain, electrical systems, heating, air conditioning, and more.
By utilizing this repair manual software, you can save a significant amount of money on vehicle maintenance. Mechanics often charge high fees for their services, but with this manual, you can perform the repairs yourself. The software is compatible with Windows, Mac computers, smartphones, and tablets, making it easy to access and use.