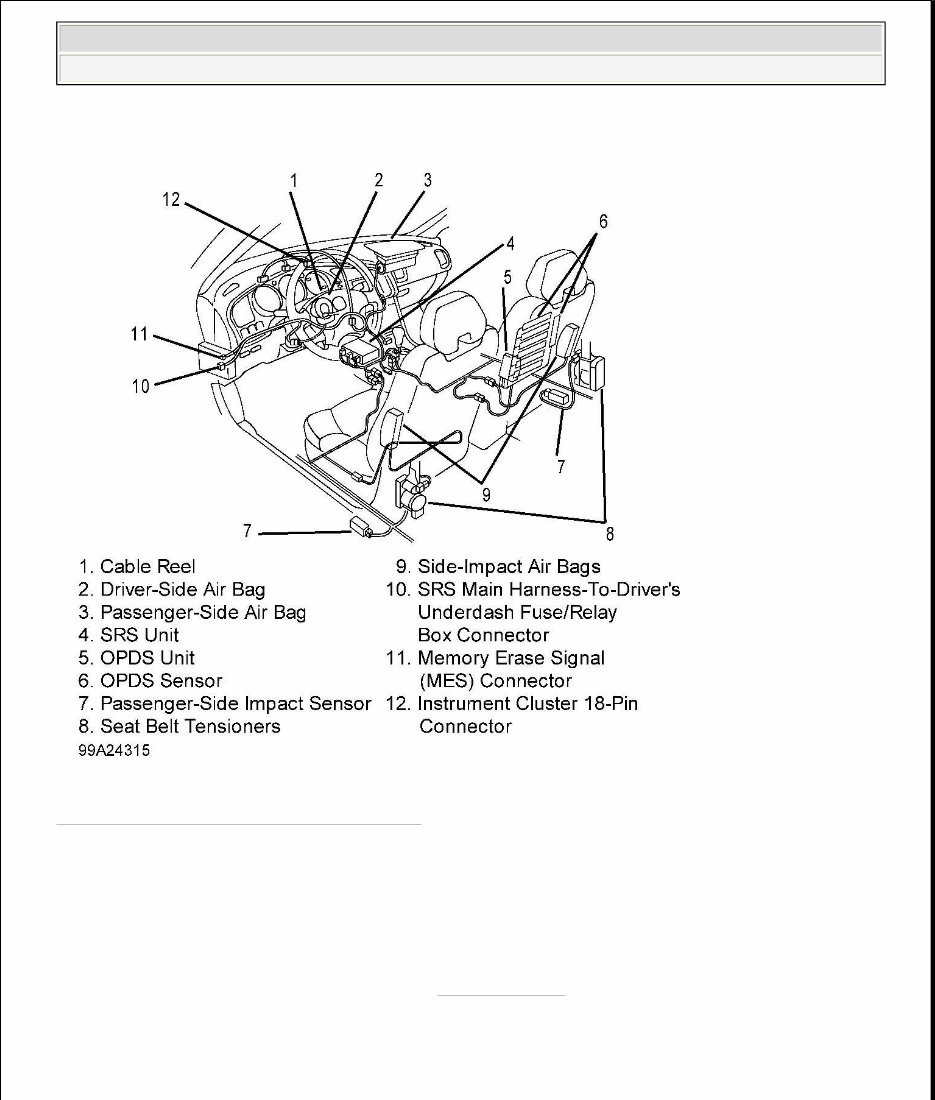
2001 ACCESSORIES/SAFETY EQUIPMENT Acura - Air Bag Restraint Systems DESCRIPTION & OPERATION Supplemental Restraint System (SRS) is designed to protect driver and front passenger by activating when vehicle receives a sufficient front-end impact. System includes driver-side air bag, passenger-side air bag, driver and front passenger side-impact air bags, side-impact sensors, SRS unit (with internal safing and impact sensors) and cable reel. See Fig. 1 . The main circuit in SRS unit senses and judges force of impact and, if necessary, ignites inflator charges in air bag assemblies, causing air bags to inflate. If battery voltage is too low or power is disconnected due to impact, voltage regulator and back-up power circuit keeps voltage at a constant level. Side-impact air bags are located in each front seat back. Side-impact air bags are designed to deploy when a moderate to severe side impact occurs. Passenger side-impact air bag also includes an Occupant Position Detection System (OPDS). This system contains sensors and a control unit, located in passenger's setback, to determine passenger seat's occupant height and position. If OPDS control unit determines passenger seat's occupant head is in deployment path of side-impact air bag, side impact air bag will be disabled. If passenger side-impact air bag is disabled, side-impact indicator light will come on. If passenger setback is replaced, OPDS control unit must be initialized. See INITIALIZING OCCUPANT POSITION DETECTION SYSTEM (OPDS) UNIT under DIAGNOSTICS. COMPONENT LOCATIONS Refer to illustration for component locations. See Fig. 1 . WARNING: Accidental air bag deployment is possible. Personal injury may result. Read and follow all WARNINGS and AIR BAG SAFETY PRECAUTIONS before working on air bag system or related components. 2001 Acura 3.2CL 2001 ACCESSORIES/SAFETY EQUIPMENT Acura - Air Bag Restraint Systems 2001 Acura 3.2CL 2001 ACCESSORIES/SAFETY EQUIPMENT Acura - Air Bag Restraint Systems
Fig. 1: Locating Restraint System Components Courtesy of AMERICAN HONDA MOTOR CO., INC. SYSTEM OPERATION CHECK When ignition is turned on, SRS indicator light should come on for about 6 seconds, and then go off. Make sure both horn buttons work. Take a test drive and make sure cruise control switches work. While vehicle is driven, SRS indicator light should not come on or flash. If SRS indicator light does not operate as specified, system must be inspected-repaired as soon as possible. See DIAGNOSTICS . AIR BAG SAFETY PRECAUTIONS Observe these precautions when working with air bag system: 2001 Acura 3.2CL 2001 ACCESSORIES/SAFETY EQUIPMENT Acura - Air Bag Restraint Systems
Carefully inspect any SRS part before installing. DO NOT install any part that shows signs of being dropped or improperly handled, such as dents, cracks or deformation. Use only a digital multimeter to check system. Ensure multimeter output is 10 milliamp (0.01-amp) or less when switched to lowest value in ohmmeter range. A tester with higher output could damage air bag circuit or cause accidental deployment and possible injury. DO NOT install used SRS parts from another vehicle. When making SRS repairs, use only new parts. Except when indicated, always disconnect negative battery cable, and wait at least 3 minutes before making SRS repairs. Whenever ignition is on, or has been turned off for less than 3 minutes, be careful not to bump SRS unit. Air bags could accidentally deploy and cause damage or injury. Radio contains an anti-theft protection circuit. Be sure to get anti-theft code number before disconnecting battery cables. DO NOT try to disassemble air bags or SRS unit. There are no serviceable parts. Once an air bag has been deployed, it cannot be repaired or reused. Store removed air bags with pad surface up. If air bags are improperly stored face down, accidental deployment could propel unit with enough force to cause serious injury. Store removed air bags on secure flat surface away from any high heat source and free of any oil, grease, detergent or water. Store SRS unit in cool and dry place. DO NOT spill water or oil on SRS unit, and keep away from dust. Disconnect air bag connectors before disconnecting SRS harness connectors. Ensure SRS unit is installed securely. ADJUSTMENTS CABLE REEL CENTERING With cable reel installed, rotate cable reel fully clockwise. Rotate cable reel counterclockwise about 2 1-2 turns until arrow mark on cable reel label points straight up. See Fig. 2 . NOTE: New replacement cable reels are pre-centered. 2001 Acura 3.2CL 2001 ACCESSORIES/SAFETY EQUIPMENT Acura - Air Bag Restraint Systems
Fig. 2: Centering Cable Reel Courtesy of AMERICAN HONDA MOTOR CO., INC. DISABLING & ACTIVATING AIR BAG SYSTEM WARNING: Accidental air bag module deployment is possible. Personal injury may result. Never use memory savers when working on air bag system. 2001 Acura 3.2CL 2001 ACCESSORIES/SAFETY EQUIPMENT Acura - Air Bag Restraint Systems
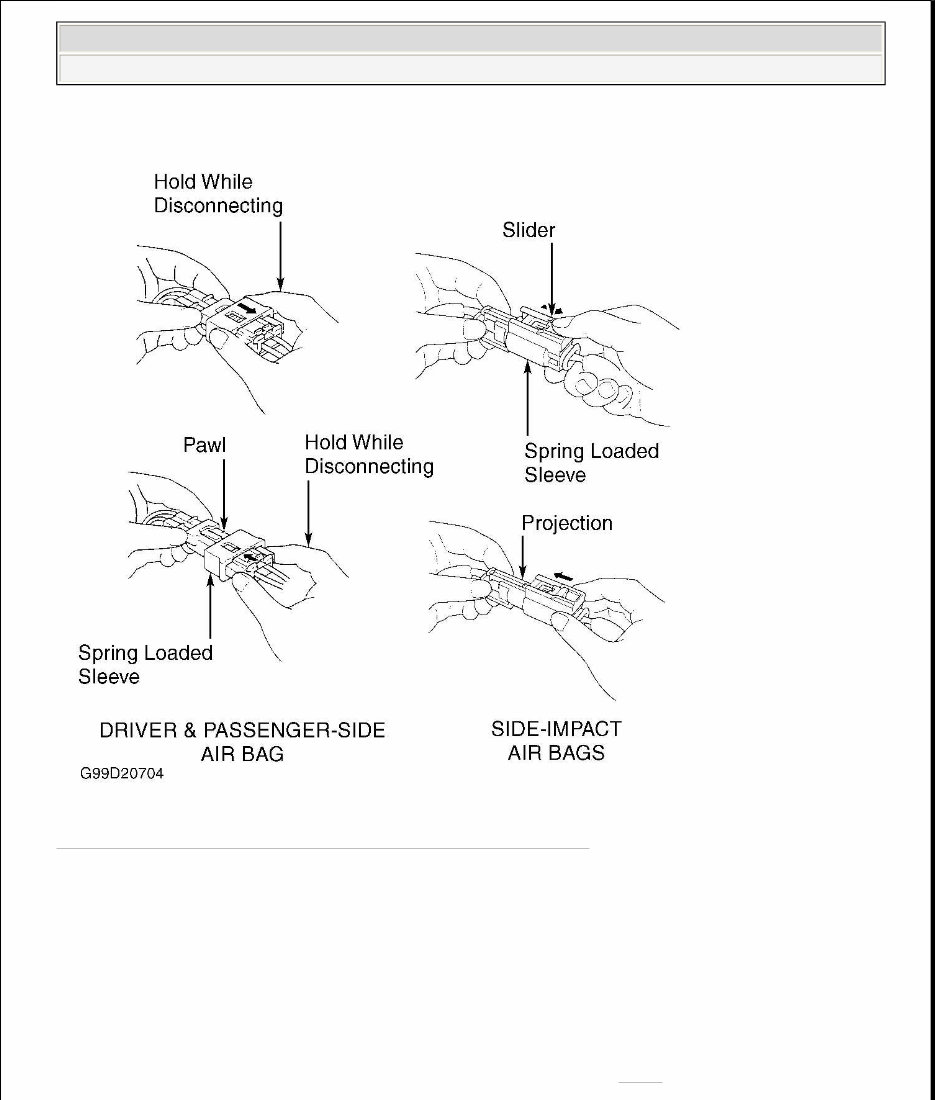
SPRING-LOADED LOCK CONNECTORS To disconnect, pull spring-loaded sleeve toward stop while holding opposite half of connector. Then pull connector halves apart. Be sure to pull on sleeve and not on connector itself. See Fig. 3 . To connect, hold pawl-side connector half, and press on back of sleeve-side connector half in direction shown. As connector halves are pressed together, sleeve is pushed back by pawl. DO NOT touch sleeve. When connector halves are completely connected, pawl is released, and spring-loaded sleeve locks connector. When backprobing spring-loaded lock connectors, remove retainer before inserting test probes from wire side. Carefully pry out retainer with flat-tip screwdriver. Retainer may be discarded after removal. Accidental air bag deployment is possible. Personal injury may result. Turn ignition off, disconnect negative battery cable, and wait 3 minutes before disconnecting any SRS connectors. NOTE: Radio contains an anti-theft protection circuit. Be sure to obtain anti-theft code number before disconnecting battery cables. 2001 Acura 3.2CL 2001 ACCESSORIES/SAFETY EQUIPMENT Acura - Air Bag Restraint Systems
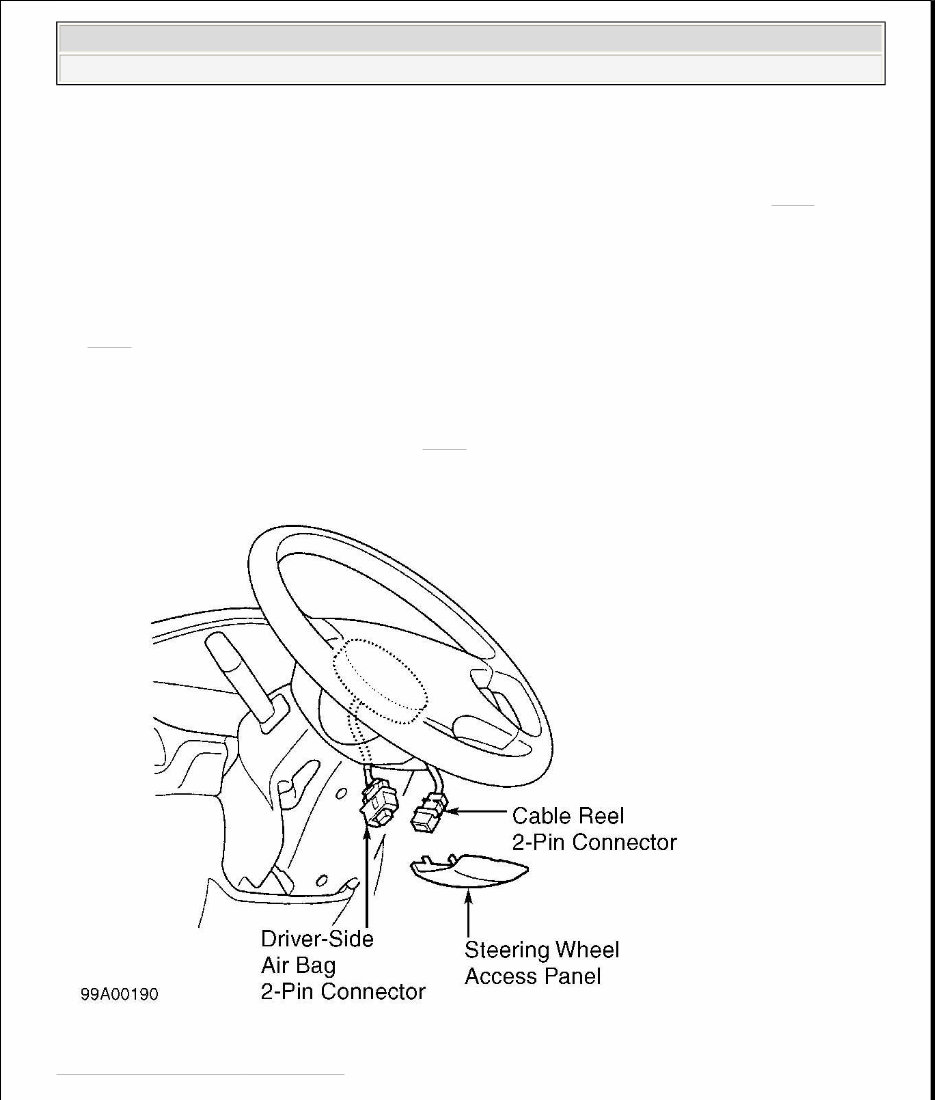
Fig. 3: Disconnecting & Connecting Spring - loaded Lock Connectors Courtesy of AMERICAN HONDA MOTOR CO., INC. DISABLING SYSTEM Driver-side Air Bag Turn ignition off. Disconnect negative battery cable. Wait at least 3 minutes. Remove access panel from steering wheel. Disconnect air bag connector from cable reel connector. See Fig. 4 .Driver-side air bag is now disabled. NOTE: When disconnected, driver-side and passenger-side air bag connectors are automatically shorted. 2001 Acura 3.2CL 2001 ACCESSORIES/SAFETY EQUIPMENT Acura - Air Bag Restraint Systems
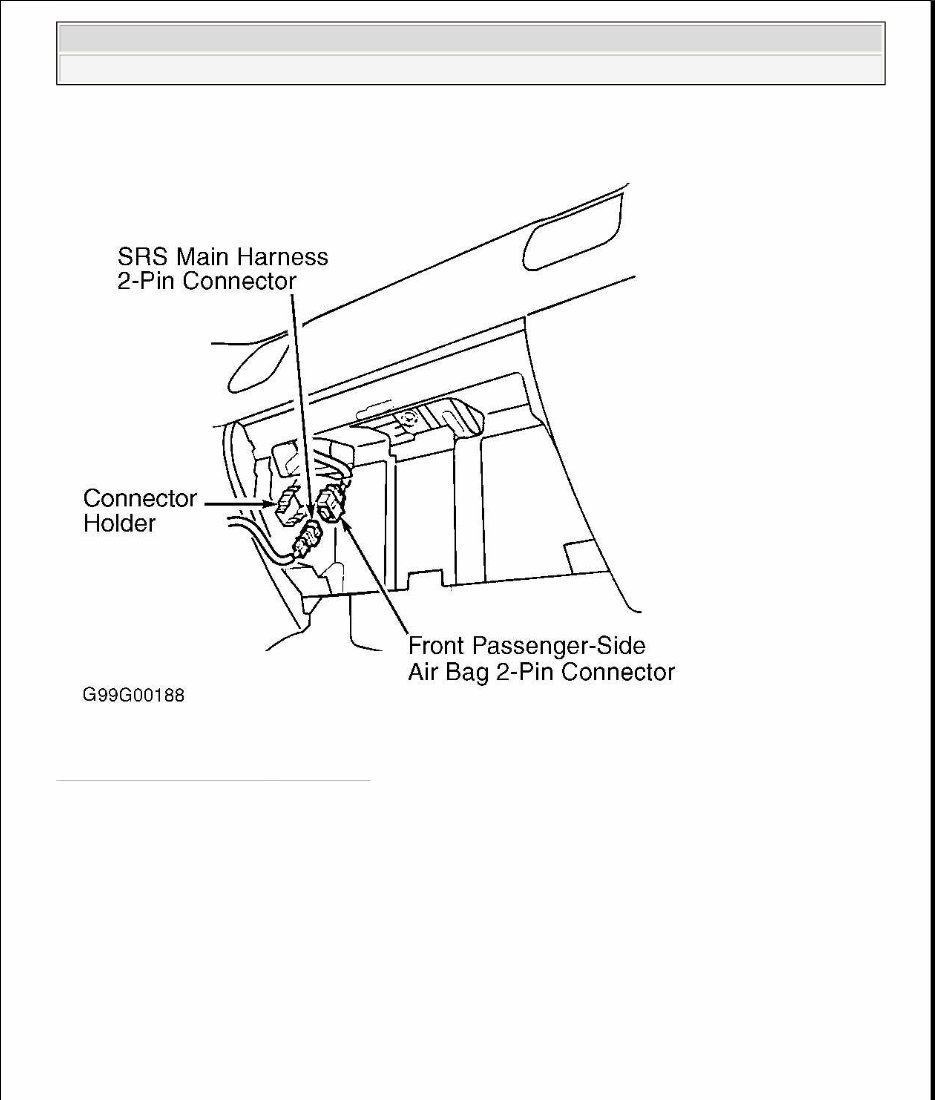
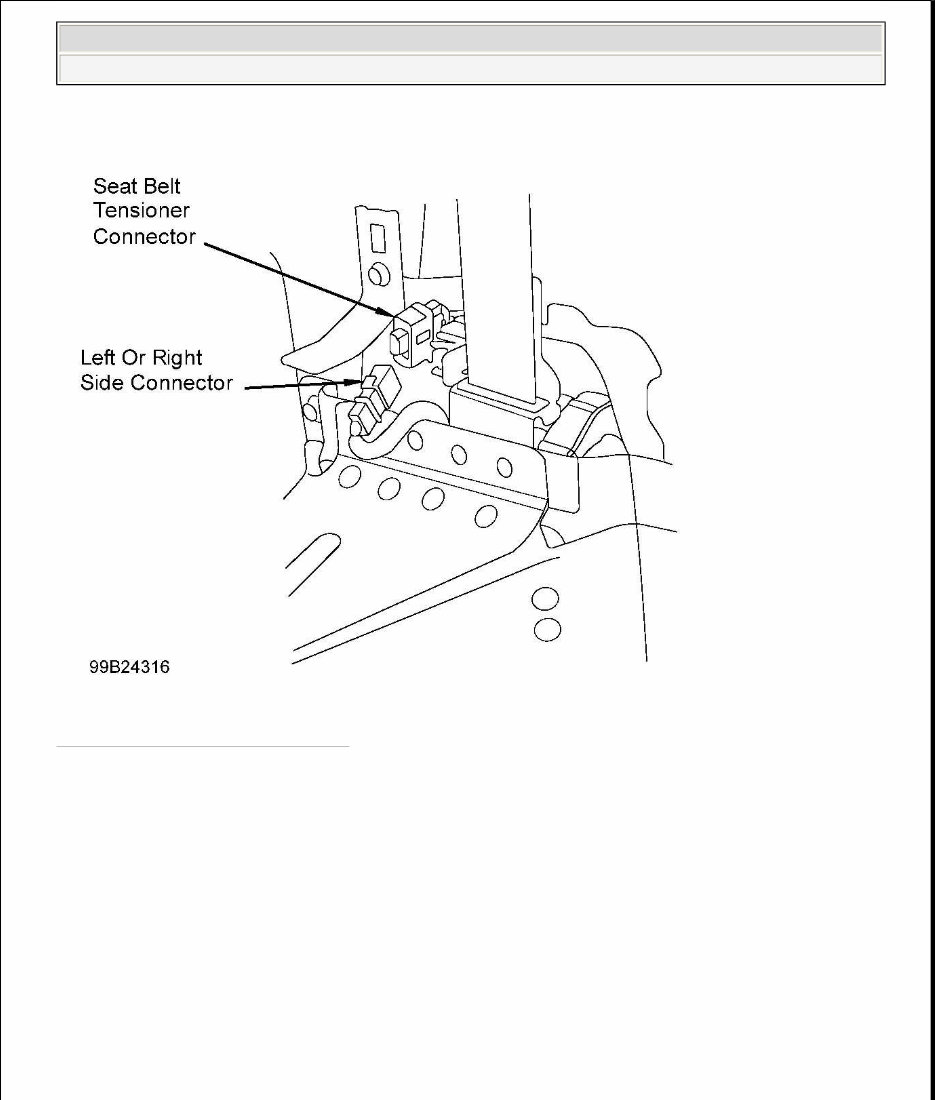
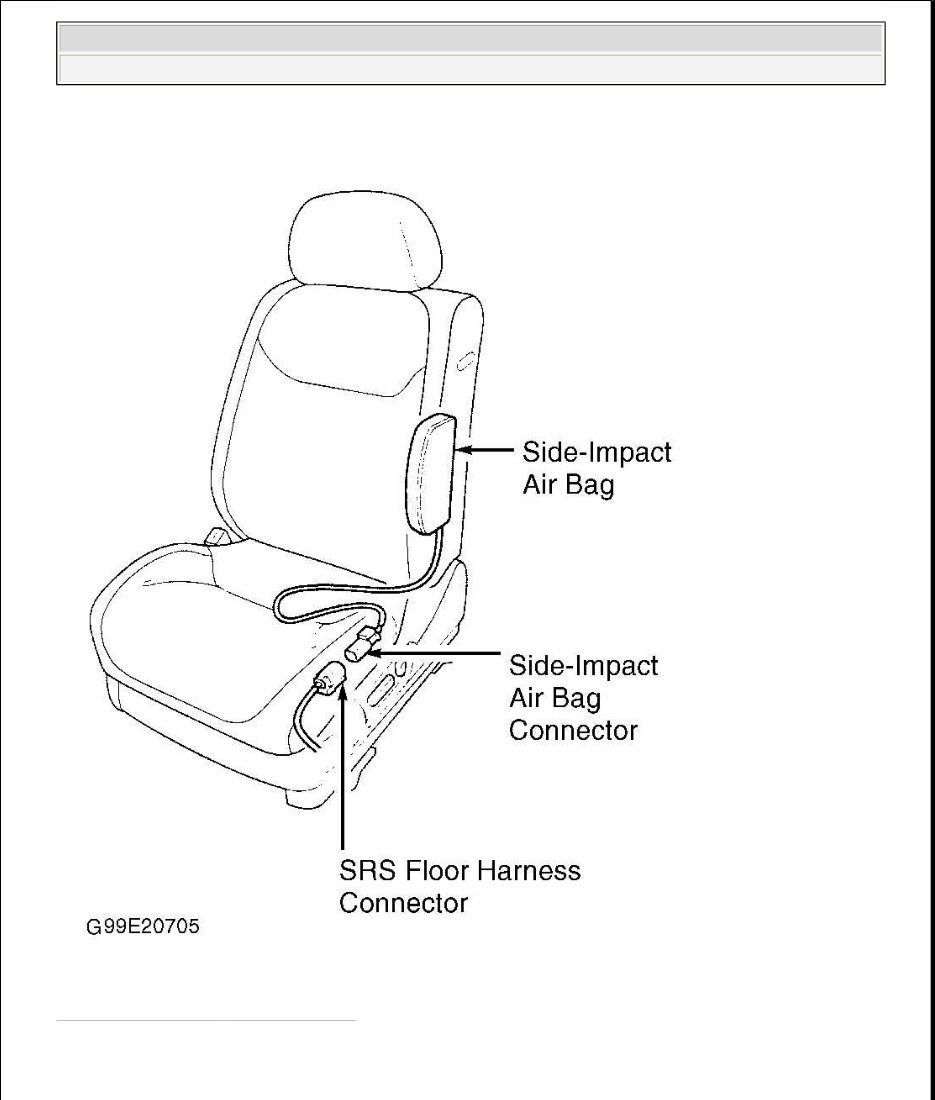
Passenger-side Air Bag Turn ignition off. Disconnect negative battery cable. Wait at least 3 minutes. Remove glove box. Remove 4-pin connector from holder, then disconnect air bag connector from SRS main harness connector. See Fig. 5 . Passenger-side air bag is now disabled. Seat Belt Tensioners Turn ignition off. Disconnect negative battery cable. Wait at least 3 minutes. Remove left and right B-pillar trim panels. Disconnect left and right-side wire harness 2-pin connectors from seat belt tensioner 2-pin connectors. See Fig. 6 . Seat belt tensioners are now disabled. Side-impact Air Bag Turn ignition off. Disconnect negative battery cable. Wait at least 3 minutes. Disconnect side-impact air bag connector from SRS floor harness connector. See Fig. 7 . Side-impact air bag is now disabled. Fig. 4: Disabling Driver - side Air Bag Courtesy of AMERICAN HONDA MOTOR CO., INC. 2001 Acura 3.2CL 2001 ACCESSORIES/SAFETY EQUIPMENT Acura - Air Bag Restraint Systems
Fig. 5: Disabling Passenger - side Air Bag Courtesy of AMERICAN HONDA MOTOR CO., INC. 2001 Acura 3.2CL 2001 ACCESSORIES/SAFETY EQUIPMENT Acura - Air Bag Restraint Systems
Fig. 6: Disabling Seat Belt Tensioners Courtesy of AMERICAN HONDA MOTOR CO., INC. 2001 Acura 3.2CL 2001 ACCESSORIES/SAFETY EQUIPMENT Acura - Air Bag Restraint Systems
Fig. 7: Disabling Side - impact Air Bags Courtesy of AMERICAN HONDA MOTOR CO., INC. ACTIVATING SYSTEM 2001 Acura 3.2CL 2001 ACCESSORIES/SAFETY EQUIPMENT Acura - Air Bag Restraint Systems
If you are in need of a repair manual for your 2003 Acura CL, look no further. Our comprehensive repair manual is the perfect resource for both professional mechanics and DIY enthusiasts. Unlike traditional paper manuals, this accessible provides a more cost-effective and convenient solution.
Whether you are tackling brake repairs, suspension component replacements, engine troubleshooting, or standard maintenance tasks, this has you covered. It contains all the necessary service information for addressing issues related to brakes, engine, suspension, steering, drivetrain, electrical systems, heating, air conditioning, and more.
By utilizing this repair manual , you can save a significant amount of money on vehicle maintenance and repairs. Mechanics often charge high fees for their services, making a DIY approach a more economical choice. The is designed for easy use and is compatible with Windows, Mac computers, smartphones, and tablets.