IH/Cub Cadet 582/682/782/982 Tractors OEM Service & Repair Manual
What's Included?
Lifetime Access
Fast Download Speeds
Online & Offline Access
Access PDF Contents & Bookmarks
Full Search Facility
Print one or all pages of your manual
Due to a continuous program of research and development,someprocedures, specifications and parts may be altered in a constant effort to improve our products. When changes and improvements are made in our products, periodic revisions may be made to this manual to keep it up-to-date. It is suggested that customerscontact their dealer for information on the latest revision. UBRARY FlUNG INFORMATION 1. File this manual and divider in the last binder of your OPP Service Manual Library. 2. On page15 (Cub Cadets and Equipment) of your OPP library index, enter model heading 582, 682, 782 and 982 on the open line below the last Model 1100 entry. Enter this manual description, form number and book filed in under the 582, 682, 782 and 982 heading. INTERNATIONAL@ CUBCADET@TRACTORS Models 582, 582 Special, 682, 782 and 982 Chassis & IH Equipment GSS-1497 W/Revision 2 August, 1981 I
General Contents Page SafeWorkRules IV Standard Torque Data for Nuts and Bolts. VI MetricConversionTables VIII Flangette Bearing Installation X Section III
WORK SAFELY FOllOW THESE RULES This symbol is used to call your attention to instructions concerning your personal safety. Be sure to observe and follow these instructions. 6. When operating a power washer to clean a machine before servicing, be careful at all times to avoid injury. Maintain proper footing and balance at all times. Never direct the spray at people or animals, as high pressure spray can cause serious injury. 7. I f a portable heater is used to heat the service area the following precautions must be observed: (a) Do not use portable heaters in presence of volatile materials such as gasoline or paint, as fire or explosion may result. 1. To prevent accidental starting, always pull the high tension wire(s) off of the spark plug(s) be- fore servicing and/or adjusting the machine. (b) To avoid being burned, do not touch the heater during operation. 2. To prevent injury, do not allow children or by-standers around the machine while it is being adjusted and/or serviced. (c) Portable heaters consume oxygen and combustion fumes can be hazardous. Heater should be used only in a well ventilated area. Keep a window or door partially open to provide ventilation. 3. Do not wear rings, wrist watches or loose fit- ting clothing when working on machinery, they could catch on moving parts causing serious in- jury. Wear sturdy, rough-soled work shoes. Never adjust and/or service a machine in bare feet, sandals or sneakers. (d) Keep the heater at least four (4) feet from combustible materials. (e) Never use gasoline as fuel. 8. Handle gasoline with care -it is highlyflammable: 4. Always wear safety glasses when using a hammer, chisel or other tools that may cause chips to fly. (a) Use approved gasoline container. (b) Never remove the fuel tank cap or fill the fuel tank when the engine is running, is hot, or indoors. Also, do not smoke when working around flammable fuel. 5. Be sure to reinstall safety devices, guards or shields after adjusting and/or servicing the machine. IV
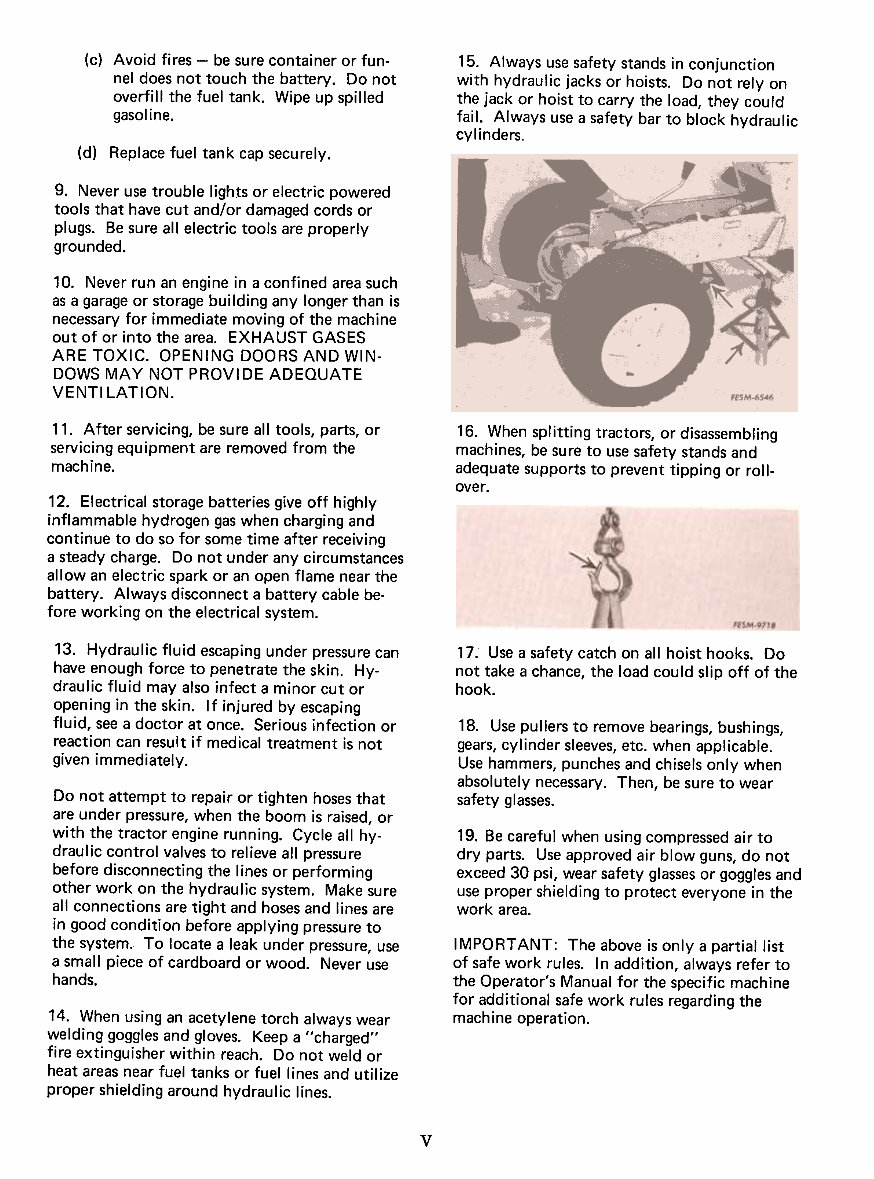
(c) Avoid fires -be sure container or fun- nel does not touch the battery. Do not overfill the fuel tank. Wipe up spilled gasol ine. 15. Always use safety stands in conjunction with hydraulic jacks or hoists. Do not rely on the jack or hoist to carry the load, they could fail. Always use a safety bar to block hydraulic cylinders. (d) Replace fuel tank cap securely. 9. Never use trouble lights or electric powered tools that have cut and/or damaged cords or plugs. Be sure all electric tools are properly grounded. 10. Never run an engine in a confined area such as a garage or storage building any longer than is necessary for immediate moving of the machine out of or into the area. EXHAUST GASES ARE TOXIC. OPENING DOORS AND WIN- DOWS MAY NOT PROVIDE ADEQUATE VENTI LATION. 11. After servicing, be sure all tools, parts, or servicing equipment are removed from the machine. 16. When splitting tractors, or disassembling machines, be sure to use safety stands and adequate supports to prevent tipping or roll- over. 12. Electrical storage batteries give off highly inflammable hydrogen gas when charging and continue to do so for some time after receiving a steady charge. Do not under any circumstances allow an electric spark or an open flame near the battery. Always disconnect a battery cable be- fore working on the electrical system. 13. Hydraulic fluid escaping under pressure can have enough force to penetrate the skin. Hy- draulic fluid may also infect a minor cut or opening in the skin. If injured by escaping fluid, see a doctor at once. Serious infection or reaction can result if medical treatment is not given immediately. 17. Use a safety catch on all hoist hooks. Do not take a chance, the load could slip off of the hook. 18. Use pullers to remove bearings, bushings, gears, cylinder sleeves, etc. when applicable. Use hammers, punches and chisels only when absolutely necessary. Then, be sure to wear safety glasses. Do not attempt to repair or tighten hoses that are under pressure, when the boom is raised, or with the tractor engine running. Cycle all hy- draulic control valves to relieve all pressure before disconnecting the lines or performing other work on the hydraulic system. Make sure all connections are tight and hoses and lines are in good condition before applying pressure to the system.. To locate a leak under pressure, use a small piece of cardboard or wood. Never use hands. 19. Be careful when using compressed air to dry parts. Use approved air blow guns, do not exceed 30 psi, wear safety glassesor goggles and use proper shielding to protect everyone in the work area. IMPORTANT: The above is only a partial list of safe work rules. I n addition, always refer to the Operator's Manual for the specific machine for additional safe work rules regarding the machine operation. 14. When using an acetylene torch always wear welding goggles and gloves. Keep a "charged" fire extinguisher within reach. Do not weld or heat areas near fuel tanks or fuel lines and utilize proper shielding around hydraulic lines. v
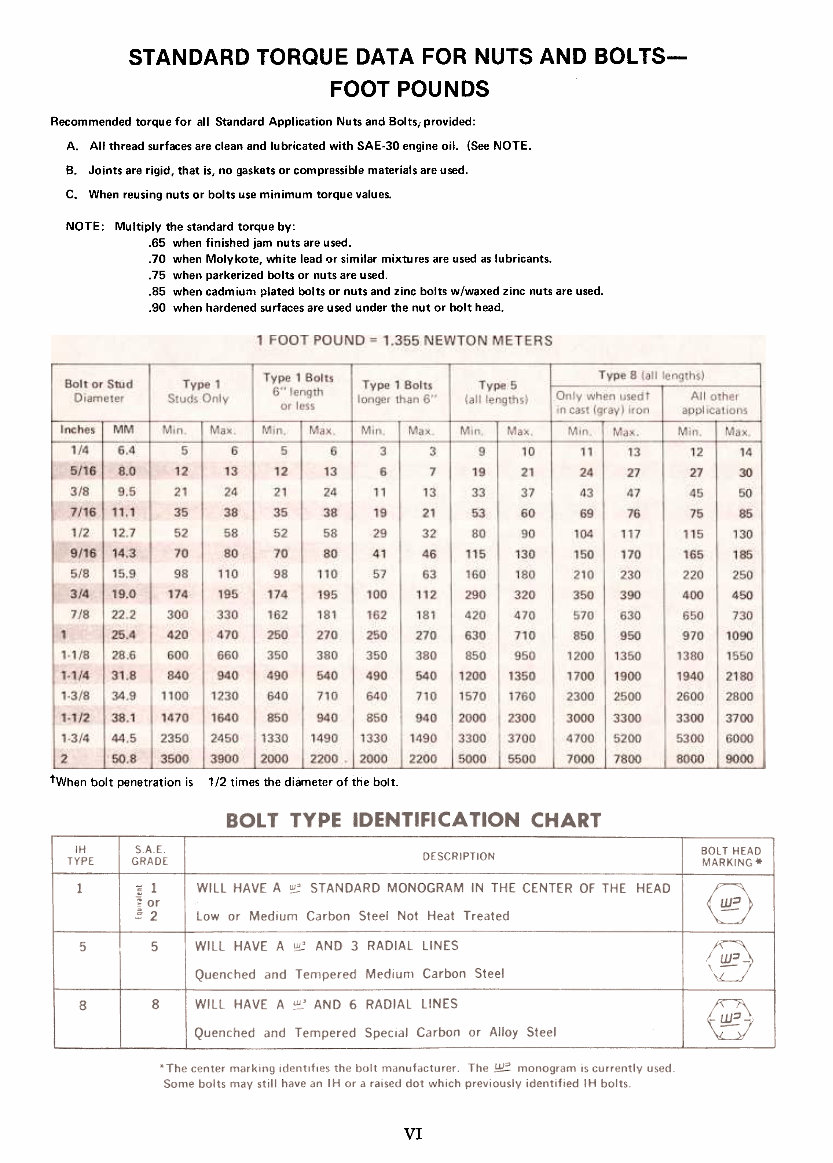
STANDARD TORQUE DATA FOR NUTS AND BOLTS- FOOT POUNDS Recommendedtorque for all Standard Application Nuts and Bolts, provided: A. All thread surfaces are clean and lubricated with SAE-30 engine oil. (SeeNOTE. B. Joints are rigid, that is, no gasketsor compressible materials are used. C. When reusing nuts or bolts use minimum torque values. NOTE: Multiply the standard torque by: .65 when finished jam nuts are used. .70 when Molykote, white lead or similar mixtures are used as lubricants. .75 when parkerized bolts or nuts are used. .85 when cadmium plated bolts or nuts and zinc bolts w/waxed zinc nuts are used. .90 when hardened surfaces are used under the nut or bolt head. tWhen bolt penetration is 1/2 times the diameter of the bolt. VI
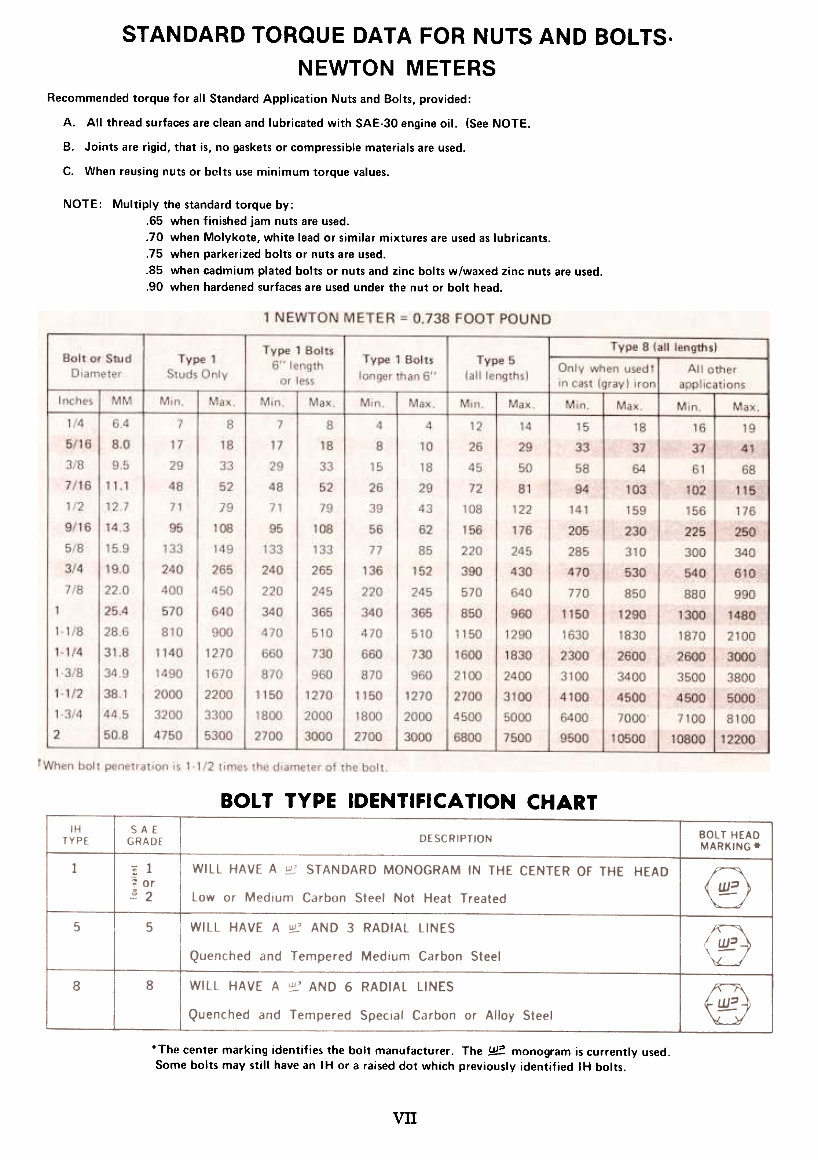
STANDARD TORQUE DATA FOR NUTS AND BOLTS. NEWTON METERS Recommended torque for all Standard Application Nuts and Bolts, provided: A. All thread surfaces are clean and lubricated with SAE-30 engine oil. (See NOTE. B. Joints are rigid, that is, no gaskets or compressible materials are used. C. When reusing nuts or bolts use minimum torque values. NOTE: Multiply the standard torque by: .65 when finished jam nuts are used. .70 when Molykote, white lead or similar mixtures are used as lubricants. .75 when parkerized bolts or nuts are used. .85 when cadmium plated bolts or nuts and zinc bolts w/waxed zinc nuts are used. .90 when hardened surfaces are used under the nut or bolt head. SOL T TYPE IDENTIFICATION CHART *The center marking identifies the bolt manufacturer. The ~ monogram is currently used. Some bolts may still have an IH or a raised dot which previously identified IH bolts. vn
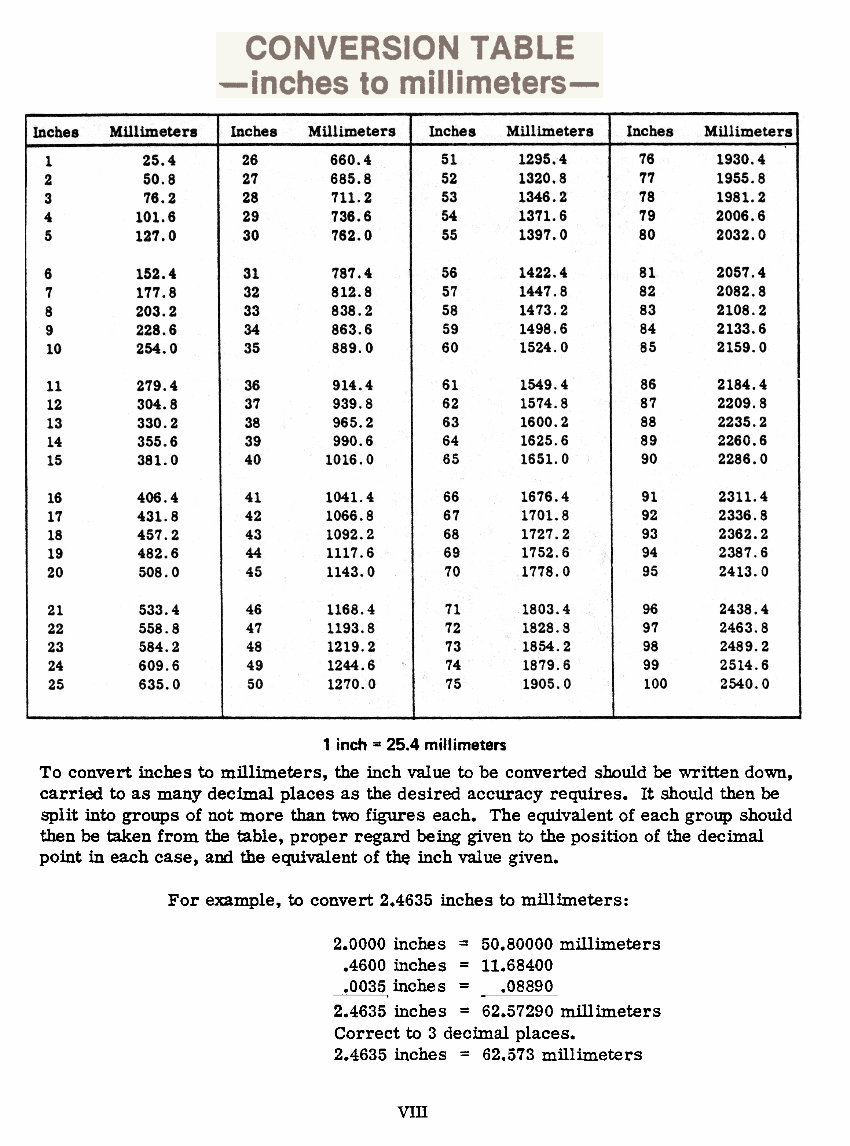
Inches Inches Inches Inches Millimeters Millimeters Millimeters Millimeters I 51 52 53 54 55 1295.4 1320.8 1346.21371.61397.0 76 77 78 7980 1930.4 1955.8 1981.22006.62032.0 25.4 50.8 76.2101.6 127.0 26 27 28 29 30 660.4685.8 711.2 736.6782.0 1 2 3 4 5 56 57 58 59 60 1422.4 1447.8 1473.2 1498.6 1524.0 81 82 83 84 85 2057.42082.8 2108.22133.62159.0 6 7 8 9 10 152.4177.8 203.2 228.6 254.0 31 32 33 34 35 787.4812.8 838.2 863.6 889.0 36 37 38 39 40 914.4 939.8 965.2 990.61016.0 61 62 63 64 65 1549.41574.8 1600.2 1625.6 1651.0 86 87 8889 90 2184.42209.82235.2 2260.6 2286.0 11 12 13 14 15 279.4 304.8 330.2355.6 381.0 1676.41701.8 1727.21752.61778.0 91 92 93 94 95 2311.42336.8 2362.2 2387.6 2413.0 16 17181920 406.4431.8 457.2 482.6 508.0 41 42 43 44 45 1041.41066.8 1092.21117.61143.0 66 67 68 69 70 46 47 48 49 50 1168.41193.81219.2 1244.61270.0 71 72 73 74 75 1803.4 1828.8 1854.21879.6 1905.0 96 97 98 99 100 2438.4 2463.8 2489.22514.6 2540.0 21 22 23 24 25 533.4 558.8 584.2 609.6 635.0 1 inch = 25.4 millimeters To convert inches to millimeters, the inch value to be converted should be written down, carried to as many decimal places as the desired accuracy requires. It should then be split into groups of not more than two figures each. The equivalent of each group should then be taken from the table, proper regard being given to the position of the decimal point in each case, and the equivalent of ~ inch value given. For example, to convert 2.4635 inches to millimeters: 2.0000 inches = 50.80000 millimeters .4600 inches = 11.68400 .0035,inches = -.0889~ 2.4635 inches = 62.57290 millimeters Correct to 3 decimal places. 2.4635 inches = 62.573 millimeters VIll
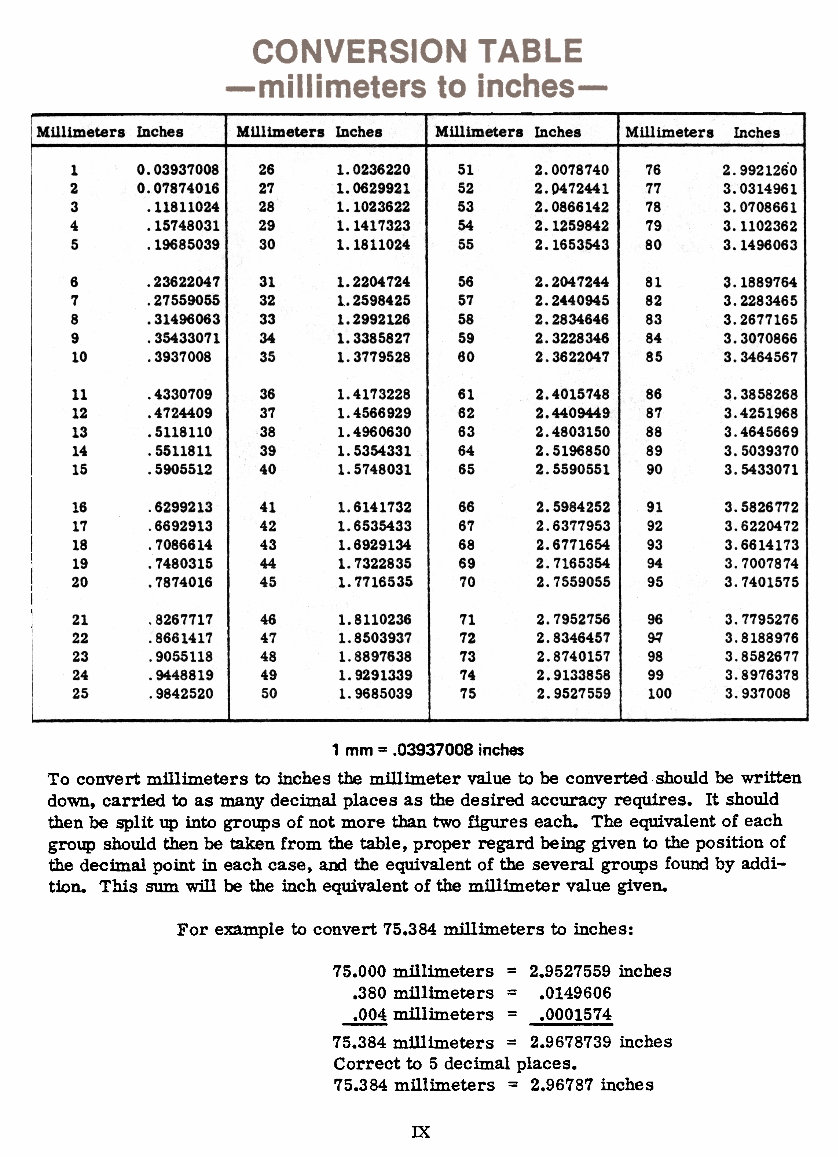
Millimeters Inches Millimeters Inches Millimeters Inches Millimeters Inches 2.99212603.0314 3.1102362 3.1496063 1 2 3 4 5 0.03937008 0.07874016 .11811024 .15748031 .19685039 26 27 28 29 30 1.02362201.0629921 1.1023622 1.14173231.1811024 51 52 53 54 55 2.00787402.0472441 2.0866142 2.1259842 2.1653543 76 77 78 7980 .23622047 .27559055 .31496063 .35433071 .3937008 31 32 33 34 35 1.2204724 1.2598425 1.2992126 1.33858271.3779528 56 57 58 59 60 2.2047244 2.2440945 2.2834646 2.3228346 2.3622047 6 7 8 9 10 81 82 83 84 85 3.1889764 3.2283465 3.2677165 3.3070866 3.3464567 11 12 13 14 15 .4330709 .4724409 .5118110 .5511811 .5905512 36 37 38 39 40 1.4173228 1.4566929 1.4960630 1.5354331 1.5748031 61 62 63 64 65 2.4015748 2.4409449 2.4803150 2.5196850 2.5590551 86 87 88 89 90 3.38582683.4251 3.46456693.5039 16 17 18 1920 .6299213 .6692913 .7086614 .7480315 .7874016 41 42 43 44 45 1.6141732 1.6535433 1.6929134 1.7322835 1.7716535 66 67 68 69 70 2.5984252 2.6377953 2.6771654 2.7165354 2.7559055 91 92 93 94 95 3.5826772 3.6220472 3.6614173 3.7007874 3.7401575 1.8110236 1.8503937 1.88976381.9291339 1.9685039 2.7952756 2.8346457 2.8740157 2.9133858 2.9527559 96 ~ 98 99100 3.77952763.81889763.8582677 3.8976378 3.937008 21 22 23 24 25 .8267717 .8661417 .9055118 .9448819 .9842520 46 47 48 49 50 71 72 73 74 75 1 mm = .03937008 inches To convert millimeters to inches the millimeter value to be converted should be written down, carried to as many decimal places as the desired accuracy requires. It should then be split up into groups of not more than two figures each. The equivalent of each group should then be taken from the table, proper regard being given to the position of the decimal point in each case, aIxI the equivalent of the several groups found by addi- tion. This sum will be the inch equivalent of the millimeter value given. For example to convert 75.384 millimeters to inches: 75.000 millimeters = 2.9527559 inches .380 millimeters = .0149606 .004 millimeters = .0001574 75.384 millimeters = 2.9678739 inches Correct to 5 decimal places. 75.384 millimeters = 2.96787 inches IX
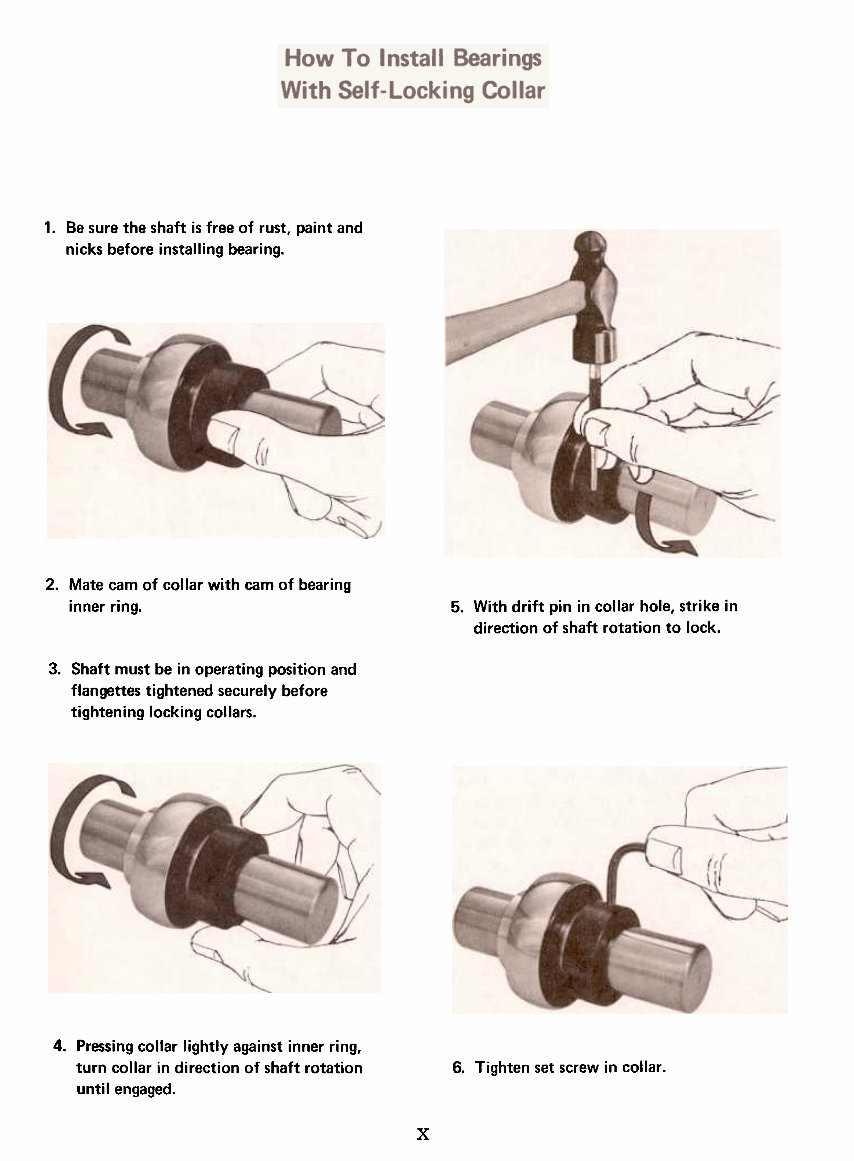
1. Be sure the shaft is free of rust, paint and nicks before installing bearing. 2. Mate cam of collar with tam of bearing inner ring. 5. With drift pin in collar hole, strike in direction of shaft rotation to lock. 3. Shaft must be in operating position and flangettes tightened securely before tightening locking collars. 4. Pressing collar lightly against inner ring, turn collar in direction of shaft rotation until engaged. 6. Tighten set screw in collar. x
IH/Cub Cadet 582/682/782/982 Tractors Service & Repair Manual is a comprehensive guide covering the following models:
582
582 Special
682
782
982
This manual is an invaluable resource for both professional mechanics and DIY enthusiasts. It provides detailed troubleshooting and replacement procedures, along with step-by-step instructions, clear images, and exploded-view illustrations.
Regular maintenance is essential for the durability of your tractor. Over time, certain parts will wear out and require replacement. This manual equips you with the manufacturer's recommended troubleshooting charts and replacement procedures, enabling you to save on repairs, minimize downtimes, and effectively maintain your tractor.
Please note: This is not a generic repair manual but the official guide used by professional technicians. It contains comprehensive troubleshooting and replacement procedures, step-by-step instructions, exploded-view illustrations, and clear images.
With this manual, you can easily access specific information without the hassle of flipping through numerous pages. Additionally, it offers the convenience of digital access, allowing you to search, screenshot, and bookmark content. If preferred, you also have the option to print a physical copy.
Printable: Yes Language: English Compatibility: Compatible with various electronic devices, including PC & Mac computers, Android and Apple smartphones & tablets, etc. Requirements: Adobe Reader (free)
Recently Viewed
5,521,897Happy Clients
2,594,462eManuals
1,120,453Trusted Sellers
15Years in Business
Price:
Actual Price:
IH/Cub Cadet 582/682/782/982 Tractors OEM Service & Repair Manual