Owner's Manual Riding Mower Model No. 247.27022 CAUTION: Before using this product, read this manual and follow all safety rules and operating instructions. • Safety • Operation • Maintenance • Storage • EspaSol, Page 47 For answers to your questions about this product, call: 1-800-659-5917 Sears Craftsman Help Line (5 am. - 5 pm., Mon. - Sat.) Sears, Roebuck And Co., Hoffman Estates, IL 60179 U.S.A. Visit our website: www.sears.com/craftsman FORM NO. 769-00704A Printed in U.S.A. (5/2003) Downloaded from www.Manualslib.com manuals search engine
Content Page Warranty Information ................................ 2 Safe Operation Practices .......................... 3 Assembly ................................................. 6 Operation ................................................. 8 Maintenance ............................................. 13 Service & Adjustment ............................... 16 Content Page Off-Season Storage ................................... 23 Trouble-Shooting ....................................... 23 Parts List ................................................... 25 Slope Guide .............................................. 45 EspaSol ..................................................... 47 Service Phone Numbers ............................ Back Cover LIMITED WARRANTY ON RIDING MOWER: For two (2) years from the date of purchase, if this Craftsman Riding Equipment is maintained, lubricated and tuned up according to the instructions in the owner's manual, Sears will repair or replace free of charge any parts that are found to be defective in material or workmanship according to the guidelines of coverage listed below. Sears will also provide free labor for these applicable warranted parts for the two full years. During first 30 clays of purchase, there will be no charges to service the product at your home for issues covered by this warranty. (See exclusions below). For your convenience, IN HOME warranty service will still be available after the first 30 days of purchase, but a trip charge will apply. This charge will be waived if the product is dropped off at an authorized Sears location. For the nearest authorized Sears location, please call 1-800-4-MY-HOME®. This warranty applies only while this product is within the United States. EXCLUSIONS This Warranty does not cover: Expendable items which become worn during normal use, including but not limited to blades, spark plugs, air cleaners, belts, and oil filters. Standard Maintenance Servicing, oil changes or tune-ups Tire replacement or repair caused by punctures from outside objects, such as nails, thorns, stumps, or glass. Repairs necessary because of operator abuse, including but not limited to, damage caused by towing objects beyond the capability of the riding equipment, impacting objects that bend the frame or crankshaft, or over-speeding the engine. Repairs necessary because of operator negligence, including but not limited to, electrical and mechanical damage caused by improper storage, failure to use the proper grade and amount of engine oil, failure to keep the deck clear of flammable debris, or failure to maintain the equipment according to the instructions contained in the owner's manual. Engine (fuel system) cleaning or repairs caused by fuel determined to be contaminated or oxidized (stale). In general, fuel should be used within 30 days of its purchase date. Normal deterioration and wear of the exterior finishes, or product label replacement. Riding equipment used for commercial or rental purposes. LIMITED WARRANTY ON BATTERY For ninety (90) clays from date of purchase, if any battery included with this riding equipment proves defective in material or workmanship and our testing determines the battery will not hold charge, Sears will replace the battery at no charge. During the first 30 days of purchase, there will be no charges to replace the battery at your home. After the first 30 days, for your convenience, IN-HOME warranty service will still be available but a trip charge will apply. This charge will be waived if the Craftsman product is dropped of at an authorized Sears location. For the nearest authorized Sears location, please call 1-800-4- MY-HOME®. This battery warranty applies only while this product is within the United States. This warranty gives you specific legal rights, and you may also have other rights, which vary, from state to state. Sears, Roebuck and Co.,Dept.817WA, Hoffman Estates, IL 60179 Horsepower: ............................... 10.0 Engine Oil ................................... 48 oz. or 1.4 liters Fuel ............................................ Unleaded Regular Spark Plug: ................................. P/N 491055 Engine: ........................................ 212907-0272 Ignition Key (Std.) ........................ P/N 725-0201 Model Number ........................... 247.27022 Serial Number ........................................................... Date of Purchase ...................................................... Record both sedal number and date of purchase and keep in a safe place for future reference. Downloaded from www.Manualslib.com manuals search engine
Congratulations onmaking asmart purchase.Your new Craftsman_ product isdesigned andmanufactured foryears ofdependable operation. Butlikeallproducts, itmayrequire repair from time totime. That'swhenhaving a Repair Protection Agreement cansaveyoumoney andaggravation. Here's what's included intheAgreement: Expert service by our 12,000 professional repair specialists Unlimited service and no charge for parts and labor on all covered repairs Product replacement if your covered product can't be fixed ,t 4 Discount of 10% from regular price of service and service-related parts not covered by the agreement; also, 10% off regular price of preventive maintenance check Fast help by phone - phone support from a Sears technician on products requiring in-home repair, plus convenient repair scheduling Purchase a Repair Protection Agreement now and protect yourself from unexpected hassle and expense. Once you purchase the Agreement, a simple phone call is all that it takes for you to schedule service. You can call anytime day or nighL or schedule a service appointment online. Sears has over 12,000 professional repair specialists, who have access to over 4.5 million quality parts and accessories. That's the kind of professionalism you can count on to help prolong the life of your new purchase for years to come. Purchase your Repair Protection Agreement today! Some limitations and exclusions apply. For prices and additional information call 1-800-827-6655. Sears Installation Service For Sears professional installation of home appliances, garage door openers, water heaters, and other major home items, in the U.S.A. call 1-800-4-MY-HOME® ,i_ WARNING: This symbol points out important safety instructions which, if not followed, could endanger the personal safety and/or property of yourself and others. Read and follow all instructions in this manual before attempting to operate this machine. Failure to comply with these instructions may result in personal injury. When you see this symbol--heed its warning. WARNING: The Battery and Engine Exhaust contains chemicals known to the State of California to cause cancer, birth defects or other reproductive harm. The battery and posts contain lead; wash hands after handling. _lb WARNING: This machine was built to be operated according to the rules for safe operation in this manual. As with any type of power equipment, carelessness or error on the part of the operator can result in serious injury. This machine is capable of amputating hands and feet and throwing objects. Failure to observe the following safety instructions could result in serious injury or death. General Operation 1. Read, understand, and follow all instructions on the machine and in the manual(s) before attempting to assemble and operate. Save this manual for future and regular reference and for ordering replacement parts. 2. Be familiar with all controls and their proper operation. Know how to stop machine and disengage them quickly. 3. Never allow children under 14 years old to operate this machine. Children 14 years old and over should read and understand operation instructions and safety rules in this manual and should be trained and supervised by parent. 4. Never allow adults to operate this machine without proper instruction. 5. To help avoid blade contact or a thrown object injury, keep bystanders, helpers, children and pets at least 75 feet from the machine while it is in operation. Stop machine if anyone enters the area. 6. Thoroughly inspect the area where the equipment is to be used. Remove all stones, sticks, wire, bones, toys, and other foreign objects which could be picked up and thrown by the blade(s). Thrown objects can cause serious personal injury. 7. Plan your mowing pattern to avoid discharge of material toward roads, sidewalks, bystanders and the like. Also, avoid discharging material against a wall or obstruction which may cause discharged material to ricochet back toward the operator. 8. Always wear safety glasses or safety goggles during operation and while performing an adjustment or repair to protect your eyes. Thrown objects which ricochet can cause serious injury to the eyes. 9. Wear sturdy, rough-soled work shoes and close-fitting slacks and shirts. Loose fitting clothes and jewelry can be caught in movable parts. Never operate this machine in bare feet or sandals. Downloaded from www.Manualslib.com manuals search engine
10.Beaware ofthemower andattachment discharge direction anddonotpoint itatanyone. Donotoperate the mower without thedischarge cover orentiregrass catcher initsproper place. 11.Donotputhands orfeetnearotating partsorunder the cutting deck. Contact with theblade(s) canamputate hands andfeet. 12.Amissing ordamaged discharge cover cancauseblade contact orthrown object injuries. 13.Stop theblade(s) whencrossing gravel ddves, walks, or roads andwhilenotcuttingrass. 14.Watch fortrafficwhenoperating near orcrossing roadways. Thismachine isnotforuseonpublic roadway. 15.Donotoperate themachine whileunder theinfluence of alcohol ordrugs. 16.Mowonly indaylight orgoodartificial light. Never carry passengers. 17.Disengage blade(s) before shifting intoreverse. Backup slowly. Always lookdownandbehind before andwhile backing toavoidaback-over accident. 18.Slowdownbefore turning. Operate themachine smoothly. Avoiderratic operation andexcessive speed. 19.Disengage blade(s), setparking brake, stopengine and wait until theblade(s) come toacomplete stopbefore removing grasscatcher, emptying grass, unclogging chute, removing anygrassordebris, ormaking any adjustments. 20. Never leavearunning machine unattended. Always turn offblade(s), place transmission inneutral, setparking brake, stopengine andremove keybeforedismounting. 21. Useextracarewhen loading orunloading themachine intoatrailer ortruck. Thisunitshould notbedrivenupor down ramp(s), because theunit could tipover, causing serious personal injury. Theunitmust bepushed manually onramp(s) toloadorunload properly. 22. Muffler andengine become hotandcancauseaburn. Do notouch. 23. Check overhead clearances carefully beforedriving under lowtreebranches, wires, door openings etc., where theoperator maybestruck orpulled from theunit, which could result inserious injury. 24. Disengage allattachment clutches, depress thebrake pedal completely andshift intoneutral before attempting tostart engine. 25. Your machine isdesigned tocutnormal residential grass ofaheight nomore than10". Donotattempt tomow through unusually tall,drygrass (e.g., pasture) orpilesof dry leaves. Drygrassorleaves maycontact theengine exhaust and/or builduponthemower deckpresenting a potential firehazard. 26.Useonlyaccessories andattachments approved forthis machine bythemachine manufacturer. Read, understand and followallinstructions provided with the accessory orattachment. 27. Data indicates thatoperators, age60yearsandabove, areinvolved inalargepercentage oftractor-related injuries. Theseoperators should evaluate theirability to operate thetractor safelyenough toprotect themselves andothers fromserious injury. 28. Ifsituations occur whicharenotcovered inthismanual, usecareandgood judgment. Contact Searservice center forassistance. Slope Operation Slopes are a major factor related to loss of control and tip- over accidents which can result in severe injury or death. All slopes require extra caution. If you cannot back up the slope or if you feel uneasy, do not mow it. For safety, use the slope guide on page 45 to measure slopes before operating this unit on a sloped or hilly area. If the slope is greater than 15 degrees as shown on the slope gauge, do not operate this unit there. Do: 1. Mow up and down slopes, not across. Exercise extreme caution when changing direction on slopes. 2. Watch for holes, ruts, bumps, rocks, or other hidden objects. Uneven terrain could overturn the machine. Tall grass can hide obstacles. 3. Use slow speed. Choose a low enough speed setting so that you will not have to stop or shift while on the slope. Tires may lose traction on slopes even though the brakes are functioning properly. Always keep machine in gear when going down slopes to take advantage of engine braking action. 4. Follow the manufacturer's recommendations for wheel weights or counterweights to improve stability of the machine. Use extra care with grass catchers or other attachments. These can change stability of the machine. 5. Keep all movement on the slopes slow and gradual. Do not make sudden changes in speed or direction. Rapid engagement or braking could cause the front of the machine to lift and rapidly flip over backwards which could cause serious injury. 6. Avoid starting or stopping on a slope. If tires lose traction, disengage the blade(s) and proceed slowly straight down the slope. Do Not: 1. Do not turn on slopes unless necessary; then, turn slowly and gradually downhill, if possible. 2. Do not mow near drop-off sites, ditches or embankments. The mower could suddenly turn over if a wheel is over the edge of a cliff, ditch, or if an edge caves in. 3. Do not try to stabilize the machine by putting your foot on the ground. 4. Do not use a grass catcher on steep slopes. 5. Do not mow on wet grass. Reduced traction could cause sliding. 6. Do not shift to neutral and coast downhill. Over-speeding may cause the operator to lose control of the machine resulting in serious injury or death. Children 1, Tragic accidents can occur if the operator is not alert to the presence of children. Children are often attracted to the machine and the mowing activity. They do not understand the dangers. Never assume that children will remain where you last saw them. a. Keep children out of the mowing area and in watchful care of a responsible adult other than the operator. b. Be alert and turn machine off if a child enters the area. c. Before and while backing, look behind and down for small children. Downloaded from www.Manualslib.com manuals search engine
2. d. Never carry children, even with the blade(s) shut off. They may fall off and be sedously injured or interfere with safe machine operation. e. Use extreme carewhen approaching blind corners, doorways, shrubs, trees or other objects that may block your vision of a child who may run into the machine. f. Disengage the cutting blade(s) before shifting in reverse. The "No-Cut-In Reverse" feature emphasizes not to cut in reverse and to avoid back-over accidents; do not defeat it. g. Keep children away from hot or running engines. They can suffer burns from a hot muffler. h. Remove key when machine is unattended to prevent unauthorized operation. Never allow children under 14 years old to operate the machine. Children 14 years old and over should read and understand the operation instructions and safety rules in this manual and should be trained and supervised by a parent. Safe Handling Of Gasoline 1. To avoid personal injury or property damage use extreme care in handling gasoline. Gasoline is extremely flammable and the vapors are explosive. Serious personal injury can occur when gasoline is spilled on yourself or your clothes which can ignite. Wash your skin and change clothes immediately. a. Use only an approved gasoline container. b. Never fill containers inside a vehicle or on a truck or trailer bed with a plastic liner. Always place containers away from your vehicle before filling. c. When practical, remove gas-powered equipment from the truck or trailer and refuel it on the ground. If this is not possible, then refuel such equipment on a trailer with a portable container, rather than from a gasoline dispenser nozzle. d. Keep the nozzle in contact with the rim of the fuel tank or container opening at all times until fueling is complete. Do not use a nozzle lock-open device. e. Extinguish all cigarettes, cigars, pipes and other sources of ignition. f. Neverfuelmachineindoors. g. Never remove gas cap or add fuel while the engine is hot or running. Allow engine to cool at least two minutes before refueling. h. Never over fill fuel tank. Fill tank to no more than Y_inch below bottom of filler neck to allow space for fuel expansion. i. Replace gasoline cap and tighten securely. j. If gasoline is spilled, wipe it off the engine and equipment. Move unit to another area. Wait 5 minutes before starting the engine. k. To reduce fire hazards, keep machine free of grass, leaves, or other debris build-up. Clean up oil or fuel spillage and remove any fuel soaked debris. L Never store the machine or fuel container inside where there is an open flame, spark or pilot light as on a water heater, space heater, furnace, clothes dryer or other gas appliances. m. Allow a machine to cool at least 5 minutes before storing. General Service 1. Never run an engine indoors or in a poorly ventilated area. Engine exhaust contains carbon monoxide, an odorless, and deadly gas. 2. Before cleaning, repairing, or inspecting, make certain the blade(s) and all moving parts have stopped. Disconnect the spark plug wire and ground against the engine to prevent unintended starting. 3. Periodically check to make sure the blades come to complete stop within approximately (5) five seconds after operating the blade disengagement control. If the blades do not stop within the this time frame, your unit should be serviced professionally by an authorized dealer. 4. Check brake operation frequently as it is subjected to wear during normal operation. Adjust/service as required. 5. Check the blade(s) and engine mounting bolts at frequent intervals for proper tightness. Also, visually inspect blade(s) for damage (e.g., excessive wear, bent, cracked). Replace the blade(s) with the original equipment manufacturer's (O.E.M.) blade(s) only, listed in this manual. "Use of parts which do not meet the original equipment specifications may lead to improper performance and compromise safety!" 6. Mower blades are sharp. Wrap the blade or wear gloves, and use extra caution when servicing them. 7. Keep all nuts, bolts, and screws tight to be sure the equipment is in safe working condition. 8. Never tamper with the safety interlock system or other safety devices. Check their proper operation regularly. 9. After striking a foreign object, stop the engine, disconnect the spark plug wire(s) and ground against the engine. Thoroughly inspect the machine for any damage. Repair the damage before starting and operating. 10. Never attempt to make adjustments or repairs to the machine while the engine is running. 11. Grass catcher components and the discharge cover are subject to wear and damage which could expose moving parts or allow objects to be thrown. For safety protection, frequently check components and replace immediately with original equipment manufacturer's (O.E.M.) parts only, listed in this manual. "Use of parts which do not meet the original equipment specifications may lead to improper performance and compromise safety!" 12. Do not change the engine governor settings or over- speed the engine. The governor controls the maximum safe operating speed of the engine. 13. Maintain or replace safety and instruction labels, as necessary. 14. Observe proper disposal laws and regulations for gas, oil, etc. to protect the environment. Your Responsibility Restrict the use of this power machine to persons who read, understand and follow the warnings and instructions in this manual and on the machine. Downloaded from www.Manualslib.com manuals search engine
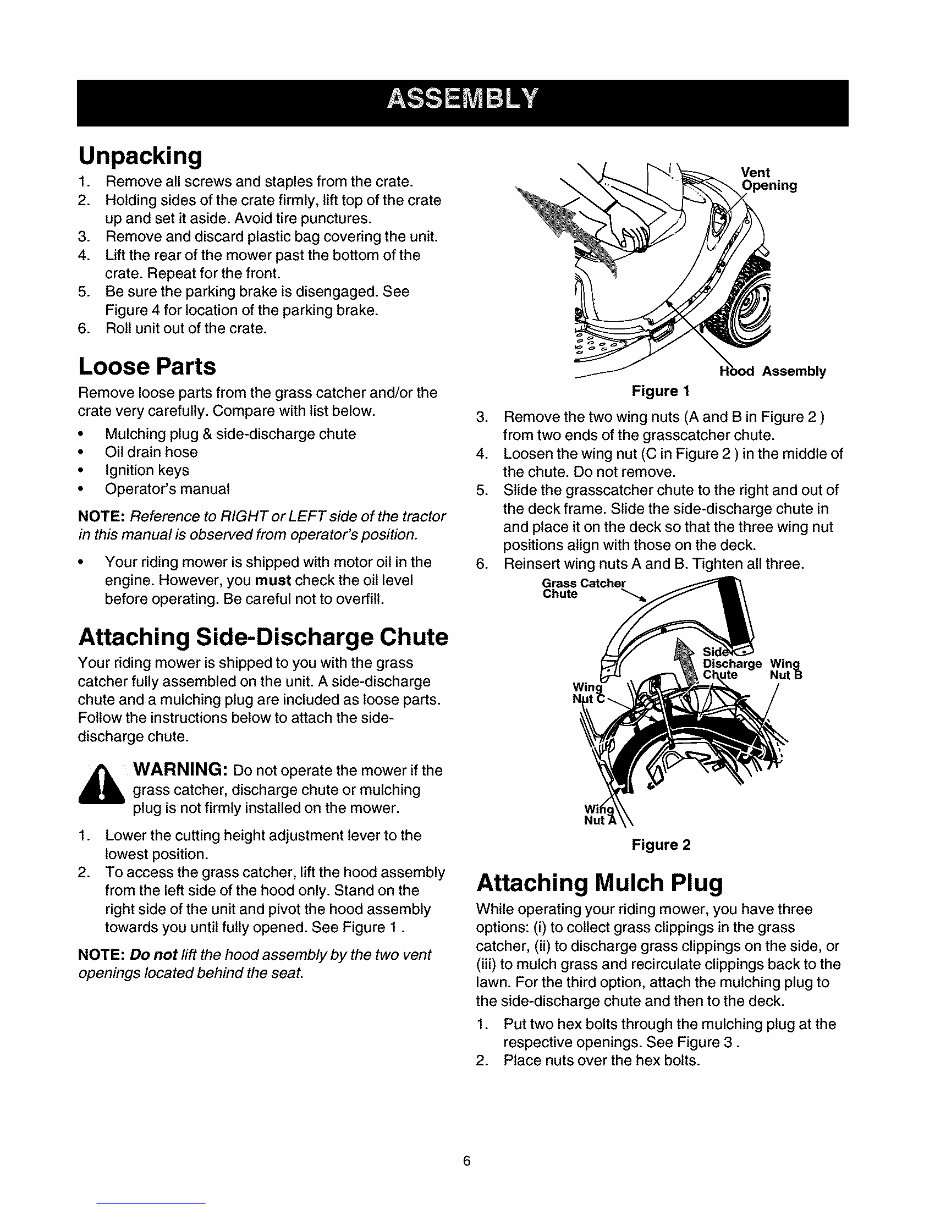
Unpacking 1. Remove all screws and staples from the crate. 2. Holding sides of the crate firmly, lift top of the crate up and set it aside. Avoid tire punctures. 3. Remove and discard plastic bag covering the unit. 4. Lift the rear of the mower past the bottom of the crate. Repeat for the front. 5. Be sure the parking brake is disengaged. See Figure 4 for location of the parking brake. 6. Roll unit out of the crate. Loose Parts Remove loose parts from the grass catcher and/or the crate very carefully. Compare with list below. • Mulching plug & side-discharge chute • Oil drain hose • Ignition keys • Operator's manual NOTE: Reference to RIGHT or LEFT side of the tractor in this manual is observed from operator's position. • Your riding mower is shipped with motor oil in the engine. However, you must check the oil level before operating. Be careful not to overfill. Attaching Side-Discharge Chute Your riding mower is shipped to you with the grass catcher fully assembled on the unit. A side-discharge chute and a mulching plug are included as loose parts. Follow the instructionsbelow to attach the side- discharge chute. j_ WARNING: Do not operate the mower if the grass catcher, discharge chute or mulching plug is not firmly installed on the mower. 1. 2. Lower the cutting height adjustment lever to the lowest position. To access the grass catcher, lift the hood assembly from the left side of the hood only. Stand on the right side of the unit and pivot the hood assembly towards you until fully opened. See Figure 1. NOTE: Do not lift the hood assembly by the two vent openings located behind the seat. Vent Assembly Figure 1 3. Remove the two wing nuts (A and B in Figure 2) from two ends of the grasscatcher chute. 4. Loosen the wing nut (C in Figure 2 ) in the middle of the chute. Do not remove. 5. Slide the grasscatcher chute to the right and out of the deck frame. Slide the side-discharge chute in and place it on the deck so that the three wing nut positions align with those on the deck. 6. Reinsert wing nuts A and B. Tighten all three. GrassCatcher Chute Win Nut_l Nut Figure 2 Attaching Mulch Plug While operating your riding mower, you have three options: (i) to collect grass clippings in the grass catcher, (ii) to discharge grass clippings on the side, or (iii) to mulch grass and recirculate clippings back to the lawn. For the third option, attach the mulching plug to the side-discharge chute and then to the deck. 1. Put two hex bolts through the mulching plug at the respective openings. See Figure 3. 2. Place nuts over the hex bolts. Downloaded from www.Manualslib.com manuals search engine
Wing Nut A Side Discharge Chute ulchin Plug Figure 3 3. Insert the plug into the side-discharge chute aligning the two slots on two sides of the side- discharge chute with those on the mulching plug. 4. To attach the mulching plug now to the unit, follow earlier instructions to attach side-discharge chute to the deck. 5. Place wing nut on each of the hex bolts and thread a few turns. See Figure 3. Check that the mulch plug is aligned correctly within the discharge chute. 6. Tighten both wing nuts. Downloaded from www.Manualslib.com manuals search engine
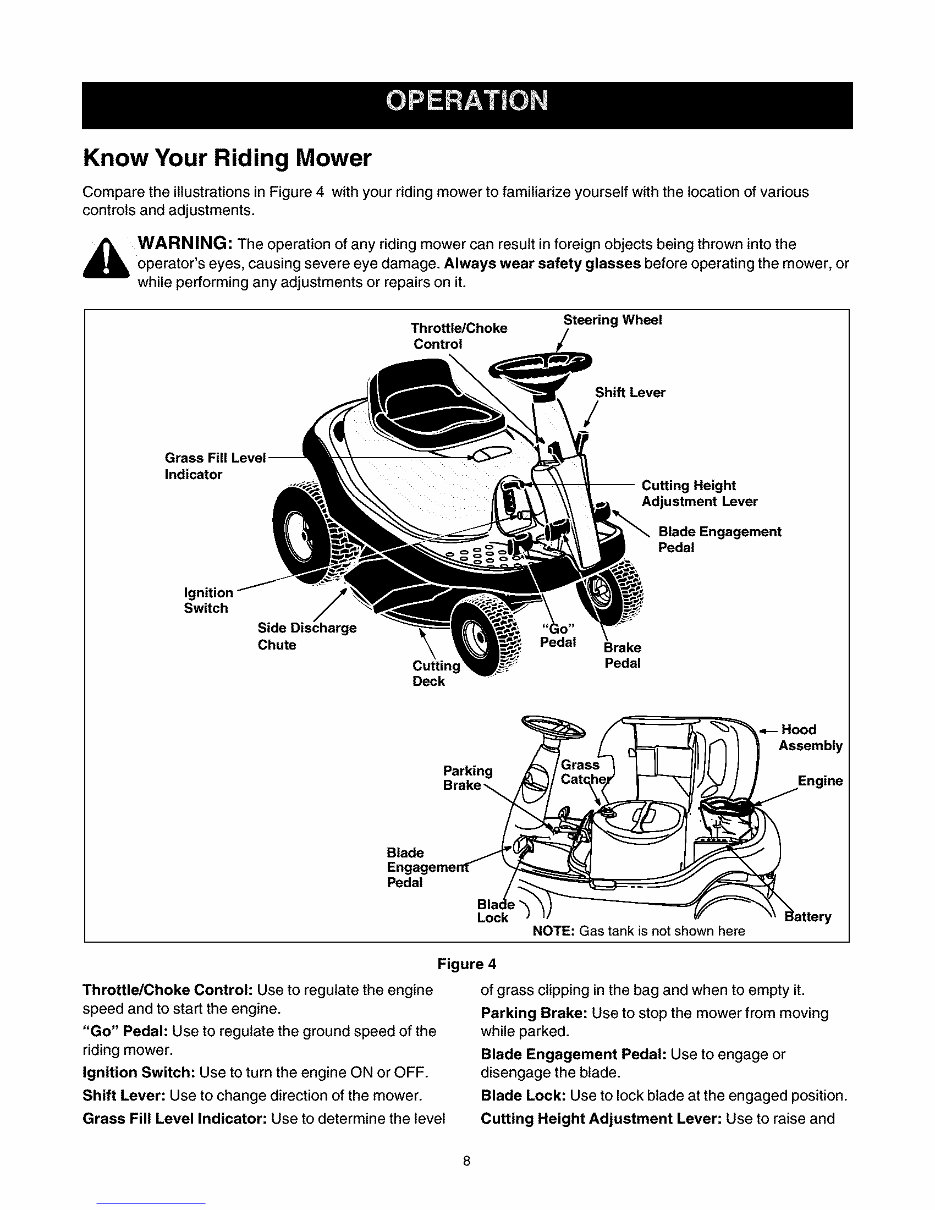
Know Your Riding Mower Compare the illustrations in Figure 4 with your riding mower to familiarize yourself with the location of various controls and adjustments. ,_ WARNING: The operation of any riding mower can result in foreign objects being thrown into the operator's eyes, causing severe eye damage. Always wear safety glasses before operating the mower, or while performing any adjustments or repairs on it. Throttle/Choke Control Steering Wheel Shift Lever Indicator g Height Adjustment Lever Blade Engagement Pedal Ignition Switch Side Discharge Chute Cutting Deck Pedal Brake Pedal Blade Pedal Parking Lock NOTE: Gas tank is not shown here Figure 4 Throttle/Choke Control: Use to regulate the engine speed and to start the engine. "Go" Pedal: Use to regulate the ground speed of the riding mower. Ignition Switch: Use to turn the engine ON or OFF. Shift Lever: Use to change direction of the mower. Grass Fill Level Indicator: Use to determine the level of grass clipping in the bag and when to empty it. Parking Brake: Use to stop the mower from moving while parked. Blade Engagement Pedal: Use to engage or disengage the blade. Blade Lock: Use to lock blade at the engaged position. Cutting Height Adjustment Lever: Use to raise and Downloaded from www.Manualslib.com manuals search engine
lowercuttingdeckwhichdetermines thecuttingheight. BrakePedal:Usetostopthemower's forwardor reversemotion. For Your Safety • Know location and function of all controls. • Be sure blades and engine are stopped before placing hands or feet near blades. • Before leaving operator's position, disengage blade(s), place the shift lever in neutral, engage parking brake, shut engine off and remove key. Stopping the Riding Mower 1. Release blade engagement pedal all the way. 2. Release "Go" Pedal and depress the brake pedal. 3. When the mower comes to a complete stop, place the shift lever in neutral. 4. Engage the parking brake by pulling up on the parking brake knob. 5. Turn the ignition key to OFF position and remove the key. Safety Interlock This unit is equipped with a safety interlock system for your protection. The interlock safety switches are connected to the brake pedal, the blade engagement pedal, the shift lever, and the seat. The purpose of the safety interlock system is threefold: • To prevent the engine from starting unless the brake pedal is depressed and the blade engagement pedal is disengaged; • To shut off the engine if the blade pedal is not disengaged when the shift lever is put into reverse; and • To shut the engine off when the operator leaves the seat without engaging the parking brake. ,_ WARNING: TO avoid the risk of serious injury, do not operate the riding mower if the interlock system is malfunctioning. Using Shift Lever This lever is used to regulate direction of the riding mower. It can be set at forward, neutral, or reverse settings. These settings are marked F, N, and R respectively on the unit. This unit is designed not to mow when the shift lever is in B position. (If the blade is engaged while shift lever is at the R position, the unit wilt shut off. To restart the unit, disengage the blade.) 1. Before you move the shift lever to any of the positions, depress the brake pedal and stop the unit. Keep your foot on the brake pedal. 2. The shift lever is locked at the N position. Move the lever outwards (left) and slide the lever upward to F or downward to R position as desired. NOTE: Look to the rear and make sure the path is free of obstacles before positioning the shift/ever to the reverse. 3. Do not force the shift lever. If it does not shift, release the brake pedal slightly to line up the shifting collar in the transmission, then try to move the shift lever. 4. Slowly release the brake pedal and take your foot off the pedal. Always make sure that there is no one in the way when you run the mower. Using Throttle/Choke Control The throttle/choke control is I___ used to increase or decrease the speed of the engine.The FAST and the SLOW positions are marked with illustrations of a rabbit and a turtle respectively. • For normal operation and when using a grass catcher, move the throttle/ choke control to the FAST position. • For maximum charging of the battery and also for a cooler engine while running, move the throttle/ choke control to the FAST position. • For transport and to tow pull-behind attachments, move the throttle/choke control to the SLOW. Grass Fill Level Indicator This indicator was designed to add convenience to your riding mower. While the mower is running, air will flow through the discharge chute and into the grass catcher. If the grass catcher is empty, air flows through easily pushing the ball up. If the grass catcher is full, air does Grass Fill Level Indicator not flow through it allowing the ball to fall. So if you see the ball in the grass catcher fill level indicator falling down, you should stop the mower and empty the bag. Downloaded from www.Manualslib.com manuals search engine
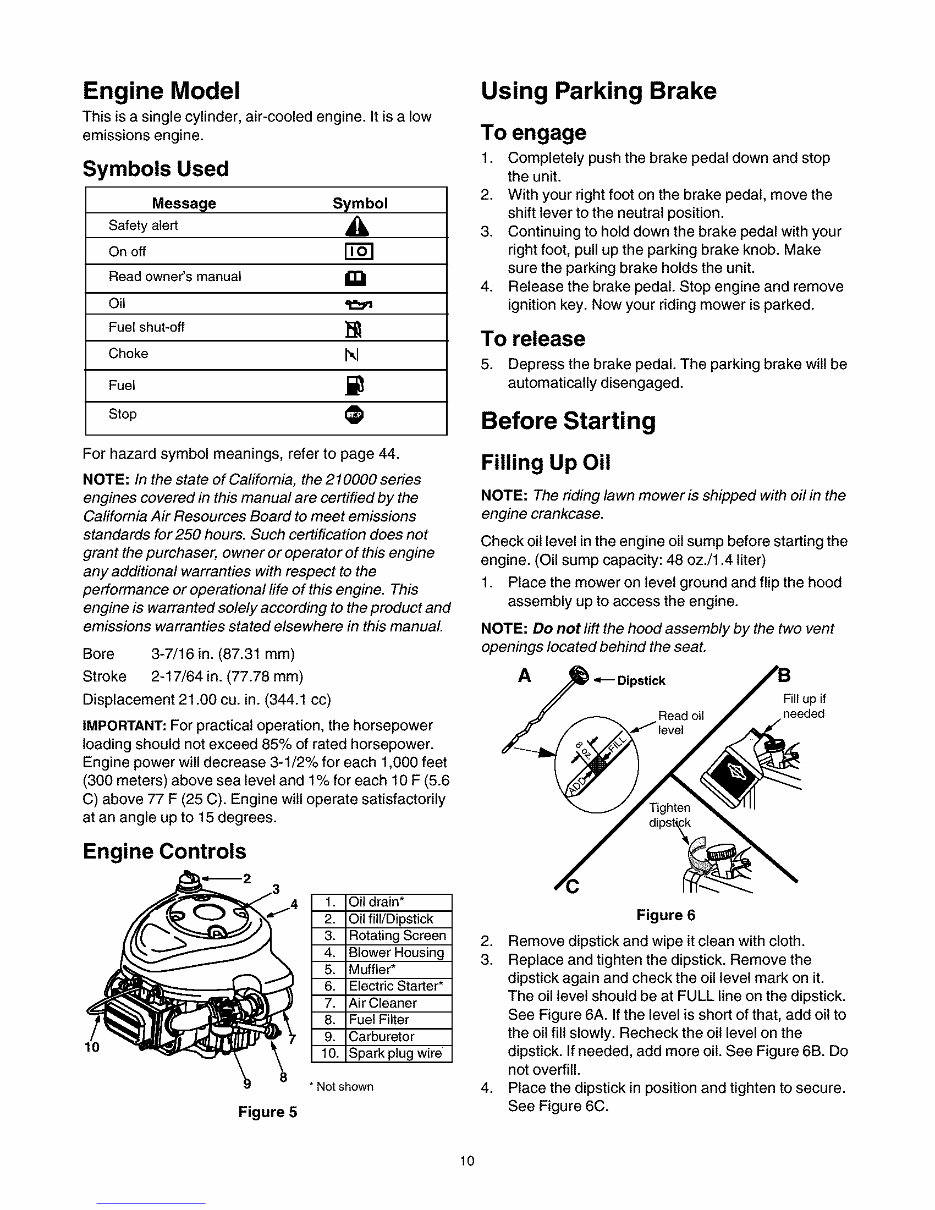
Engine Model This is a single cylinder, air-cooled engine. It is a low emissions engine. Symbols Used Message Symbol Safety alert _, On off Read owner's manual Oil Fuel shut-off ]_ Choke I",l Fuel ._ Stop I_1 For hazard symbol meanings, refer to page 44. NOTE: In the state of California, the 210000 series engines covered in this manual are certified by the California Air Resources Board to meet emissions standards for250 hours. Such certification does not grant the purchaser, owner or operator of this engine any additional warranties with respect to the performance or operational life of this engine. This engine is warranted solely according to the product and emissions warranties stated elsewhere in this manual Bore 3-7/16 in. (87.31 mm) Stroke 2-17/64 in. (77.78 mm) Displacement 21.00 cu. in. (344.1 cc) IMPORTANT: For practical operation, the horsepower loading should not exceed 85% of rated horsepower. Engine power will decrease 3-1/2% for each 1,000 feet (300 meters) above sea level and 1% for each 10 F (5.6 C) above 77 F (25 C). Engine will operate satisfactorily at an angle up to 15 degrees. Engine Controls _2 1. Oil drain* 2. Oil fill/Dipstick 3. Rotating Screen 4. Blower Housing 5. Muffler* 6. Electric Starter* 7. Air Cleaner 8. Fuel Filter 9. Carburetor 10. Spark plug wire * Not shown Figure 5 Using Parking Brake To engage 1. Completely push the brake pedal down and stop the unit. 2. With your right foot on the brake pedal, move the shift lever to the neutral position. 3. Continuing to hold down the brake pedal with your right foot, pull up the parking brake knob. Make sure the parking brake holds the unit. 4. Release the brake pedal. Stop engine and remove ignition key. Now your riding mower is parked. To release 5. Depress the brake pedal. The parking brake will be automatically disengaged. Before Starting Filling Up Oil NOTE: The riding lawn mower is shipped with oil in the engine crankcase. Check oil level in the engine oil sump before starting the engine. (Oil sump capacity: 48 oz./1.4 liter) 1. Place the mower on level ground and flip the hood assembly up to access the engine. NOTE: Do not lift the hood assembly by the two vent openings located behind the seat. A Dipstick Fill up if Read oil needed Figure 6 2. Remove dipstick and wipe it clean with cloth. 3. Replace and tighten the dipstick. Remove the dipstick again and check the oil level mark on it. The oil level should be at FULL line on the dipstick. See Figure 6A. If the level is short of that, add oil to the oil fill slowly. Recheck the oil level on the dipstick. If needed, add more oil. See Figure 6B. Do not overfill. 4. Place the dipstick in position and tighten to secure. See Figure 6C. 10 Downloaded from www.Manualslib.com manuals search engine
This is a comprehensive owner's service manual for the CRAFTSMAN Riding Mower Model No.247.27022. It is a factory workshop service manual repair manual that covers a wide range of essential content, making it useful for both professional mechanics and DIY enthusiasts.
Safety
Operation
Maintenance
Storage
Espanol, Page 47
The table of contents includes:
Warranty Information
Safe Operation Practices
Assembly
Operation
Maintenance
Service & Adjustment
Off-Season Storage
Trouble-Shooting
Parts List
Slope Guide
EspaSol
Service Phone Numbers
The repair parts covered in this manual include Switch Plate, Steering Tube Assembly, Steering Support Bracket, Front Axle Assembly, and various screws, nuts, and more.
The file format is compatible with all versions of Windows & Mac, and the language used is English. It requires Adobe Reader & Win for access.
This manual covers the entire vehicle from start to finish, providing a wealth of information at your fingertips. It is the only workshop service manual you will ever need, offering smart, convenient, and fast access.
Instant access means there will be no shipping costs or waiting for a paper or CD manual to arrive in the mail. You will receive this manual today via instant download. Buy with confidence!
For more information and to obtain the manual, visit http://EMMASTONE.tradebit.com or search for the name EMMASTONE on http://WWW.tradebit.com.
Thank you for visiting our page and have a nice day!
We're currently collecting product reviews for this item. In the meantime, here are some reviews from our past customers sharing their overall shopping experience.
4.5
Out of 5.0
Overall Rating
89%
of customers that buy from this merchant give them a 4 or 5-Star rating.
Verified Buyer
September 19, 2025 by Kenneth C. (Georgia, US)
“It's too easy”
Verified Buyer
September 19, 2025 by Thomas R. (US)
“So far so good, but I haven't downloaded the software yet!”
Verified Buyer
September 19, 2025 by James D. (California, US)
“There are other online sites offering repair manuals, but they make you jump through expensive hoops for one . I found what I needed quickly, bought it, download it and I was done.”
Verified Buyer
September 19, 2025 by Steven S. (US)
“Quick and easy to buy, next I will see if is quick and easy to use.”
Got me out of a pickle quick.Order was within minutes, digital format.Thank you
Baruere D.09-16-25 - New York, US
V good
Matt W.09-16-25 - US
Thank you for making such a detailed repair book so convenient
Chuck S.09-16-25 - US
easy, no problems
Michael T.09-16-25 - US
Still to check content but good so far.
JEREMIAH M.09-19-25 - US
GREAT
Michael P.09-19-25 - US
quick and easy
Chris C.09-19-25 - US
Very easy
Reinier F.09-19-25 - US
Excelente
Duilio C.09-18-25 - US
Great!
Nick C.09-18-25 - US
Easy
Robbie B.09-18-25 - TX, United States
Nice experience would shop here again.
Phill S.09-18-25 - LINCOLNSHIRE, GB
Great communication
Robert N.09-18-25 - US
thanks
Stephen W.09-18-25 - New York, US
nice quick purchase
Dan S.09-18-25 - US
Fast and easy
Leif H.09-18-25 - Texas, US
Very easy and quick buy
Derek H.09-18-25 - Georgia, US
It was very easy to find and purchase the repair manual that I needed!
Doug R.09-18-25 - US
Stop
Matthew I.09-18-25 - Worker Region, US
We've got a mix of Doosan forklifts at our facility and finding one manual that covers them all was a surprise. Got everything from service procedures to controller diagnostics. Helped me fix a charger issue and it's now bookmarked on the shop computer for the whole team. Way easier than calling the hotline.
Harry T.09-18-25 - US
Easy to use
J B.09-18-25 - US
good
Sam B.09-18-25 - Ontario, CA
Very good
Thomas J.09-18-25 - Östergötland , SE
All as exspected.
Glenn B.09-18-25 - Arizona, US
Quick and easy purchase.
Nigel B.09-18-25 - Western Australia, AU
All good
Robert L.09-18-25 - US
Delivery details
Cameron S.09-17-25 - US
good
Arthur H.09-17-25 - Maine, US
easy
Stig F.09-17-25 - US
Easy
Wallis B.09-17-25 - Victoria, AU
There was a bit of a problem downloading but it was sorted at their end with no problem to me
Jozef B.09-17-25 - US
Very satisfying buying on this site. Not my first manual !!
Linda D.09-17-25 - New York, US
Hope I find easy access.
Greg F.09-17-25 - Victoria, AU
very quick and easy
Ted P.09-17-25 - US
no problems at all
Rory D.09-17-25 - US
Very good
Micheal H.09-17-25 - US
Thanks
Bozhidar R.09-17-25 - Nord Holland , Haarlem, NL
Ik verwachtte een PDF-bestand, maar ik ontving een .ova-bestand en ik kan het ontvangen bestand niet openen.
Les C.09-17-25 - South Carolina, US
Fast and easy
Roger W.09-17-25 - Tennessee, US
Got me what I needed
Todd M.09-17-25 - US
Easy Checkout
Andrew R.09-17-25 - Michigan, US
Quick and easy
Niall F.09-17-25 - CO CORK, IE
All good....bit awkward to navigate
Peeradet A.09-17-25 - US
Good and easy
Pedro G.09-17-25 - US
very fast
Dom K.09-17-25 - US
very easy
Greto M.09-17-25 - US
great
Enkhtugs B.09-16-25 - Ulaanbaatar, Mongolia
ok, tnx
Jan H.09-16-25 - NO
Have some experiens from before
Henry S.09-16-25 - US
Easy to find manual
David G.09-16-25 - Northamptonshire, GB
Got me out of a pickle quick.Order was within minutes, digital format.Thank you
Baruere D.09-16-25 - New York, US
V good
Matt W.09-16-25 - US
Thank you for making such a detailed repair book so convenient