


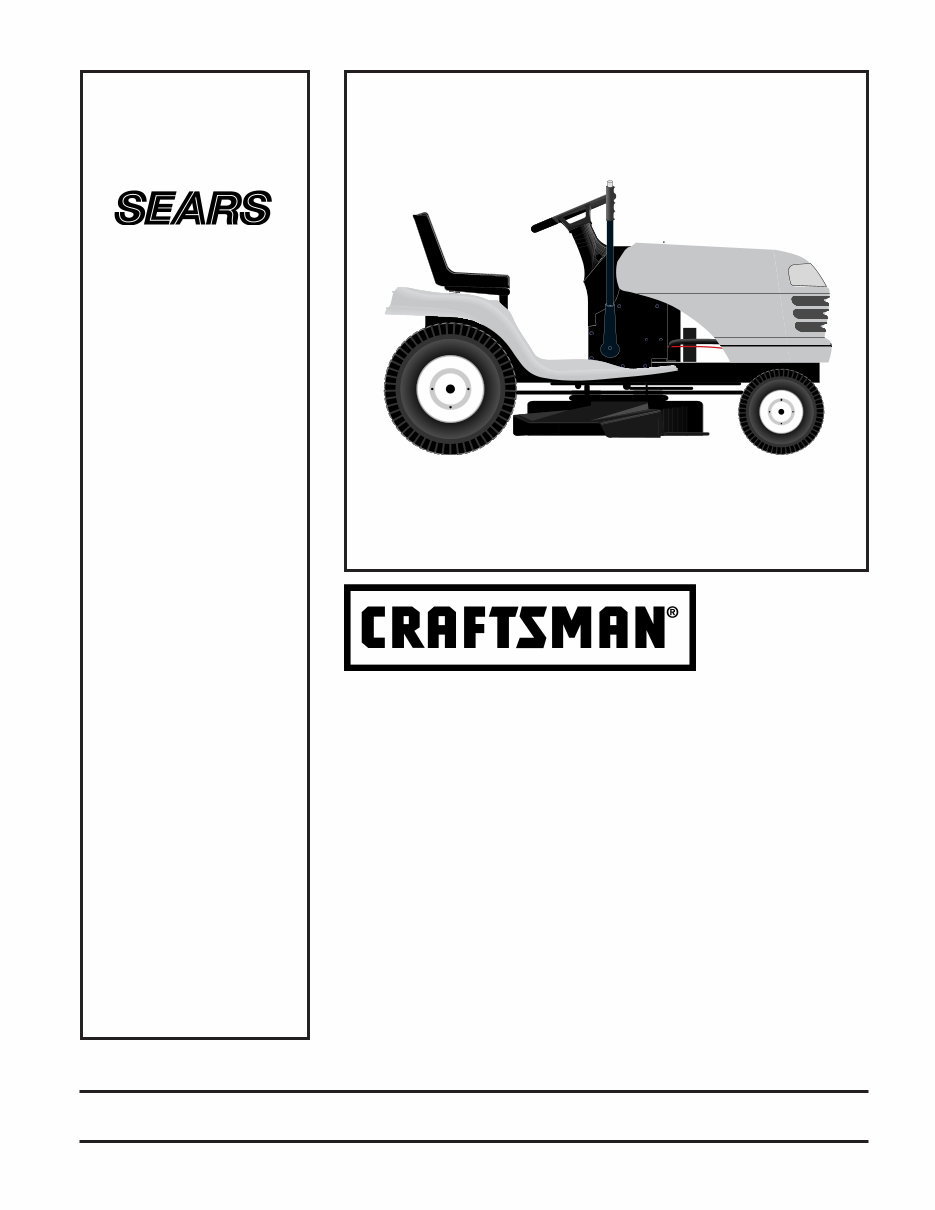
16.0 HP
ELECTRIC START
42" MOWER
6 SPEED TRANSAXLE
LAWN TRACTOR
Important:
Read and follow
all Safety Rules
and Instructions
Before Operating
This Equipment
MODEL NO.
944.604160
OWNER’S
MANUAL
• Assembly
• Operation
• Maintenance
• Service and Adjustments
• Repair Parts
Sears Canada, Inc., Toronto, Ontario M5B 2B8
02494

2
DO NOT:
• Do not turn on slopes unless necessary, and then,
turn slowly and gradually downhill, if possible.
• Do not mow near drop-offs, ditches, or embankments.
The mower could suddenly turn over if a wheel is over
the edge of a cliff or ditch, or if an edge caves in.
• Do not mow on wet grass. Reduced traction could
cause sliding.
• Do not try to stabilize the machine by putting your foot
on the ground.
• Do not use grass catcher on steep slopes.
III. CHILDREN
Tragic accidents can occur if the operator is not alert to
the presence of children. Children are often attracted to
the machine and the mowing activity. Never assume that
children will remain where you last saw them.
• Keep children out of the mowing area and under the
watchful care of another responsible adult.
• Be alert and turn machine off if children enter the
area.
• Before and when backing, look behind and down for
small children.
• Never carry children. They may fall off and be seriously
injured or interfere with safe machine operation.
• Never allow children to operate the machine.
• Use extra care when approaching blind corners, shrubs,
trees, or other objects that may obscure vision.
IV. SERVICE
• Use extra care in handling gasoline and other fuels.
They are flammable and vapors are explosive.
- Use only an approved container.
- Never remove gas cap or add fuel with the engine
running. Allow engine to cool before refueling. Do
not smoke.
- Never refuel the machine indoors.
- Never store the machine or fuel container inside where
there is an open flame, such as a water heater.
• Never run a machine inside a closed area.
• Keep nuts and bolts, especially blade attachment bolts,
tight and keep equipment in good condition.
• Never tamper with safety devices. Check their proper
operation regularly.
• Keep machine free of grass, leaves, or other debris
build-up. Clean oil or fuel spillage. Allow machine to
cool before storing.
• Stop and inspect the equipment if you strike an object.
Repair, if necessary, before restarting.
• Never make adjustments or repairs with the engine
running.
• Grass catcher components are subject to wear, dam-
age, and deterioration, which could expose moving
parts or allow objects to be thrown. Frequently check
components and replace with manufacturer's recom-
mended parts, when necessary.
• Mower blades are sharp and can cut. Wrap the blade(s)
or wear gloves, and use extra caution when servicing
them.
• Check brake operation frequently. Adjust and service
as required.
I. GENERAL OPERATION
• Read, understand, and follow all instructions in the
manual and on the machine before starting.
• Only allow responsible adults, who are familiar with the
instructions, to operate the machine.
• Clear the area of objects such as rocks, toys, wire, etc.,
which could be picked up and thrown by the blade.
• Be sure the area is clear of other people before mow-
ing. Stop machine if anyone enters the area.
• Never carry passengers.
• Do not mow in reverse unless absolutely necessary.
Always look down and behind before and while back-
ing.
• Be aware of the mower discharge direction and do not
point it at anyone. Do not operate the mower without
either the entire grass catcher or the guard in place.
• Slow down before turning.
• Never leave a running machine unattended. Always
turn off blades, set parking brake, stop engine, and
remove keys before dismounting.
• Turn off blades when not mowing.
• Stop engine before removing grass catcher or un-
clogging chute.
• Mow only in daylight or good artificial light.
• Do not operate the machine while under the influence
of alcohol or drugs.
• Watch for traffic when operating near or crossing road-
ways.
• Use extra care when loading or unloading the machine
into a trailer or truck.
• Data indicates that operators, age 60 years and above,
are involved in a large percentage of riding mower-re-
lated injuries. These operators should evaluate their
ability to operate the riding mower safely enough to
protect themselves and others from serious injury.
• Keep machine free of grass , leaves or other debris
build-up which can touch hot exhaust / engine parts and
burn. Do not allow the mower deck to plow leaves or
other debris which can cause build-up to occur. Clean
any oil or fuel spillage before operating or storing the
machine. Allow machine to cool before storage.
II. SLOPE OPERATION
Slopes are a major factor related to loss-of-control and
tipover accidents, which can result in severe injury or death.
All slopes require extra caution. If you cannot back up the
slope or if you feel uneasy on it, do not mow it.
DO:
• Mow up and down slopes, not across.
• Remove obstacles such as rocks, tree limbs, etc.
• Watch for holes, ruts, or bumps. Uneven terrain could
overturn the machine. Tall grass can hide obstacles.
• Use slow speed. Choose a low gear so that you will
not have to stop or shift while on the slope.
• Follow the manufacturer’s recommendations for wheel
weights or counterweights to improve stability.
• Use extra care with grass catchers or other attachments.
These can change the stability of the machine.
• Keep all movement on the slopes slow and gradual.
Do not make sudden changes in speed or direction.
• Avoid starting or stopping on a slope. If tires lose trac-
tion, disengage the blades and proceed slowly straight
down the slope.
SAFETY RULES
Safe Operation Practices for Ride-On Mowers
IMPORTANT: THIS CUTTING MACHINE IS CAPABLE OF AMPUTATING HANDS AND FEET AND THROWING OBJECTS. FAILURE
TO OBSERVE THE FOLLOWING SAFETY INSTRUCTIONS COULD RESULT IN SERIOUS INJURY OR DEATH.
3
TABLE OF CONTENTS
SAFETY RULES ......................................................... 2-3
PRODUCT SPECIFICATIONS ....................................... 4
CUSTOMER RESPONSIBILITIES................................. 4
WARRANTY................................................................... 4
ASSEMBLY ................................................................. 6-8
OPERATION ............................................................. 9-13
MAINTENANCE SCHEDULE ...................................... 14
MAINTENANCE ...................................................... 14-17
SERVICE AND ADJUSTMENTS ............................ 18-23
STORAGE .................................................................... 24
TROUBLESHOOTING ............................................ 25-26
REPAIR PARTS - TRACTOR .................................. 28-43
REPAIR PARTS - ENGINE...................................... 44-49
PARTS ORDERING/SERVICE.........................................
BACK COVER..................................................................
WARNING: In order to prevent accidental
starting when setting up, transporting,
adjusting or making repairs, always dis-
connect spark plug wire and place wire
where it cannot contact spark plug.
• Be sure the area is clear of other people before mowing. Stop
machine if anyone enters the area.
• Never carry passengers or children even with the blades
off.
• Do not mow in reverse unless absolutely necessary. Always
look down and behind before and while backing.
• Never carry children.They may fall off and be seriously injured
or interfere with safe machine operation.
• Keep children out of the mowing area and under the watchful
care of another responsible adult.
• Be alert and turn machine off if children enter the area.
• Before and when backing, look behind and down for small
children.
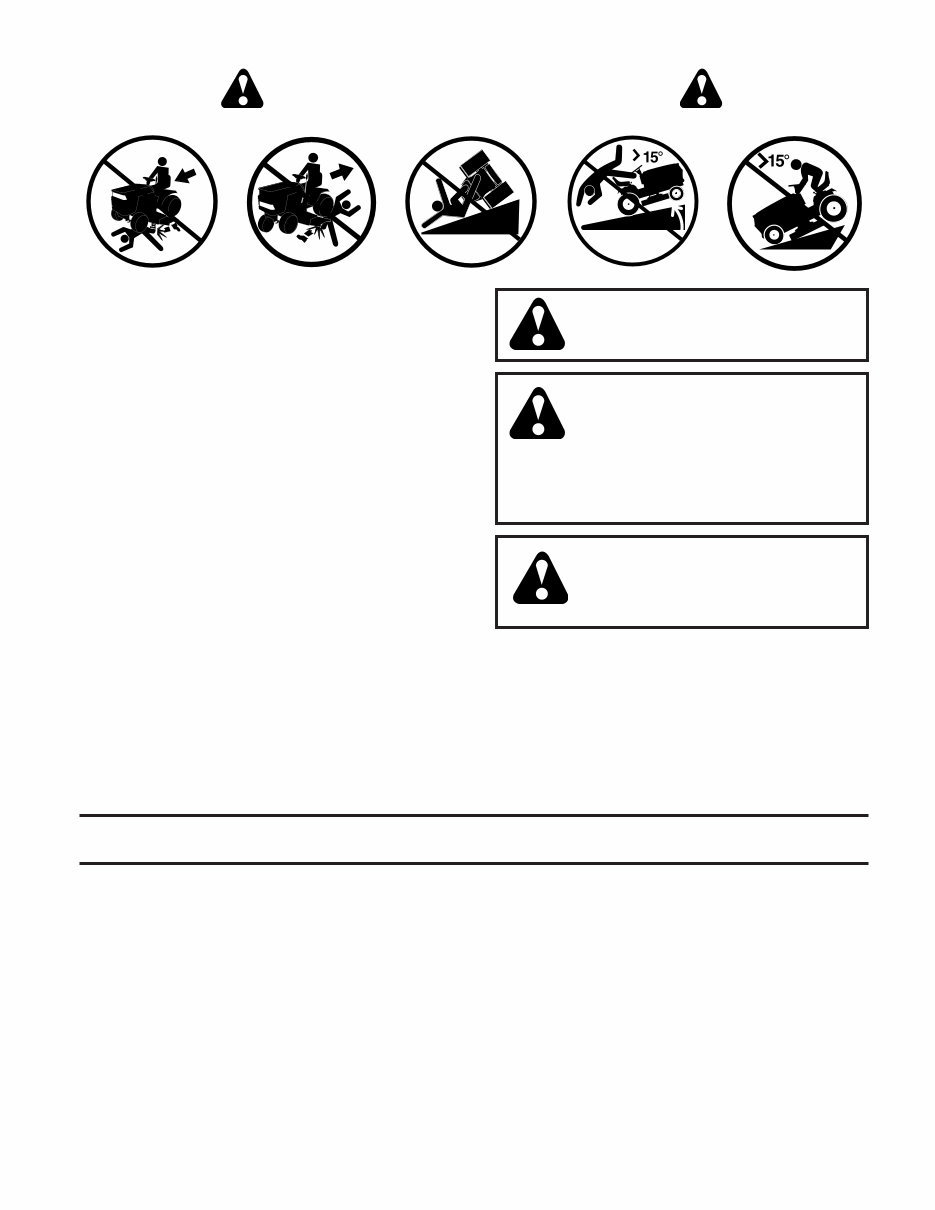
• Mow up and down slopes (15° Max), not across.
• Remove obstacles such as rocks, tree limbs, etc.
• Watch for holes, ruts, or bumps. Uneven terrain could overturn
the machine. Tall grass can hide obstacles.
• Use slow speed. Choose a low gear so that you will not have
to stop or shift while on the slope.
• Avoid starting or stopping on a slope. If tires lose traction,
disengage the blades and proceed slowly straight down the
slope.
• If machine stops while going uphill, disengage blades, shift
into reverse and back down slowly.
• Do not turn on slopes unless necessary, and then, turn slowly
and gradually downhill, if possible.
WARNING: Do not coast down a hill in neu-
tral, you may lose control of the tractor.
WARNING: Tow only the attachments that
are recommended by and comply with
specifications of the manufacturer of your
tractor. Use common sense when towing.
Operate only at the lowest possible speed
when on a slope. Too heavy of a load, while
on a slope, is dangerous. Tires can lose
traction with the ground and cause you to
lose control of your tractor.
SAFETY RULES
Safe Operation Practices for Ride-On Mowers

4
PRODUCT SPECIFICATIONS
Gasoline Capacity 1.25 Gallons
and type: Unleaded Regular
Oil Type SAE 30 (above 32°F)
(API-SF-SJ): SAE 5W-30 (below 32°F)
Synthetic (below 0°F)
Your tractor was shipped from the factory with non-synthetic
SAE 10W30 motor oil
Oil Capacity: 3.0 Pints
Spark Plug: Champion RC12YC
(Gap: .030")
Ground Speed (MPH): Forward:
1st 1.1
2nd 1.4
3rd 2.2
4th 3.3
5th 4.4
6th 4.9
Reverse: 1.4
Tire Pressure: Front: 14 PSI
Rear: 12 PSI
Charging System: 3 Amps Battery
5 Amps Headlights
Battery: AMP/HR: 28
Min. CCA: 230
Case Size: U1R
Blade Bolt Torque: 27-35 FT. LBS.
LIMITED TWO (2) YEAR WARRANTY ON CRAFTSMAN TRACTOR (RIDING EQUIPMENT)
For two (2) years from date of purchase Sears Canada, Inc. will repair or replace at Sears option free of charge parts which are
defective as a result of material or workmanship.
FULL ONE (1) YEAR WARRANTY ON BATTERY
For one (1) year from date of purchase, if any battery included with this riding equipment proves defective in material or workman-
ship and our testing determines the battery will not hold a charge, Sears will replace the battery at no charge.
COMMERCIAL OR RENTAL USE
Warranty on Riding Equipment used for commercial or rental purposes is limited to ninety (90) days.
This Warranty does NOT cover:
1. Pre-delivery set-up.
2. Tire replacement or repair caused by punctures from outside objects (such as nails, thorns, stumps, or glass).
3. Expendable items which become worn during normal use, such as blades, spark plug, air cleaners and belts.
4. Repairs necessary because of operator abuse or negligence, including damaged jackshaft or mandrel and the
failure to operate and maintain the equipment according to the instructions contained in the Owner’s Manual.
5. In Home service.
Warranty service is available by returning the Craftsman Riding Equipment to the nearest Sears Service Centre/Department in
Canada. This warranty applies only while this product is in use in Canada.
This warranty is in addition to any statutory warranty and does not exclude or limit legal rights you may have but shall run concur-
rently with applicable provincial legislation. Furthermore, some provinces do NOT allow limitation on how long an implied warranty
will last so the above limitations may not apply to you.
SEARS CANADA, INC., TORONTO, ONTARIO M5B 2B8
MAINTENANCE AGREEMENT
A Maintenance Agreement is available on this product.
Contact your nearest Sears store for details.
CUSTOMER RESPONSIBILITIES
• Read and observe the safety rules.
• Follow a regular schedule in maintaining, caring for
and using your tractor.
• Follow the instructions under “Maintenance” and “Stor-
age” sections of this owner’s manual.
CONGRATULATIONS on your purchase of a new Tractor.
It has been designed, engineered and manufactured to give
you the best possible dependability and performance.
Should you experience any problem you cannot easily rem-
edy, please contact your nearest authorized service center/
department. We have competent, well-trained technicians
and the proper tools to service or repair this tractor.
Please read and retain this manual. The instructions will
enable you to assemble and maintain your tractor properly.
Always observe the “SAFETY RULES”.
WARNING: This tractor is equipped with an internal com-
bustion engine and should not be used on or near any
unimproved forest-covered, brush-covered or grass-covered
land unless the engine’s exhaust system is equipped with
a spark arrester meeting applicable local or state laws (if
any). If a spark arrester is used, it should be maintained
in effective working order by the operator.
A spark arrester for the muffler is available through your
nearest authorized service center/department (See REPAIR
PARTS section of this manual).
5
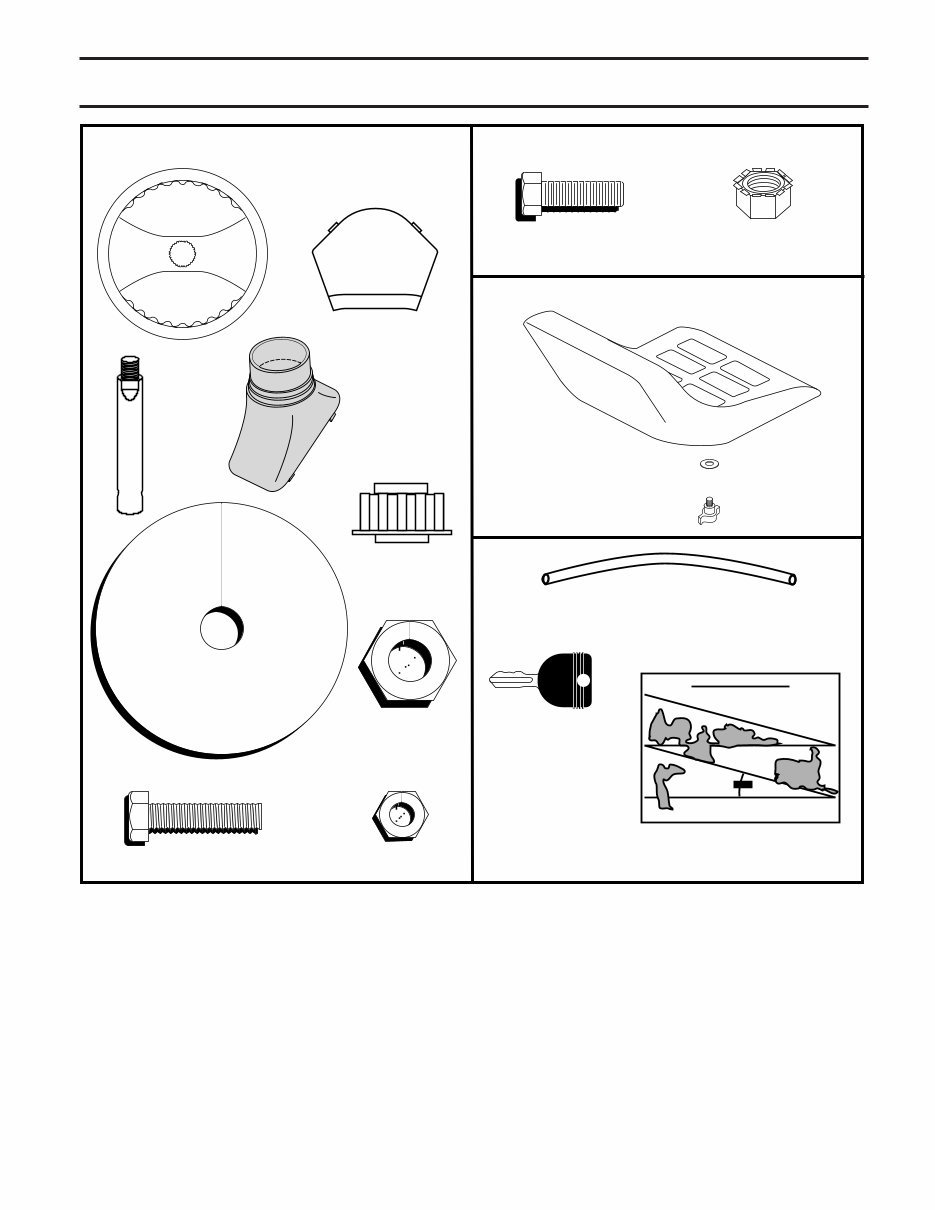
CONTENTS OF HARDWARE PACK
Steering
Wheel Insert
Steering
Extension
Shaft
Steering
Sleeve
Steering Wheel
(1) Knob
(1) Washer
17/32 x 1-3/16 x 12 Gauge
Seat
Battery
Keys
Slope Sheet
(2) Hex Bolts
1/4-20 x 3/4
(2) Keps Nut 1/4-20
(1) Large Flat Washer
(1) Hex Bolt 1/4-28 x 1-1/4 (1) Locknut 1/4-28
(1) Locknut 1/2-20
Steering Wheel
Adapter
(2) Keys
Slope Sheet
(1) Oil Drain Tube
For Future Use
6
ASSEMBLY
TOOLS REQUIRED FOR ASSEMBLY
A socket wrench set will make assembly easier. Standard
wrench sizes are listed.
(2) 7/16" wrenches Utility knife
(1) 3/4" wrench Tire pressure gauge
Phillips screwdriver
When right or left hand is mentioned in this manual, it means
when you are in the operating position (seated behind the
steering wheel).
TO REMOVE TRACTOR FROM
CARTON
UNPACK CARTON
• Remove all accessible loose parts and parts cartons
from carton .
• Cut along dotted lines on all four panels of carton.
Remove end panels and lay side panels flat.
• Check for any additional loose parts or cartons and
remove.
Your new tractor has been assembled at the factory with exception of those parts left unassembled for shipping purposes.
To ensure safe and proper operation of your tractor all parts and hardware you assemble must be tightened securely. Use
the correct tools as necessary to insure proper tightness.
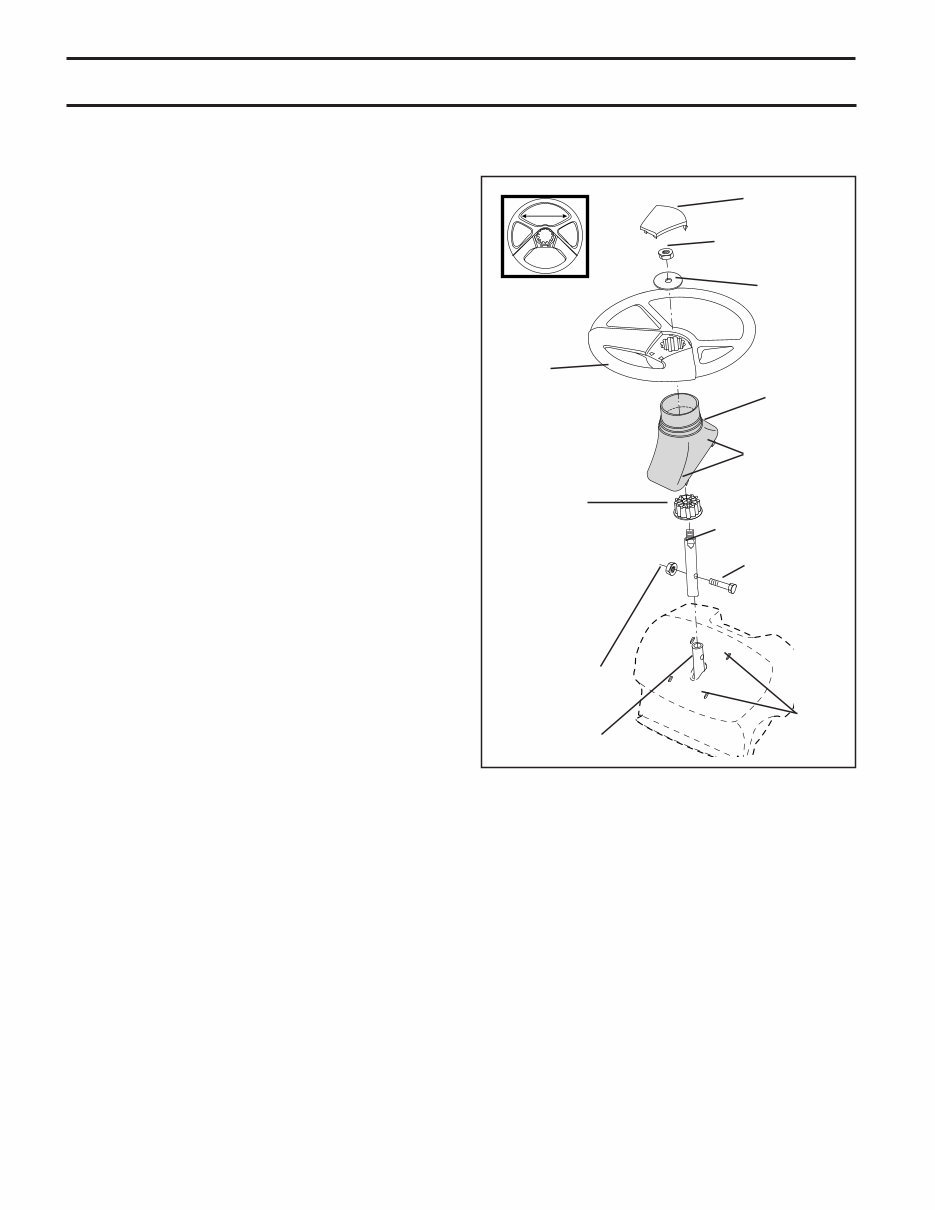
FIG. 1
BEFORE REMOVING TRACTOR FROM
SKID
ATTACH STEERING WHEEL (SEE FIG. 1)
ASSEMBLE EXTENSION SHAFT AND BOOT
• Slide extension shaft onto lower steering shaft. Align
mounting holes in extension and lower shafts and install
1/4 hex bolt and locknut. Tighten securely.
IMPORTANT: TIGHTEN BOLT AND NUT SECURELY TO 10-12
FT. LBS TORQUE.
• Place tabs of steering boot over tab slots in dash and
push down to secure.
INSTALL STEERING WHEEL
• Position front wheels of the tractor so they are pointing
straight forward.
• Remove steering wheel adapter from steering wheel
and slide adapter onto steering shaft extension.
• Position steering wheel so cross bars are horizontal
(left to right) and slide inside boot and onto adapter.
• Assemble large flat washer, 1/2 hex nut and tighten
securely.
• Snap steering wheel insert into center of steering
wheel.
• Remove protective materials from tractor hood and
grill.
IMPORTANT: CHECK FOR AND REMOVE ANY STAPLES
IN SKID THAT MAY PUNCTURE TIRES WHERE TRACTOR
IS TO ROLL OFF SKID.
02597
1/4 LOCKNUT
LOWER
STEERING
SHAFT
STEERING
BOOT
EXTENSION SHAFT
1/4 HEX BOLT
STEERING
WHEEL
INSERT
ADAPTER
1/2 HEX NUT
LARGE FLAT
WASHER
TABS
TAB
SLOTS
7
ASSEMBLY
HOW TO SET UP YOUR TRACTOR
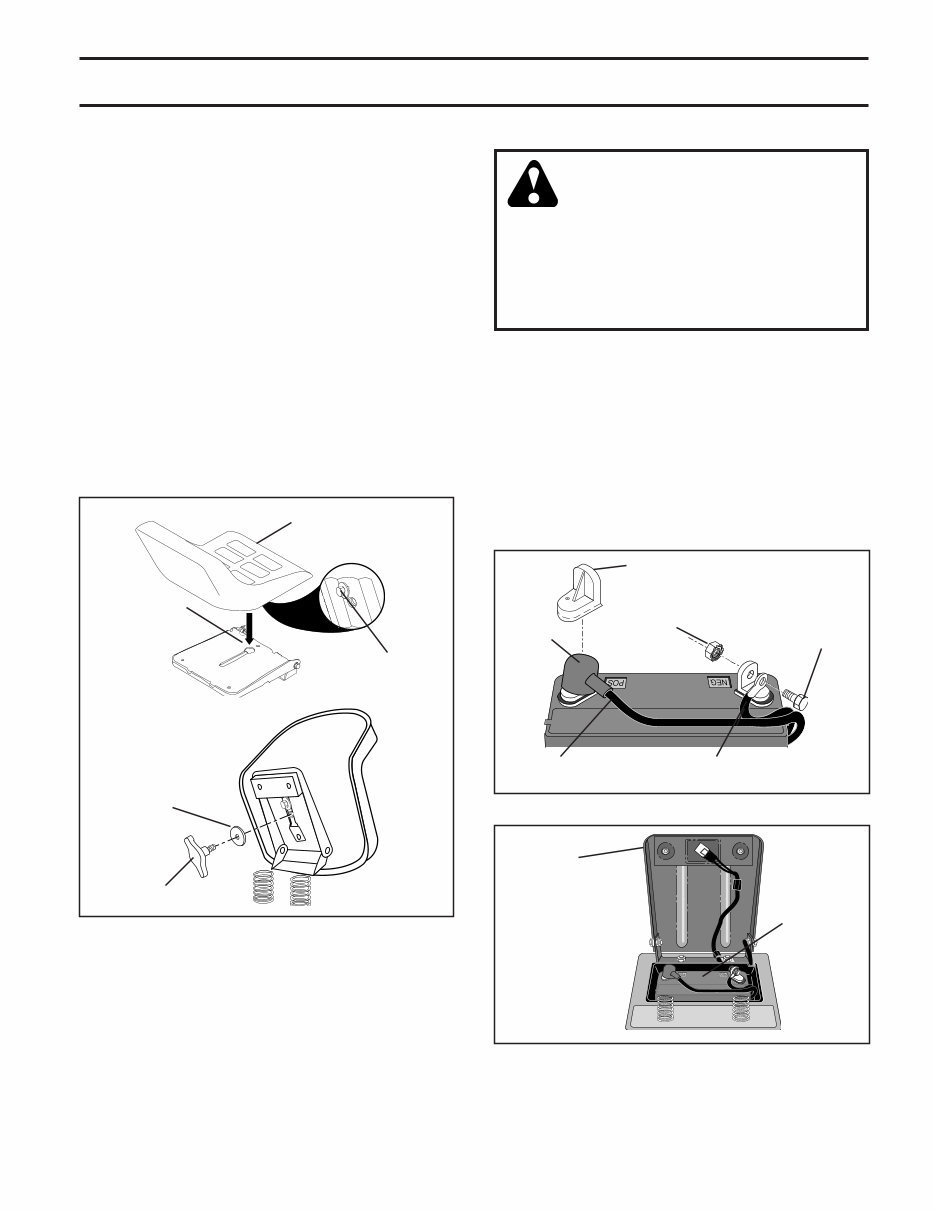
INSTALL SEAT (See Fig. 2)
Adjust seat before tightening adjustment knob.
• Remove adjustment knob and flat washer securing
seat to cardboard packing and set aside for assembly
of seat to tractor.
• Pivot seat upward and remove from the cardboard pack-
ing. Remove the cardboard packing and discard.
• Place seat on seat pan so head of shoulder bolt is
positioned over large slotted hole in pan.
• Push down on seat to engage shoulder bolt in slot and
pull seat towards rear of tractor.
• Pivot seat and pan forward and assemble adjustment
knob and flat washer loosely. Do not tighten.
• Lower seat into operating position and sit on seat.
• Slide seat until a comfortable position is reached
which allows you to press clutch/brake pedal all the
way down.
• Get off seat without moving its adjusted position.
• Raise seat and tighten adjustment knob securely.
FIG. 2
2466
02464
SEAT PAN
SHOULDER
BOLT
ADJUSTMENT
KNOB
FLAT WASHER
SEAT
FIG. 3
FIG. 4
02604
02602
HEX BOLT
NEGATIVE (BLACK)
CABLE
POSITIVE (RED)
CABLE
KEPS
NUT
SEAT PAN
TERMINAL
COVER
DISCARD TERMINAL
PROTECTIVE CAPS
CONNECT BATTERY (See Figs. 3 and 4)
CAUTION: Do not short battery ter-
minals by allowing a wrench or any
other object to contact both terminals
at the same time. Before connecting
battery, remove metal bracelets, wrist-
watch bands, rings, etc.
Positive terminal must be connected
first to prevent sparking from accidental
grounding.
• Lift seat pan to raised position.
• Remove terminal protective caps and discard.
• If this battery is put into service after month and year
indicated on label (label located between terminals)
charge battery for minimum of one hour at 6-10
amps.
• First connect RED battery cable to positive (+) terminal
with hex bolt and keps nut as shown. Tighten securely.
Slide terminal cover over terminal.
• Connect BLACK grounding cable to negative (-) ter-
minal with remaining hex bolt and keps nut. Tighten
securely.
LABEL

8
ASSEMBLY
✓CHECKLIST
BEFORE YOU OPERATE AND ENJOY YOUR NEW TRAC-
TOR, WE WISH TO ASSURE THAT YOU RECEIVE THE
BEST PERFORMANCE AND SATISFACTION FROM THIS
QUALITY PRODUCT.
PLEASE REVIEW THE FOLLOWING CHECKLIST:
✓ All assembly instructions have been completed.
✓ No remaining loose parts in carton.
✓ Battery is properly prepared and charged. (Minimum
1 hour at 6 amps).
✓ Seat is adjusted comfortably and tightened securely.
✓ All tires are properly inflated. (For shipping purposes,
the tires were overinflated at the factory).
✓ Be sure mower deck is properly leveled side-to-side/
front-to-rear for best cutting results. (Tires must be
properly inflated for leveling).
✓ Check mower and drive belts. Be sure they are routed
properly around pulleys and inside all belt keepers.
✓ Check wiring. See that all connections are still secure
and wires are properly clamped.
WHILE LEARNING HOW TO USE YOUR TRACTOR, PAY
EXTRA ATTENTION TO THE FOLLOWING IMPORTANT
ITEMS:
✓ Engine oil is at proper level.
✓ Fuel tank is filled with fresh, clean, regular unleaded
gasoline.
✓ Become familiar with all controls - their location and
function. Operate them before you start the engine.
✓ Be sure brake system is in safe operating condition.
CHECK TIRE PRESSURE
The tires on your tractor were overinflated at the factory
for shipping purposes. Correct tire pressure is important
for best cutting performance.
• Reduce tire pressure to PSI shown in “PRODUCT
SPECIFICATIONS” section of this manual.
CHECK DECK LEVELNESS
For best cutting results, mower housing should be properly
leveled. See “TO LEVEL MOWER HOUSING” in the Service
and Adjustments section of this manual.
CHECK FOR PROPER POSITION OF ALL
BELTS
See the figures that are shown for replacing motion and
mower blade drive belts in the Service and Adjustments
section of this manual. Verify that the belts are routed
correctly.
CHECK BRAKE SYSTEM
After you learn how to operate your tractor, check to see that
the brake is properly adjusted. See “TO ADJUST BRAKE”
in the Service and Adjustments section of this manual.
NOTE: You may now roll or drive your tractor off the skid.
Follow the appropriate instruction below to remove the
tractor from the skid.
TO ROLL TRACTOR OFF SKID (See Op-
eration section for location and function of
controls)
• Press lift lever plunger and raise attachment lift lever
to its highest position.
• Release parking brake by depressing clutch/brake
pedal.
• Place gearshift lever in neutral (N) position.
• Roll tractor forward off skid.
• Remove banding holding the deflector shield up against
tractor.
TO DRIVE TRACTOR OFF SKID (See Op-
eration section for location and function of
controls)
WARNING: Before starting, read, understand and follow
all instructions in the Operation section of this manual. Be
sure tractor is in a well-ventilated area. Be sure the area in
front of tractor is clear of other people and objects.
• Be sure all the above assembly steps have been com-
pleted.
• Check engine oil level and fill fuel tank with gasoline.
• Sit on seat in operating position, depress clutch/brake
pedal and set the parking brake.
• Place gear shift lever in neutral (N) position.
• Press lift lever plunger and raise attachment lift lever
to its highest position.
• Start the engine. After engine has started, move throttle
control to idle position.
• Depress clutch/brake pedal into full "BRAKE" position
and hold. Move gearshift lever to 1st gear.
• Slowly release clutch/brake pedal and slowly drive
tractor off skid.
• Apply brake to stop tractor, set parking brake and place
gearshift lever in neutral position.
• Turn ignition key to "STOP" position.
Continue with the instructions that follow.
9
OPERATION
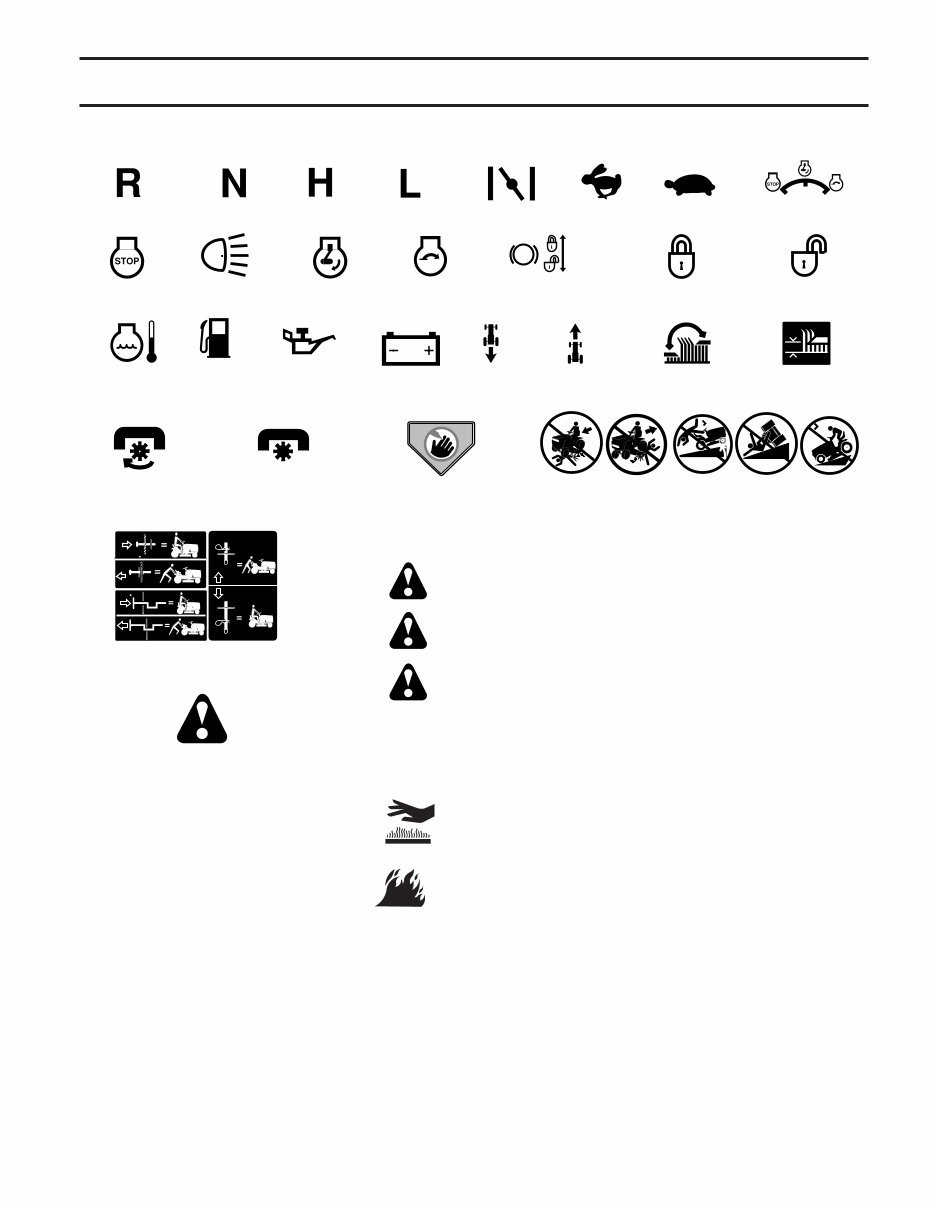
These symbols may appear on your tractor or in literature supplied with the product. Learn and understand their mean-
ing.
DANGER, KEEP HANDS
AND FEET AWAY
FREE WHEEL
(Automatic Models only)
OVER TEMP
LIGHT
KEEP AREA CLEAR SLOPE HAZARDS
15
15
(SEE SAFETY RULES SECTION)
BATTERY REVERSE FORWARD
FAST SLOW
ENGINE ON ENGINE OFF
OIL PRESSURE
LIGHTS ON
FUEL
CHOKE
MOWER HEIGHT
PARKING BRAKE
LOCKED
PARKING BRAKE
UNLOCKED
REVERSE NEUTRAL HIGH LOW
ATTACHMENT
CLUTCH ENGAGED
PARKING BRAKE
IGNITION
ATTACHMENT
CLUTCH DISENGAGED
P
ENGINE START
MOWER LIFT
Failure to follow instructions
could result in serious injury or
death. The safety alert symbol
is used to identify safety inform-
ation about hazards which can
result in death, serious injury
and/or property damage.
DANGER indicates a hazard which, if not avoided,
will result in death or serious injury.
WARNING indicates a hazard which, if not avoided,
could result in death or serious injury.
CAUTION indicates a hazard which, if not avoided,
might result in minor or moderate injury.
CAUTION when used without the alert symbol,
indicates a situation that could result in damage
to the tractor and/or engine.
FIRE indicates a hazard which, if not avoided,
could result in death, serious injury and/or
property damage.
HOT SURFACES indicates a hazard which,
if not avoided, could result in death, serious injury
and/or property damage.
10
OPERATION
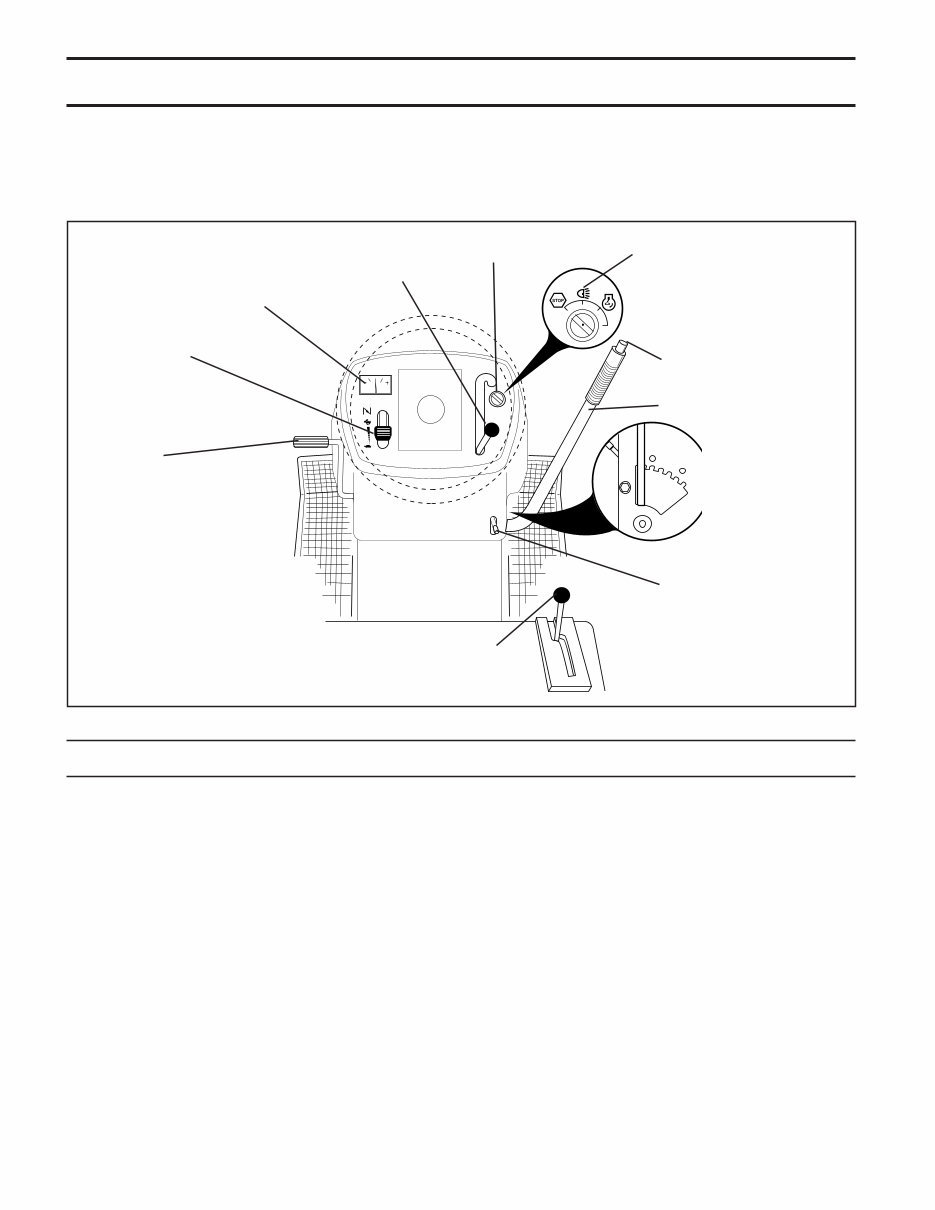
KNOW YOUR TRACTOR
READ THIS OWNER'S MANUAL AND SAFETY RULES BEFORE OPERATING YOUR TRACTOR
Compare the illustrations with your tractor to familiarize yourself with the locations of various controls and adjustments.
Save this manual for future reference.
ATTACHMENT CLUTCH LEVER - Used to engage the
mower blades, or other attachments mounted to your
tractor.
LIGHT SWITCH POSITION - Turns the headlights on and
off.
THROTTLE/CHOKE CONTROL - Used for starting and
controlling engine speed.
CLUTCH/BRAKE PEDAL - Used for declutching and brak-
ing the tractor and starting the engine.
PARKING BRAKE - Locks clutch/brake pedal into the
brake position.
GEARSHIFT LEVER - Selects the speed and direction
of the tractor.
ATTACHMENT LIFT LEVER - Used to raise, lower, and
adjust the mower deck or other attachments mounted to
your tractor.
LIFT LEVER PLUNGER - Used to release attachment lift
lever when changing its position.
IGNITION SWITCH - Used for starting and stopping the
engine.
AMMETER - Indicates charging (+) or discharging (-) of
battery.
Our tractors conform to the safety standards of the American National Standards Institute.
FIG. 5
PARKING
BRAKE
CLUTCH/BRAKE
PEDAL
THROTTLE/CHOKE
CONTROL
AMMETER
GEAR SHIFT
LEVER
ATTACHMENT
LIFT LEVER
LIFT LEVER
PLUNGER
IGNITION
SWITCH
ATTACHMENT
CLUTCH LEVER
LIGHT SWITCH
POSITION
MOWER
DECK HEIGHT
ADJUSTMENT
POSITIONS
You're Reading a Preview
What's Included?
 Lifetime Access
Fast Download Speeds
Online & Offline Access
Access PDF Contents & Bookmarks
Full Search Facility
Print one or all pages of your manual
$37.99
16 HP Electric START 42 MOWER 6 SPEED TRANSAXLE Lawn Tractor
Viewed 88 Times Today

What's Included?
Lifetime Access
Fast Download Speeds
Online & Offline Access
Access PDF Contents & Bookmarks
Full Search Facility
Print one or all pages of your manual
$37.99

Secure transaction
What's Included?
Lifetime Access
Fast Download Speeds
Online & Offline Access
Access PDF Contents & Bookmarks
Full Search Facility
Print one or all pages of your manual
Description
Get the comprehensive manual for the 16 HP Electric Start 42 Mower 6 Speed Transaxle Lawn Tractor. This manual is an essential resource for both professional mechanics and DIY enthusiasts. It provides detailed instructions and diagrams for maintenance, repair, and troubleshooting of the lawn tractor.
With this manual, you can efficiently perform tasks such as engine maintenance, belt replacement, and transaxle adjustments. It also includes valuable information on electrical systems, steering, and brake maintenance. Whether you're a seasoned mechanic or a novice enthusiast, this manual equips you with the knowledge needed to keep your lawn tractor in top condition.


