Workshop Manual 101 91 08-26 Auto Mower / Solar Mower For Husqvarna Parts Call 606-678-9623 or 606-561-4983 http://aini235.tradebit.com
English – 3 Contents 1. Foreword .................................................................................................................... 4 2. Installation instructions ......................................................................................... 4 2.1. Boundary wire ..................................................................................................... 4 2.2. Auto Mower charging station .............................................................................. 5 2.3. Large areas .......................................................................................................... 6 2.4. Sloping areas ....................................................................................................... 6 2.5. Separate working areas ....................................................................................... 7 2.6. Compatibility with 1995 model Solar Mower ..................................................... 7 2.7. Search loop size ................................................................................................... 8 2.8. Narrow passages ............................................................................................... 10 2.9 Making a professional installation .................................................................... 13 3. Start-up and charging ........................................................................................... 13 3.1. Searching for charging station .......................................................................... 13 3.2. Recharging Auto Mower for first time ............................................................... 13 3.3. Recharging Solar Mower for first time ............................................................. 13 4. Supplementary commands .................................................................................. 14 4.1. Find forgotten code ........................................................................................... 14 4.2. Demo mode ....................................................................................................... 14 4.3. Auto Mower charge commands ......................................................................... 14 4.4. Mow secondary area ......................................................................................... 14 4.5. Run further over boundary loop ........................................................................ 14 4.6. Running without a loop installation .................................................................. 15 4.7. Resetting ............................................................................................................ 15 5. Maintenance ............................................................................................................ 15 6. Adjacent installations ........................................................................................... 15 6.1. Solar Mower 1998 model onwards ................................................................... 15 6.2. Auto Mower 1998 model onwards .................................................................... 16 6.3. Solar Mower 1995 model .................................................................................. 16 6.4. Synchronising Auto Mower areas ...................................................................... 16 7. Energy and the environment ............................................................................... 17 8. Battery technology ........................................................................................ 17 8.1. General .............................................................................................................. 17 8.2. Battery connector .............................................................................................. 17 8.3. Testing the battery capacity ............................................................................... 18 9. Loop system ................................................................................................... 19 9.1. Operation .......................................................................................................... 19 9.2 Installation mode ............................................................................................... 19 9.3 Interference in the loop system .......................................................................... 20 10. Wiring and component layout ............................................................................ 21 11. Mower programs modes ............................................................................... 24 11.1. Charging mode .................................................................................................. 24 11.2. Night mode (Solar Mower only) ........................................................................ 24 11.3. Normal mode ..................................................................................................... 24 11.4. Test mode ........................................................................................................... 24 12. Troubleshooting ...................................................................................................... 24 12.1. General .............................................................................................................. 24 12.2 Test mode ........................................................................................................... 25 12.3 Volatge in the AutoMower’s power supply ........................................................ 26 12.4. Symptom charts ................................................................................................. 27 13. Messages and settings ........................................................................................... 36 14. Differences between different year models ................................................. 37 14.1. Differences on 1999 model mowers .................................................................. 37 14.2. Differences on 1998 model mowers .................................................................. 38 14.3. Upgrading to model 2000 ................................................................................. 39 15. Service aids .............................................................................................................. 39 For Husqvarna Parts Call 606-678-9623 or 606-561-4983 http://aini235.tradebit.com
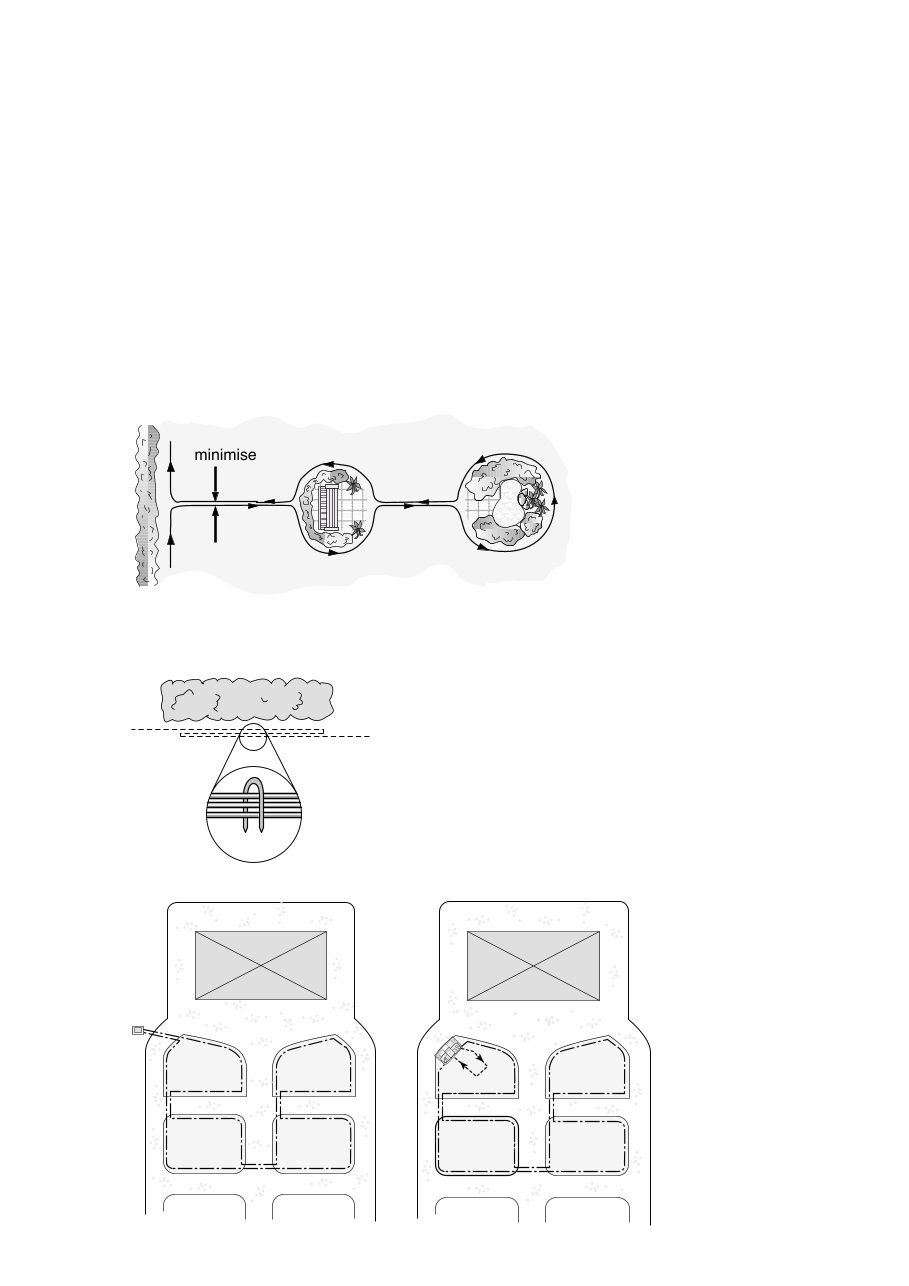
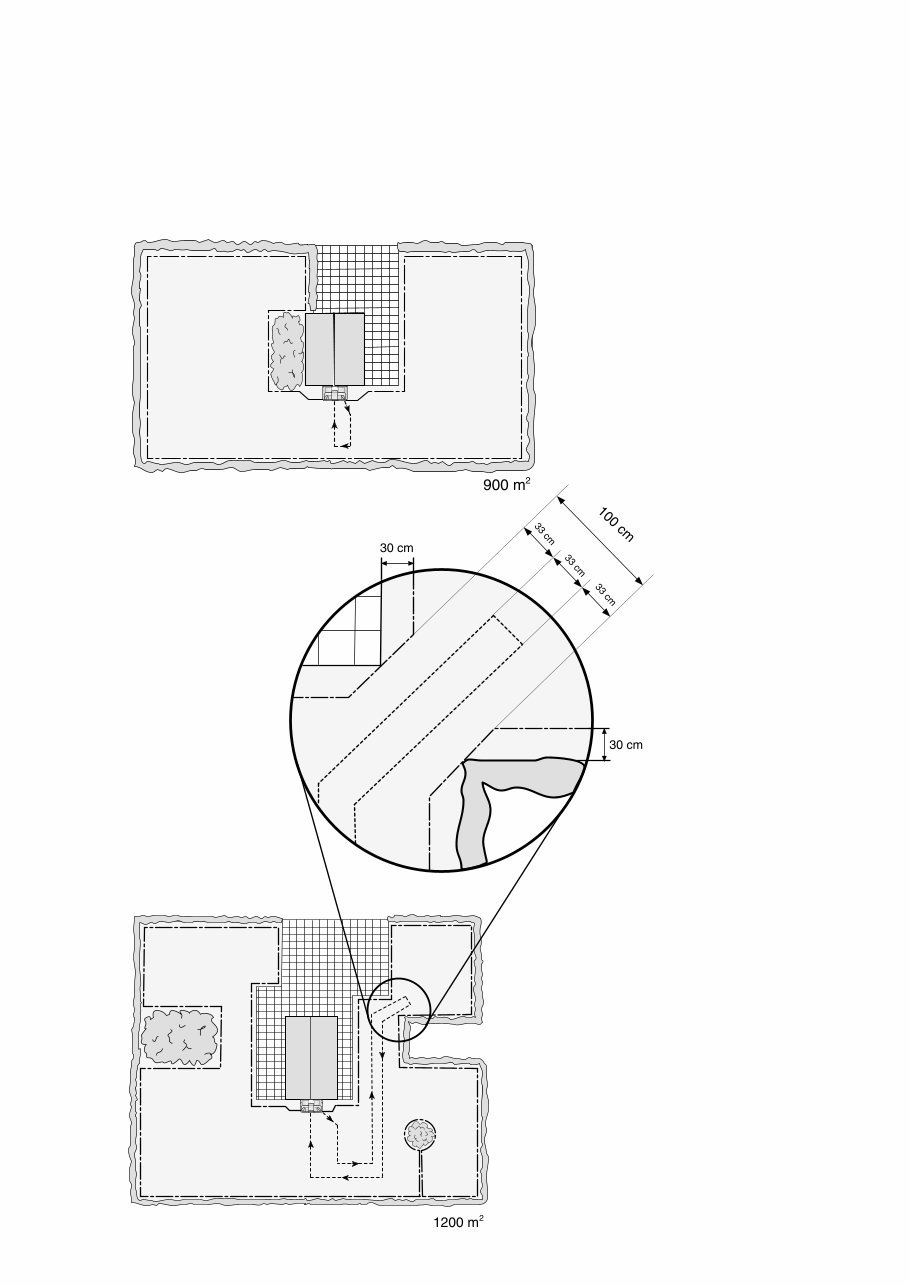
4 – English It is a good idea to set aside extra wire in a couple of places especially near the charging station. This allows small adjustments to be made in the future. Route the cable as shown in the figure below. Parallel wires must be routed close together. 1. Foreword The purpose of this document is to serve as a detailed supplement to the operator’s manual. In order to get the maximum benefit from it you should first read the operator’s manual carefully. The intended target group is product managers and service personnel. The first chapters in particular contains very important information also for salespeople and dealers. This document replaces the 1999 edition. 2. Installation instructions 2.1. Boundary wire Parallel wires that run to an island or generator must be laid very close together, and if stapled in position should be held by the same staples. If they lie some distance from each other (> 5 mm) the mower may in certain situations turn around (wires running to an island) or escape from the area (wires running to a generator). The sensitivity of the mower to the spacing of parallel wires leading to an island depends on the distance to the rest of the boundary wire, and its layout. In many cases the wires can be up to 10 cm apart without causing the mower to turn, but to ensure reliable installation in all situations we recommend a maximum of 5 mm. If the lawn is divided into several sections then the wire must be laid to form a series of islands. For Husqvarna Parts Call 606-678-9623 or 606-561-4983 http://aini235.tradebit.com
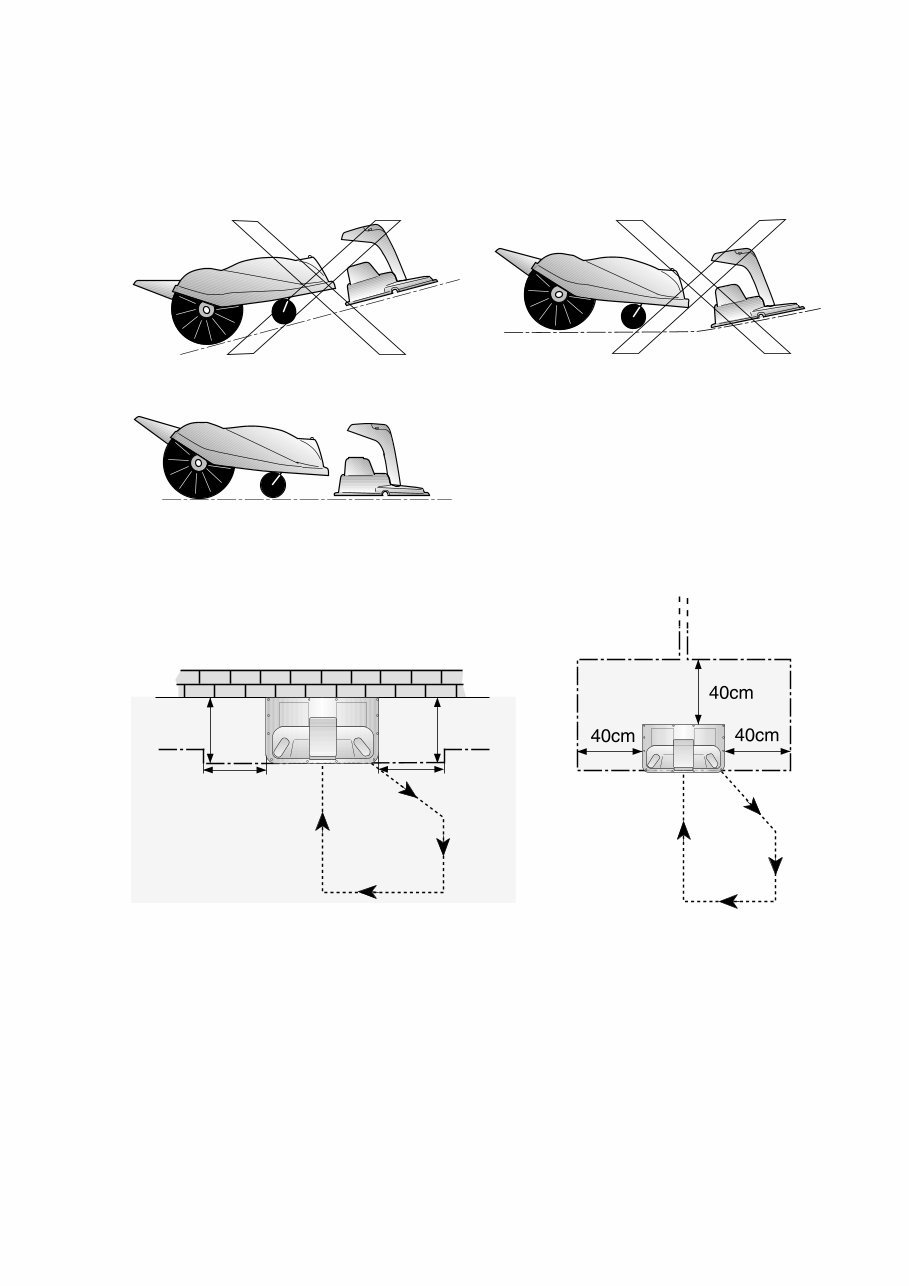
English – 5 2.2. Auto Mower charging station The ground a metre or so in front of the charging station must be level or slope slightly towards the charging station. This is necessary because the mower rebounds gently from the charging station and might otherwise stop a slight distance away from the charging station, preventing the mower from making contact with the contact plates. It is also important that the area in front is flat and that the charging station does not lean to one side. This is to ensure that the mower’s charging pins make the best possible contact with the contact plates of the charging station. 40x40 cm 40x40 cm It is not necessary to place the charging station against a wall or at the edge of the lawn, as shown in most of the illustrations. It can also be placed in an island, but the island must be large enough so that the mower cannot drive into the charging station from behind. The battery life will be prolonged if it is charged at as low a temperature as possible. It is therefore an advantage if the charging station is placed in the shade during the hottest hours of the day. It should also be remembered that the ground in front of the charging station can become rather worn with time. If the mower does not make proper contact with the contact plates of the charging station or loses contact during charging, it will leave the charging station. It will then start searching for the station again in an attempt to dock properly and make better contact. As usual the cutting disc will not turn while the mower is searching for the charging station. If the mower loses contact with the charging station more than four times in one complete hour the installation is considered unsatisfactory and the mower will then stop adjacent to the charging station and signal the error message “cannot find charging station”. If the charging station is placed against a wall it is important that the boundary wire is installed so that the mower cannot run into the area immediately to the side of the charging station. Otherwise the mower may get caught on the top of the charging station towers. For Husqvarna Parts Call 606-678-9623 or 606-561-4983 http://aini235.tradebit.com
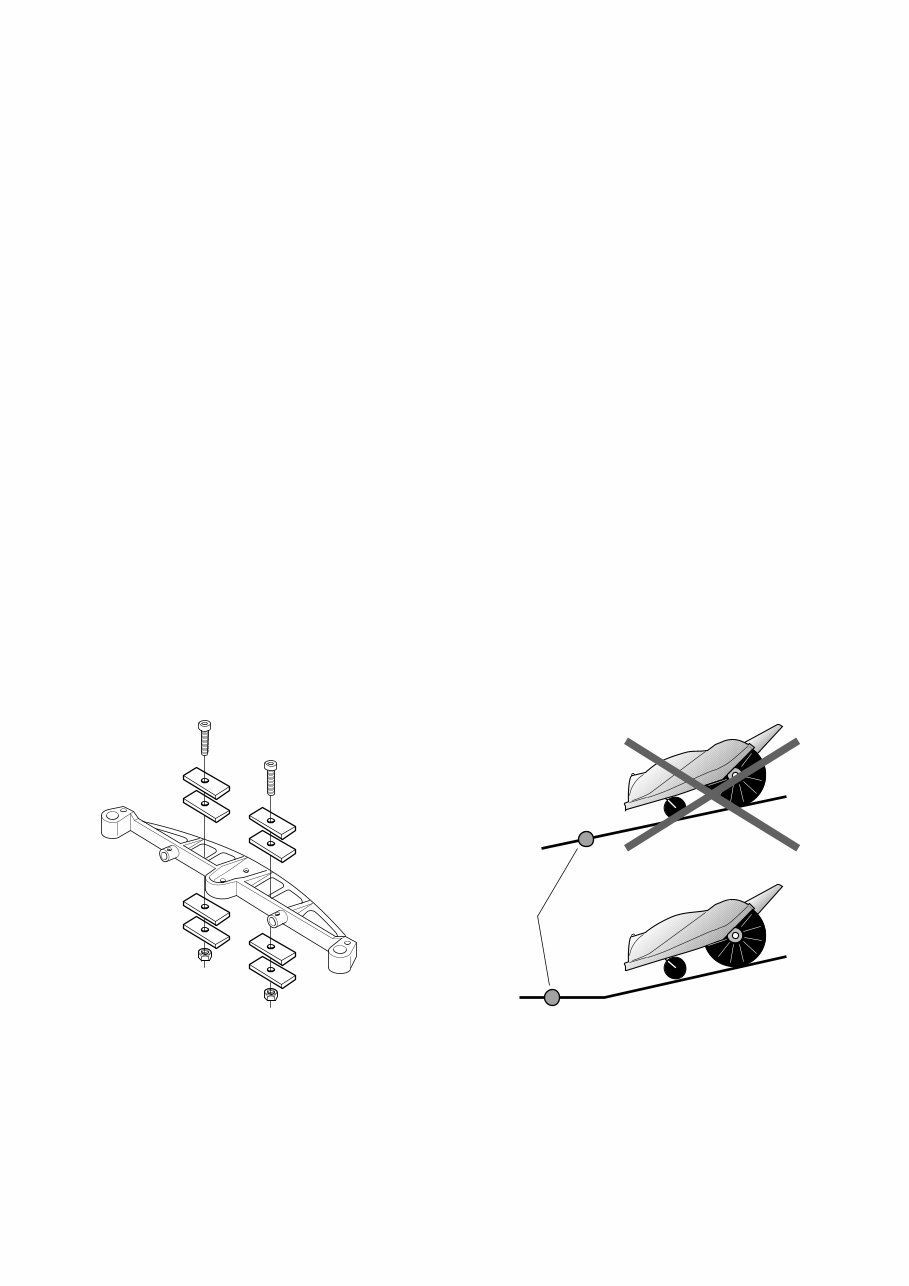
6 – English 2.3. Large areas The operator’s manual states a maximum area of 1200-1500 m 2 . The mower can, however, cover larger areas, up to 2000 m 2 , depending on a number of factors: • The geometric complexity of the area. Are there many trees, flower beds, narrow passages, etc.? • How shady is the plot (Solar Mower only)? • How fast does the grass grow? What’s the climate like, is the lawn fed regularly, etc? If you are unsure, the best way to find out is to try. If the area is so big that it requires several mowers then they can be combined in a variety of ways. In the case of the Solar Mower, several machines can work within the same boundary wire, as long as the distance from the mower to the nearest length of wire never exceeds 35 m. Auto Mower model 2000 can be programmed so that two mowers share one charging station. Both mowers can then work over a common area of 2400-3000 m 2 depending on the same factors mentioned above. The mowers are set for “double operation” by entering * 8#1#, and are reset with *8#0#. You should avoid using the timers if possible, but if you must use them the clocks and timers on both mowers must be synchronised. The advantages of “double operation” compared to two separate installations are as follows: • Cheaper. • No synchronisation of systems necessary. • Simpler installation as only one charging station and one search loop are required. Note that the incoming search loop must lay straight for about 2 min front of the charging station to give good operation. In the case of the Auto Mower model 98-99 it is not possible to let several mowers work together and share a charging station. Instead, they must each have separate adjacent areas, each with its own charging station. See chapter 6.4. The third option is to combine one Auto Mower with any number of Solar Mowers. 2.4. Sloping areas The mowers can work on slopes with an incline of 15˚, Auto Mowers a little more, Solar Mowers somewhat less. The mowers can be fitted with accessory weights that can be added in steps of 200-400 g (Art.No. 535 09 11-01) to allow mowing on greater inclines. Of course, you should use as little extra weight as possible to mow the slopes in question. The mower with run a little faster downhill and in doing so come further over the boundary wire and may encounter problems in returning especially in damp weather conditions. It is therefore an advantage if the slope is not too steep just where the boundary wire is installed. Boundary wire For Husqvarna Parts Call 606-678-9623 or 606-561-4983 http://aini235.tradebit.com
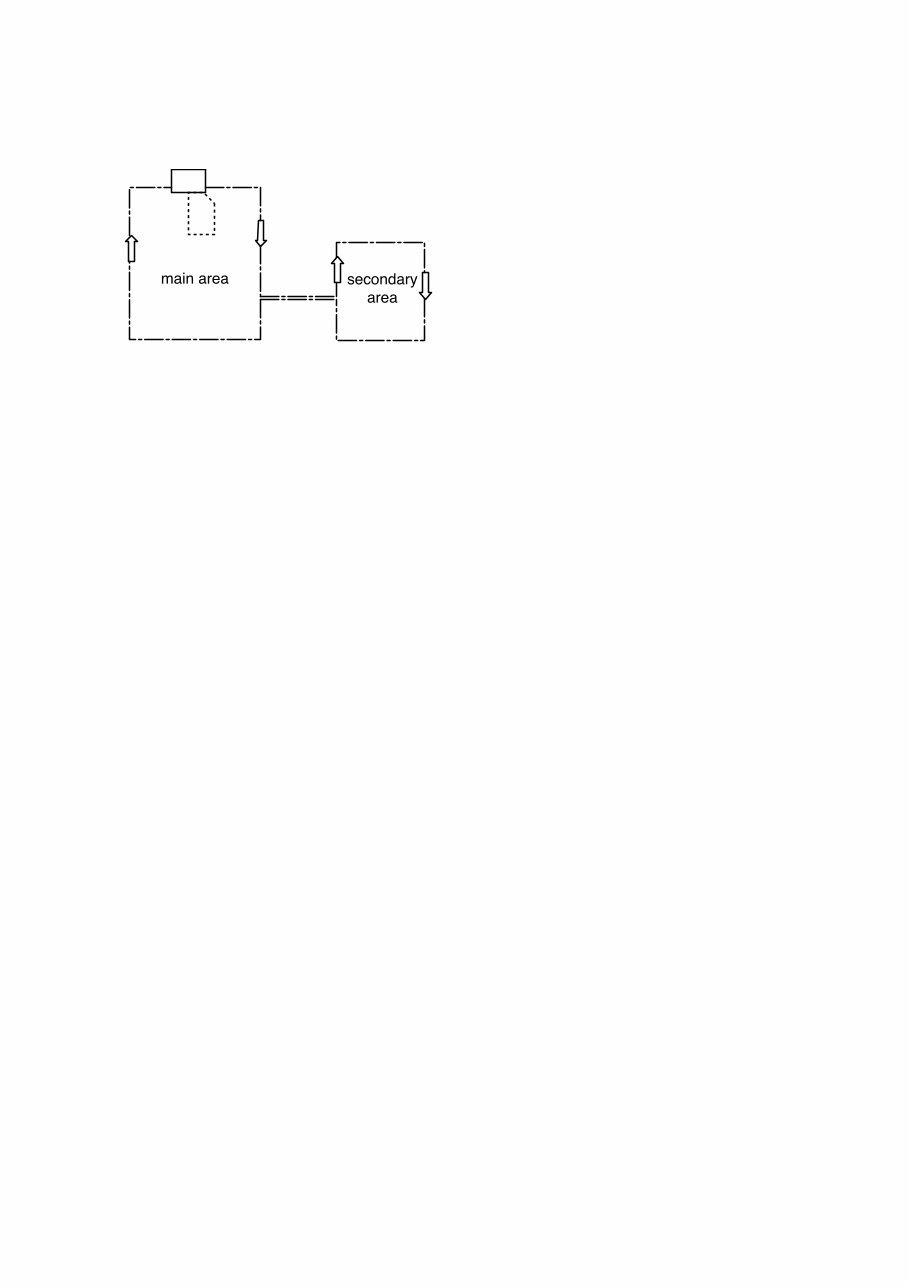
English – 7 2.5. Separate working areas Naturally a single mower can be used in several areas if it is carried by hand between them. If they are close together then one area can be made a secondary area by extending the boundary wire. This applies to both the Auto Mower and Solar Mower. If the areas are far apart it will be necessary to move the generator or charging station between the two areas or buy an additional generator (article number 535 05 67-01) or charging station (article number 535 09 10-01). The signal from the boundary wire is identical for both the Auto Mower and Solar Mower, if it is not necessary to recharge the Auto Mower in the secondary area it may be easier and cheaper to install a generator there to power the boundary wire. If a single charging station is installed in either of the areas it will be necessary to do the following: In order to fully charge the Auto Mower and prevent it from setting off again when it is fully charged you must dock the mower with the charging station and enter the command * 33 #. The mower will then reverse out and stop in front of the charging station once it is fully charged. The mower can then be carried to the secondary area, preferably after switching the ON/STOP switch to STOP. When the mower is placed in the secondary area and the personal code is entered (if the switch was set to STOP) the Auto Mower will continue working until the battery is drained, and will then stop and display the fault code “cannot find charging station”. If you enter *33# when the mower is not in the charging station it will continue to mow until the battery is discharged, stop and give the fault code. The command to “mow secondary area” can be cancelled with the command * 34 #. If the mower has drained its battery you will have to dock the mower with the charging station manually. If there is still some charge in the battery, for example if it has been interrupted while mowing the secondary area, then it will start searching if necessary for the charging station by itself once you have keyed in * 34 #. This naturally assumes that the mower has been placed back in the main area. The error message “cannot find charging station” returns the mower automatically to normal mode and cancels the command * 33 #. A fully charged battery in good condition can run the mower for 2.5–3.5 hours, after you enter the command * 33 #, depending on the cutting resistance. 2.6. Compatibility with 1995 model Solar Mower Models from 1998 onwards should not be operated with a 1995 model generator, nor should a 1995 model mower be operated with a generator model from 1998 onwards. On the other hand it is technically possible to use the existing boundary wire installation from a later or earlier model. You should remember however that the 1998 model and later models over-run the boundary wire by about 30 cm, while 1995 model mowers will turn before they reach the wire. For Husqvarna Parts Call 606-678-9623 or 606-561-4983 http://aini235.tradebit.com
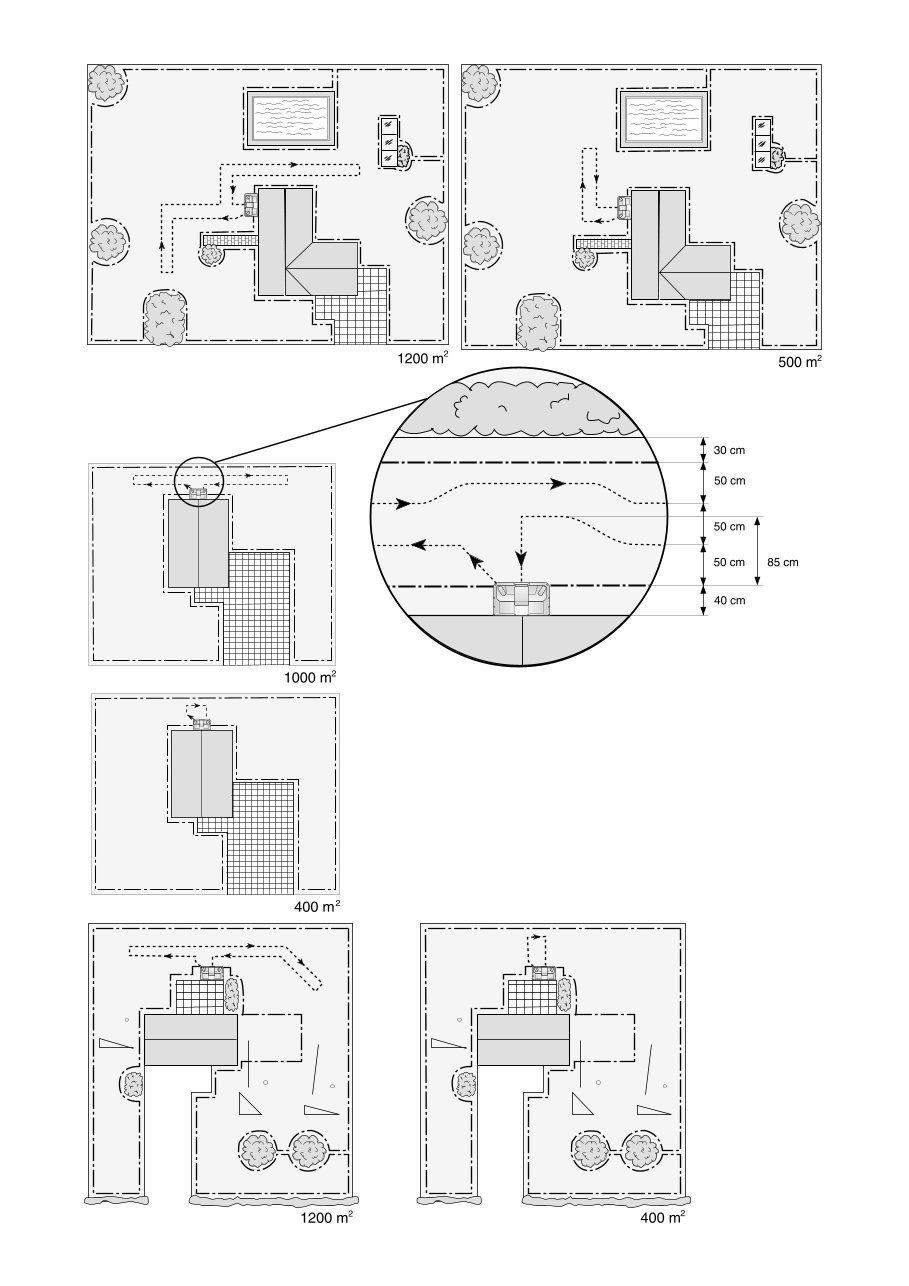
8 – English 2.7. Search loop size There is an ideal length for the search wire. If it is too long the mower will be forced to follow the search wire for longer than necessary, and if it is too short the mower may not find the charging station. The ideal length depends on • The size of the working area • The complexity of the working area; passages, obstacles, etc. The drawings below show typical search loop sizes depending on the layout of the working area. Measurements denote m 2 of lawn. For Husqvarna Parts Call 606-678-9623 or 606-561-4983 http://aini235.tradebit.com
English – 9 45 15 15 45 15 15 For Husqvarna Parts Call 606-678-9623 or 606-561-4983 http://aini235.tradebit.com
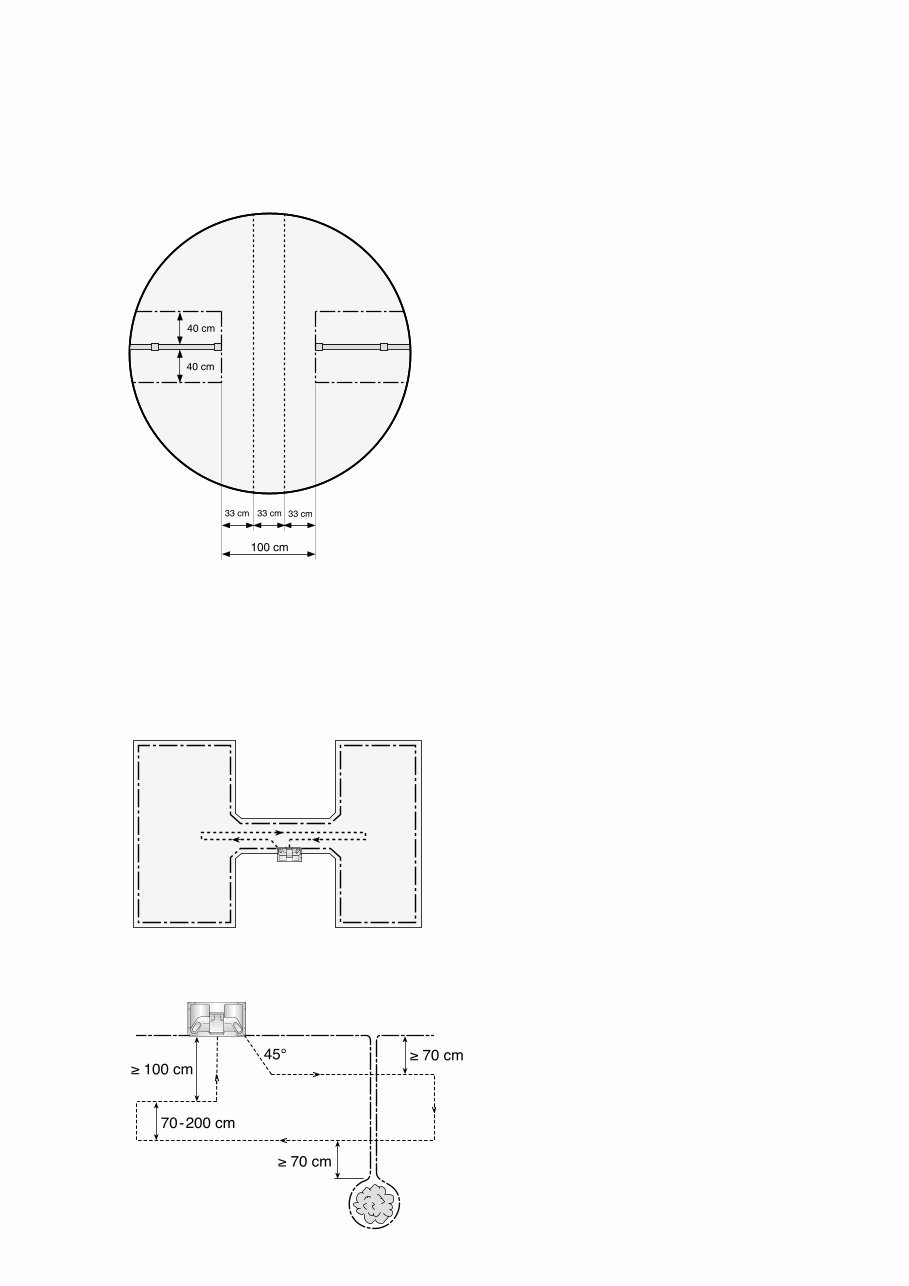
10 – English 2.8. Narrow passages One of the biggest challenges of installation is long, narrow passages. The mower must be able to manoeuvre in the passage (more critical for the Solar Mower) and the loop wires must not be laid too close to each other in order to work properly (more critical for the Auto Mower if the search wires are also laid in the passage). The Solar Mower really needs a passage width of around 2 m in order to manoeuvre properly in any passage longer than 3–4 m. The Auto Mower can cope with around 1.5 m. If these passage widths are reduced the mower will spend a disproportionate amount of time there. A short passage, such as a gateway, can be narrower. If there are two large areas joined by a narrow passage it may be difficult for the mower to find the entrance to the passage and hence work effectively in both areas. One way of getting the mower to spend roughly the same amount of time in both areas is to place the charging station in the centre of the narrow passage. The mower will turn roughly as often to the left as it does to the right when it leaves the charging station, so it will reach both of the large areas. It is appropriate to program a special exit angle from the charging station (possible with Auto Mower 2000) if the station is positioned in a narrow passage or aisle. This prevents the mower from frequently stopping unnecessarily in the vicinity of the charging station and in doing so wearing down the grass. In addition, if you activate the “symmetry function” using * 67 # 1 # the mower will run alternately to the right and left in the selected direction. You should, wherever possible, try to maintain the recommended minimum distance between the loops as stated in the operator’s manual, i.e. 70 cm. This dimension has been chosen to give a safe margin of reliability for all combinations of wire installations. An island must not be placed inside the search loop. For Husqvarna Parts Call 606-678-9623 or 606-561-4983 http://aini235.tradebit.com
You're Reading a Preview
What's Included?
Lifetime Access
Fast Download Speeds
Online & Offline Access
Access PDF Contents & Bookmarks
Full Search Facility
Print one or all pages of your manual
$28.99
Husqvarna Auto mower / Solar mower Workshop Service Repair Manual
This factory service repair manual for the Husqvarna Auto mower / Solar mower provides detailed illustrations and step-by-step instructions. It is designed for both do-it-yourself enthusiasts and experienced mechanics. The manual offers complete disassembly instructions, along with hundreds of photos and illustrations to guide the reader through each service and repair procedure. The manual comes in PDF format, compatible with all PC-based Windows operating systems and Mac. All pages are printable, making it an inexpensive way to maintain the vehicle.
This manual is known by various names:
- Husqvarna Auto mower / Solar mower Service Manual
- Husqvarna Auto mower / Solar mower Repair Manual
- Husqvarna Auto mower / Solar mower Workshop Manual
- Husqvarna Auto mower / Solar mower Service Repair Manual
The Service Repair Manual covers special tools, specifications, delivery and dealer service, design and function, repair instructions, electrical system, hydraulic system, troubleshooting guides, and more. It is an instant digital download, saving on postage and packaging costs. The manual is compatible with all versions of Windows and Mac, and requires Adobe Reader. Purchasing the right repair manual for your Husqvarna Auto mower / Solar mower will save you time and money in the long run. All pages are printable for convenience.
Reviews
Q&A
Recently Viewed
5,521,897Happy Clients
2,594,462eManuals
1,120,453Trusted Sellers
15Years in Business
Price:
Actual Price:
Husqvarna Auto mower / Solar mower Workshop Service Repair Manual






 Lifetime Access




