


101 89 22-26
Workshop Manual
Brush Cutters, Trimmers,
Pruners, Hedge Trimmers

1
Workshop Manual
Brush cutters, Trimmers,
Pruners, Hedge trimmers
List of Contents
The Manual covers the models:
265
250
240/245
225 / 232 / 235 / 240 RBD
122
32
Mondo
235 P
225 H 60 / 225 H 75
General recommendations 2
1. Starter 3
2. Ignition system 21
3. Fuel system 31
4. Centrifugal clutch 61
5. Angle gear 83
6. Cylinder and piston 93
7. Crankshaft and Crankcase 115
8. Hydraulic unit 139
9. Cutting equipment 145
10. Tools 153
2
General recommendations
Special tools
Some of the work described in the Workshop Manual requires
special tools. In each section where this is necessary there is a
picture of the tool and an order number.
We recommend the use of special tools in order to avoid
expensive damage to parts in question and personal injury and
to provide an efficient repair procedure.
502 51 03-01
Bear in mind:
Do not start the engine without the clutch drum and
driveline fitted as the clutch can become detached and
cause severe personal injury.
Do not touch hot components, e.g. the muffler and clutch
before they have cooled sufficiently to avoid burns.
Avoid getting fuel or oil on your skin or in your mouth.
Use a barrier cream on your hands. This reduces the risk
of infection and makes dirt easier to wash away.
Long term contact with engine oil can represent a health
hazard.
Never start the engine indoors. Exhaust fumes are poison-
ous!
– Wipe up oil spills from the floor immediately to avoid
slipping.
– Do not use tools that are worn or fit badly, for example on
nuts and bolts.
+ Always work on a clean bench.
+ Always work logically to ensure all parts are fitted correctly
and that nuts and bolts are tightened.
+ Use the special tools where recommended to be able to
carry out the work correctly and efficiently.
Fire risk
Handle fuel with respect as it is extremely inflammable.
Do not smoke and ensure there are no open flames or sparks
in the vicinity.
Make sure there is a working fire extinguisher close at hand.
Do not try to extinguish a petrol fire with water.
Poisonous fumes
When using cleaning agents read the instructions carefully.
Ensure there is good ventilation when handling petrol and
other volatile fluids.
The engine's exhaust fumes are poisonous. Test run the
engine outdoors.
!
!
!
!
Contact faces and gaskets
Ensure all surfaces are clean and free from gasket residue, etc.
When cleaning use a tool that will not damage the contact face.
Any scratches or unevenness should be removed using a flat
fine cut file.
Sealing rings
Always replace a sealing ring that has been dismantled. The
sensitive sealing lip can easily be damaged resulting in inferior
sealing capacity. Surfaces which the seal shall seal against
must also be completely undamaged. Lubricate the sealing lip
with grease before it is fitted and ensure that it is not damaged
e.g. by shoulders and splines on a shaft. Use tape or a conical
sleeve as protection. It is important that the sealing ring faces in
the right direction for it to act as it is intended.
3
Starter
1.
Contents
Dismantling
General 4
Model 265
Dismantling 4
Assembly 5
Model 250
Dismantling 7
Assembly 8
Models 240/245
Dismantling 9
Assembly 10
Models 225, 232, 235, 240
Dismantling 11
Assembly 12
Model 122
Dismantling 13
Assembly 14
Models 32, Mondo
Dismantling 15
Assembly 17
Assembly, general 19
Replace the drive pawls 19
4
1 Starter
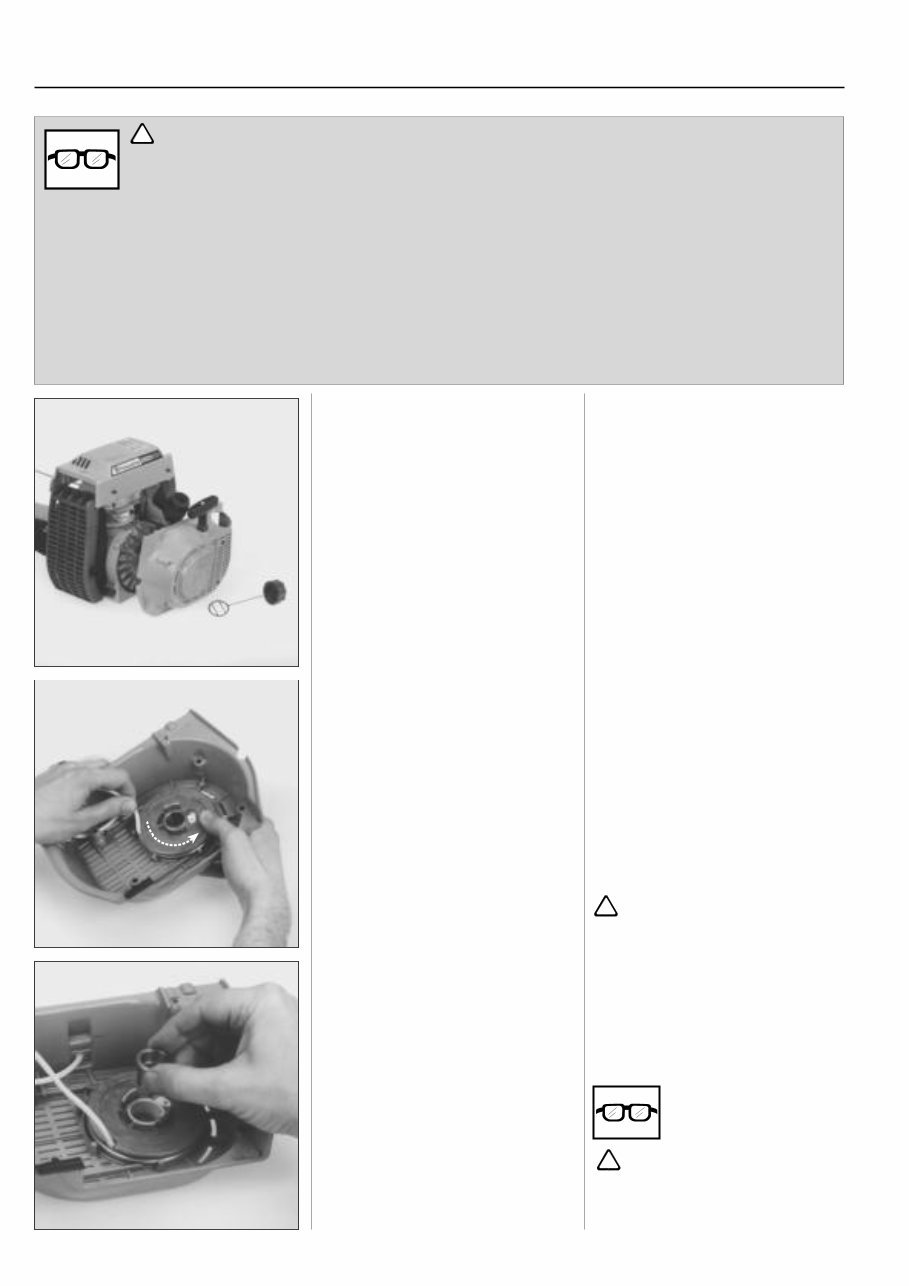
WARNING!
Protective glasses should be worn when working on the starter to avoid injury to the eyes
if, for some reason, the return spring should fly out.
Dismantling
General
Dismantle the starter from the engine
body.
Model 265
Dismantling
Release the spring pressure.
Remove the screw and washer in the
centre of the starter pulley and bearing
sleeve.
Lift out the starter pulley.
Dismantling
General
Remove all bolts and lift off the starter.
On some models the cylinder cover and
tank filler cap must be removed.
!
Model 265
Dismantling
Release the spring pressure. Pull out the
starter cord approx. 30 cm.
Hold the starter pulley with your thumb
and place the cord in the cut-out on the
starter pulley rim.
Let the starter pulley slowly recoil.
NOTE!
Stop the spring with your thumb.
WARNING!
Take care not to injure your thumb
on the screw at the cord's fastening.
Remove the screw and washer in the
centre of the starter pulley and bearing
sleeve.
Lift out the starter pulley carefully so that
the spring does not follow and fly out.
!
WARNING!
Wear protective glasses. The return
spring can fly out and cause per-
sonal injury.
!
You're Reading a Preview
What's Included?
Fast Download Speeds
Offline Viewing
Access Contents & Bookmarks
Full Search Facility
Print one or all pages of your manual
$33.99
HUSQVARNA Brush cutters Trimmers Pruners Pruning saws Hedge trimmers Ice drills Blowers COVERS All Models
Viewed 69 Times Today

What's Included?
Fast Download Speeds
Offline Viewing
Access Contents & Bookmarks
Full Search Facility
Print one or all pages of your manual
$33.99

Secure transaction
What's Included?
Fast Download Speeds
Offline Viewing
Access Contents & Bookmarks
Full Search Facility
Print one or all pages of your manual
Description
If you own a Brush cutters, Trimmers, Pruners, Pruning saws, Hedge trimmers, Ice drills, Blowers, then this is the service manual for you. It covers all you need to know for the service and repair of your tools. The manual includes nice clear text and images and spans 220 pages.


