Toro Multi-Pro 5500 Sprayer Service Repair Workshop Manual
What's Included?
Lifetime Access
Fast Download Speeds
Online & Offline Access
Access PDF Contents & Bookmarks
Full Search Facility
Print one or all pages of your manual
PART NO. 00075SL (Rev. D) Service Manual Reelmaster R 5500-D Preface The purpose of this publication is to provide the service technician with information for troubleshooting, testing, and repair of major systems and components on the Reelmaster 5500-D. REFER TO THE TRACTION UNIT AND CUTTING UNIT OPERATOR’S MANUALS FOR OPERATING, MAINTENANCE AND ADJUSTMENT INSTRUC- TIONS. Space is provided in Chapter 2 of this book to insert the Operator’s Manuals and Parts Catalogs for your machine. Replacement Operator’s Manuals are available by sending complete Model and Serial Num- ber to: The Toro Company 8111 Lyndale Avenue South Bloomington, MN 55420–1196 The Toro Company reserves the right to change product specifications or this publication without notice. This safety symbol means DANGER, WARNING, or CAUTION, PERSONAL SAFETY INSTRUC- TION. When you see this symbol, carefully read the instructions that follow. Failure to obey the instructions may result in personal injury. NOTE: A NOTE will give general information about the correct operation, maintenance, service, testing, or re- pair of the machine. IMPORTANT: The IMPORTANT notice will give im- portant instructions which must be followed to pre- vent damage to systems or components on the machine. E The Toro Company – 2000, 2002, 2003, 2004, 2007
Safety Reelmaster 5500-D Page 1 - 1 Safety Chapter 1 Safety Table of Contents GENERAL SAFETY INSTRUCTIONS 1 . . . . . . . . . . . . Before Operating 1 . . . . . . . . . . . . . . . . . . . . . . . . . . . . While Operating 2 . . . . . . . . . . . . . . . . . . . . . . . . . . . . Maintenance and Service 3 . . . . . . . . . . . . . . . . . . . . JACKING INSTRUCTIONS 4 . . . . . . . . . . . . . . . . . . . . . General Safety Instructions The REELMASTER 5500-D was tested and certified by TORO for compliance with the B71.4-1990 specifica- tions of the American National Standards Institute. Al- though hazard control and accident prevention partially are dependent upon the design and configuration of the machine, these factors are also dependent upon the awareness, concern, and proper training of the person- nel involved in the operation, transport, maintenance, and storage of the machine. Improper use or mainte- nance of the machine can result in injury or death. To re- duce the potential for injury or death, comply with the following safety instructions. WARNING To reduce the potential for injury or death, comply with the following safety instructions. Before Operating 1. Read and understand the contents of the traction unit and cutting unit Operator’s Manual before starting and operating the machine. Become familiar with the controls and know how to stop the machine and engine quickly. A replacement manual is available by sending the complete model and serial number to: The Toro Company 8111 Lyndale Avenue South Bloomington, Minnesota 55420–1196. 2. Never allow children to operate the machine. Do not allow adults to operate machine without proper instruc- tion. Only trained operators who have read this manual should operate this machine. 3. Never operate the machine when under the influ- ence of drugs or alcohol. 4. Keep all shields, safety devices and decals in place. If a shield, safety device or decal is defective, illegible or damaged, repair or replace it before operating the ma- chine. Also tighten any loose nuts, bolts or screws to en- sure machine is in safe operating condition. 5. Always wear substantial shoes. Do not operate ma- chine while wearing sandals, tennis shoes, sneakers or when barefoot. Do not wear loose fitting clothing that could get caught in moving parts and possibly cause personal injury. Wearing safety glasses, safety shoes, long pants and a helmet is advisable and required by some local ordinances and insurance regulations. 6. Assure interlock switches are adjusted correctly so engine cannot be started unless traction pedal is in NEUTRAL and cutting units are DISENGAGED. 7. Remove all debris or other objects that might be picked up and thrown by the reels or fast moving compo- nents from other attached implements. Keep all by- standers away from operating area. 8. Since diesel fuel is highly flammable, handle it care- fully: A. Use an approved fuel container. B. Do not remove fuel tank cap while engine is hot or running. C. Do not smoke while handling fuel. D. Fill fuel tank outdoors and only to within an inch of the top of the tank, not the filler neck. Do not overfill. E. Wipe up any spilled fuel.
Reelmaster 5500-D Page 1 - 2 Safety While Operating 9. Sit on the seat when starting and operating the ma- chine. 10.Before starting the engine: A. Engage the parking brake. B. Make sure traction pedal is in NEUTRAL and the ENABLE / DISABLE switch is in DISABLE. C. After engine is started, release parking brake and keep foot off traction pedal. Machine must not move. If movement is evident, the neutral return mecha- nism is adjusted incorrectly; therefore, shut engine off and adjust until machine does not move when traction pedal is released. 11.Seating capacity is one person. Therefore, never carry passengers. 12.Do not run engine in a confined area without ade- quate ventilation. Exhaust fumes are hazardous and could possibly be deadly. 13.Check interlock switches daily for proper operation. If a switch fails, replace it before operating the machine. The interlock system is for your protection, so do not by- pass it. Replace all interlock switches every two years. 14.Using the machine demands attention and to pre- vent loss of control: A. Operate only in daylight or when there is good ar- tificial light. B. Drive slowly C. Watch for holes or other hidden hazards. D. Look behind machine before backing up. E. Do not drive close to a sand trap, ditch, creek or other hazard. F. Reduce speed when making sharp turns and turning on a hillside. G. Avoid sudden stops and starts. 15.Traverse slopes carefully. Do not start or stop sud- denly when traveling uphill or downhill. 16.Operator must be skilled and trained in how to drive on hillsides. Failure to use caution on slopes or hills may cause loss of control and vehicle to tip or roll possibly re- sulting in personal injury or death. On 4–wheel drive models, always use the seat belt and ROPS together. 17.If engine stalls or loses power and cannot make it to the top of a slope, do not turn machine around. Always back slowly straight down the slope. 18. DON’T TAKE AN INJURY RISK! When a person or pet appears unexpectedly in or near the mowing area, STOP MOWING. Careless operation, combined with terrain angles, ricochets, or improperly positioned guards can lead to thrown object injuries. Do not resume mowing until area is cleared. 19.Do not touch engine, muffler or exhaust pipe while engine is running or soon after it is stopped. These areas could be hot enough to cause burns. 20.If cutting unit strikes a solid object or vibrates abnor- mally, stop immediately, turn engine off, set parking brake and wait for all motion to stop. Inspect for damage. If reel or bedknife is damaged, repair or replace it before operating. Do not attempt to free blocked cutting unit by reversing reel direction. Damage to reel may result. 21.Before getting off the seat: A. Move traction pedal to neutral. B. Set parking brake. C. Disengage cutting units and wait for reels to stop. D. Stop engine and remove key from switch. E. Toro recommends that anytime the machine is parked (short or long term) the cutting units should be lowered to the ground. This relieves pressure from the lift circuit and eliminates the risk of cutting units accidentally lowering to the ground. F. Do not park on slopes unless wheels are chocked or blocked.
Safety Reelmaster 5500-D Page 1 - 3 Safety Maintenance and Service 22.Before servicing or making adjustments, stop engine and remove key from the switch. 23.Make sure machine is in safe operating condition by keeping all nuts, bolts and screws tight. 24.Make sure all hydraulic line connectors are tight, and all hydraulic hoses and lines are in good condition be- fore applying pressure to the system. 25.Keep body and hands away from pin hole leaks in hy- draulic lines that eject high pressure hydraulic fluid. Use cardboard or paper to find hydraulic leaks. Hydraulic fluid escaping under pressure can penetrate skin and cause injury. Fluid accidentally injected into the skin must be surgically removed within a few hours by a doc- tor familiar with this form of injury or gangrene may re- sult. 26.Before disconnecting or performing any work on the hydraulic system, all pressure in system must be re- lieved by stopping engine and lowering cutting units to the ground. 27.If major repairs are ever needed or assistance is de- sired, contact an Authorized Toro Distributor. 28.To reduce potential fire hazard, keep engine area free of excessive grease, grass, leaves and dirt. Clean protective screen on front of engine frequently. 29.If engine must be running to perform maintenance or an adjustment, keep hands, feet, clothing and other parts of the body away from cutting units and other mov- ing parts. Keep everyone away. 30.Do not overspeed the engine by changing governor setting. To assure safety and accuracy, have an Autho- rized Toro Distributor check maximum engine speed. 31.Shut engine off before checking or adding oil to the crankcase. 32.Disconnect battery before servicing the machine. If battery voltage is required for troubleshooting or test procedures, temporarily connect the battery. 33.At the time of manufacture, the machine conformed to the safety standards for riding mowers. To assure op- timum performance and continued safety certification of the machine, use genuine Toro replacement parts and accessories. Replacement parts and accessories made by other manufacturers may result in non-conformance with the safety standards, and the warranty may be voided. 34.When changing attachments, tires, or performing other service, use correct blocks, hoists, and jacks. Make sure machine is parked on a solid level floor such as a concrete floor. Prior to raising the machine, remove any attachments that may interfere with the safe and proper raising of the machine. Always chock or block wheels. Use jack stands or solid wood blocks to support the raised machine. If the machine is not properly sup- ported by blocks or jack stands, the machine may move or fall, which may result in personal injury (see Jacking Instructions).
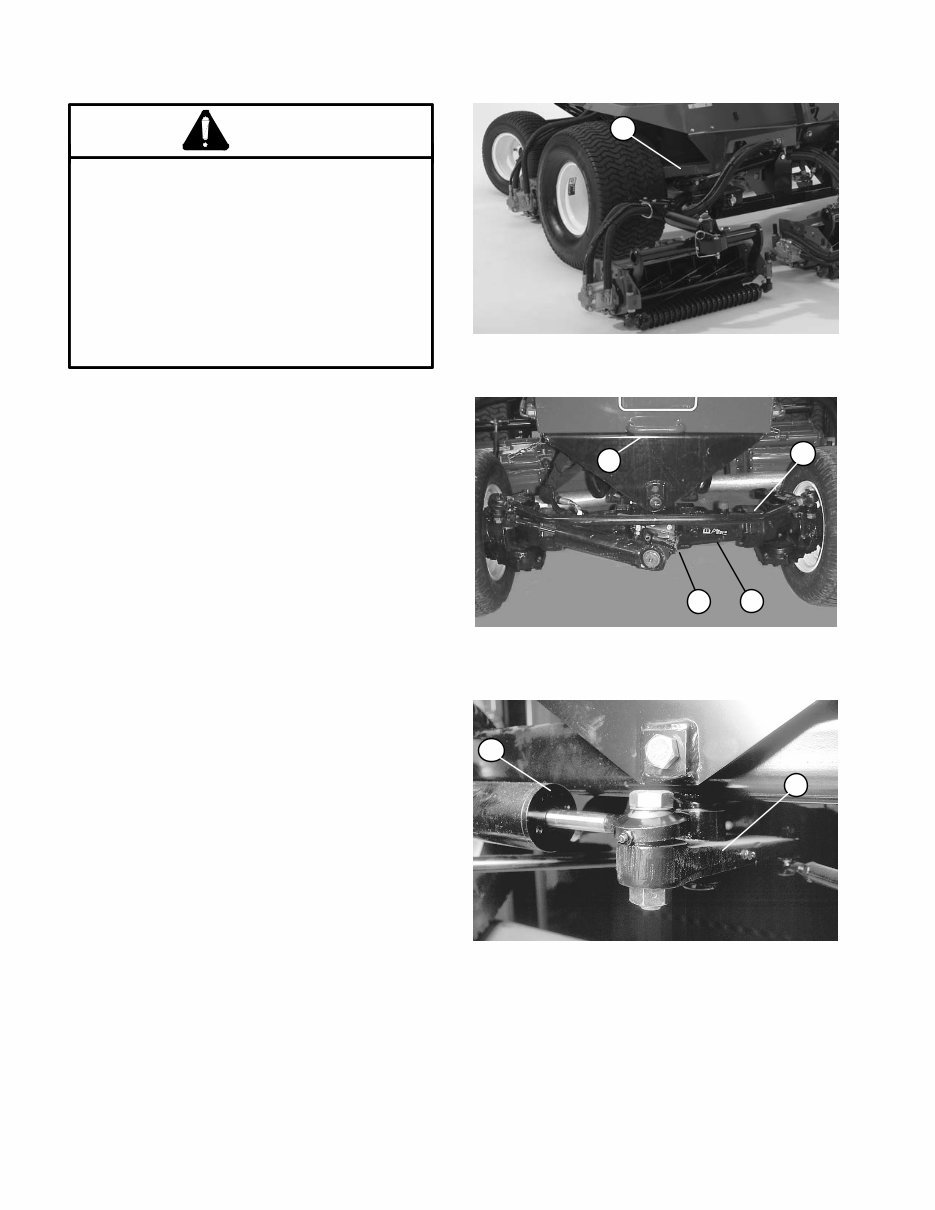
Reelmaster 5500-D Page 1 - 4 Safety Jacking Instructions CAUTION When changing attachments, tires, or performing other service, use correct blocks, hoists, and jacks. Make sure machine is parked on a solid lev- el surface such as a concrete floor. Prior to rais- ing machine, remove any attachments that may interfere with the safe and proper raising of the machine. Always chock or block wheels. Use jack stands or solid wood blocks to support the raised machine. If the machine is not properly sup- ported by blocks or jack stands, the machine may move or fall, which may result in personal injury. Jacking the Front End (Fig. 1) 1. Set parking brake and chock both rear tires to pre- vent the machine from moving. 2. Position jack securely under the tie down rod that is welded to the square tube of the front frame. 3. Position jack stands or hardwood blocks under the square tube as close to the wheels as possible to sup- port the machine. Jacking the Rear End 1. The preferred method of lifting the rear end of the machine is (Fig. 2): A. Secure a chain fall or hoist to the tie down rod on the rear of the frame. B. Chock both front tires. Lift rear of the machine off the ground. C. On 2WD models, use jack stands or blocks under the axle as close to the wheels as possible to secure the machine. D. On 4WD models, use jack stands or blocks under the axle tube as close to the gear box housings as possible to secure the machine. 2. If the rear of the machine can not be lifted as above: A. On 2WD models, place jack securely under the pivot bracket for the steering cylinder (Fig. 3). B. On 4WD models, place jack securely under the differential case (Fig. 2). C. Chock both front tires. Jack rear of machine off the ground. Figure 1 1. Square tube (front frame) 1 1. Differential case 2. Axle tube 3. Gearbox housing 4. Tie down rod Figure 2 3 1 2 4 1. Pivot bracket 2. Steering Cylinder Figure 3 2 1 D. On 2WD models, use jack stands or blocks under the axle as close to the wheels as possible to secure the machine. E. On 4WD models, use jack stands or blocks under the axle tube as close to the gear box housings as possible to secure the machine.
The Toro Multi-Pro 5500 Sprayer Service Repair Manual is a comprehensive resource designed to provide all the necessary information for both professional mechanics and DIY enthusiasts. This manual contains easy-to-read text sections accompanied by high-quality diagrams and instructions, covering a wide range of topics including accessories, theory of operation, spray system flow diagrams, electrical diagrams, sprayer set-up, troubleshooting and service guide, and maintenance.
Whether you are using Windows or Mac, this manual is compatible with all versions and is available in English language. It requires Adobe Reader for access. The manual is an essential tool for anyone looking to save time and money by performing repairs and maintenance themselves, with the confidence that comes from having access to detailed and accurate information.
It's crucial to invest in the right repair manual for your Toro Multi-Pro 5500 Sprayer, as it will not only save you money in the long run but also provide you with a deeper understanding of your equipment. Additionally, all pages of the manual are printable, offering convenience and ease of use.
Recently Viewed
5,521,897Happy Clients
2,594,462eManuals
1,120,453Trusted Sellers
15Years in Business
Price:
Actual Price:
Toro Multi-Pro 5500 Sprayer Service Repair Workshop Manual