

Yamaha Banshee Porting Guide
What's Included?
Fast Download Speeds
Online & Offline Access
Access PDF Contents & Bookmarks
Full Search Facility
Print one or all pages of your manual
This CD\Book is only a guide in aiding you in porting your own cylinders.
This CD\Book also shows what tools should be used and suggest what
tools to use where. By understanding how the 2-stroke works and what
some of the porting does to your power, you can make your own porting
adjustments. Remember that bigger is not always better. Many times, just
by matching the cases and sleeves to the existing porting is an enormous
improvement. Opening up the porting too large can cut down on velocity
and compression. Always use careful planning before starting to port your
cylinder(s). Don't plan to use low range pipes and port your cylinders for
high rev. or use high rev. pipes and port your cylinder(s) for low-end
power. With porting your cylinders, there are endless variables. So with
your first experimentation with porting don't over do it. A 20 thousands of
an inch cut in a port will make a noticeable difference.
Use this information at your own risk and use the information with some
common sense. I am not responsible for any damage done to yourself,
someone else, your personal property or anyone else's property from
reading this CD\Book.
Note: Many of the photos are 1200 dpi and may take 4-5 seconds to load
onto the page.
Let's start by understanding how a 2-stroke works. Below are some illustrations
to help us understand the basic principles of the 2-stroke motor.
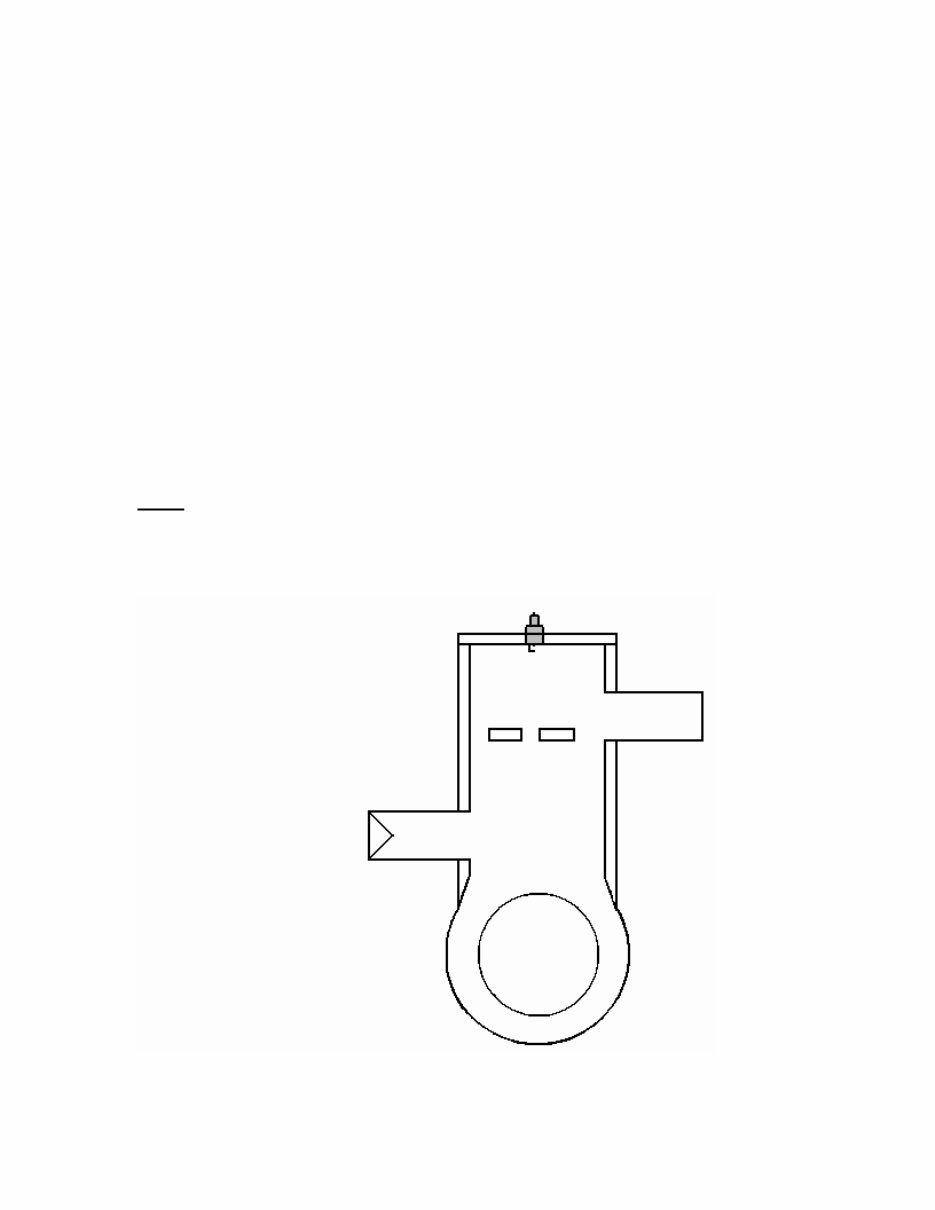
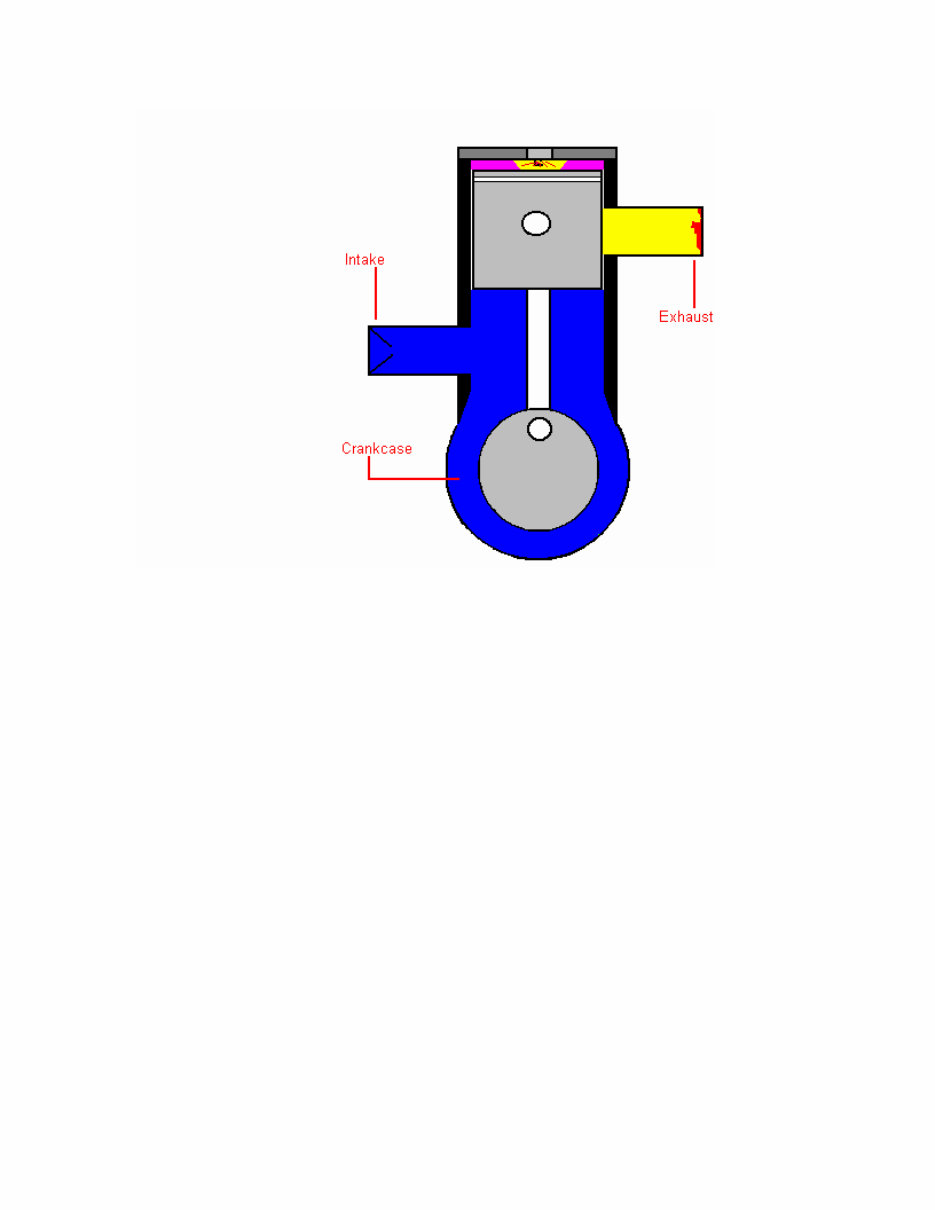
Above is a cut away view of a 2-stroke cylinder and crankcase.
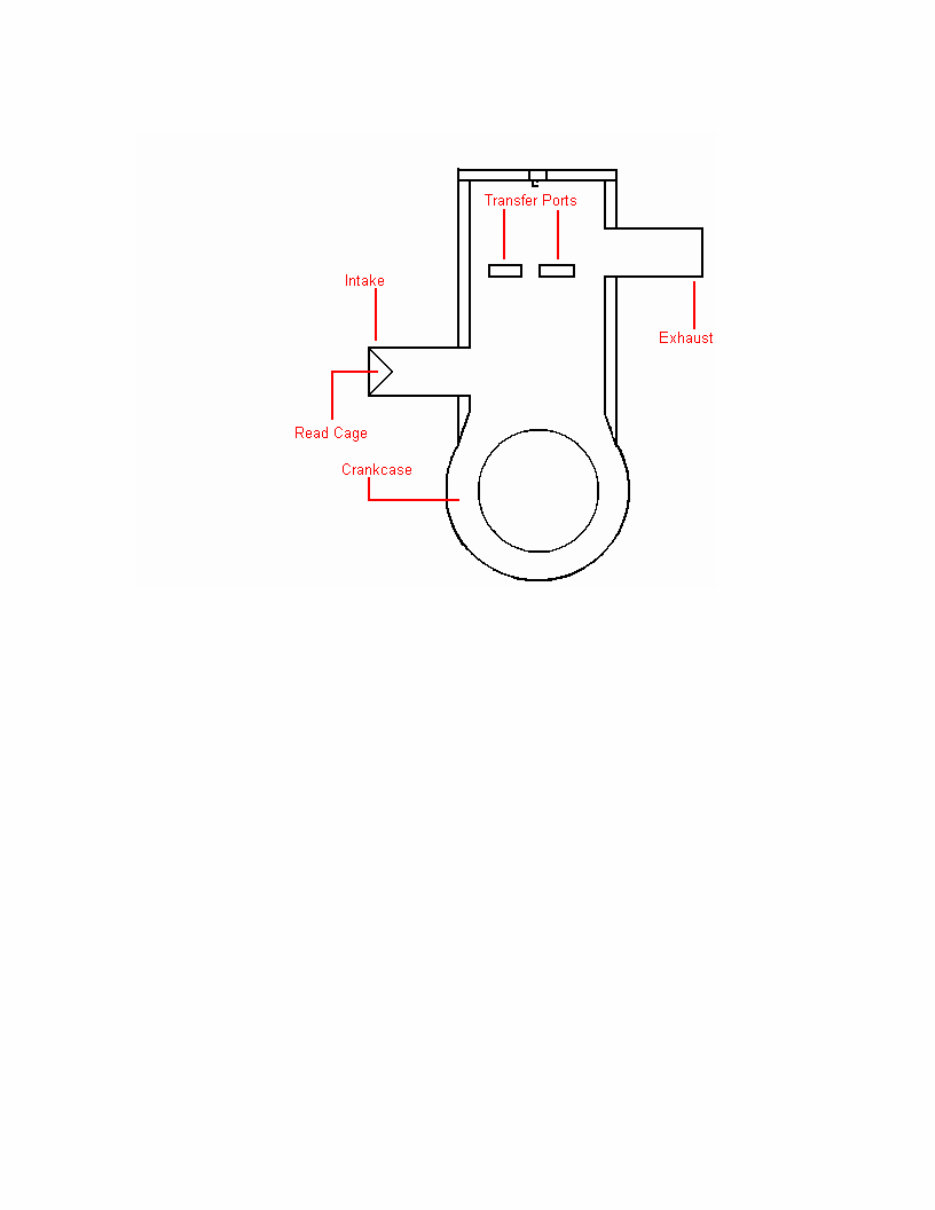
This shows the basic look inside a 2-stroke cylinder and crankcase.

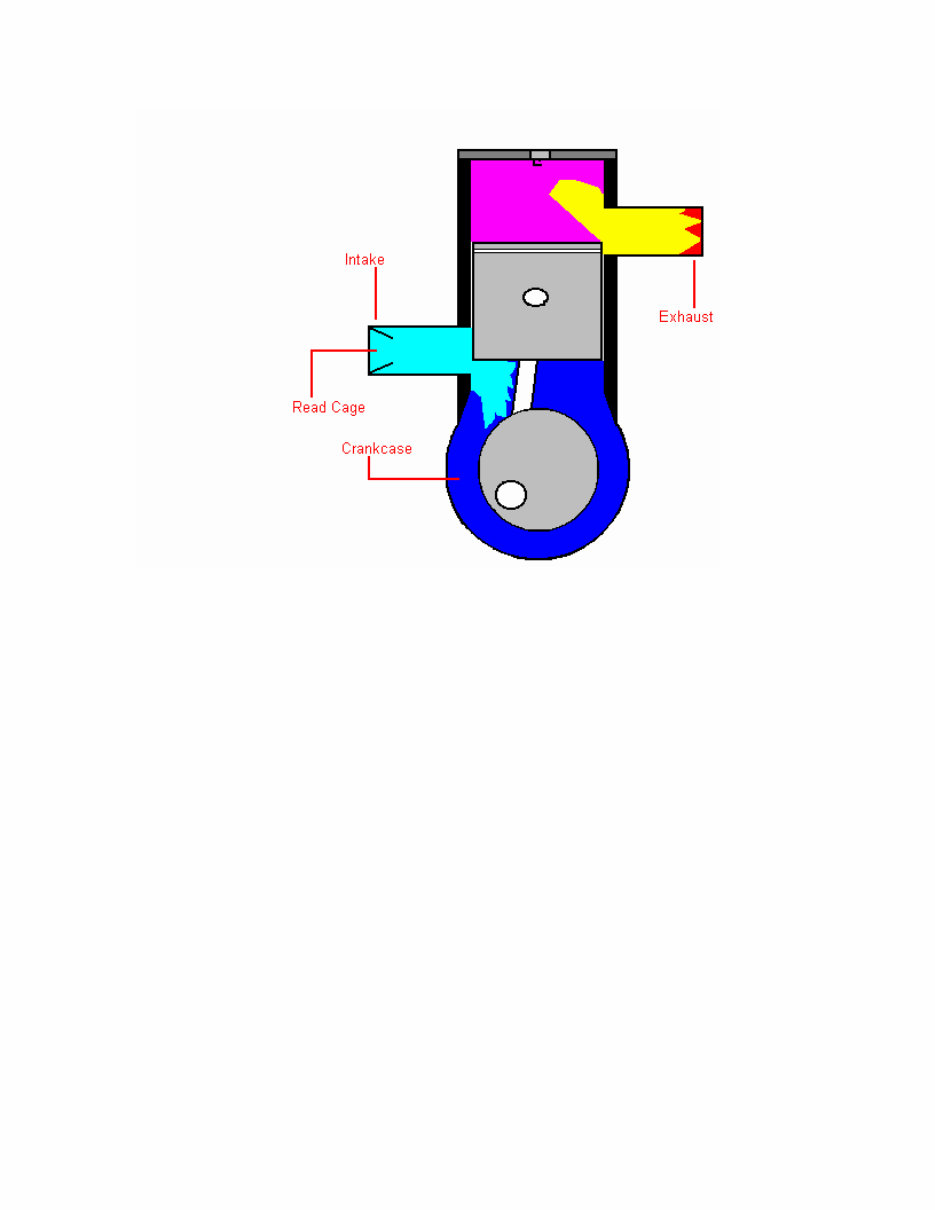
This Illustration shows the piston and crank in the bottom dead center position.
When the piston is in this position; the reeds are closed, the transfer ports are
exposed/open and the exhaust port is exposed/open. With the transfer ports
open, the compressed air/fuel mixture is forced through the transfer ports,
helping to force the burnt air/fuel mixture out the exhaust as the fresh air/fuel
mixture enters. When the spark detonates the air fuel mixture, the force of the
explosion helps remove the burnt air/fuel mixture when the exhaust port starts to
open. This will also start a small vacuum affect as the transfer ports start to open.
The purple is the fresh air/fuel mixture entering the cylinder through the transfer
ports. The yellow is the burnt fuel being forced out the exhaust. The red is the
burnt fuel from the previous power stroke. The dark blue is residual compressed
air and fuel. The light blue is fresh air/fuel waiting behind the reed cage, with the
reed cage in the closed position.
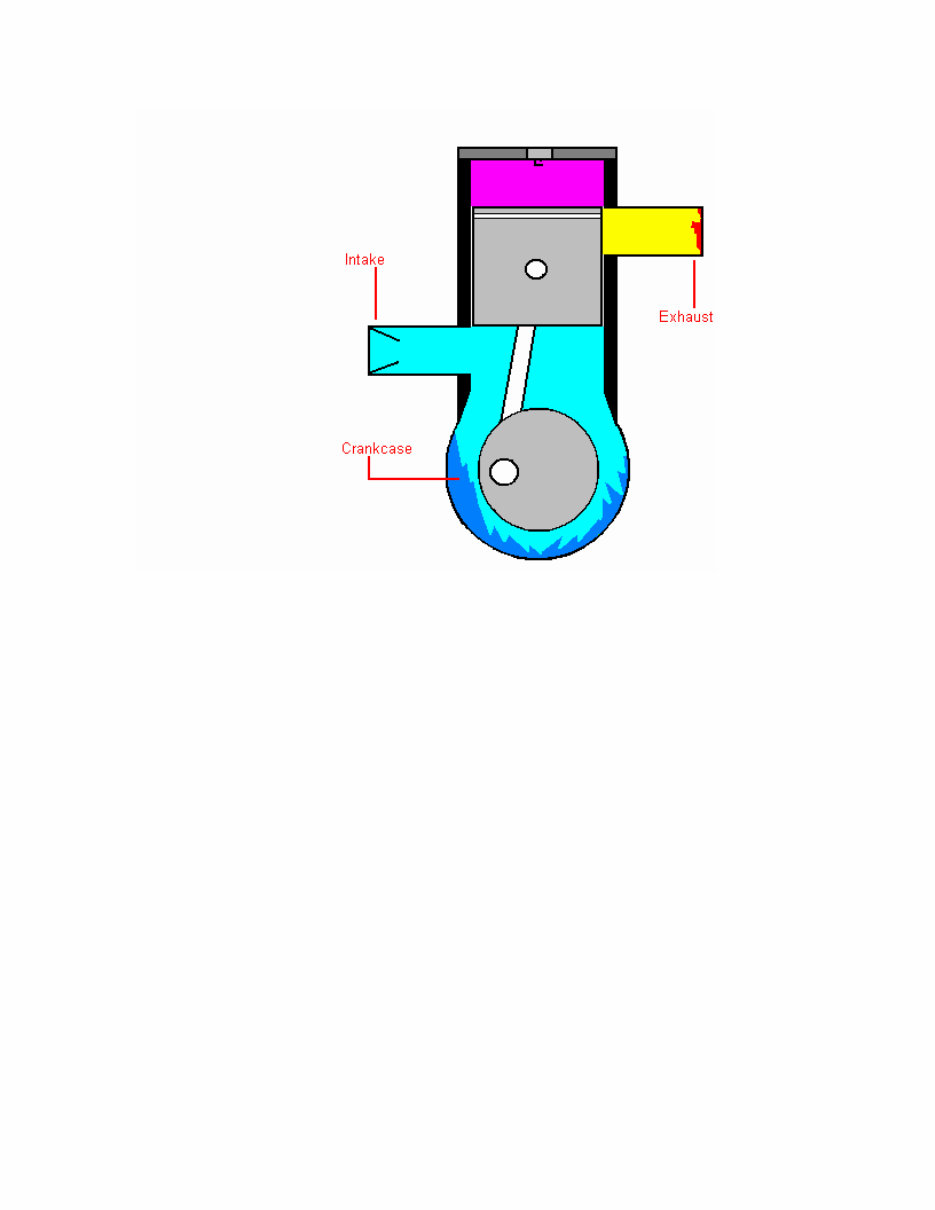
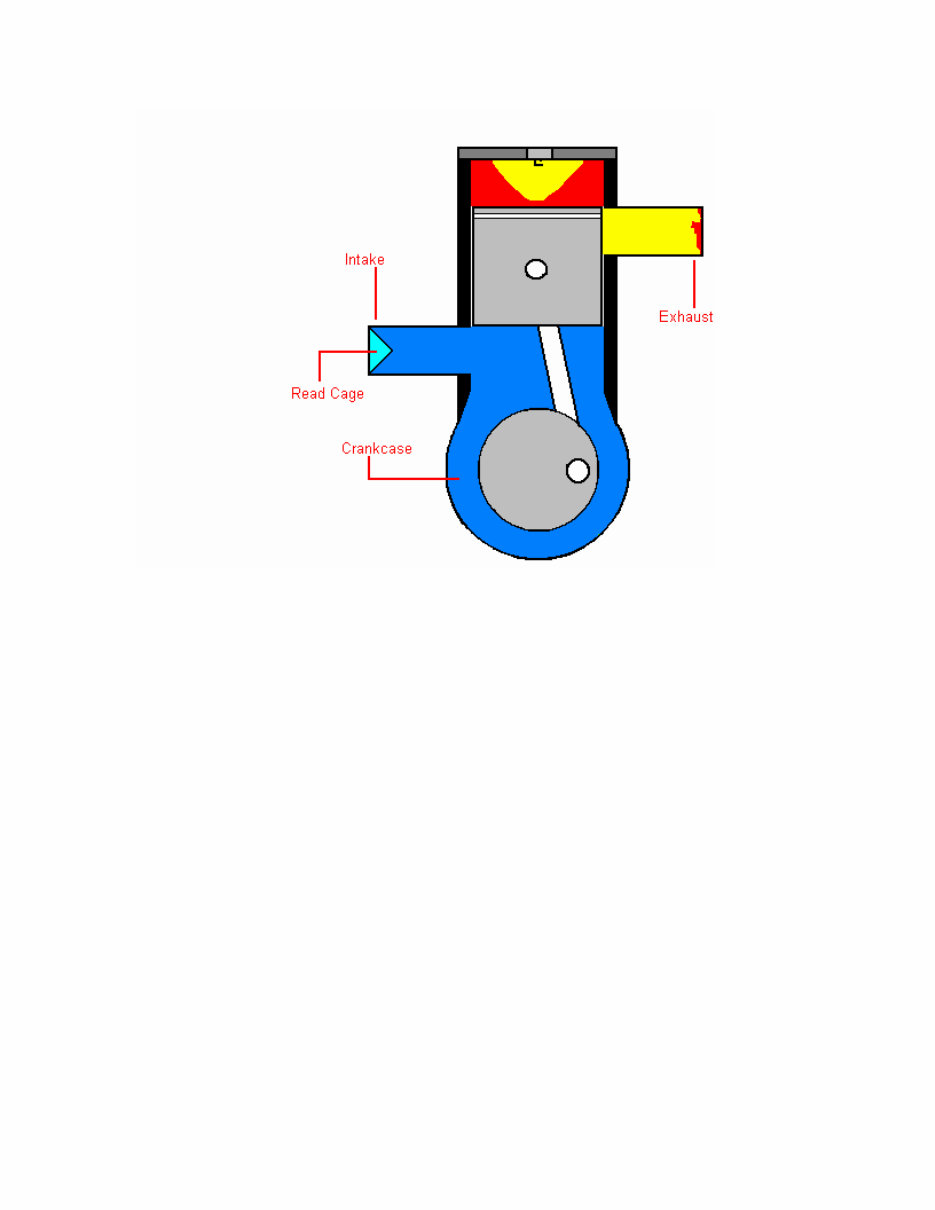
Here we can see with the piston moving upward, the transfer ports begin to close
and the piston creates a vacuum. This vacuum opens the reed cage, sucking the
air/fuel mixture into the cylinder. As the piston travels upward it continues to force
the burnt air/fuel mixture out the exhaust port.
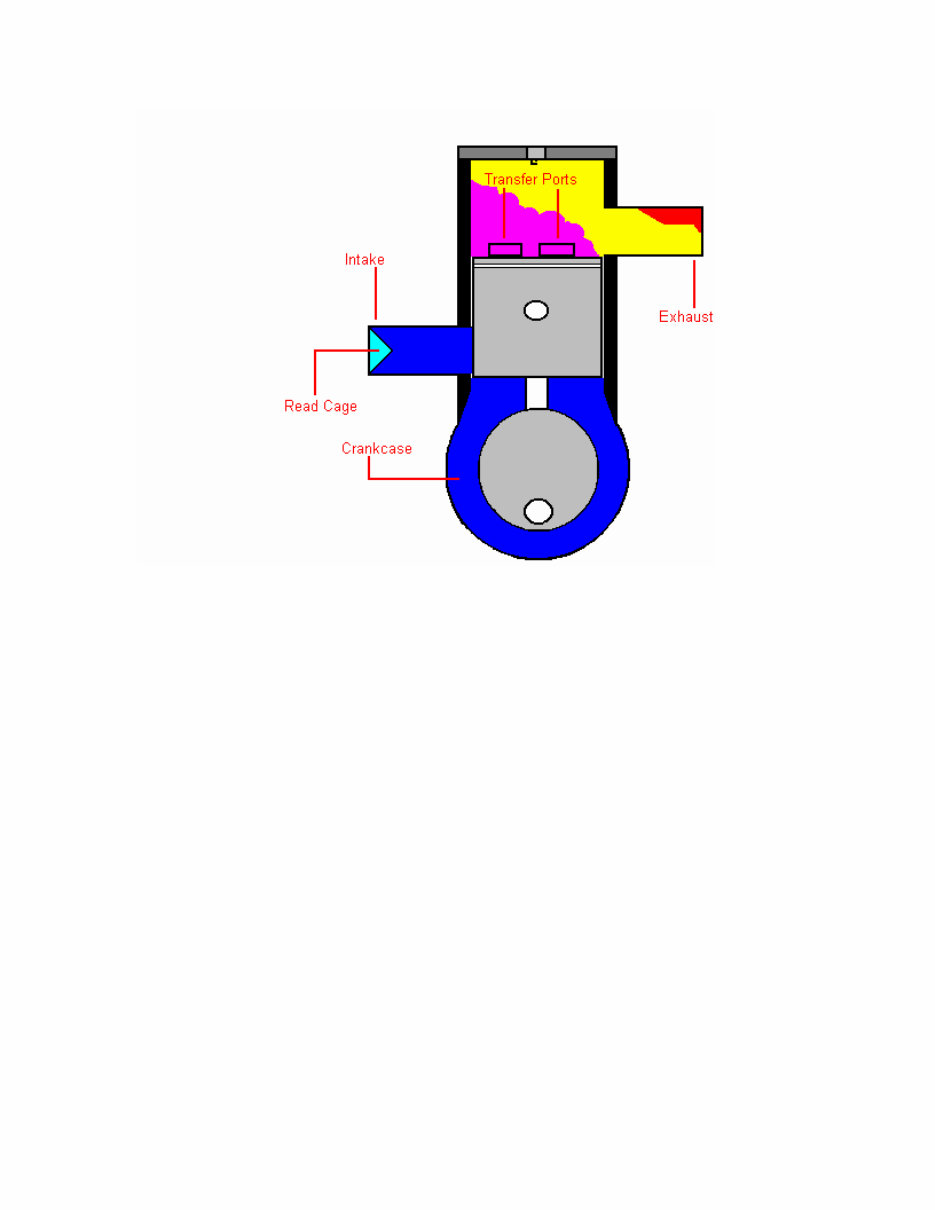
In this picture the piston is still traveling upward, but has passed the exhaust port.
Now the air fuel mixture is being compressed between the piston, rings and
head. The upward movement of the piston is still drawing air/fuel into the lower
part of the cylinder under the piston.

In this illustration the piston is at top dead center. The air/fuel mixture is at it
highest compression. The reeds are still open, but are about to be slammed shut
from the power stroke. The area under the piston and in the crankcase is filled
with fresh air/fuel mixture.
Here we can see the spark from the spark plug, which is detonating the
compressed air/fuel mixture. The detonation of the air/fuel mixture provides the
power and forces the piston down. The bigger the bang, the larger the force
pushing the piston down and the greater amount of horsepower is achieved. Also
notice, as the piston starts to move down, the reeds start to close. The force of
the fresh air/fuel mixture trying to escape closes the reeds.
This picture shows the reeds completely closed and the fresh air/fuel mixture is
being compressed under the piston. The fresh air/fuel mixture will continue to be
compressed until the piston passes the openings of the transfer ports.
Now we are right where we started from. The air/fuel mixture was compressed
and being forced through the transfer ports, forcing the burnt air/fuel mixture out
the exhaust. These are your 2-strokes.
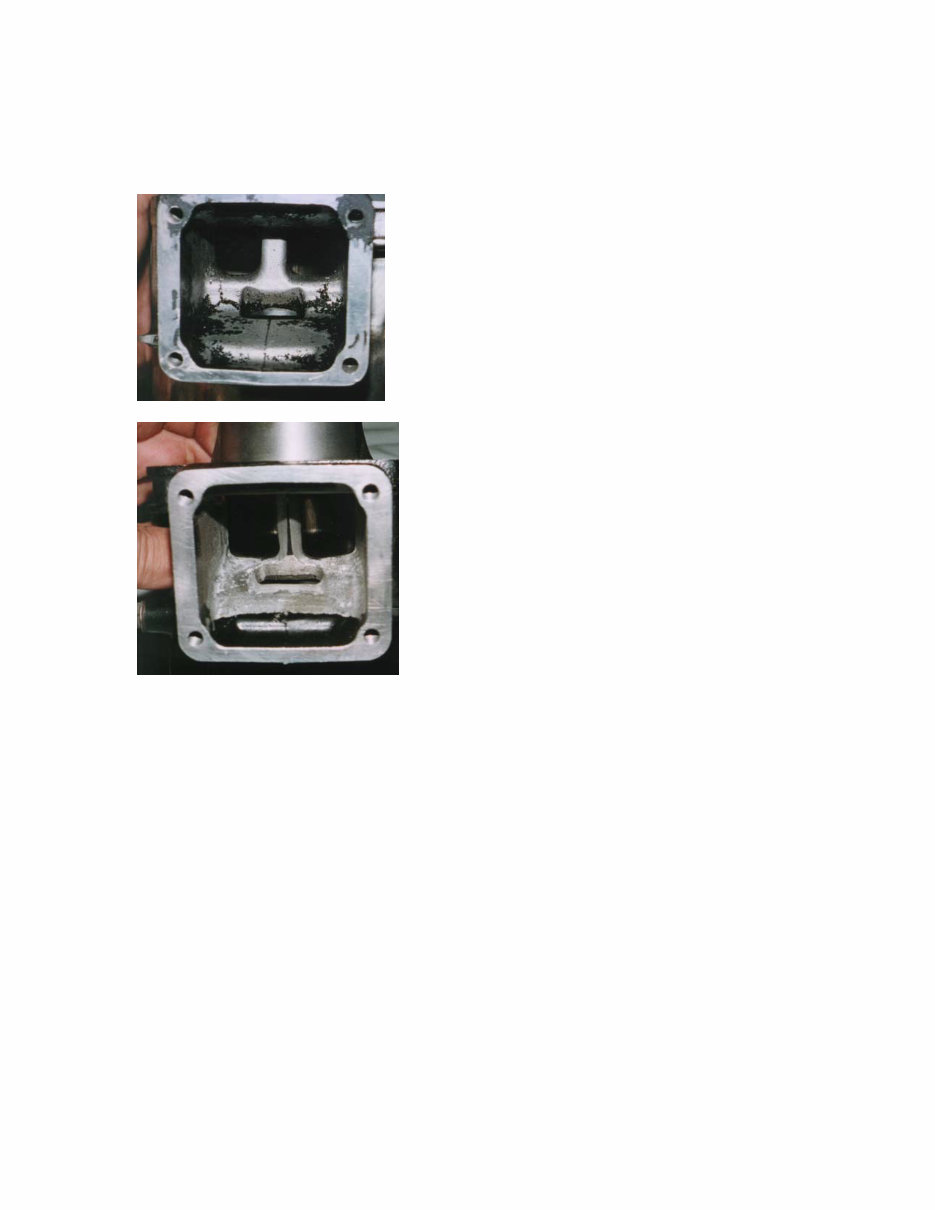
Now that we have some understanding of how the 2-stroke motor works, let's
look at a stock intake port and a ported intake port on a Yamaha Banshee
cylinder.
Stock
Ported
You can see the difference in the size of the stock cylinder ports verses the ports
on the ported cylinder. The ported cylinder will allow much more air/fuel mixture
to enter the cylinder. The ported cylinder is a dramatic difference and is for a
large bore, stroked motor. You might not want to be this dramatic when you port
your cylinder. You only want the cylinder opened up to accommodate the
application. If you open the porting up too large, it will hurt you rather than help
you. The more area you remove, the less the mixture gets compressed when the
piston travels downward and the reeds are closed. You need the fresh air/fuel
mixture to get compressed under the piston so when the transfer ports open is
forces the mixture into the cylinder with a great amount of velocity. The more
velocity, more of the mixture will transfer into the cylinder. If the areas below the
piston and in the lower transfer ports are too large, you will end up with a lot of
residual air/fuel, not used or transferred.
You're Reading a Preview
What's Included?
Fast Download Speeds
Online & Offline Access
Access PDF Contents & Bookmarks
Full Search Facility
Print one or all pages of your manual
$28.99
Viewed 52 Times Today


Secure transaction
What's Included?
Fast Download Speeds
Online & Offline Access
Access PDF Contents & Bookmarks
Full Search Facility
Print one or all pages of your manual
$28.99
Get the Yamaha Banshee Porting DIY Guide to learn how to port your own Banshee for enhanced power. This guide provides step-by-step instructions for the port work, explaining the functioning of a two-stroke engine, the benefits of porting, the essential areas for porting, the process, recommended tools, and sourcing options. Ideal for both professional mechanics and DIY enthusiasts.


