Acknowledgements Our thanks ere due to Honda (UK) Limited for permission to reproduce their line drawings and for supplying the colour transparency of the CB400 NC featured on the front cover. Paul Branson. of Paul Branson Motorcycles Ltd Yeovil, supplied the Honda C8250 N and various technical information used in the preparauon of the manual. Brian Horsfall gave considerable assistance with the strip- down and robulldlng and devised the ingenious methods for About this manual The purpose of this manual Is to present the owner with a concise and graphic guide which will enable him to tackle any operation from baslc routine maintenance to a major overhaul. It has been assumed that any work will be undertaken without the luxury of a well-equipped workshop and a range of manufacturers service tools To thla and. the machma featured In the manual was stripped and rebuilt In our own workshop. by a team comprising a mechanic. a photographer and the author. The resulting photographic aequenoe depicts events as they took place the hands shown being those of the author and the mechanic. The use of specialised. and expensive. service tools was avoided unless their use was conaidered to be essential due to risk of breakage or injury. Thera is usually some way of Improvising a m11hod of removing a stubborn component provided that a auitable degree of care is exercised. The author learnt his motorcycle mechanics over a number of years. faced with the same difficulties and using similar facilities to those encountered by most owners. It is hoped that this practical experience can be paaaed on through the pages of this manual. Where possible. a well -used example of the machine is chosen for a workshop project as this highlights any areas which might be particularly prone to glvtng rise to problems In this way, any such difficulties are encountered and resolved before the tllCt Is written, and the techniques used to deal with overcoming the lack of service tools Tony Steadman arranged and took the photographs that accompany the text Mansur Darlington edited the text. Finally. we would also like to thank the Avon Rubber Company. who kindly supplied advice about tyre fitting NGK Spark Plugs (UK) Ltd who furnished advice about sparking plug conditions. and Renold Limited who supplied details of replace· ment chains. them can be Incorporated In the relevant Section. Armed with a working knowledge of the machine the author undertakes e considerable amount of research In order that the maximum amounts of data can be Included In the manual Each Chapter is divided into numbered secttons Within these Sections are numbered paragraphs Cross reference throughout the manual is quite straightforward and logical When reference is made See Section 6 1 o· tt means Secuon 6 paragraph 10 In the same Chapter If another Chapter ware Intended. the reference would read, for example. Sea Chapter 2. Section 6 10', All the photographs are captioned with a section/paragraph number to which they refer and are relevant to the Chapter text adjacent. Rguru (usually line illultrattons) appear in a logtcal but numerical order. within a given Chapter Fig 1 1 therefore refers to the first figure In Chepter 1 Left-hand end right-hand descriptions of the machines and their components refer to the left end right of a given machine when the rider Is seated normally Motorcycle manufacturers conttnually make changu to specifications and recommendations. and these when nottfied, are incorporated into our manuals at the earliest opportun•ty. Whilst avery care Is taken to ensure that the Information in this manual Is correct no liability can be accepted by the author or publishers for loss damage or injury caused by any errors in or omissions from the information given.
Contents Page Acknowledgements 2 About this manual 2 Introduction to the Honda CB250 N and CB400 N Super Dream models 5 Model dimensions and weight 5 Safety first! 6 Ordering spare parts 7 Routine maintenance 8 Quick glance maintenance adjustments and capacities 13 Recommended lubricants 13 Working conditions and tools 14 Chapter 1 Engine. clutch and gearbox 15 Chapter 2 Fuel system and lubrication 63 Chapter 3 Ignition system 76 Chapter 4 Frame and forks 79 Chapter 5 Wheels. brakes and tyres 89 Chapter 6 Electrical system 105 Chapter 7 The 1981 to 1 98 4 models 114 Wiring diagram 123 Conversion factors 124 Metric conversion tables 125 Index 126
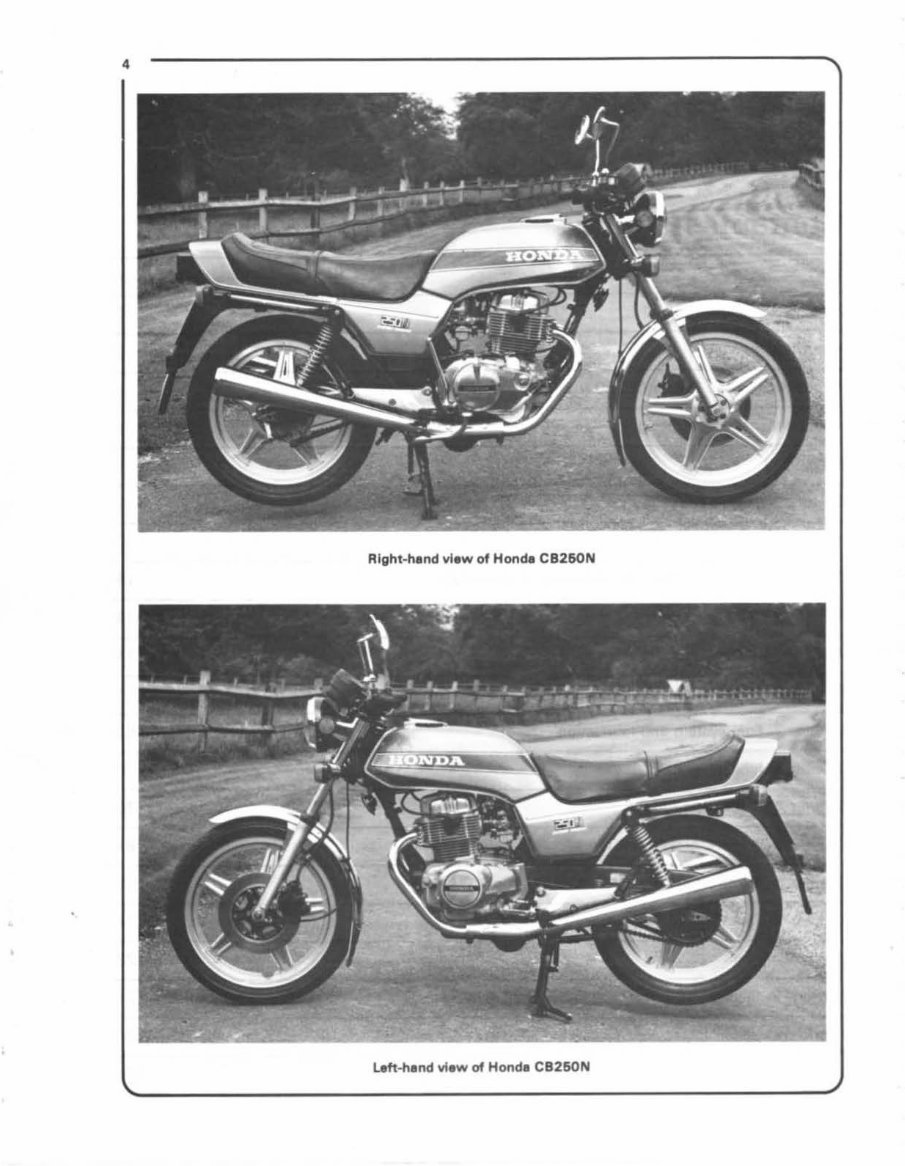
4 left-hand view of Honda CB260N
Introduction to the Honda CB250N and CB400N Super Dream models The present Honda empire which started In a wooden shack In 1947 now occupies a vast modern factory The first motorcycle to be Imported into the UK in the early 60 's. the 250 cc twin 'Dream was the thin edge of 11 wedge which has been the Japanese domination of the motorcycle Industry. Strange it looked too. to Western eyes. with pressed steel frame, and 'square' styling In 1959, Honda commenced road racing In Europe. at the tOM n races. They came 'to team, next year to race, maybe , but walked off with the manufacturer's team award. A few years after this derided start, they were to dominate all classes. with such riders as Mike Hallwood, Jim Redman. and the la te Tom Phillis and Bob Mcintyre, on four, five and she cylinder machines. Even the previously unbeaten Italian muftis no longer had things their own way, and were hard put to continue racing under really competitive terms Honda withdrew from racing in 1967 when at the top of the tree. not to retum again until the 197 7 season started Honda's success In racing has been mirrored in their sales of road going machinery, a range which included models from 49 cc to 1000 cc, and encompasses engine configurations of widely differing types such as single cylinder transverse six cylinder and even V-twin types. The Honda CB250N and the CB400N (known also as Super Dreams) were introduced in the middle of 1978 to take a larger slice of the markets that were previously contested by their forerunners. the C8250T amd CB 400T (Dreams) Although still on the market in the USA (where they are known 11 Hawks) the existing Dreams were only available in the UK for 11 six month period. Both models are of a similar design, having many Interchangeable components Tho Super Dreams have what Honda has termed European styling, with a much more sporting profile than their Immediate predecessors Including an integral- looking tank and side panel unit, a slimmer seat and new 'tail' hump lower handlebars. and footrests resposittoned rearwards Mechamcallv there have also been several changes. Both models now have a six-speed gearbox, modified inlet and exhaust paning and valw timing. redesigned crankcases and longer silencers The 400 version now sports a twin disc front brake and a quartz halogen headlamp unit. Reference Is made 10 the text. in the dismantling and reassembly procedures to the various differences In each model's equipment. Model dimensions and weight Overa ll length Overall width Height Wheelbeae ..... :- ............................ . Ground clearance Dry weight CB260N 2115 mm (83 ·3 in) 730 mm (28· 71nl 1105 mm (43·5 ml 1395 mm (54 ·9 in) 165 mm (6·5 in) 167 kg (367 lb) CB400N 2115 mm (83·3 in) 730 mm 128· 7 In) 1105 mm 1 43 5 inl 1390 mm (54.7 in) 165 mm 16·5 inl 171 kgl3771b)
Safety first ! Professional motor mechanics are tramed in safe work1ng procedures However enthusiastic you may be about gettmg on with the job in hand do take the time to ensure that your safety is not put at nsk. A moment"s lack of attention can result man accident as can failure to observe certain elementary precautions. There will always be new ways of havmg accidents and the following po1nts do not pretend to be a comprehensive list of all dangers they are Intended rather to make you aware of the risks and to encourage a safety-consc1ous approach to all work you carry out on your veh1cle Essential DOs and DONTs DON'T start the engine w1thout first ascertaining that the transmission is 1n neutral DON'T suddenly remove the filler cap from a hot cooling system - cover it with a cloth and release the pressure gradually first or you may get scalded by escap1ng coolant. DON'T attempt to dra1n oil until you are sure it has cooled sufficiently to avoid scalding you DON 'T grasp any part of the engme eKhaust or silencer without first ascertaining that it is sufficiently cool to avoid burning you DON'T allow brake fluid or antifreeze to contact the machines pamtwork or plastic components DON'T syphon toxic liquids such as fuel brake fluid or antifreeze by mouth . or allow them to remain on your skin DON'T mhale dust - 1t may be 1njurious to health !see Asbestos heading) DON'T allow any spilt oil or grease to remain on the floor - wipe 11 up straight away before someone slips on it DON'T use Ill fitting spanners or other tools which may slip and cause Injury DON 'T attempt to lift a heavy component wh1ch may be beyond your capablhty - get assistance DON'T rush to finish a job or take unverified short cuts DON'T allow ch1ldren or animals in or around an unattended veh1cle DON'T Inflate a tyre to a pressure above the recommended maximum Apart from overstressing the carcase and wheel nm, in extreme cases the tyre mey blow off forcibly. DO ensure that the machine is supported securely at all times This is especially Important when the machine is blocked up to eid wheel or fork removal DO take care when attempt1ng to slacken a stubborn nut or bolt It 1s generally better to pull on a spanner rather than push. so that if slippage occurs you fall away from the machine rather than on to It DO wear eye protection when using power tools such as drill . sander. bench grinder etc DO use a barrier cream on your hands pnor to undertaking dirty jobs 11 will protect your skin from mfection as well as makmg the d1rt easier to remove afterwards but make sure your hands aren t left slippery. Note that long·term contact with used eng1ne oil can be e health hazard. DO keep loose clothing !cuffs tie etc) and long hair well out of the way of moving mechanical parts DO remove nngs wristwat ch etc before working on the vehicle - especially the electrical system DO keep your work area tidy it IS only too easy to fall over articles left ly1ng around. DO exercise caution when compressing springs for removal or mstallatton Ensure that the tension 1s apphed and released in a controlled manner using suitable tools which preclude the possibility of the spring escap1ng VIOlently. DO ensure that any lilttng tackle used has a safe working toad rating adequate for the job DO get someone to check periodically that all is well. when working alone on the vehicle DO carry ~ut work In a logical sequence and check that everything Is correctly assembled and tightened afterwards DO remember that your vehicles safety affects that of yourself and others. If in doubt on any po1nt. get specialist adv1ce IF. tn sp1te of following these precautions you ere unfortunate enough to 1njure yourself, seek medical attention as soon as POSSible . Asbestos Certam fnction. insulat1ng sealtng and other products such as brake linings clutch ltnings gaskets l.'tc contam asbestos Extreme care must be wlcen to avoid mhalation of dust from such produces smce 11 is harardous to health If m doubt assume that they do conte1n asbestos Fire Remember at all ttmes that petrol !gasoline) 1s h1ghlv flammablE.> Ne11er smoke. or have any ktnd of naked flame around when working on the veh1cle But the risk does not end there a spark caused bv an electncal short-ctrcult. by two metal surfaces contacting each other, by careless use of toots or even by stattc electnctty bu1lt up in vour body under cer ta1n cond1t1ons can 1gnite petrol vapo•Jr. which 1n a conf1ned space IS highly expiOSIIIe Alwavs d1sconnect the battery earth lgroundl termmal before work1ng on anv part of the fuel or electrical svstem and never nsk sp1lhng fuel on to a hot eng1ne or exhaust It is recommended that a fire exttngu1sher of a type suitable for fuel and electrical fires IS kept handy in the garage or workplace at all t1mes. Never try to eKttngu1sh a fuel or electrical fire with water No te . Any reference to 11 torch appearing m thiS nJtJnual should ,,lw.Jys be ttlken to meiln a hand held battery OPl'f<Jted electoc 1,1mp or 1/ashllght It does not mean a weldmg 9•15 torch or blowl.lmp Fumes Certa1n fumes are h1ghly toxic and can QUICkly cause unconSCIOusness and even death if inhaled to any elltent Petrol (gasoline) vapour comes into this category. as do the vapours from certain solvents such as trichloroethylene Any dratn1ng or pouring of such volatile fluids should be done 1n a we!l venttlated area. When using cleanmg fluids and solvents read the tnstruc ttons carefully. Never use matenals from unmarked contamers - they may g1ve off potsonous vapours Never run the eng1ne of a motor vehicle in an enclosed space such as a garage E11haust fumes contain carbon mon · oxide wh1ch Is e11tremely poisonous: if you need to run the engine always do so in the open atr or at least have the rear of the veh1cle outside the workplace . The battery Never cause a spark or allow <J naked tight. near the veh1cle s battery . It will normally be giv1ng off a cer tain amount of hydrogen gas wh1ch IS h1ghtv e~Cplos1ve Always ci1sconnect the battery earth lgroundl termmal before work1ng on the luel or electrical systems If possible, loosen the hiler plugs or cover when charg1ng the battery from an external source Do not charge at an e11cess1ve rate or the battery mav burst . Take care when 1opp1ng up and when carrymg the battery The ac1d electrolyte even when d1luted IS very corroSive and should not be allowed to contact the eves or sk1n If vou ever need to prepare electrolyte yourself, always add the acid slowly to the water and never the other way round. Protect against splashes by weanng rubber gloves and gog{lles. M ams electfiCtty and electflcal equtpment When us1ng an electnc power tool. mspectlon hght etc, always ensure that the appliance IS correctly connected to 1ts plug and that , where necel>S&ry, 1t IS properly earthed (grounded) . Do not use such appliances m damp cond1t1ons and. agam beware of creating a spark or apptymg excess1ve heat 1n the viCinitY of fuel or fuel vapour Also ensure that the appliances meet the relevant national safety standards Ignition HT voltage A severe electnc shock can result from touch1ng certain parts of the igmtton svstem such as the HT leads when the engine is running or being cranked particularly 1f components are damp or the Insulation IS defective. Where an electromc 19n1t1on system IS fmed . the HT voltage is much h1gher and could prove fatal.
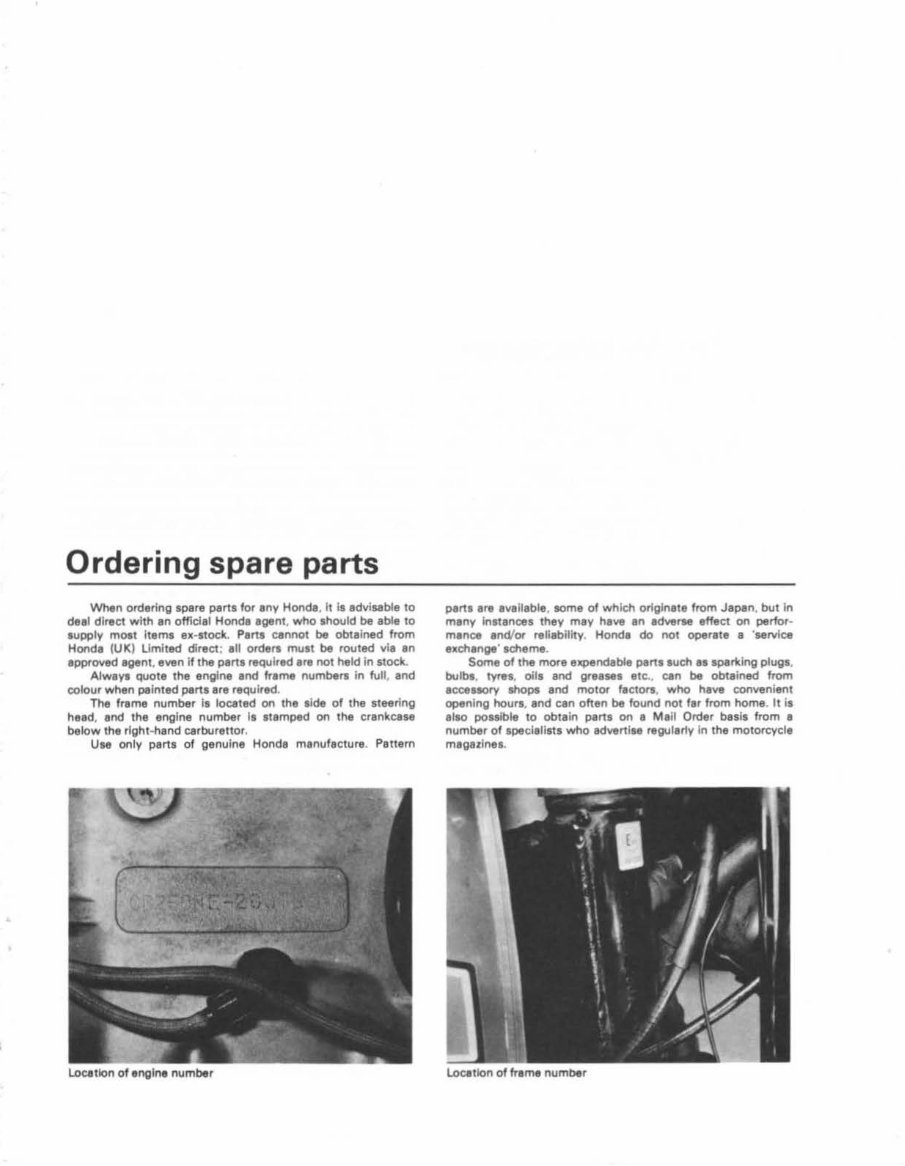
Ordering spare parts When ordering spare parts for any Honda, It Is advisable to deal direct with an official Honda agent. who should be able to supply most items ex-stock. Parts cannot be obtained from Honda (UK) Umlted direct. all orders must be routed via an ap!)f'oved agent, even if the parts required are not held in stock. Always quote the engine and frame numbers In full and colour when painted p«rts are required The frame number is located on the side of the steering head, and the engine number Is stamped on the crankcase below the right-hand carburettor. Use only parts of genuine Honda manufacture. Pattern L.ocatlon of engine number parts are available, some of which originate from Jap«n. but In many Instances they may have an adverse effect on perfor- mance and'or reliability. Honda do not operate a 'service exchange' scheme. Some of the more eJCPendable p«rts such 11 sp«rklng plugs bulbs. tyres. oils and greases etc. can be obtained from accessory shops and motor factors, who have convenient opening hours, and can often be found not far from home. It is also ponible to obtain parts on a Mall Order basis from a number of specialists who advertise regularly In the motorcycle magazines. location of frame number
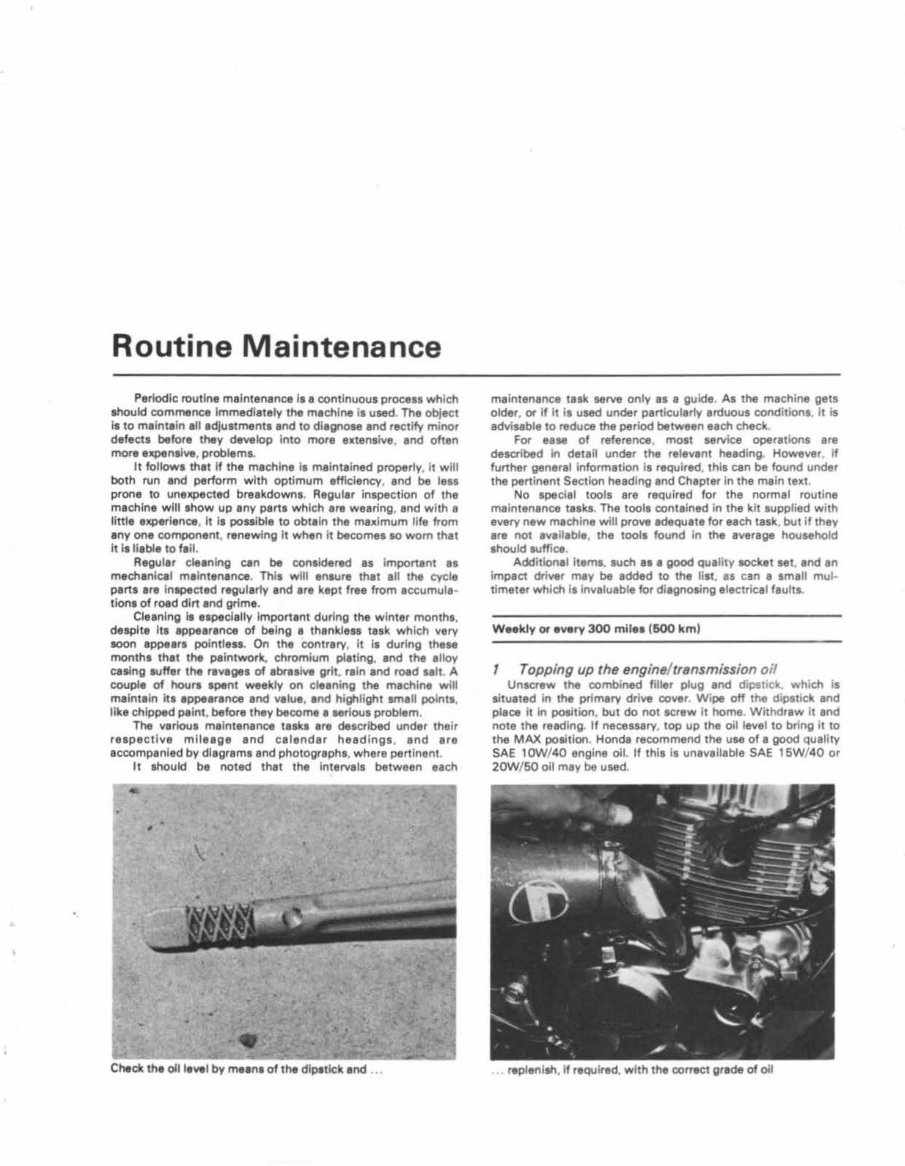
Routine Maintenance Periodic routine maintenance Is a continuous process which should commence Immediately the machine is used The object Is to maintain all adjustment• and to dlagnosa and rectify minor defects before they develop Into more extensive. and often more expensive. problems. It follows that If the machine Is maintained properly, it will both run and perform with optimum efficiency, and be less prone to unexpected breakdowns. Regular Inspection of the machine will show up any parte which are wearing, and with a little experience. It Is possible to obtain the maximum life from any one component, renewing It when It becomes 10 wom that It Is liable to fall. Regular cleaning can be considered as important as mechanical maintenance. This will ensure that all the cycle parts are lnapected regularly and are kept free from accumula- tions of road dirt and grime. Cleaning Is especially Important during the winter months. despite Ita eppearance of being a thankless task which very soon appears pointiest. On the contrary, It Is during these months that the palntwork. chromium plating, and the alloy casing suffer the ravages of abrasive grit, rain and ro.d salt. A couple of hours spent weekly on cleaning the machine will maintain Its eppearance and value, and highlight small pol nu. like chipped pelnt. before they become a serious problem. The various maintenance talks are described under their respective mileage and c alendar head ings . and are accompani ed by diagrams and photographs, where pertinent. It should be noted that the Intervals between each - \ . Check the oil level by means of the dipstick end . maintenance task serve only as 1 guide. As the machine gets older. or If It Is used under particularly arduous conditions it is advisable to reduce the period between each check For easa of reference most sarvlce operations are described In detail under the relevant heading. However if further general Information is required this can be found under the pertinent Section heading and Chapter In the main text. No special tools are required for the normal routine maintenance taska. The tools contained In the kit supplied with every new machine will prove adequate for each task but If they are not available, the tools found In the average housahold should suffice. Additional items such as a good quahty lOCket sat and an Impact driver may be added to the list. as can a small mu l- timeter which Is invaluable for diagnosing electrical faults Weekly 01' every 300 miles (600 km) 1 Topping up the enginel trsnsmission oil Unscrew the combined filler plug and dipsuck, which is situated in the primary drive cover Wipe off the dipstJck and place It In position, but do not screw It home Wrthdraw It end note the reeding. If necessary. top up the oil level to bring It to the MAX polltlon. Honda recommend the use of a good quality SAE 1 OW / 40 engine oil. If this Is unavailable SAE 15W/40 or 20W/ 50 oil may be used. . . replenish, if required, with the correct grade of oil
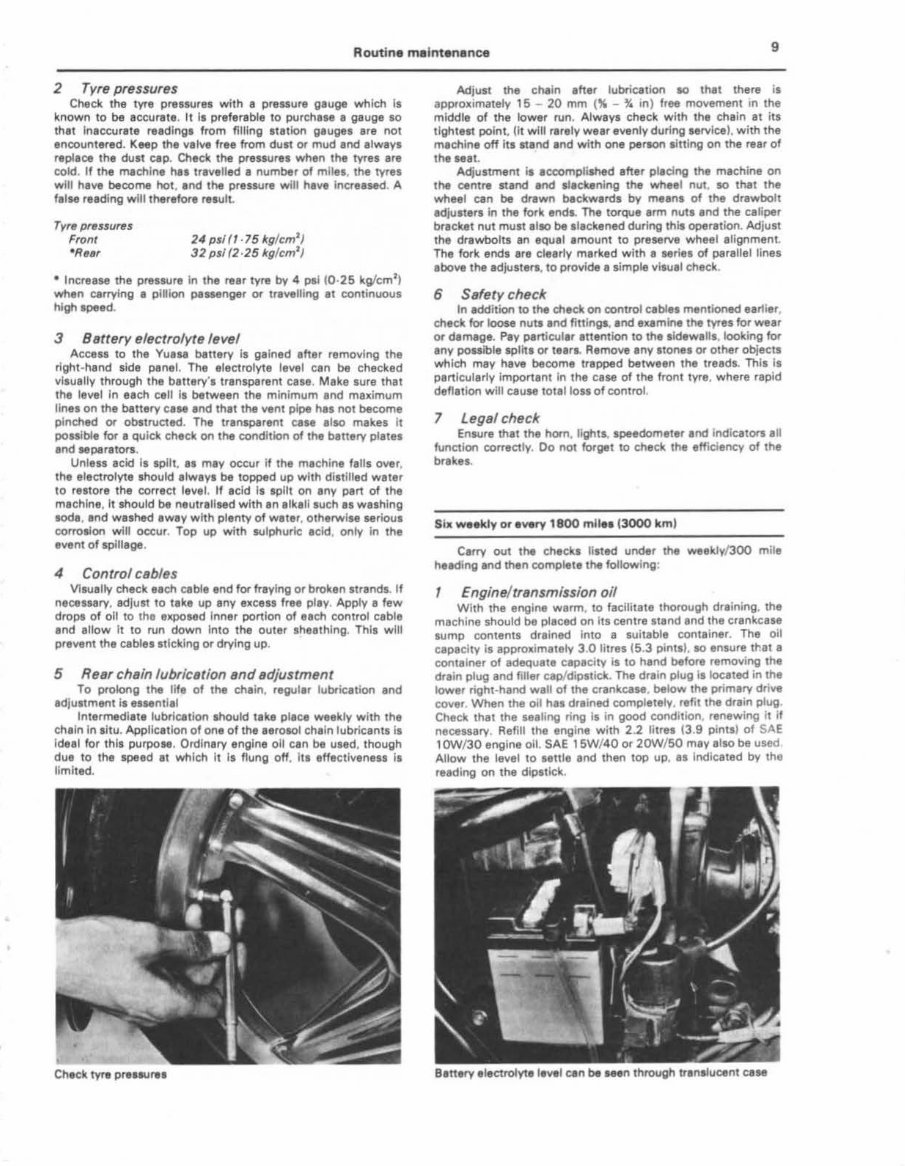
Routine maintenance 9 2 Tyre pressures Check the tyre pressures with a pressure gauge which Is known to be accurate. It Is preferable to purchase a gauge so that Inaccurate readings from filling station gauges are not encountered. Keep the valve free from dust or mud and always replace the dust cap. Check the pressures when the tyTes are cold. If the machine has travelled a number of miles. the tYres will have become hot, and the pressure will have Increased A false reading will therefore result. Tyre pressuru Front •RetJr 24 psi (1·75 kg/cm 2 J 32 psi (2 ·25 kg/cm 2 } • Increase the pressure In the rear tYre by 4 psi 10 · 25 kg/cm 2 1 when carrying a pillion paS$8nger or travelling at continuous high speed. 3 Battery electrolyte level Access to the Vuasa battery Is gained after removing the right-hand side panel. The electrolyte level can be checked visually through the battery's transparent case Make sure that the level In each cell Is between the minimum and maximum lines on the battery case and that the vent pipe has not become pinched or obstructed. The transparent case also makes it possible for a quick check on the condition of the battery plates and separators. Unless acid is spilt, as may occur if the machine falls over. the electrolyte should always be topped up with distilled water to restore the correct level. If acid Is spilt on any part of the machine, it should be neutralised with an alkali such as washing soda, and washed away with plenty of water. otherwise serious corrosion will occur. Top up with sulphuric acid. only In the event of spillage. 4 Control cables VIsually check each cable and for fraying or broken strands. If necessary, adjust to take up any excess free play. Apply a few drops of oil to the exposed Inner portion of each control cable and allow It to run down Into the outer sheathing This will prevent the cables sticking or drying up. 5 Resr chain lubrication and adjustment To prolong the life of the chain. regular lubrication and adjustment is essential Intermediate lubrication should take place weekly with the chain In situ. Application of one of the aerosol chain lubricants is Ideal for this purpose. Ordinary engine oil can be used, though due to the speed at which It Is flung off . Ita effectiveness Is limited. Check tYre presiUrel Adjust the chain after lubrication so that there IS approximately 15 - 20 mm (% - % 1n) free movement 1n the middle of the lower run. Always check with the chain at its tightest point, (It will rarefy weer evenly during service). with the machine off its stand and with one person sitting on the rear of the seat. Adjustment is accomplished after placing the machine on the centre stand and slackening the wheel nut. so that the wheal can be drawn backwards by means of the drawbolt adjusters In the fork ends. The torque arm nuts and the caliper bracket nut must al10 be slackened during this operation. Adjust the drawbolts an equal amount to preserve wheel alignment The fork ends are clearly marked with a series of parallel lines above the adjusters, to provide a simple visual check. 6 Safety check In addition to the check on control cables mentioned ear1ier check for loose nuts and fittings. and examine the tyres for wear or damage. Pay particular attention to the sidewalls. looking for eny possible splits or tears. Remove any stones or other objects which may have become trapped between the treads. This Is particularly important In the case of the front wre. where rapid deflation will cause total loss of control 7 Legal check Ensure that the hom. lights speedometer and indicators all function correctly Oo not forget to check the efficiency of the brakes. Six weekly or every 1800 mllea (3000 km) Carry out the checks li sted under the waekly/ 300 mile heeding and then complete the following Engine/transmission oil With the engine werm. to facilitate thorough draining. the mach1ne should be placed on its centre stand and the crankcase sump contents drained Into a suitable container. The oil capacity is approximately 3 0 litres (5.3 pints), so ensure tl-ot a container of adequate capaCitY is to hand before removing the drain plug and filler captdipsuck. The drein plug 1S located in the lower right-hand wall of the crankcase. below the primary drive cover When the oil has drained completely refit the drain plug Check that the sealing ring Is In good condition renewing It if necessary. Refill the engine with 2.2 lltres (3.9 pints) of SAE 1 OW/30 engine oil SAE 15W/40 or 20W/60 may also be used Allow the level to settle and then top up, as Indicated by the reading on the dipstick Banerv electrolyte level can be seen through translucent case
Discover top-quality workshop service and repair manuals, essential for professional mechanics and DIY enthusiasts alike. These comprehensive manuals provide detailed instructions and step-by-step diagrams for all workshop procedures, from basic maintenance like changing plugs to more complex tasks such as engine rebuilding. Additionally, they include electrical diagrams, torque settings, fluid capacities, and more.
Gain access to the most comprehensive diagnostic, service, repair, and maintenance information with just a click. These manuals, written by manufacturers, contain thousands of pages of diagrams and detailed information tailored to specific vehicle or equipment repair needs. They are the most accurate and complete source of original service manuals, wiring diagrams, and bulletins.
Each service repair workshop manual is year and model specific, featuring factory diagnostic and repair procedures. This grants you access to the same repair information used by certified technicians and mechanics.
All manuals are available in easy-to-use .PDF files, compatible with both Windows and MAC operating systems. Multiple forms of payment are accepted, including Paypal, Credit, and Debit Cards.
Comprehensive workshop service and repair manuals
Year and model specific
Factory diagnostic and repair procedures
Windows & MAC compatible .PDF files
Accepts Paypal, Credit & Debit Cards
Recently Viewed
5,521,897Happy Clients
2,594,462eManuals
1,120,453Trusted Sellers
15Years in Business
Price:
Actual Price:
1978-1984 Honda CB250N Super Dream Service & Repair Manual