

Chinese GY6 150cc Scooter Service & Repair Manual
What's Included?
Fast Download Speeds
Online & Offline Access
Access PDF Contents & Bookmarks
Full Search Facility
Print one or all pages of your manual

CHINESE
GY6 150cc
SERVICE & REPAIR
MANUAL

Servicing information 1
Vehicle bodymuffler 2
Inspection & Adjustment 3
Lubricating system 4
Carburetor air filter 5
Cooling system 6
Disassembly of engine 7
Cylinder head covercylinder head
cylinder bodyvalve
8
CVT system 9
Gearbox 10
Right side covermagnetowater pump 11
Crankcase bodycrankshaftpiston set 12
Front wheel front brake front suspension
steering system
13
Rear wheelrear brakerear suspension
system
14
Batterycharging system 15
Ignition system 16
Electric starting systemoverriding clutch 17
Lightinginstruments & metersswitch 18
Circuit diagramwiring diagram 19
Troubleshooting
FOREWORD
This manual contains an introductory descrip-
tion of procedures for inspectionmaintenance,
overhaul disassembly & assemblyremoval
and installation of components and parts, trouble-
shooting and service data together with illustra-
tions of our scooters
Chapter 1general service information, tools
vehicle structure and technical data.
Chapter 2 inspection and adjusting key
points service guideline
Chapter 3: and later disassembly of parts and
components installation overhaul and
troubleshooting.
The manufacturer reserves the right to
make improvements or modifications to the
products without prior notice. Overhaul and
maintenance should be done according to
the actual state and condition of the cooters.
INDEX

Conversion Table
Item Example Conversion
Pressure 200Kpa
(2.00lgf/cm
2
)
33kpa(250mmHg)
1kgf/cm
2
=98.0665kpa 1kpa=1000pa
1mmHg=133.322Pa=0.133322Kps
Torque 18 N(1.8kgf-m) 1kgf m=9.80665N m
Volume 419ml 1ml=1cm
3
=1cc
1l=1000cm
3
Force 12N (1.2kgf) 1kgf=9.80665N
1 Overhaul Information
Cautions…………………………………1-1 Special Tools…….……….……….1-16
Cautions for Disassembling and Assembling..1-3 Lubricant, Sealing Agent …………. 1-18
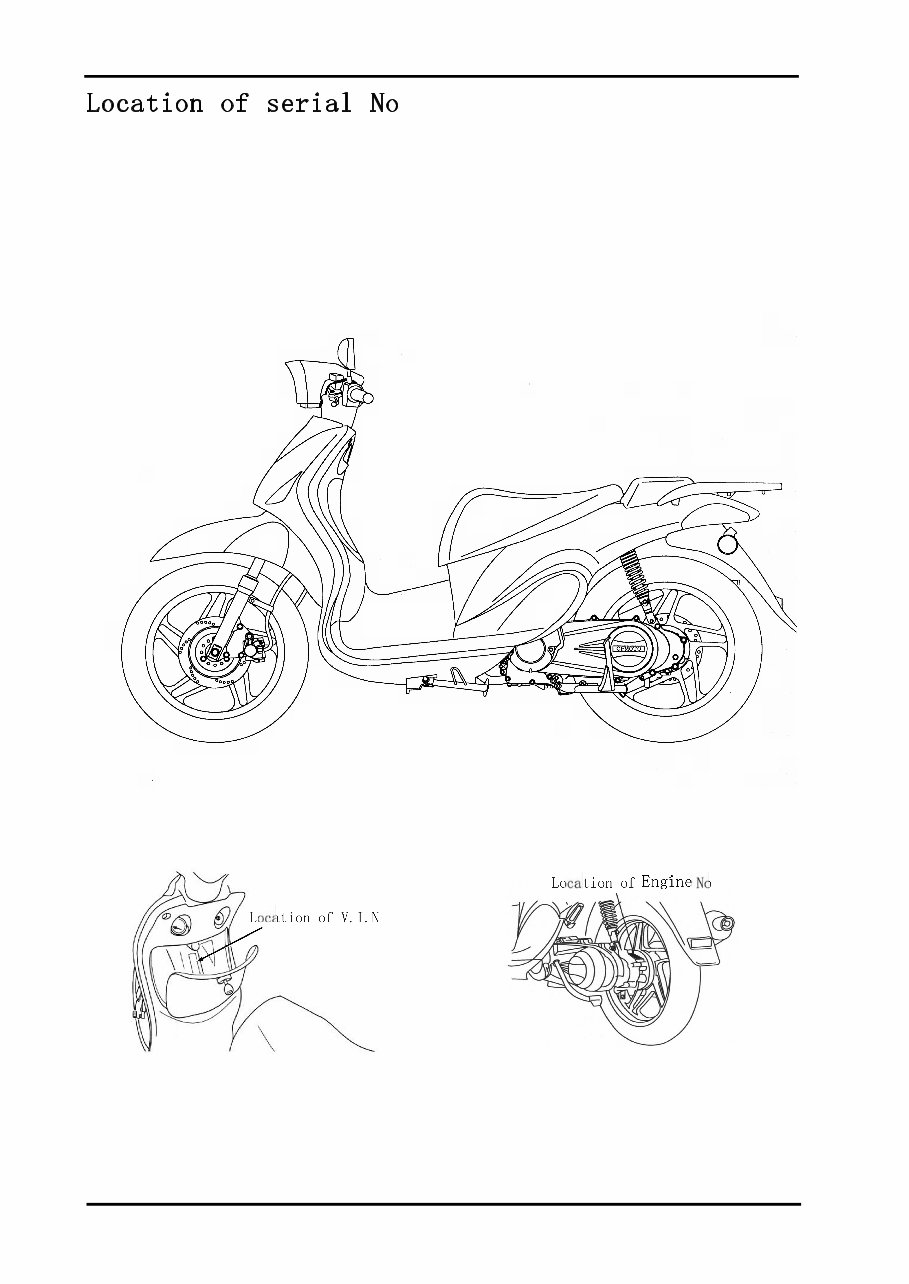
VIN Number & Engine Number.. …………1-6 Cable Routing….……….……… .1-20
Main Data Table ……….…………….…...1-7 Protecting Device for Hazardous
Overhaul Data Table.. ……………….……..1-9 Gas Proliferation………….……… 1-27
Tightening Torque …………….……… 1-14 Secondary Air Intake Device ……….1-28
Cautions for Operation
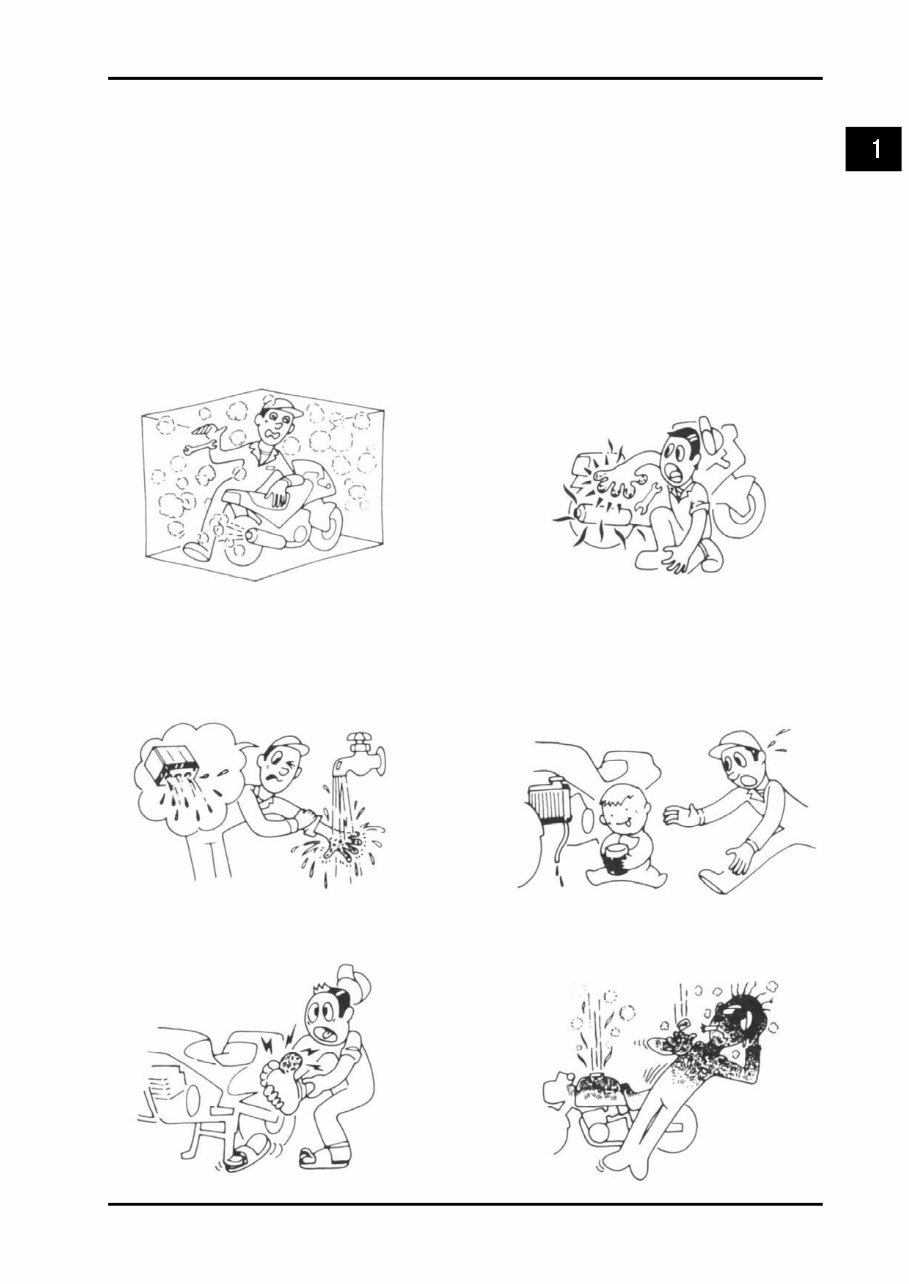
Safety Cautions
Warning: Hazardous components in exhaust. Warning: Do not touch the engine
Do not run the engine in a enclosed or or muffler with bare hands after the engine
poorly ventilated place for long time. has just stopped to avoid scalding. Wear
long-sleeve work clothes and gloves for operation.
Caution: Battery liquid(dilute sulfuric acid) Warning: Coolant is poisonous. Do not
is highly causitic and may cause burns to drink or splash to skin, eyes or clothes.
skin and eyes. Flush with water if splashed Flush with plenty of soap water if splashed to
to skin and get immediate medical skin. Flush with water and consult the doctor.
attention. Flush with water if splashed to If drinking the coolant, induce vomiting and
clothes to avoid burns. Keep battery and consult doctor. Keep coolant away from reach
liquid away from reach of children of children.
Caution: Wear proper work clothes, Warning: Gasoline is highly flammable. No
cap and boots. If necessary, were dust- smoking or fire. Also keep against sparks.
glass,gloves and mask if necessary. Vaporized gasoline is also explosive. Operate
in a well-ventilated place.
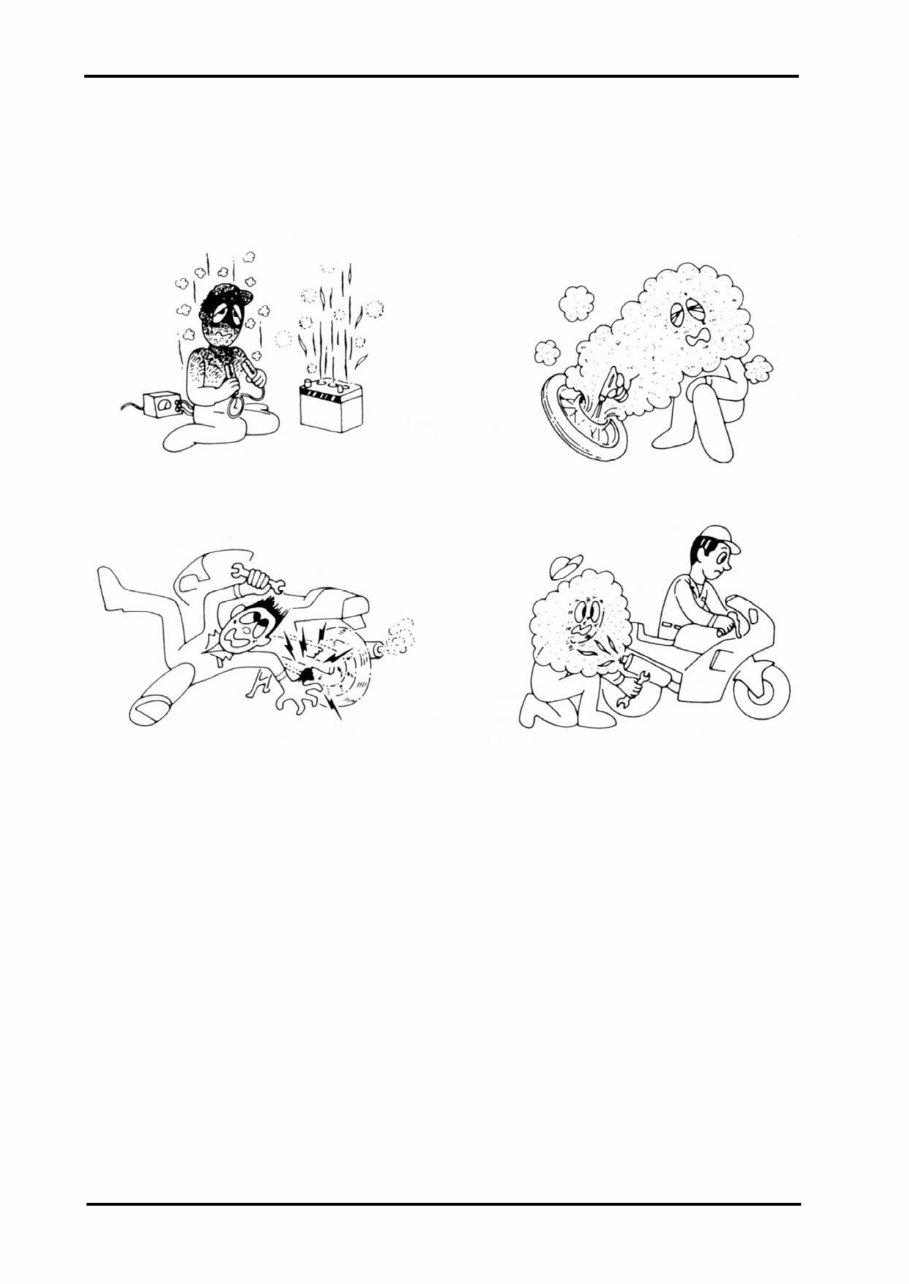
Caution: When charged, Battery may Warning: The asbestos dust on the brake
generate hydrogen which is explosive. drum is carcinogenic is breathed in.
Charge the battery in a well-ventilated Do not clean off the dust with compressed air.
place. Use cleaning detergent to avoid dust
proliferation.
Warning: Be careful not to get clamped Warning: When more than two people are
by the turning parts like wheels and operating, keep reminding each other for
clutch. safety purpose.
1 Overhaul Information
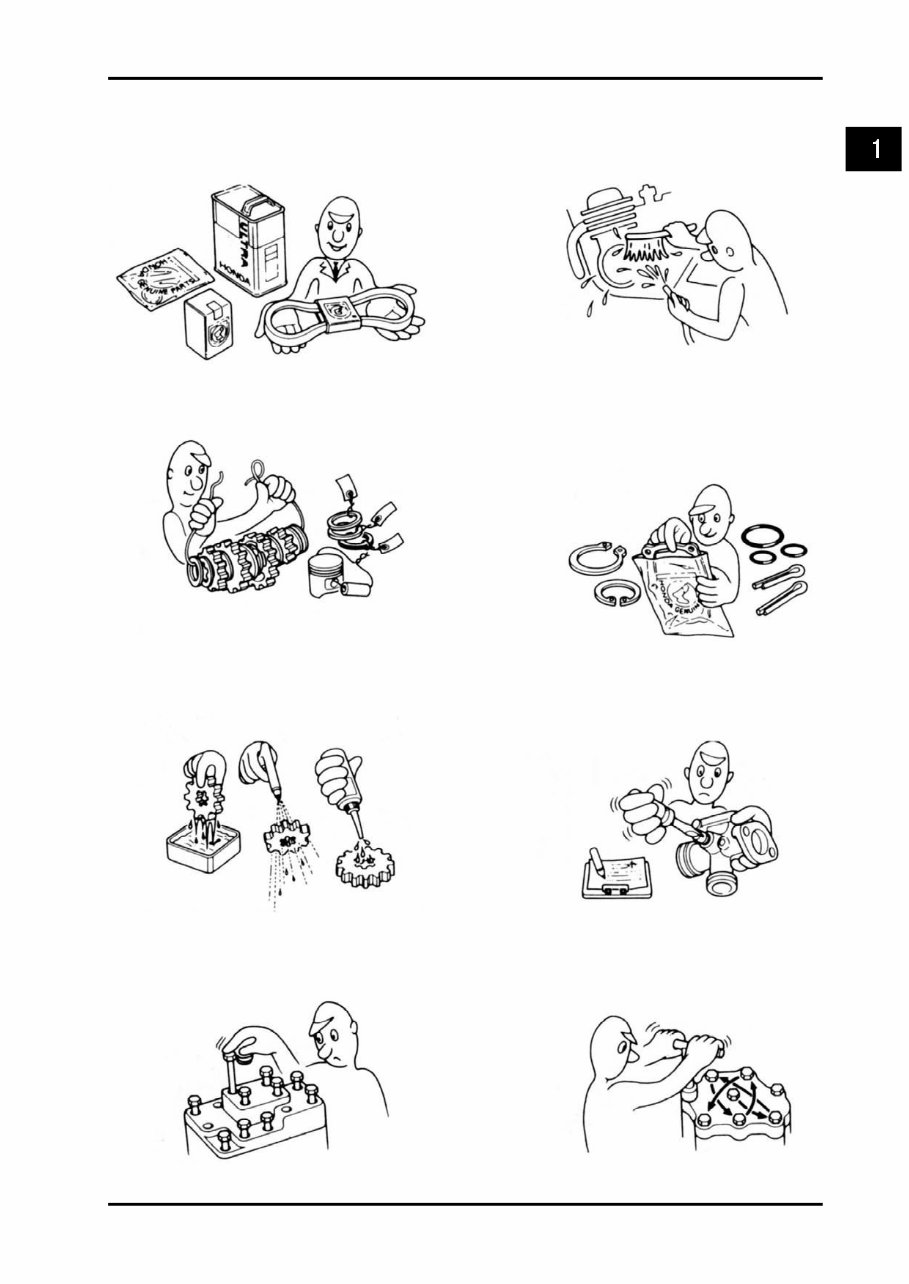
Cautions for Disassembling and Assembling
Use genuine CMSI parts, Clean the mud, dust before over hauling
lubricants and grease
Place and store the disassembled parts Replace the disassembled washers, o-rings,
Separately in order for correct assemble. Piston pin circlip, cotter pin with new ones.
Elastic circlips might get distorted after
Disassembled. Do not use the loosed circlips.
Clean and blow off the detergent Measure the data during disassembly for
after disassembling the parts. Apply correct assembling.
lubricants on the surface of
moving parts.
If not knowing the length of screws, Pre-tighten the bolts, nuts and screws, then
install the screws one by one and tighten tighten according to the specified torque,
with same torque. From big to small and from inner side to outer side.
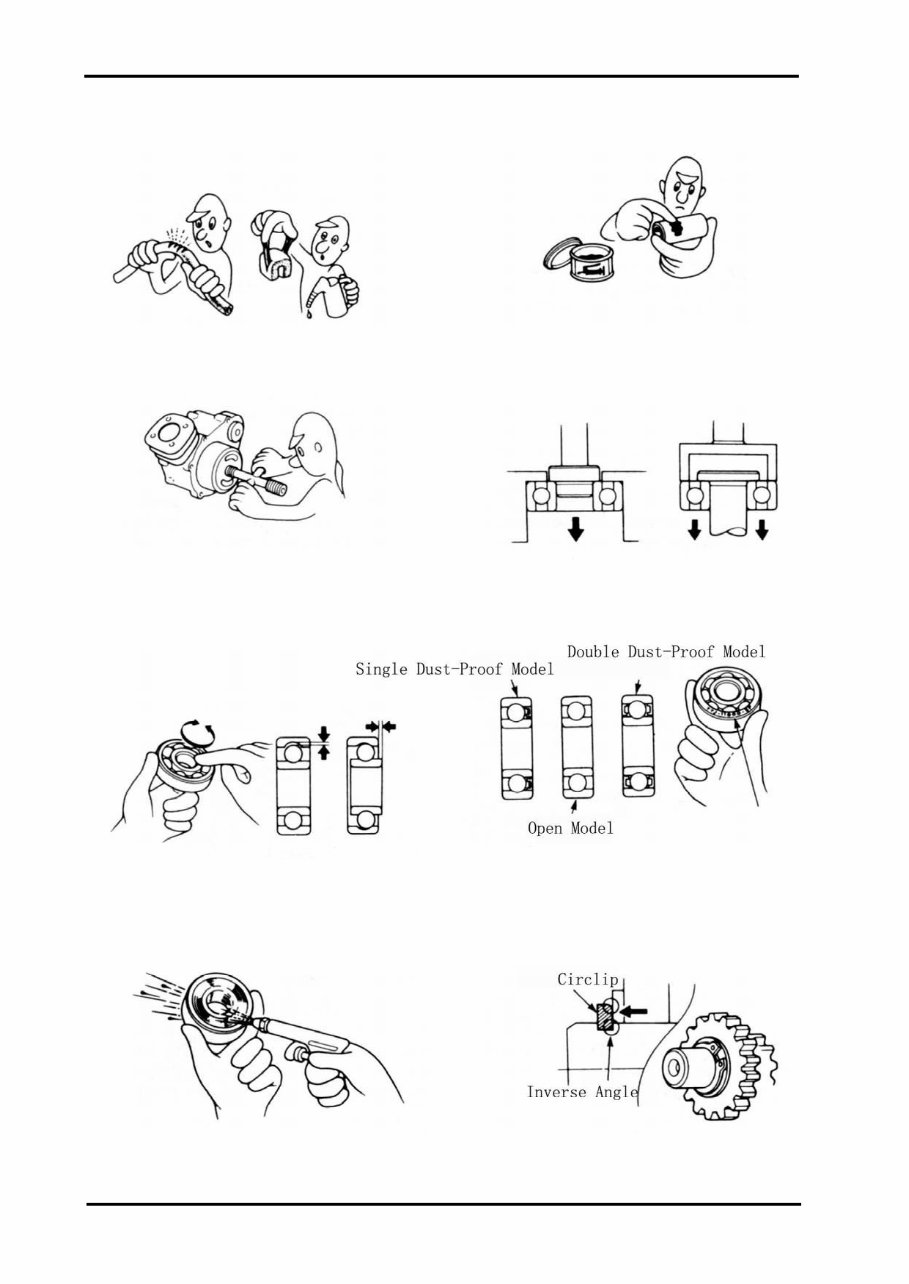
Check if the disassembled rubber parts Apply or inject recommended lubricant to
are aged and replace if necessary. Keep the the specified parts.
rubber parts away from grease.
Use special tools wherever necessary If the disassembling of pressed ball bearing
is done by pressing the balls, do not use the
disassembled bearing.
Turn the ball bearing with hands to Install the one-side dust-proof bearing in
make sure the bearing will turn smoothly. The right direction. When assembling the
.Replace if the axial or radial play is too big. open type or double-side dustproof bearing,
.If the surface is uneven, clean with oil install with manufacturer#s mark outward.
and replace if the cleaning does not help.
.When pressing the bearing into the machine
or to the shaft, replace the bearing if it could
not be pressed tight.
Keep the bearing block still when blowing Install the elastic circlip properly.
dry the bearing after washing clean. Apply Turn the circlip after assembling to make
oil or lubricant before assembling. Sure is has been installed into the slot.
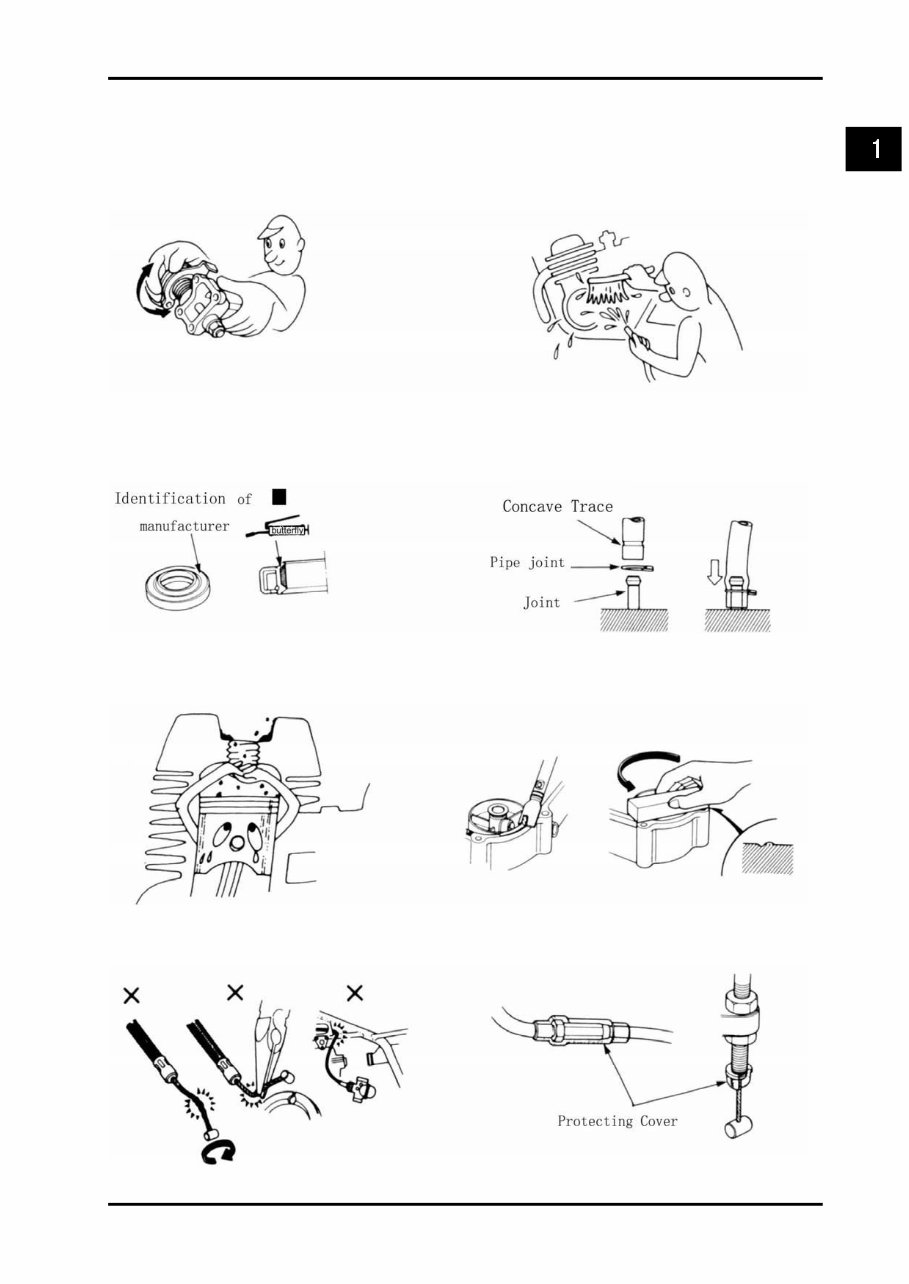
1 Overhaul Information
After assembling, check if all the tightened Brake fluid and coolant may damage
parts are properly tightened and can move coating, plastic and rubber parts. Flush
smoothly. these parts with water if splashed.
Install oil seal with the side of When installing pipes, insert the pipe till
manufacturer#s mark outward. the end. Fit the pipe clip, if any, into the
.do not fold or scratch the oil seal lip groove. Replace the pipes that cannot be
.apply grease to the oil seal lip tightened.
before assembling
Do not mix mud or dust into engine Clean the gaskets and washers of the engine
or the hydraulic brake system. cases before assembling. Remove the scratches
on the contact surfaces by polishing evenly with
an oilstone.
Do not twist or bend the cables too When assembling the parts of caps, insert the
much. Distorted or damaged cables caps to the grooves, if any.
may cause poor operation.
You're Reading a Preview
What's Included?
Fast Download Speeds
Online & Offline Access
Access PDF Contents & Bookmarks
Full Search Facility
Print one or all pages of your manual
$27.99
Viewed 38 Times Today


Secure transaction
What's Included?
Fast Download Speeds
Online & Offline Access
Access PDF Contents & Bookmarks
Full Search Facility
Print one or all pages of your manual
$27.99
- The Chinese GY6 150cc Scooter Service & Repair Manual is a comprehensive guide designed to assist with troubleshooting and replacement procedures for your scooter.
- It is a valuable resource for both professional mechanics and DIY enthusiasts, providing manufacturer-recommended maintenance and repair instructions.
- This digital manual features clear images and exploded-view illustrations to visually guide you through each procedure, eliminating the need to flip through physical pages.
- It offers the convenience of portability, allowing you to carry it on electronic devices such as PC, Mac, smartphones, and tablets, and is compatible with Adobe Reader for easy access.
- Whether you prefer digital access or a physical copy, this manual caters to your needs, offering the option to print it out for easy reference.
- Investing in this reliable repair manual can help save on repair costs, enhance your scooter's reliability, and empower you to handle repairs without frequent visits to the repair shop.


