2014 Can-Am Spyder RT / RT-S Service & Repair Manual
What's Included?
Lifetime Access
Fast Download Speeds
Online & Offline Access
Access PDF Contents & Bookmarks
Full Search Facility
Print one or all pages of your manual
SAFETY NOTICE SAFETY NOTICE This manual has been prepared as a guide to cor- rectly service and repair 2013-2014 Can-Am™ roadsters described in the list in the INTRODUCTION . This SHOP MANUAL SUPPLEMENT must be used in conjunction with the 2013 CAN-AM ROADSTER SHOP MANUAL (P/N 219 100 736). Refer to this manual when a particular system is not covered in this supplement. This edition was primarily published to be used by technicians who are already familiar with service procedures relating to Bombardier Recreational Products Inc. (BRP) products. Mechanical tech- nicians should attend continuous training courses given by B.R.P.T.I. Please note that the instructions will apply only if proper hand tools and special service tools are used. The content depicts parts and procedures appli- cable to the particular product at time of writing. SERVICE and WARRANTY BULLETINS may be published to update the content of this manual. Make sure to read and understand them. Dealer modifications that were carried out after manufac- turing of the product, whether or not authorized by BRP, are not included. In addition, the sole purpose of the illustrations throughout the manual, is to assist identification of the general configuration of the parts. They are not to be interpreted as technical drawings or ex- act replicas of the parts. The use of BRP parts is most strongly recom- mended when considering replacement of any component. Dealer and/or distributor assistance should be sought in case of doubt. The engines and the corresponding components identified in this document should not be utilized on product(s) other than those mentioned in this document. It is understood that certain modifications may render use of the vehicle illegal under existing federal, provincial and state regulations. WARNING Indicates a potential hazard that, if not avoided, could result in serious injury or death. CAUTION Indicates a hazardous situation which, if not avoided, could result in minor or moderate injury. NOTICE Indicates an instruction which, if not followed, could result in severe damage to ve- hicle components or other property. NOTE: Indicates supplementary information re- quired to fully complete an instruction. Although the mere reading of such information does not eliminate the hazard, your understand- ing of the information will promote its correct use. Always use common shop safety practice. It is understood that this manual may be trans- lated into another language. In the event of any discrepancy, the English version shall prevail. BRP disclaims liability for all damages and/or in- juries resulting from the improper use of the con- tents. We strongly recommend that any services be carried out and/or verified by a highly skilled professional mechanic. rmr2014-005 I
INTRODUCTION INTRODUCTION GENERAL INFORMATION This Shop Manual covers the following BRP made 2013-2014 Can-Am Roadsters Spyder RT. MODEL COLOR MODEL NUMBER Timeless Black A3EB, A3ED, A3EE, A3EF SM6 White Pearl A3EG Timeless Black B2EB, B2ED RT SE6 White Pearl B2EE Timeless Black B5EB White Pearl B5ED Circuit Yellow B5EF SM6 Cognac B5EH Timeless Black A4EB White Pearl A4ED, A4EF, A4EG, A4ER Circuit Yellow A4EH RT-S SE6 Cognac A4EK, A4EM, A4EN, A4EP Black Current B9EB, B9ED Silver Platinum B9EE, B9EG, B9EH, B9EJ, B9EK, B9EL, B9EN RT Limited SE6 Cognac B9ER, B9ET, B9EU, B9EV The information and component/system descriptions contained in this manual are correct at time of writ- ing. BRP however, maintains a policy of continuous improvement of its products without imposing upon itself any obligation to install them on products previously manufactured. Due to late changes, there may be some differences between the manufactured product and the de- scription and/or specifications in this document. BRP reserves the right at any time to discontinue or change specifications, designs, features, models or equipment without incurring obligation. II rmr2014-005
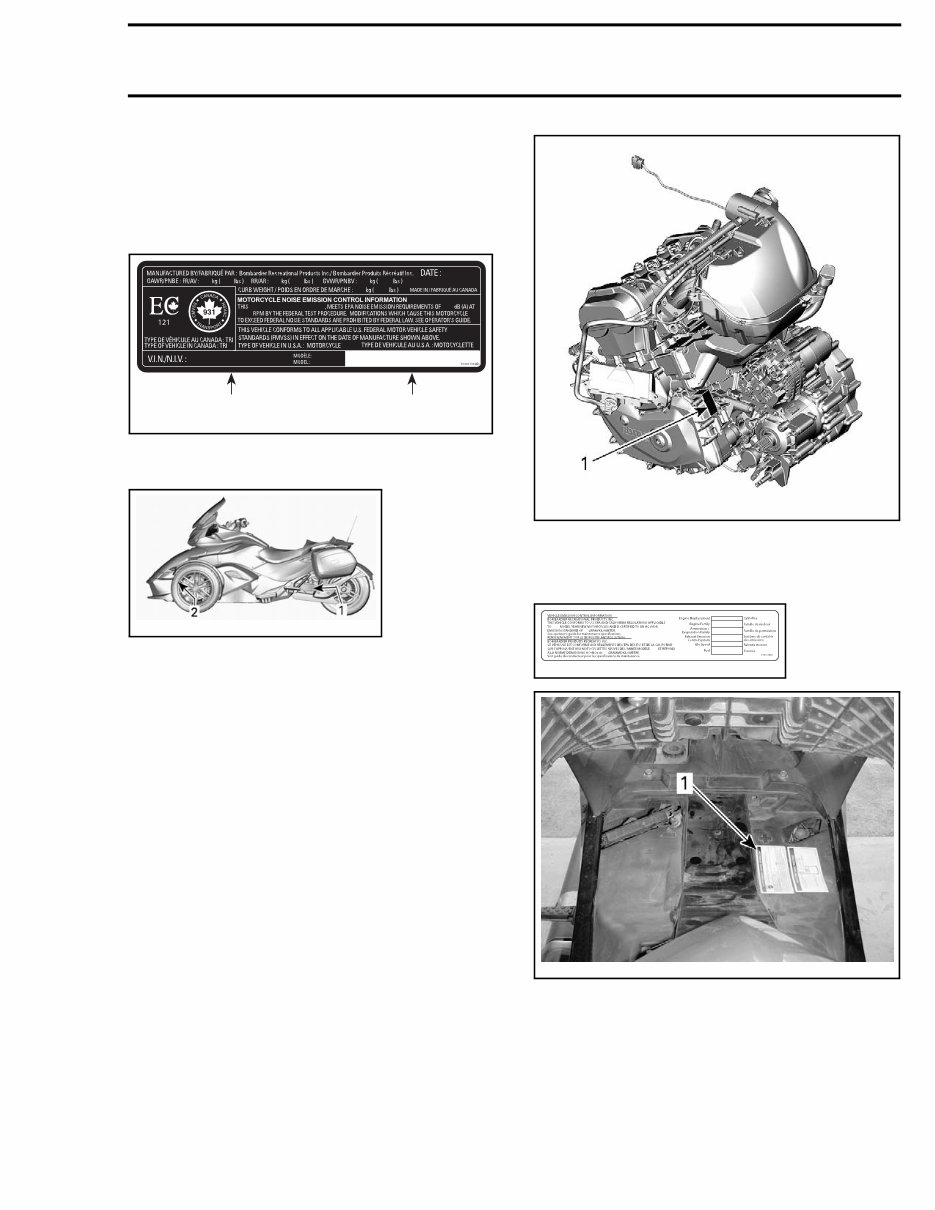
INTRODUCTION VEHICLE INFORMATION VEHICLE IDENTIFICATION NUMBER (V.I.N.) rmo2008-001-091_a TYPICAL — VEHICLE SERIAL NUMBER LABEL 1. VIN (Vehicle Identification Number) 2. Model number rmo2013-003-037_a TYPICAL - LOCATION OF VIN 1. Swing arm (VIN label) 2. Lower frame (VIN stamped on left side) ENGINE IDENTIFICATION NUMBER (EIN) The engine identification number is located on the left rear of engine, near the alternator. rmo2014-005-008_a 1. Engine Identification Number (EIN) location EPA COMPLIANCE LABEL rmo2008-001-094 rmo2008-001-044_b TYPICAL 1. EPA exhaust emission label located under seat rmr2014-005 III
Subsection 01 (MAINTENANCE SCHEDULE) MAINTENANCE SCHEDULE Maintenance is very important for keeping your vehicle in safe operating condition. Proper maintenance is the owner's responsibility. Perform periodic checks and follow the maintenance schedule. The main- tenance schedule does not exempt the pre-ride inspection. WARNING Failure to properly maintain the vehicle according to the maintenance schedule and procedures can make it unsafe to operate. BREAK-IN INSPECTION - 5 000 KM (3,000 MI) Using BRP Utility and Diagnostic Software (B.U.D.S.), check fault codes and install required updates. Replace engine oil and oil filter. Check clutch fluid level (SM6 model only). Check brake fluid level. Check reverse mechanism operation. Check engine coolant level. Inspect throttle twist grip operation. Check lighting system (brake light, hazard warning light, turn signal lights, position lights, license plate light). Clean brake light switch. Check operation of control switches. Inspect the drive belt condition and its tension. Adjust if required. Check tightening torque of the front wheels lug nuts. Check tightening torque of the rear wheel axle nut. Check parking brake operation. Adjust as required. Check wheels wear. Align front wheels if required. Check tires pressure. Adjust as required. Check brake pads and discs condition. Check passenger handholds looseness. Check footrests looseness. Check body panels looseness. Check operation of storage compartment latches, hinges and key barrels. Check and retighten exhaust pipe, clamping rings, joints, and gaskets condition. rmr2014-006 1
Subsection 01 (MAINTENANCE SCHEDULE) EVERY 15 000 KM (9,300 MI) OR 1 YEAR (WHICHEVER COMES FIRST) Using BRP Utility and Diagnostic Software (B.U.D.S.), check fault codes and install required updates. Replace engine oil and oil filter. Check clutch fluid level (SM6 model only). Check brake fluid level. Replace every 2 years. Check brake hoses Check reverse mechanism operation. Check radiator, hoses and water pump. Check engine coolant level. Perform a pressure test of cooling system. Inspect throttle twist grip operation. Check lighting system (brake light, hazard warning light, turn signal lights, position lights, license plate light). Clean brake light switch. Check operation of control switches and passenger switches. Check condition of fuel hoses, fuel evaporation lines and canister. Check battery connections tightening. Inspect the drive belt condition and its tension. Adjust if required. Check and retighten exhaust pipe, clamping rings, joints, and gaskets condition. Check steering for abnormal play. Check tie-rods condition. Check shock absorbers for leaks or other damages. Check tightening torque of the front wheels lug nuts. Check tightening torque of the rear wheel axle nut. Check ball joints condition. Check front wheel bearings condition. Check parking brake operation. Adjust as required. Check wheels wear. Align front wheels if required. Check tires pressure. Adjust as required. Check brake pads and discs condition. Check passenger handholds looseness. Check footrests looseness. Check body panels looseness. Check operation of storage compartment latches, hinges and key barrels. EVERY 30 000 KM (19,000 MI) Replace air filter and clean air filter housing. Replace clutch fluid (SM6 model only). Replace the fuel filter (or every 5 years). 2 rmr2014-006
Subsection 01 (MAINTENANCE SCHEDULE) EVERY 45 000 KM (28,000 MI) Replace the Hydraulic Control Module (HCM) oil filter (SE6 model only). Replace the canister pre-filter. Replace engine coolant (or every 5 years). Replace the spark plugs. Check front suspension arms rubber bushings. rmr2014-006 3
Subsection XX (PRESEASON PREPARATION) PRESEASON PREPARATION Prior to use the vehicle, proper preparation is re- quired after the storage period. Any worn, broken or damaged parts found during the storage procedure should have been replaced. If not, proceed with the replacement. PROCEDURES VEHICLE PREPARED AS PER STORAGE PROCEDURE Remove vehicle protective cover, muffler protec- tive bag and clean the vehicle. Charge battery as required. Refer to CHARGING SYSTEM. Check the following items: – Tires: Look for damage, incorrect inflation and excessive tread wear. – Wheels and lug nuts: Look for damage. Check front wheel lug nuts if they are properly tighten. Be sure the rear wheel axle nut and cotter pin are in place. – Drive belt: Look for fraying, cuts, punctures and missing teeth. Verify alignment. For addi- tional information, refer to DRIVE BELT AND REAR WHEEL subsection. – Leaks: Look under the vehicle for any leaks. – Brake pedal: Press and make sure you feel firm resistance. Pedal must fully return when released. – Throttle handle: Twist a few times. Be sure it operates freely and returns to idle position when released. – Clutch lever (SM5 model): Squeeze to be sure it operates easily and fully returns when released. Adjust if needed. Refer to CLUTCH (SM5) subsection. – Clutch oil level (SM5 model): Check clutch fluid level. Refer to CLUTCH (SM5) subsection. – Gearshift selector (SE5 model): Be sure gearshift selector operates normally in both di- rections and returns to center when released. Turn ignition key ON: 1. Check the gauges, indicator lamps, and mes- sages on the multifunction gauge cluster. 2. Ensure headlights, taillight, brake light, turn sig- nals, and hazards are working properly. 3. Ensure horn is working properly. 4. Start engine and verify steering operates freely. 5. Check that the engine stop button is working properly. 6. Start engine, release parking brake and ensure parking brake indicator is off on the multifunc- tion gauge cluster. 7. Drive forward slowly a few feet then apply brake to test. VEHICLE NOT PREPARED AS PER STORAGE PROCEDURE Proceed with the same steps as specified in VE- HICLES PREPARED AS PER STORAGE PROCE- DURE above. Carry out these additional steps: – Check the level of engine coolant. Refer to COOLING SYSTEM subsection. – Check the brake fluid level. Refer to BRAKES subsection. – Lubricate the front suspension arms. Refer to FRONT SUSPENSION subsection. – Replace engine oil and filter. Refer to LUBRICA- TION SYSTEM subsection. – Replace HCM oil filter (SE5 model). Refer to HYDRAULIC CONTROL MODULE (SE5) sub- section. – Models with a flat footrest: Release the latch underneath footrest. Pivot footrest by pushing down its front part. Flip back the footrest until it latches. The mechanism must work freely. rmr2013-005 1
Subsection 02 (STORAGE PROCEDURE) STORAGE PROCEDURE SERVICE PRODUCTS Description Part Number Page LONG LIFE ANTIFREEZE .............................................................. 219 702 685 ........................................... 1 XPS FUEL STABILIZER.................................................................. 413 408 601 ........................................... 1 XPS ROADSTER WASH ................................................................ 219 701 703 ........................................... 2 XPS STORAGE OIL (EXCEPT U.S. COUNTRY) ............................. 413 711 600 ........................................... 1 XPS STORAGE OIL (U.S. COUNTRY ONLY) ................................. 413 711 900 ........................................... 1 GENERAL If the vehicle is not ridden for at least 4 months, such as during the winter, proper storage is nec- essary to keep the vehicle in good condition. PROCEDURES FUEL SYSTEM Fuel System Protection With the new fuel additives, it is critical to use the XPS FUEL STABILIZER (P/N 413 408 601) or an equiv- alent to prevent fuel deterioration and fuel system gumming. Follow the manufacturer's instructions for proper use. Pour fuel stabilizer in fuel tank. Fill up fuel tank. NOTICE Engine should be run after fuel sta- bilizer is added to ensure fuel system compo- nents protection against varnish deposits. Do not drain fuel system. ENGINE Engine Oil and Filter Replacement Change engine oil and filter. Refer to LUBRICA- TION SYSTEM subsection. Engine Internal Lubrication Engine internal parts should be lubricated to pro- tect them from rust formation during the storage period. Proceed as follows: 1. Remove air filter housing cover. Refer to AIR INTAKE SYSTEM subsection. 2. Spray XPS STORAGE OIL (EXCEPT U.S. COUN- TRY) (P/N 413 711 600) or XPS STORAGE OIL (U.S. COUNTRY ONLY) (P/N 413 711 900) into throttle body (5 seconds in each openings) while crank- ing in drowned mode (throttle wide open and depress start button). 3. Reinstall air filter housing cover. NOTE: Do not run engine during storage period. CLUTCH SYSTEM (SM6) Clutch Fluid Level Inspection Check clutch fluid level. Refill if necessary. COOLING SYSTEM Coolant Inspection Check coolant level. Test coolant density using an antifreeze hydrome- ter. NOTE: Follow manufacturer's instructions for proper use. Use LONG LIFE ANTIFREEZE (P/N 219 702 685) or a blend of 50% antifreeze with 50% distilled water to provide the optimum cooling, corrosion protec- tion and antifreeze protection. NOTICE Do not use tap water, straight an- tifreeze or straight water in the system. Tap water contains minerals and impurities which build up in the system. Straight water will cause the system to freeze while straight an- tifreeze will cause system temperature prob- lems. Change coolant if necessary. Refer to COOLING SYSTEM subsection. ELECTRICAL SYSTEM Battery Charging Slow charge the battery once a month at the rec- ommended charging rate of 2 A. It is not neces- sary to remove the battery. rmr2014-007 1
Subsection 02 (STORAGE PROCEDURE) WHEELS AND TIRES Tire Pressure Inflate all tires to their recommended pressure. BRAKE SYSTEM Brake Fluid Level Inspection Check brake fluid level. Refill if necessary. Brake System Lubrication Clean and lubricate mechanism of parking brake. Lubricate parking brake cable. Lubricate pivoting point of brake pedal. SUSPENSION Suspension Lubrication Lubricate front suspension arms. Refer to FRONT SUSPENSION subsection. VEHICLE Vehicle Cleaning To clean the vehicle, do not use high-pressure washers (like the ones found in car washes) as they may damage certain parts of the vehicle. NOTICE Do not clean the windshield with al- kaline or acid cleaner, gasoline or solvent to avoid windshield damage. NOTICE For Matte finishes, do not use wax, detail spray, or other products used on regular paint. Do not wash with abrasive materials. Do not use mechanical cleaners or polishers, and do not rub the surfaces vigorously. To clean the vehicle: 1. Rinse the vehicle thoroughly with water to re- move loose dirt. 2. Using a soft, clean cloth, wash the vehicle with water mixed with a mild detergent, such as soap specially formulated for motorcycles or automobiles. NOTE: Using warm water works well to remove bugs in the windshield and front panels. NOTE: For Matte finishes, hand-wash with a soft wash mitt and a mild cleaning product safe for matte paint. To remove foreign substances such as insects, use a soft applicator and a mild sol- vent. Saturate and soak area before cleaning. Rub lightly. 3. While washing the vehicle, check for grease or oil. You can use XPS ROADSTER WASH (P/N 219 701 703) or a mild automotive degreaser. Thor- oughly follow the manufacturer's instructions. 4. Dry the vehicle with a chamois or a soft towel. Vehicle Waxing Apply non-abrasive wax to plastic parts. NOTICE Do not wax or polish matte surfaces. SURFACE PRODUCT/PRECAUTION Glossy finishes Apply only non-abrasive wax, safe for clear coat paints Matte finishes Do not apply wax NOTICE Do not polish windshield with any plastic cleaner/polisher. WARNING Do not apply a vinyl or plastic protector on the seat as the surface will become slippery and the operator or the passenger may slip off the vehicle. Vehicle Protection Touch up all metal spots where paint has been scratched off. Install a plastic bag over muffler outlet to prevent moisture from entering it. Cover the vehicle with a permeable material. Avoid using plastic or similar non-breathing, coated materials that restrict air flow and allow heat and moisture to accumulate. Store vehicle in a dry unheated area, away from sunlight, with a small amount of daily temperature variation. 2 rmr2014-007
This manual covers all versions of the following machines:
2014 Can Am Spyder RT SM6 Manual Shift Motorcycles
2014 Can Am Spyder RT SE6 Electric Shift Motorcycles
2014 Can Am Spyder RT-S SM6 Motorcycles
2014 Can Am Spyder RT-S SE6 Motorcycles
2014 Can Am Spyder RT Limited SE6 Motorcycles
After payment, our informative repair manual, owners manuals, and parts catalogs contain all the information you'll need to perform repairs, look up parts, or do routine maintenance on your machine. You will have access to information regarding the following topics:
General Information
Routine Maintenance
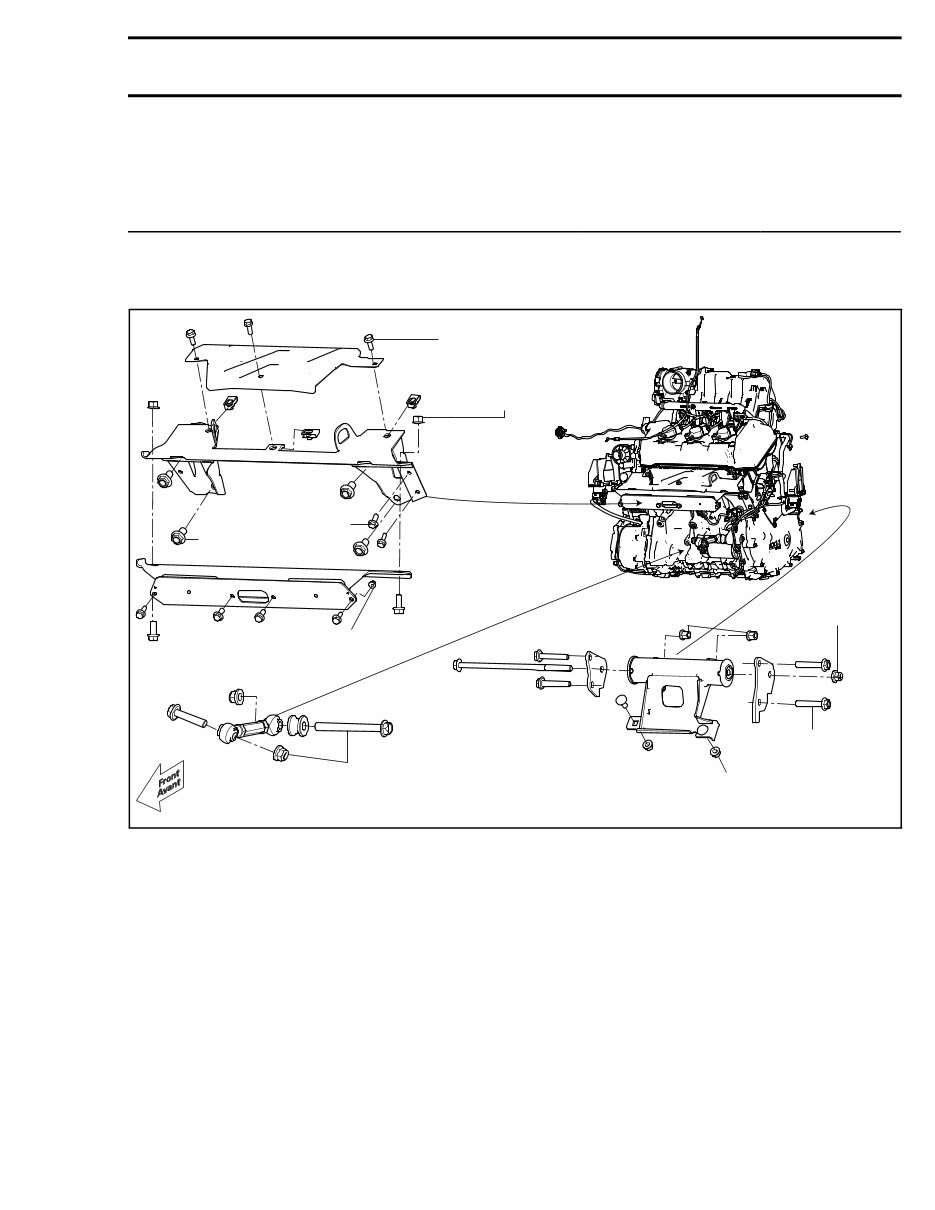
Engine Removal and Installation
Fuel System
Lubrication and Cooling System
Engine Specifications
Transmission, Drive Chain & Sprockets
Steering System
Shocks
Body Work
Intake & Exhaust
Electrical System
Advanced Troubleshooting
And much more! ......
With our repair manuals, find the page pertaining to your job, print it off, and get working on your machine. No more ruining your expensive paper shop manual with grease and dirt.
Broke down on the trail or site and have a smartphone? What a cool way to find your problem and repair it on the trail, no downtime on the job site. With our repair manuals, you instantly have access to the material needed to get you running again. Kind of tough to do that with a paper manual.
And did we mention the fact that you're saving the trees... All our repair manuals come with a Lifetime Protection Policy if lost or damaged, simply contact us and we'll replace it free of charge for life.
We provide various repair service manuals, workshop manuals, repair manuals, owners manuals, parts catalogs, and other various manuals, all in an electronic format.
UTVs, motorcycles, ATVs, quads, snowmobiles, Seadoo, equipment, small engines, inboards, outboards, and more.
* INSTANT DOWNLOAD
* NO SHIPPING COST WITH DOWNLOAD
* GET A DOWNLOAD SO NO WAITING, REPAIR IT NOW ......
Instant download after payment. Thank you
Recently Viewed
5,521,897Happy Clients
2,594,462eManuals
1,120,453Trusted Sellers
15Years in Business
Price:
Actual Price:
2014 Can-Am Spyder RT / RT-S Service & Repair Manual