

4L80E 4L80 Transmission Gearbox REBUILD PROCEDURE Manual
What's Included?
Fast Download Speeds
Online & Offline Access
Access PDF Contents & Bookmarks
Full Search Facility
Print one or all pages of your manual
GM 4L80E
Rebuild Procedures
Written by Clifford McCormick

©2003 ATRA. All Rights Reserved. Printed in U. S. A.
iii 4L80E Rebuild Procedures
Program Introduction…
The General Motors 4L80E, in production since 1991, has become the workhorse
of GM’s light truck series. This unit has also surfaced in some rather exotic and
unexpected vehicles simply because those manufacturers wanted one of the best, most
reliable units available at the time. Based on the bulletproof THM 400, which could take
just about anything a car or truck could dish out without breaking a sweat, the 4L80E was
the natural evolution of the 400, updating the design with a beefy overdrive section built
into the case in front of the venerable tried-and-true three speed. No longer does the old
governor/modulator debate tell the transmission what to do, when and how much to do it.
Fully computerized control of the shift points, torque converter clutch engagement and
line pressure control ensure that the 4L80E will be with us for quite some time to come,
easily interfacing with the newest powertrain control and diagnostic computer systems.
There may be parts of the rebuild process that you are not very familiar with, or
you may be new to this particular type of transmission. In either case, you need some
point of reference- something that will show you how to proceed when you are not sure
(or have no idea whatsoever), and that is exactly what this book is designed to do.
You will not find a photocopied section out of a factory manual between these
covers. In fact, you will notice a substantial difference between the book you are holding
and any other books written on the subject. This is because, as this book was being
written, the author was rebuilding a 4L80E step by step as he was writing this book. This
helps assure that there would be no missing steps (and it was also quite handy for taking
pictures along the way…). This book was written for transmission rebuilders by a
transmission rebuilder, in plain English rather than complex ‘factoreze’ terminology, or
instructions that have been partially ‘transrated’ from some other language.
So, whether you’ve already done a few of the 4L80E units or are about to tackle
your first one, this book will show you how to get through the sticky parts of a rebuild, as
well as the most thorough way to get through the job, start to finish. Thank you for your
attention, your efforts and your trust.

©2003 ATRA. All Rights Reserved. Printed in U. S. A.
iv 4L80E Rebuild Procedures

©2003 ATRA. All Rights Reserved. Printed in U. S. A.
v 4L80E Rebuild Procedures
Table Of Contents
Unit Disassembly
Pump
Fourth Clutch Assembly
Overrun clutch/OD Planet
Forward Clutch Drum
Direct Clutch Drum
Geartrain
Case Preparation
Valve Body
Unit Assembly
Page 1
Page 12
Page 23
Page 28
Page 36
Page 42
Page 49
Page 61
Page 65
Page 74
This program has been designed by the Automatic Transmission Rebuilders Association (ATRA) to be used by qualified automotive
transmission technicians. Since the circumstance of its use is beyond ATRA’s control, ATRA assumes no liability for the use of such
information or any damages incurred through its use and application. Nothing contained in this program is to be considered
contractual or providing some form of warranty on the part of ATRA. No part of this program should be construed as recommending
any procedure which is contrary to the vehicle manufacturer’s procedures. ATRA recommends that only certified automotive
technicians with experience in transmission diagnosis and repair perform the procedures in this program.
This program contains copyrighted material belonging to ATRA. No part of this program may be reproduced or used in any form by
any means- graphic, electronic or mechanical, including photocopying, recording, electronic, or information storage-and-retrieval
systems- without the express written permission from ATRA.
ATRA® and the ATRA® logo are registered trademarks of the Automatic Transmission Rebuilders Association.
Public exhibition or use of this material for group training or as part of a school curriculum, without the express written permission of
ATRA, is prohibited by law. For information on using this material for independent training programs, contact ATRA at (805) 604-
2000.
©2003 ATRA. All rights reserved. Printed in U.S.A.
©2003 ATRA. All Rights Reserved. Printed in U. S. A.
1 4L80E Rebuild Procedures
Unit Disassembly
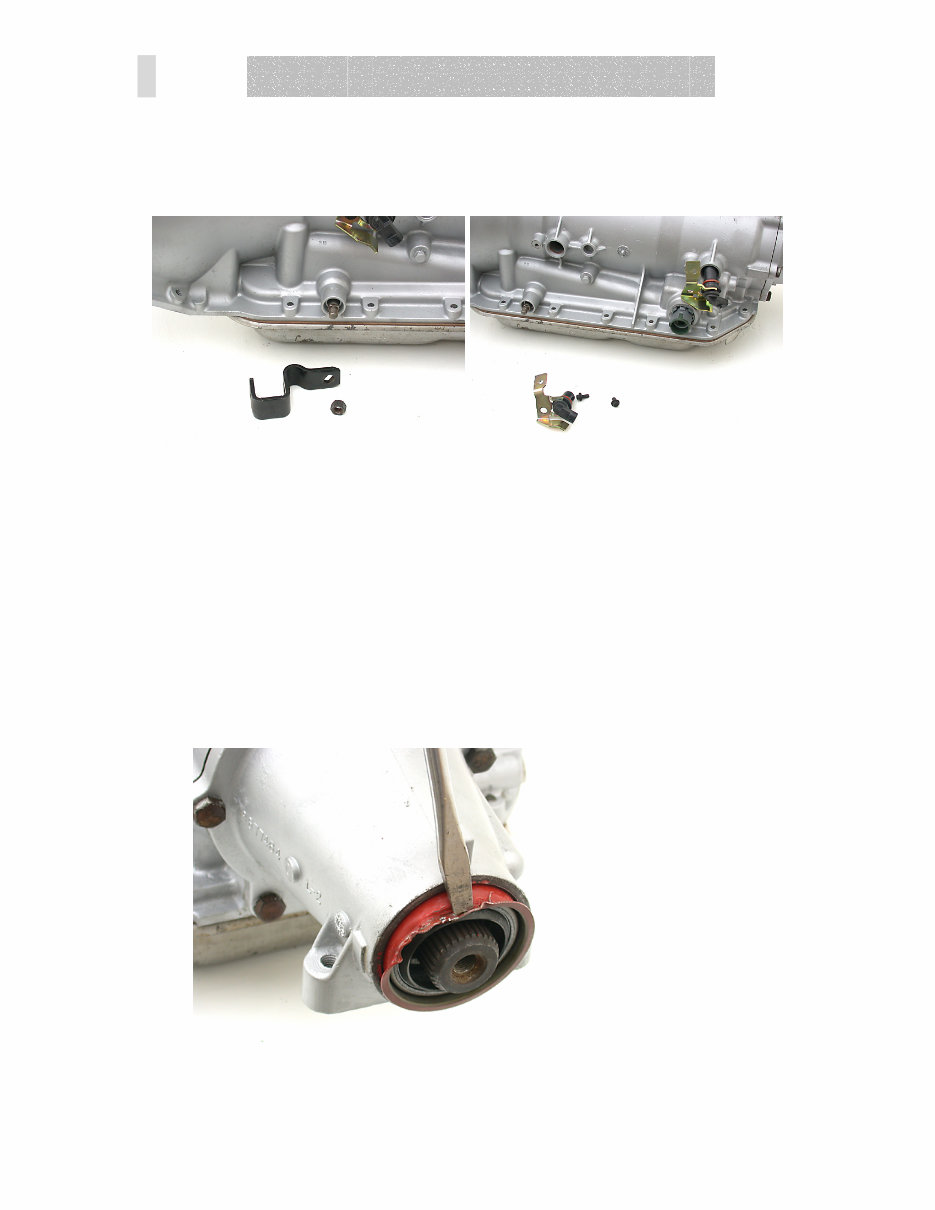
Step 1: Unbolt the shift lever and speed sensors, remove them from the case, then use a
pick to remove the o-rings from the sensors.
Note: The next two steps only apply to 2-wheel drive units.
Step 2: The rear seal usually needs to get repeatedly bashed with a hammer and
screwdriver or chisel to remove it from the extension housing as shown. This will
definitely be easier to do while the housing is still bolted to a big, heavy transmission,
rather than chasing the extension housing with your tools all over your bench and the
shop floor after it’s been removed from the unit. Save yourself the embarrassment of
somebody else seeing this clown act by removing the seal now in a dignified manner.
©2003 ATRA. All Rights Reserved. Printed in U. S. A.
2 4L80E Rebuild Procedures
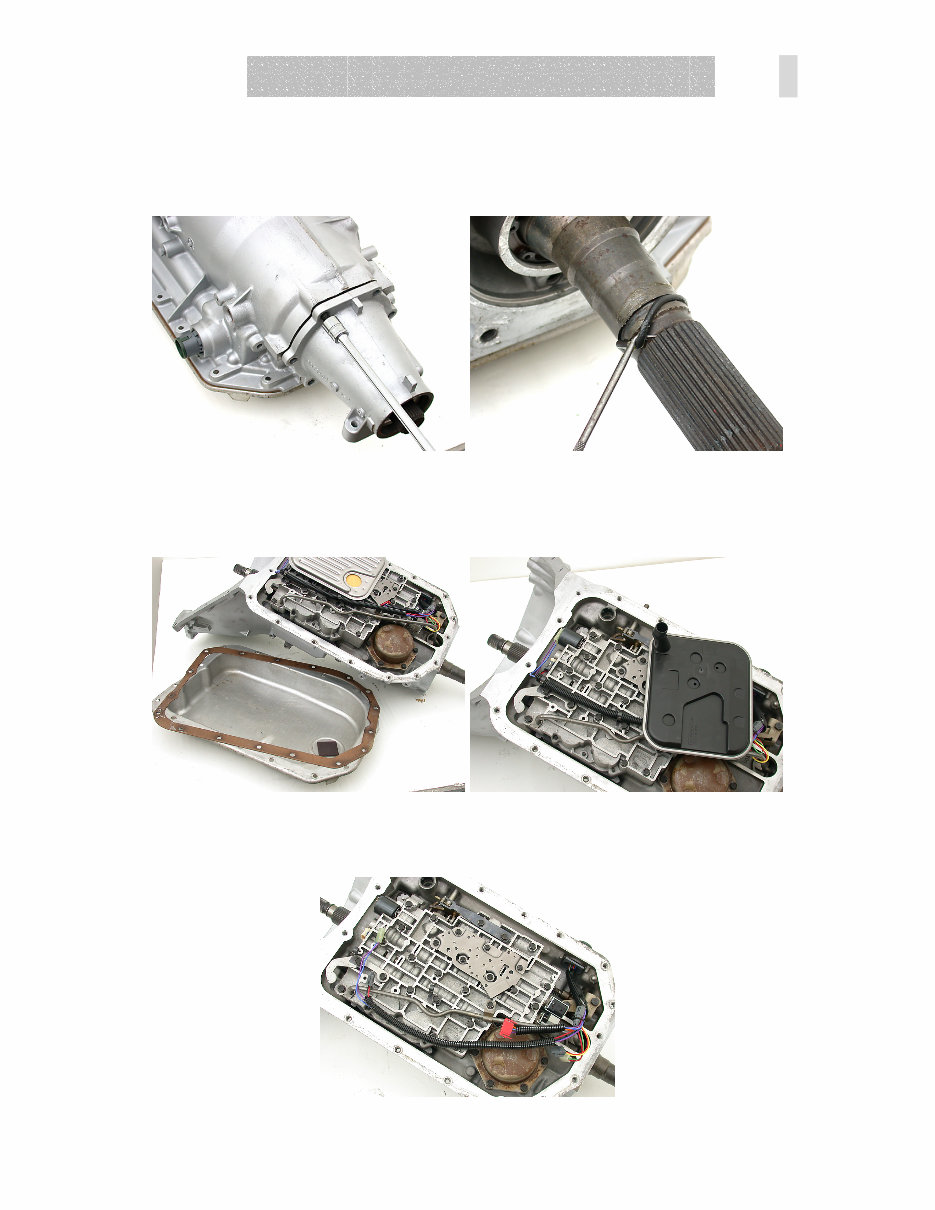
Step 3: Remove the extension housing bolts, and slide the extension housing off of the
case. Remove the o-ring from the shaft groove, paying careful attention to any thrust
washers, bearings or seals on the shaft; the exact configuration depends on the unit you're
working on.
Step 4: Unbolt the transmission oil pan, and remove the pan, gasket and oil filter from
the unit. Be careful with the pan gasket if it’s rubber and has metal bolt holes— it's
reusable as long as it’s still soft and isn’t nicked or cut anywhere. Discard the filter.
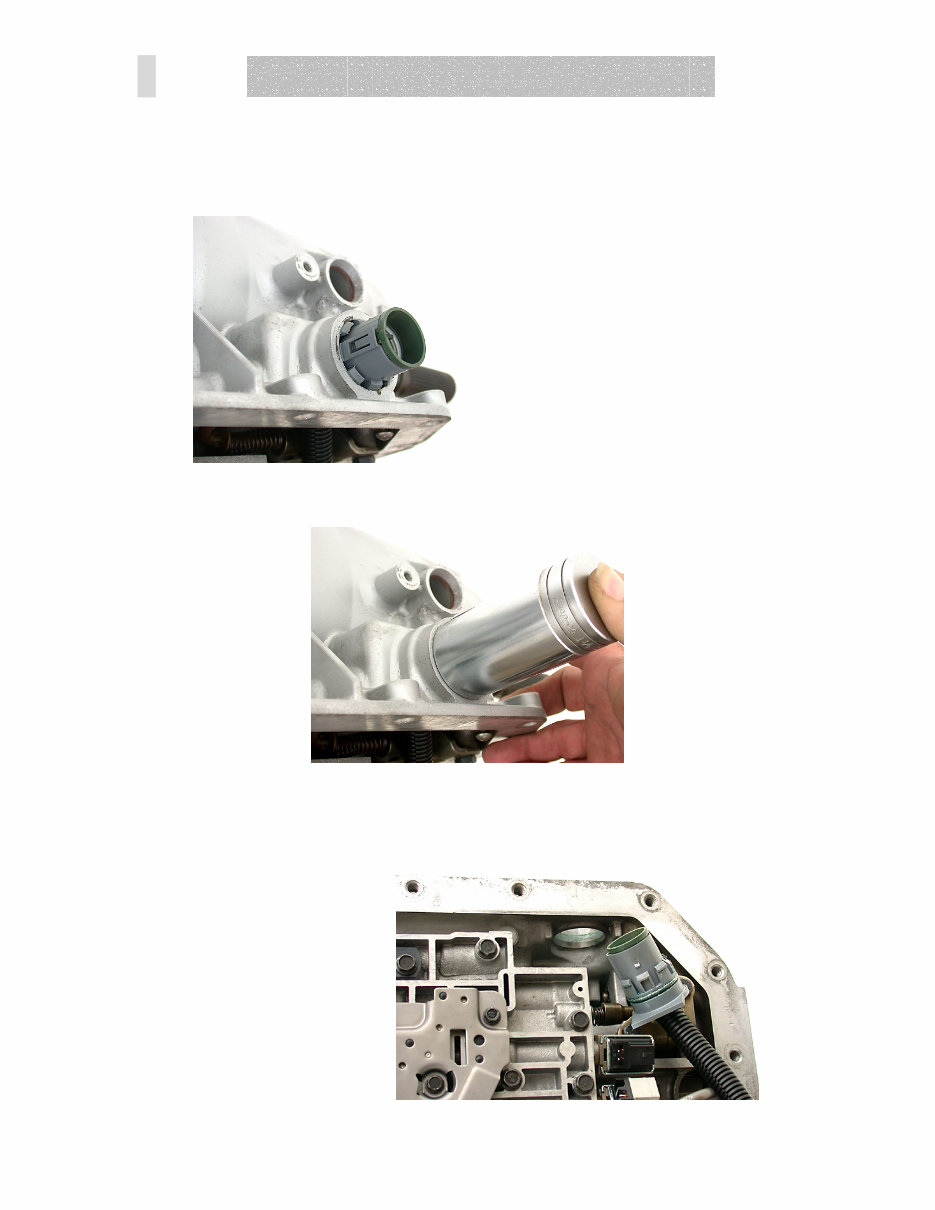
Step 5: Carefully disconnect the transmission wiring harness connectors from the
solenoids and switches on the valve body.
©2003 ATRA. All Rights Reserved. Printed in U. S. A.
3 4L80E Rebuild Procedures
Step 6: Push a 1-1/4", 12-point socket or box wrench over the transmission case
connector to compress the retaining clips, and carefully push the case connector into the
case to remove it. Don't pull on the wires; they can break internally, and cause electrical
problems later.
©2003 ATRA. All Rights Reserved. Printed in U. S. A.
4 4L80E Rebuild Procedures
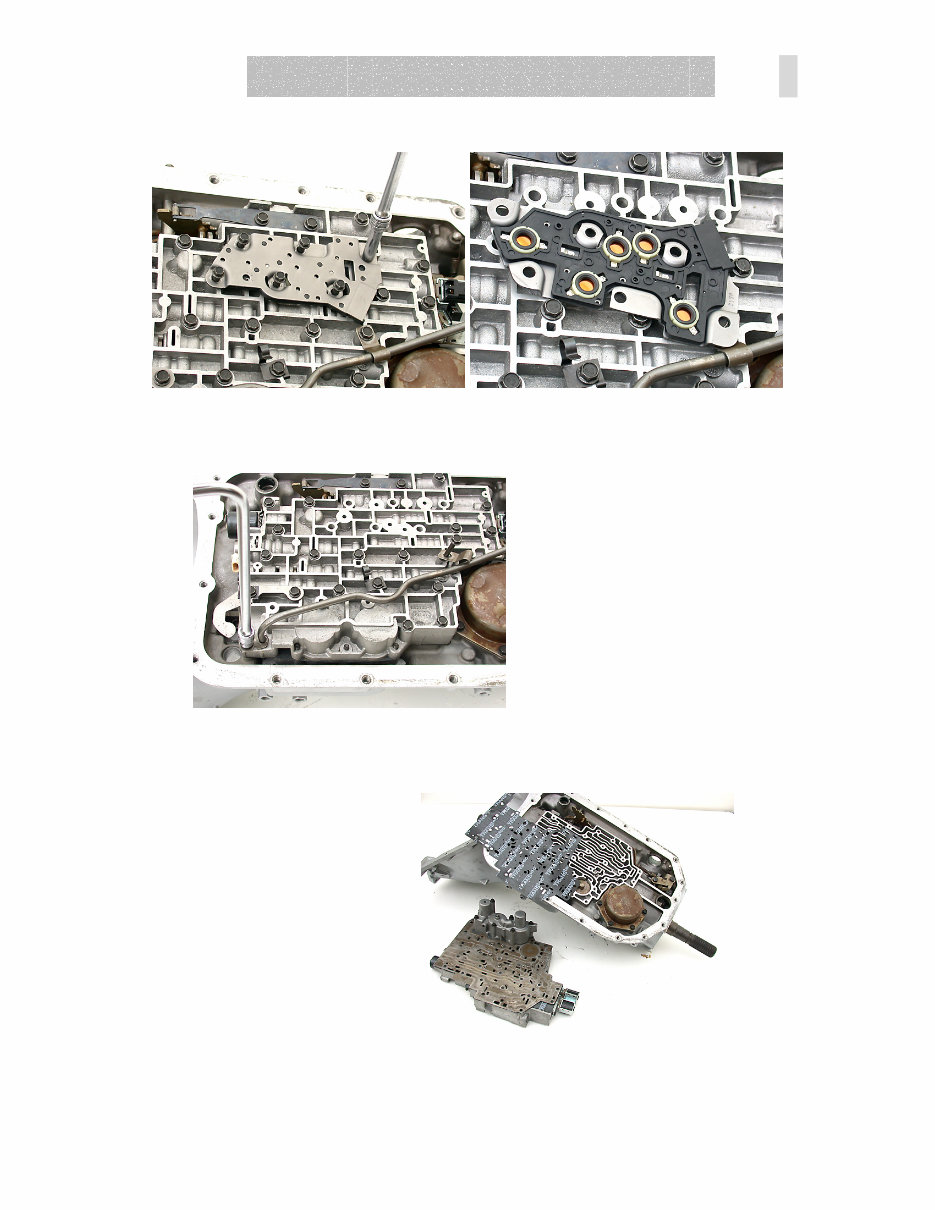
Step 7: Remove the Pressure Switch Manifold (PSM) bolts, and remove the switch.
Step 8: Remove the bracket holding the lube oil pipe in place, and carefully remove the
pipe from the unit.
Step 9: Unbolt the valve body and accumulator assembly. Remove the valve body and
accumulator assembly, separator plate and gaskets from the transmission.
©2003 ATRA. All Rights Reserved. Printed in U. S. A.
5 4L80E Rebuild Procedures
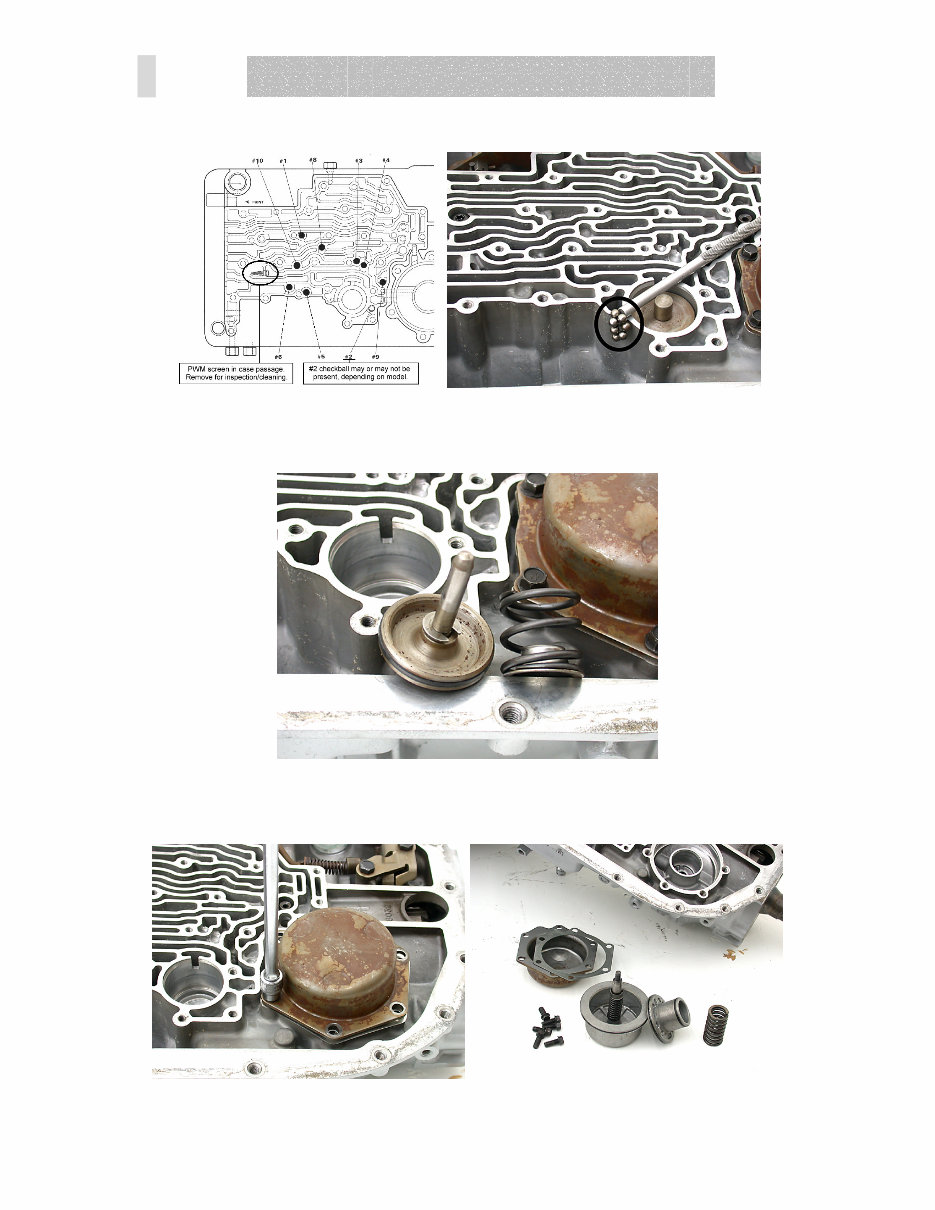
Step 10: Remove the case filter and checkballs from the case.
Step 11: Remove the Manual 2 brake band servo and spring, located directly in front of
the low/reverse servo cover.
Step 12: Unbolt the low/reverse servo cover. Remove the cover, gasket, servo and return
spring from the case. Discard the gasket.
You're Reading a Preview
What's Included?
Fast Download Speeds
Online & Offline Access
Access PDF Contents & Bookmarks
Full Search Facility
Print one or all pages of your manual
$52.99
Viewed 24 Times Today


Secure transaction
What's Included?
Fast Download Speeds
Online & Offline Access
Access PDF Contents & Bookmarks
Full Search Facility
Print one or all pages of your manual
$52.99
Get access to the comprehensive 4L80 4L80E Transmission Gearbox Rebuild Procedure Manual. This manual is an essential resource for professional mechanics and DIY enthusiasts alike. It is bookmarked for quick navigation, allowing you to find the specific section you need with ease.


