Briggs and Stratton 5 Hp Outboard Engine Repair Manual
What's Included?
Lifetime Access
Fast Download Speeds
Online & Offline Access
Access PDF Contents & Bookmarks
Full Search Facility
Print one or all pages of your manual
5 HP Outboard Troubleshooting & Repair Manual Electronic Version #275110 3/03 Please click the “Bookmarks” tab at left to enable the search and navigational features of this document. ® www.mymowerparts.com
1 TABLE OF CONTENTS Table of Contents 5 HP Outboard • Troubleshooting & Repair Manual INTRODUCTION 1 TROUBLESHOOTING 2 DISASSEMBLY 3 In the Interest of Safety 5 Safety Alert Symbols 5 Fuel Recommendations 6 Gasoline 6 Oil Recommendations 6 Lubrication System 6 Engine Oil 6 Oil Drain Plug, Oil Fill and Dipstick 6 Gear Selector 7 Operation 7 Reverse 8 Neutral 8 Forward 8 Changing Gear Case Oil 9 Check Lower Unit 13 No Start - Hard Start 13 Vibration 13 Power Loss 13 Noise 13 Cooling 13 Check Ignition 14 Armature Test 15 Tests for No Spark 15 Neutral Switch Test 16 Check Compression 17 Cylinder Leak Down Test 17 Check Carburetion 18 Steering Tension 18 Propeller Service 19 Cooling Shroud 23 Removal 23 Power Head 23 Blower Housing 24 Magnetron™ Ignition 24 Flywheel 25 Inspect Flywheel Key, Keyway, Flywheel and Crankshaft 26 Carburetor 26 Disassemble Carburetor 27 Carburetor Cleaning 27 Cylinder Head 28 Prepare Cylinder Head for Removal 28 Remove Valve Cover 28 Disassemble Cylinder Head 28 Crankshaft & Camshaft 29 Oil Slinger Lubrication 29 Piston and Connecting Rod 30 Gear Case Disassembly 30 Sliding Clutch 32 Midsection 33 Disassembly 33 Throttle Cable 34 Replacement 34 Rewind Starter 34 Remove Rope 34 Inspect Rope 34 Remove Pulley and Spring 34 Inspect Spring, Starter Housing and Pulley 35
2 TABLE OF CONTENTS Table of Contents 5 HP Outboard • Troubleshooting & Repair Manual OVERHAUL 4 Magnetron Ignition 39 Remove Armature 39 Inspect Valve Springs 39 Inspect Valve Guides 39 Finish Ream Valve Guides 39 Reface Valves and Seats 39 Remove Piston Rings 39 Check Piston Ring Groove Wear 40 Check Piston Ring End Gap 40 Check Connecting Rod 40 Undersized Connecting Rods 40 Check Piston Pin and Piston Pin Bore 41 Inspect Crankshaft 41 Inspect Camshaft 42 Check Cylinder 42 Cylinder Resizing 42 Set Up For Honing 42 Hone Cylinder 43 Cylinder Finish (“Cross Hatch”) 43 Cylinder Cleaning 44 Check Camshaft Bearings 44 Check Crankshaft Bearings 44 Remove DU™ Magneto Bearing 44 Install DU™ Magneto Bearing 45 Oil Seals 45 ASSEMBLY 5 Piston and Connecting Rod 49 Piston Rings 49 Compress Piston Rings 49 Crankshaft Installation 50 Install Connecting Rod & Piston 50 Install Camshaft 51 Install Sump 51 Crankshaft End Play 51 Install Flywheel 52 Install Armature 52 Armature Air Gap 52 Cylinder Head Assembly 53 Install Cylinder Head Plate and Rocker Arm Studs 53 Install Valves 53 Install Valve Springs and Retainers 53 Install Cylinder Head 54 Install Rocker Arms 54 Adjust Valve Clearance 55 Install Valve Cover 55 Carburetor Assembly 55 Install Welch Plug 55 Install Choke Shaft 56 Install Throttle Shaft 56 Install Inlet Needle and Float 56 Install Carburetor 57 Install Pulley and Spring 57 Install Pawls, Pawl Springs & Retainer 58 Wind Spring & Install Rope 58 Install Blower Housing 59 Gear Case Assembly 59 Mid Section Assembly 62 Install Power Head 63 Cooling Shroud Installation 64 Adjust Throttle Cable 64 Idle Adjustment 65 APPENDIX 6 Outboard Engine Fastener Specifications 68 Lower Unit Fastener Specifications 68 Ignition System Wiring Diagram 69 Component Location - Gear Case 70 Component Location-Midsection 72
1 3 Section 1 • Introduction 5 HP Outboard • Troubleshooting & Repair Manual Introduction In the Interest of Safety 5 Safety Alert Symbols 5 Fuel Recommendations 6 Gasoline 6 Oil Recommendations 6 Lubrication System 6 Engine Oil 6 Oil Drain Plug, Oil Fill and Dipstick 6 Gear Selector 7 Operation 7 Reverse 8 Neutral 8 Forward 8 Changing Gear Case Oil 9
4 Section 1 • Introduction 5 HP Outboard • Troubleshooting & Repair Manual 1 WARNING The engine exhaust from this product contains chemicals known to the State of California to cause cancer, birth defects, or other reproductive harm. WARNING ADDING FUEL • Fill fuel tank outdoors or in well ventilated area. • Do not fill portable fuel tank while it is in the boat or inside a vehicle. Always place tank on the ground when filling with gasoline. • Do not overfill tank. Fill tank to approximately 1-1/2 inches below top of neck to allow for fuel expansion. • Keep all fuel away from sparks, open flames, pilot lights, heat, and other ignition sources. • Do not smoke when refueling. • Check fuel lines, tank, cap and fittings frequently for cracks or leaks. Replace if necessary. • Locate the fuel tank in a position that keeps the vent higher than the fuel level. STARTING ENGINE • Make sure spark plug, muffler and fuel cap are in place. • Line from fuel tank is correctly connected to the engine. • Do not crank engine with spark pklug removed. • If fuel spills, wait until it evaporates before starting engine. • If engine floods, set choke to RUN position (choke open), place throttle in FAST position and crank until engine starts. TRANSPORTING EQUIPMENT • Transport outboard with transport valve in the OFF position. STORING EQUIPMENT • Store away from furnaces, stoves, water heaters, clothes dryer or other appliances that have pilot light or other ignition source because they can ignite fuel vapors. Fuel and its vapors are extremely flammable and explosive. Fire or explosion can cause severe burns or death. DANGER WARNING • Do not allow any open flame, spark, heat, or lit cigarette around battery during, and for several minutes after charging. • Wear protective goggles, rubber apron, and rubber gloves. Storage batteries give off explosive hydrogen gas during recharging. Hydrogen gas stays around battery for a long time after battery has been charged. Slightest spark will ignite hydrogen and cause explosion. You can be blinded or severely injured. Battery electrolyte fluid contains acid and is extremely caustic. Contact with battery fluid will cause severe chemical burns. WARNING • Be sur e the shift selector is in NEUTRAL position before attempting to start the outboard. • When starting engine, pull cord slowly until resistance is felt, then pull rapidly. • Allow the cord to retract slowly. Rapid retraction of starter cord (kickback) will pull hand and arm toward engine faster than you can let go. Broken bones, fractures, bruises or sprains could result. WARNING • If there is a natural or LP gas leak in the area, do not sart engine. • Do not use pressurized starting fluids because vapors are flammable. Starting engine creates sparking. Sparking can ignite nearby flammable gasses. Explosion and fire could result, causing serious injury or death. WARNING • Avoid contact with propeller. Keep people and pets away from propeller while the engine is running. • DO NOT run the outboard out of the water. • Operate equipment with guards in place. • Keep hands and feet away from rotating parts. • Tie up long hair and remove jewelry. • Do not wear loose-fitting clothing, dangling drawstrings or items that could become caught. • Keep lines, rigging and other equipment inside the boat. Rotating parts can contact or entangle hands, feet, clothing, hair or accessories. Traumatic amputation or severe laceration can result. WARNING BEFORE PERFORMING ADJUSTMENTS OR REPAIRS • Disconnect spark plug wire and keep away from spark plug. WHEN TESTING FOR SPARK • Use approved BRIGGS & STRATTON spark plug tester Part No. 19368. • Do not check for spark with spark plug removed. Unintentional sparking can result in fire or electric shock. Unintentional start-up can result in entanglement, traumatic amputation or laceration. DESIGNED FOR FRESH WATER CAUTION: Salt water is extremely corrosive to outboard components. Failure or damage related to salt water corrosion is NOT covered under the BRIGGS & STRATTON Warranty. • Do not touch hot surfaces. • Allow equipment to cool before touching. Running engines produce heat. Temperature of muffler and nearby areas can reach or exceed 150°F (65°C). Severe burns can occur. HAZARD SYMBOLS AND MEANINGS Toxic Fumes Electrocution Hot Surface Chemical Burns Pressure Unstable Moving Parts Fire Explosion
5 In the Interest of Safety Safety Alert Symbols The safety alert symbol ( ) is used to identify safety information about hazards that can result in personal injury. A signal word (DANGER, WARNING, CAUTION) is used with the alert symbol to indicate the potential severity of injury. In addition, a hazard symbol may be used to represent the type of hazard. DANGER: Indicates a hazard which, if not avoided, will result in death or serious injury. WARNING: Indicates a hazard which, if not avoided, could result in death or serious injury. CAUTION: Indicates a hazard which, if not avoided, might result in death or serious injury. NOTE: This notation is used to inform you of a method, reference or procedure that could assist with specific operations or decisions. • DO NOT run engine in an enclosed area. (Exhaust gases contain carbon monoxide, an odorless and deadly poison.) • DO NOT place hands or feet near moving or rotating parts. • DO NOT operate engine if gasoline is spilled or when smell of gasoline is present or other explosive conditions exist. (Move equipment away from spill and avoid any ignition until gasoline has evaporated.) • DO NOT tamper with links or other parts to increase engine speed. (This engine uses a non- adjustable, electronic engine speed limiter.) • DO NOT run engine without the blower housing or with other safety shields removed when doing repairs. • DO NOT crank engine with spark plug removed. (If engine is flooded, place throttle in the FAST position and crank until engine starts.) • DO NOT operate engine without a muffler. (Inspect periodically and replace if worn or leaking. If engine is equipped with muffler deflector, inspect periodically and replace if necessary. Replacement parts must be same as on original equipment.) • DO NOT run the outboard unless the propeller is either removed from the outboard or in water. Remove the spark plug lead and select NEUTRAL when servicing the outboard. Remove the propeller whenever it is necessary to test run the outboard. • PRIOR TO WORK, read and understand the section(s) of this manual that pertain to the job. Follow all safety warnings. • PULL STARTER CORD SLOWLY until resistance is felt. Then pull cord rapidly to avoid kickback and prevent hand or arm injury. • WEAR suitable eye protection (safety glasses, goggles or face shield) when performing repair procedures. • PREVENT ACCIDENTAL STARTING by removing spark plug wire from spark plug when servicing engine or equipment. • USE fresh gasoline. Stale fuel can gum carburetor and cause leakage. • CHECK fuel lines and fittings frequently for cracks or leaks. Replace if necessary. • USE Genuine Briggs & Stratton Parts or their equivalent ONLY. The use of replacement parts, which are not of equivalent quality, may damage the engine. INTRODUCTION Section 1 • Introduction 5 HP Outboard • Troubleshooting & Repair Manual 1 CAUTION: When used without the alert symbol, indicates a situation that could result in damage to equipment. CAUTION • Death, personal injury and/or property damage may occur unless service instructions are followed carefully. • Failure to follow the warnings listed below could result in death, serious injury (including paralysis) or property damage. Before attempting to service this equipment, read the entire owner's manual and operating instructions.
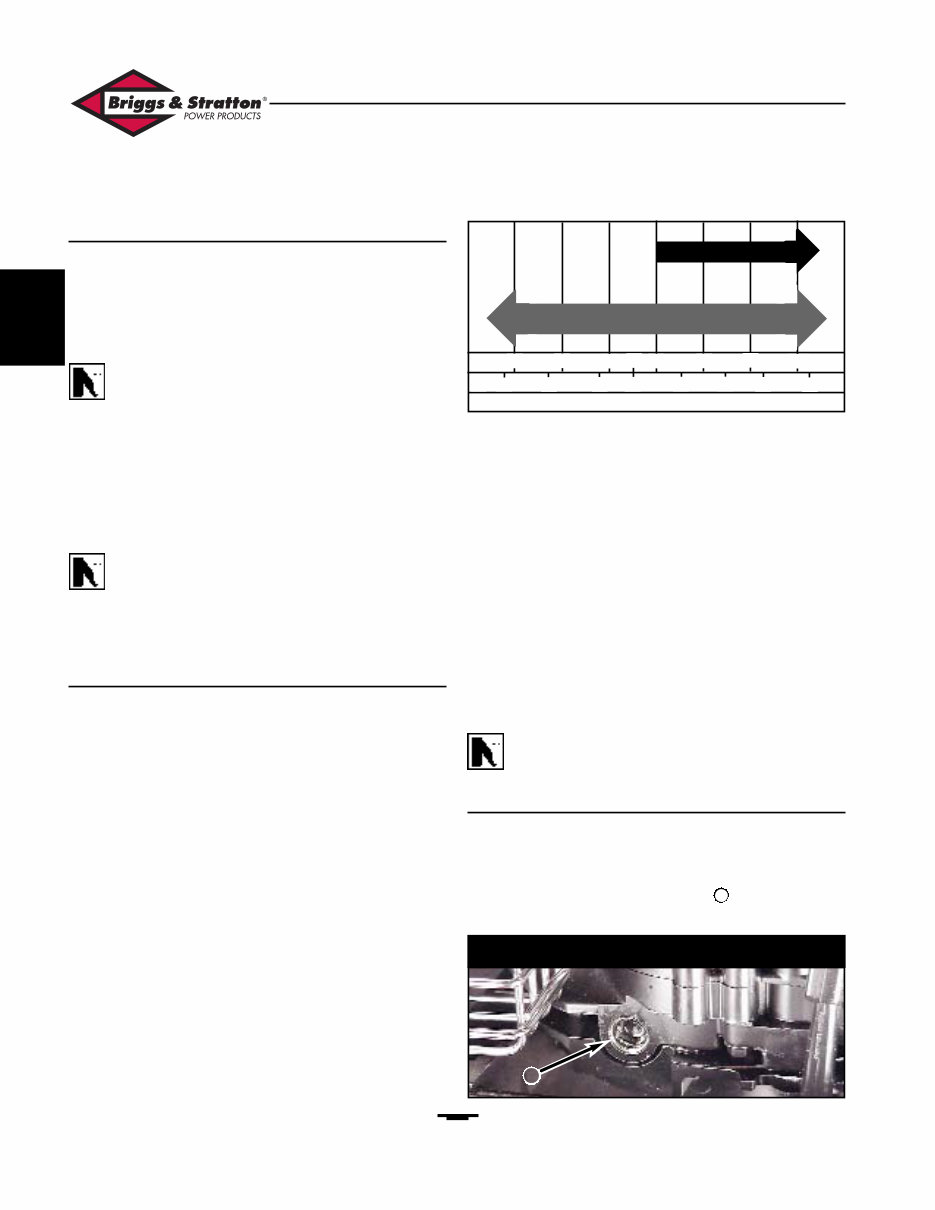
6 Fuel Recommendations Gasoline Use clean, fresh, unleaded gasoline. Leaded gasoline may be used if unleaded is not available. A minimum of 85 octane is recommended. The use of unleaded gasoline results in fewer combustion deposits and longer valve life. NOTE: We do not recommend the use of gasoline that contains alcohol, such as gasohol. However, if used, it must not contain more than 10 percent Ethanol and must be removed from the engine during storage. Do not use gasoline that contains Methanol. Only purchase a 30-day supply of gasoline. Fresh gasoline minimizes gum deposits and also will ensure fuel volatility tailored for the season in which the engine will be operated. NOTE: The use of a fuel additive, such as Briggs & Stratton Gasoline Additive (#5041) or equivalent, will minimize the formation of fuel gum deposits during storage. Such an additive may be added to the fuel tank or storage container. Oil Recommendations Lubrication System Oil has four purposes. It cools, it cleans, it seals, and it lubricates. This engine is lubricated with an oil slinger. During normal operation, small particles of dust, metal from the cylinder walls, pistons, bearings, and combustion deposits will gradually contaminate the oil. If the oil is not changed regularly, these foreign particles can cause increased friction and an abrasive action, which shortens the life of the engine. Fresh oil also assists in cooling. Old oil gradually becomes thick and loses its cooling ability and lubricating qualities. Engine Oil Use a high quality detergent oil classified "For Service SF, SG, SH, SJ" or higher. Briggs & Stratton strongly recommends the use of synthetic oil such as Briggs & Stratton (#100030C) or equivalent. If not available, SAE 30 weight oil is an acceptable substitute. No special additives should be used with recommended oils. Do not mix oil with gasoline. Air-cooled engines run hotter than automotive engines. The use of multi-viscosity oils, (10W-30 etc.) in ambient temperatures above 40°F (4°C), will result in high oil consumption. If multi-viscosity oil is used, check oil level more frequently to prevent any possible engine damage due to lack of lubrication. SAE 30 oil, if used in ambient temperatures below 40°F (4°C), will result in hard starting and possible engine damage due to inadequate lubrication. Synthetic oil meeting ILSACGF-2, API certification mark and API service symbol with "SJ/CF ENERGY CONSERVING" rating or higher, is acceptable oil at all temperatures. NOTE: Use of synthetic oil does not alter the required oil change intervals. Oil Drain Plug, Oil Fill and Dipstick 1. Change oil every 25 hours. 2. Position the engine vertically to check or change the oil. 3. Remove oil drain plug (Figure 1) . Drain oil while engine is still warm. 1 Section 1 • Introduction 5 HP Outboard • Troubleshooting & Repair Manual 1 Figure 1 — Oil Drain Plug STARTING TEMPERATURE RANGE ANTICIPATED BEFORE NEXT OIL CHANGE °C °F -20 0 20 40 60 80 100 -30 Synthetic 5W-30W, 10W-30 SAE 30 32 -20 -10 0 10 20 30 40 1
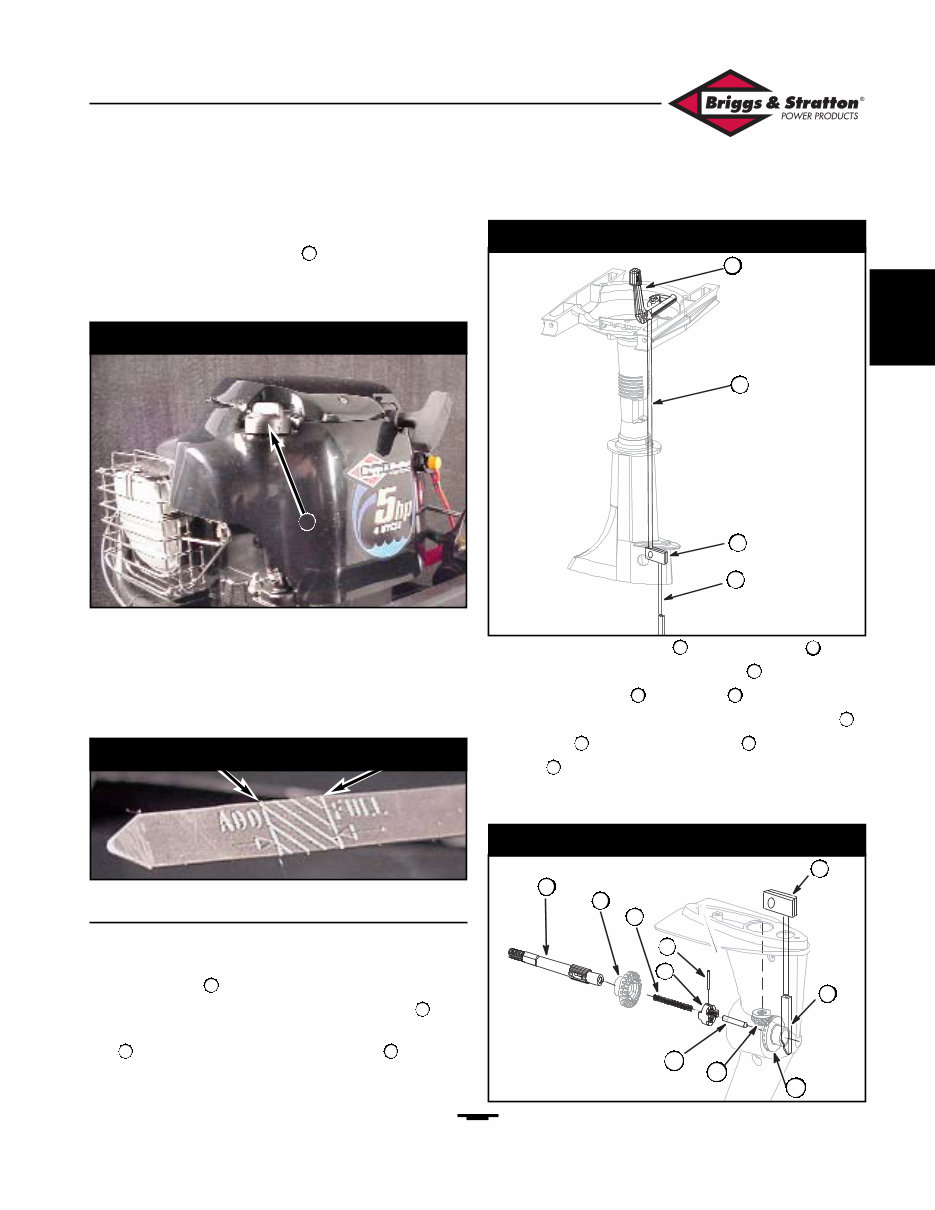
1 7 4. Install drain plug. Torque to 10 ft. lbs. (14 Nm). 5. Remove dipstick (Figure 2) . Refill slowly with 24 oz. (0.75 qt., 0.7 L) of new oil with the proper service classification and viscosity grade. Do not overfill. 6. Install the dipstick. 7. Start and run engine at idle to check for oil leaks. 8. Check the oil level. The oil level should be between the ADD and FULL marks on the dipstick. Add new oil if required (Figure 3). Gear Selector Operation The outboard operator selects gears with the shift lever handle (Figure 4) on the starboard (right) side of the outboard which acts on the shift cam/rod assembly . The shift lever is connected to the shift cam/rod by an upper rod . The rods are connected with a clamp that also provides for NEUTRAL adjustment. The forward gear (Figure 5) and reverse gear are driven simultaneously by the pinion gear and spin freely on the propeller shaft . The spring inside the propeller shaft applies forward pressure on the roll pin , sliding clutch and shift cam follower . The shift cam/rod is stepped to control the location of the sliding clutch through the shifter pin. The sliding clutch is splined to the propeller shaft. 4 10 9 8 7 5 11 6 12 3 2 4 1 2 Section 1 • Introduction 5 HP Outboard • Troubleshooting & Repair Manual Figure 4 — Gear Selector Operation Figure 5 — Forward Gear Figure 2 — Dipstick Figure 3 — Dipstick Markings 2 3 4 1 2 3 4 11 5 7 8 9 6 12 10
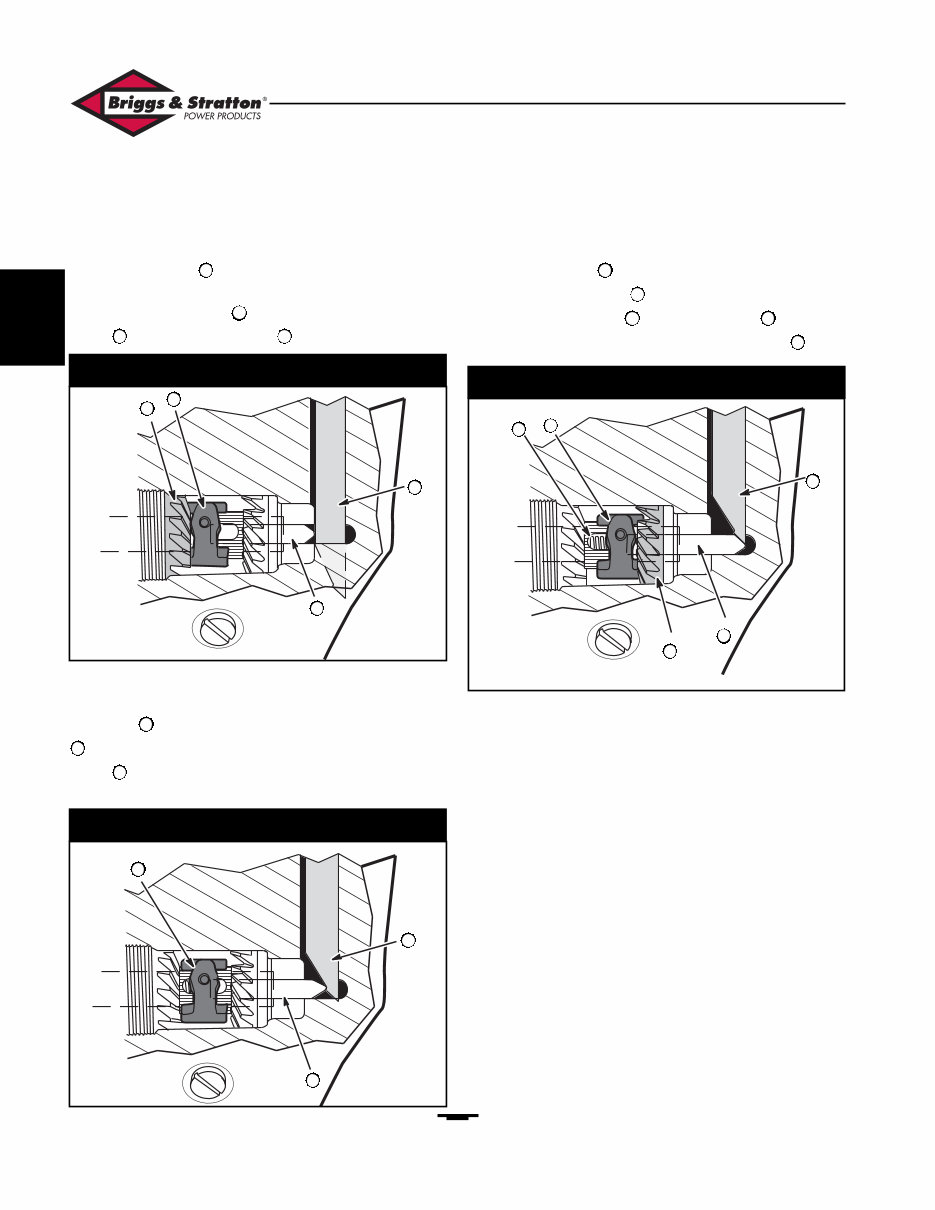
8 Reverse When the shifter is moved to the REVERSE position, the shift cam (Figure 6) is pressed down to its lowest position in the gear case. The highest surface of the cam presses the cam follower rearward, engaging the sliding clutch to the REVERSE gear . Neutral When the shifter is in the NEUTRAL position the shift cam (Figure 7) is in the middle position. The cam-follower is on the middle detent of the shifter cam. The sliding clutch is not engaged to either the FORWARD or the REVERSE gears. Forward When the shifter is set to the FORWARD position, the shift cam (Figure 8) is pulled to its highest position in the gear case. The spring inside the propeller shaft pushes the sliding clutch and cam follower forward, engaging the sliding clutch to the FORWARD gear . 8 6 5 3 9 5 6 9 2 5 6 9 Section 1 • Introduction 5 HP Outboard • Troubleshooting & Repair Manual 1 Figure 6 — Reverse Figure 7 — Neutral Figure 8 — Forward 2 9 9 9 3 5 5 5 6 6 6 8
MyGreenManuals.com is your number one source for repair manuals. Our informative repair manuals, owner's manuals, and parts catalogs contain all the information you'll need to perform repairs, look up parts, or do routine maintenance on your machine. You will have access to information regarding the following topics:
General Information
Routine Maintenance
Engine Removal and Installation
Fuel System
Lubrication and Cooling System
Engine Specifications
Transmission, Drive Chain & Sprockets
Steering System
Shocks
Body Work
Intake & Exhaust
Electrical System
Advanced Troubleshooting
With our repair manuals, find the page pertaining to your job, print it off, and get working on your machine. No more ruining your expensive paper shop manual with grease and dirt.
Broke down on the trail or site and have a smartphone? What a cool way to find your problem and repair it on the trail, no downtime on the job site. With our repair manuals, you instantly have access to the material needed to get you running again. Kind of tough to do that with a paper manual.
And did we mention the fact that you're saving the trees? All our repair manuals come with a lifetime protection policy. If lost or damaged, simply contact us, and we'll replace it free of charge for life.
We provide various repair service manuals, workshop manuals, repair manuals, owner's manuals, parts catalogs, and other various manuals, all in an electronic format.
UTVs, motorcycles, ATVs, quads, snowmobiles, Seadoo, equipment, small engines, inboards, outboards, and more.
Instant Access
No Shipping Cost
Get a Copy So No Waiting, Repair It Now
If you are looking for a specific manual and cannot find it or do not see it listed, then contact our customer support team via the contact us link above with details of the required manual, and we will do our absolute best to find and list it for you.
Instant access after payment. Thank you.
Recently Viewed
5,521,897Happy Clients
2,594,462eManuals
1,120,453Trusted Sellers
15Years in Business
Price:
Actual Price:
Briggs and Stratton 5 Hp Outboard Engine Repair Manual