Page ii Precautions It should be kept in mind, while working on the product, that the electrical and ignition systems are capable of violent and damaging short circuits or severe electrical shocks. When performing any work where electrical terminals could possibly be grounded or touched by the mechanic, the battery cables should be disconnected at the battery. Any time the intake or exhaust openings are exposed during service they should be covered to protect against accidental entrance of foreign material which could enter the cylinders and cause extensive internal damage when the engine is started. It is important to note, during any maintenance procedure replacement fasteners must have the same measurements and strength as those removed. Numbers on the heads of the metric bolts and on the surfaces of metric nuts indicate their strength. American bolts use radial lines for this purpose, while most American nuts do not have strength markings. Mismatched or incorrect fasteners can result in damage or malfunction, or possibly personal injury. Therefore, fasteners removed should be saved for reuse in the same locations whenever possible. Where the fasteners are not satisfactory for reuse, care should be taken to select a replacement that matches the original. Replacement Parts Use of parts other than the recommended service replacement parts, will void the warranty on those parts that are damaged as a result. ! WARNING Electrical, ignition and fuel system components on Mercury Marine Power Products are designed and manufactured to comply with U.S. Coast Guard Rules and Regulations to minimize risks of fire or explosion. Use of replacement electrical, ignition or fuel system components, which do not comply to these rules and regulations, could result in a fire or explosion hazard and should be avoided. When servicing the electrical, ignition and fuel systems, it is extremely important that all components are properly installed and tightened. If not, any electrical or ignition component opening would permit sparks to ignite fuel vapors from fuel system leaks, if they existed. Cleanliness and Care of Product A Mercury Marine Power Product is a combination of many machined, honed, polished and lapped surfaces with tolerances that are measured in the ten thousands of an inch/mm. When any product component is serviced, care and cleanliness are important. Throughout this manual, it should be understood that proper cleaning and protection of machined surfaces and friction areas is a part of the repair procedure. This is considered standard shop practice even if not specifically stated. Whenever components are removed for service, they should be retained in order. At the time of installation, they should be installed in the same locations and with the same mating surfaces as when removed. Personnel should not work on or under an engine that is suspended. Engines should be attached to work stands, or lowered to ground as soon as possible.
Page iii Manual Outline 1 - Important Information A - General Information B - Maintenance 2 - Gen III Cool Fuel Module All Models A - Gen III Cool Fuel Module Removal and Disassembly B - Gen III Cool Fuel Module Assembly and Installation 3 - Fuel System A - Troubleshooting and Repair B - Fuel Flow Diagram 4 - Cooling System A - Coolant and Water Flow Diagrams Important Information 1 Gen III Cool Fuel Module All Models 2 Fuel System 3 Cooling System 4
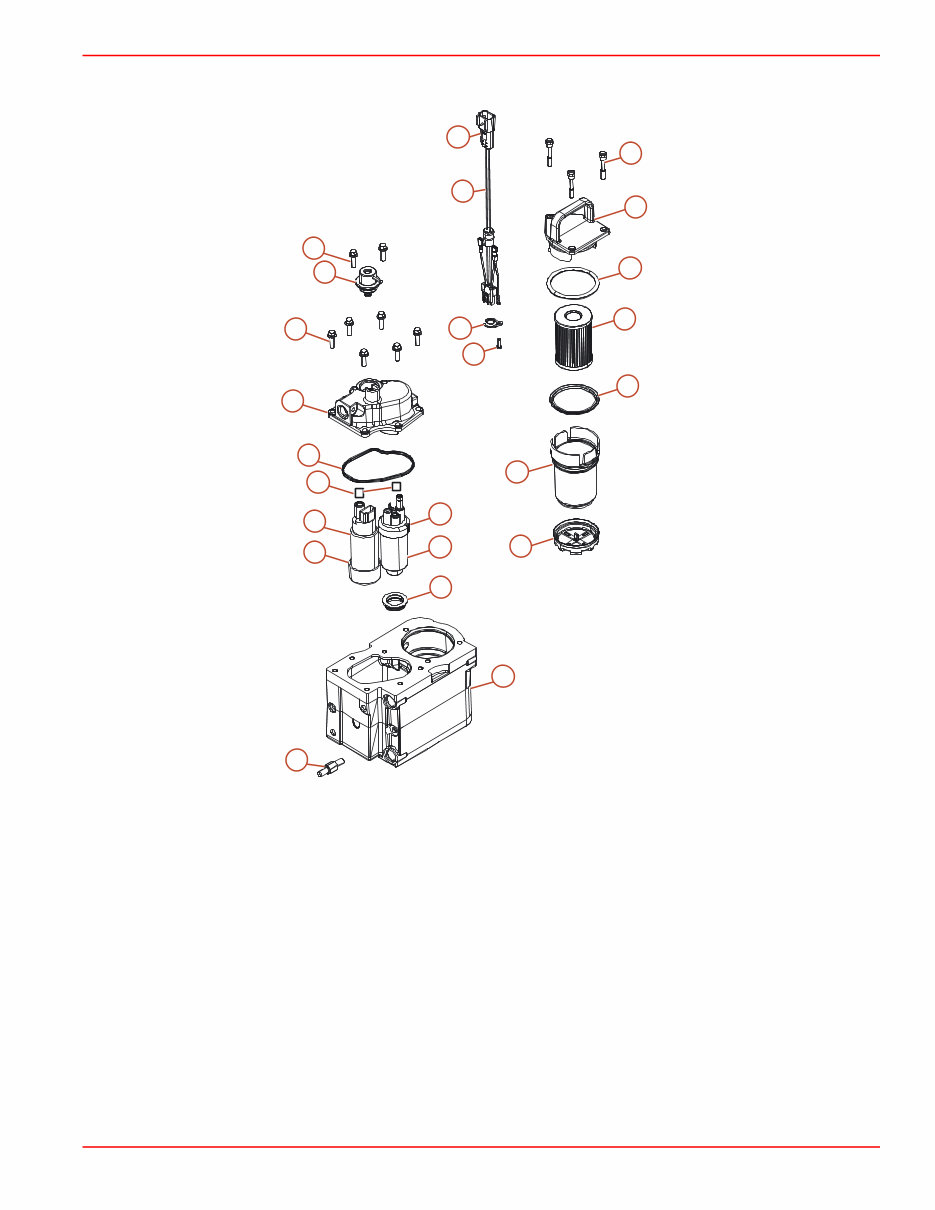
General Information 90-865376 NOVEMBER 2004 Page 1A-1 1 A Important Information Section 1A - General Information Table of Contents Introduction......................................................1A-2 Gen III Cool Fuel Module Exploded View........1A-3
General Information Page 1A-2 90-865376 NOVEMBER 2004 Introduction This supplement is designed as a service guide for the models previously listed. It provides specific information, including procedures for disassembly, inspection, assembly, and Installation to enable dealers and service mechanics to diagnose and repair the Generation III Cool Fuel Module. Before attempting repairs it is suggested that the procedure first be read through to gain knowledge of the methods and tools used and the cautions and warnings required for safety.
Maintenance 90-865376 NOVEMBER 2004 Page 1B-1 1 B Important Information Section 1B - Maintenance Table of Contents Changing Water Separating Fuel Filter Element .........................................................................1B-2
Maintenance Page 1B-2 90-865376 NOVEMBER 2004 Changing Water Separating Fuel Filter Element ! WARNING Avoid Fire or Explosion: The fuel injection system is pressurized during operation. Use care when removing the water separating fuel filter. Allow the engine to cool down before attempting to remove the water separating fuel filter in the following procedure. ! WARNING Be careful when changing the water separating fuel filter. Gasoline is extremely flammable and highly explosive under certain conditions. Ensure the ignition key is "OFF". Do not smoke or allow spark or open flame in the area when changing the fuel filter. Wipe up any spilled fuel immediately. ! WARNING Ensure that no fuel leaks exist before closing the engine hatch. 1. Allow the engine to cool down. 2. Close fuel supply valve, if equipped. NOTE: Mercury MerCruiser recommends that the engine be shut off for 12 hours prior to filter removal. 3. Disconnect the Cool Fuel Module harness from the engine wiring harness. 4. Turn the key switch to the start position and allow the starter to operate for 5 seconds to relieve fuel system pressure. 5. Turn key switch to off position. 6. Unseat the filter assembly by grasping the filter assembly handle and pulling upward. Do not completely remove the filter assembly from the Cool Fuel Module at this time.
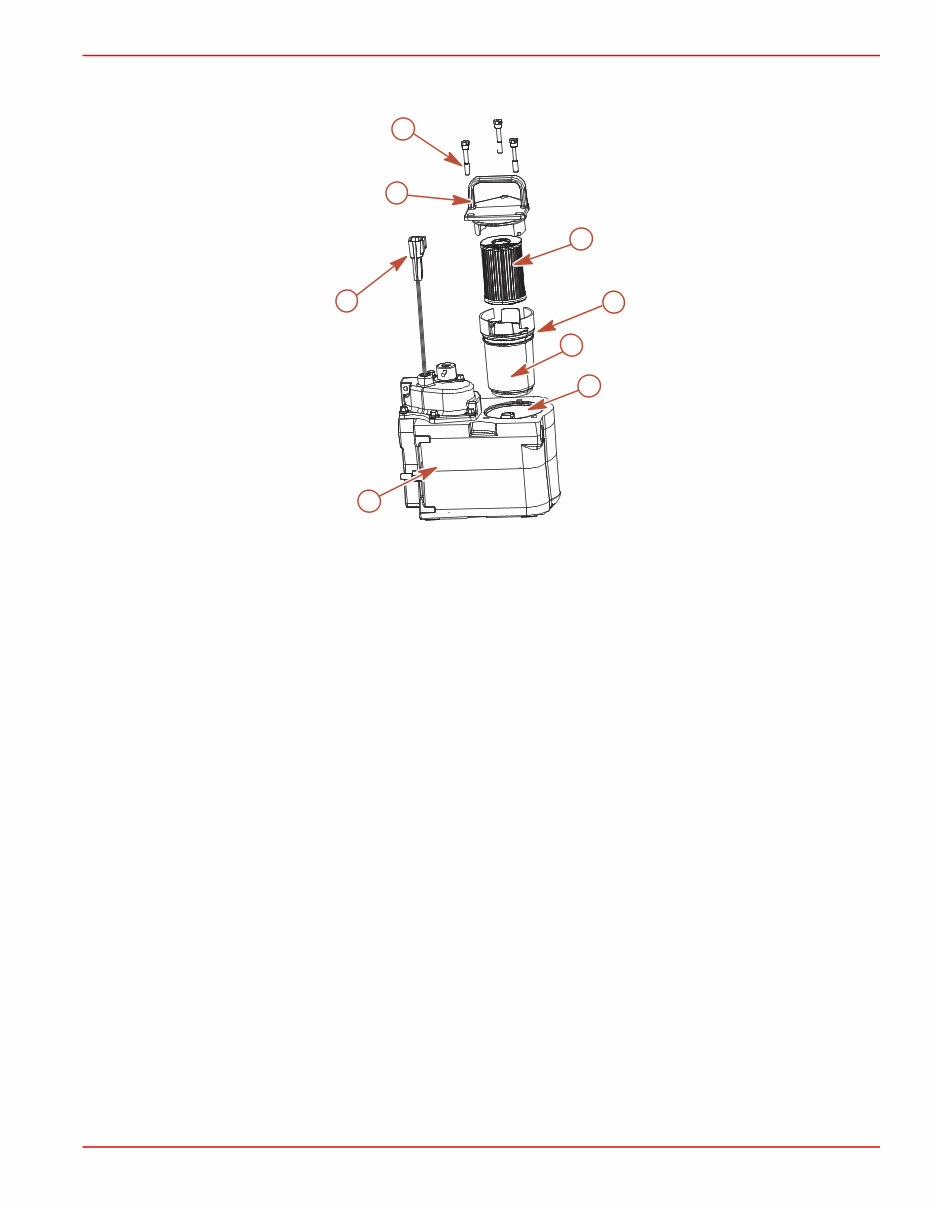
Maintenance 90-865376 NOVEMBER 2004 Page 1B-3 7. Loosen each filter assembly retaining screw until the screw is disengaged from the Cool Fuel Module. Do not remove the filter assembly retaining screws from the filter cap. d a b c e f g h 8837 a - Cool Fuel Module b - Cool Fuel Module harness c - Filter cap d - Filter assembly retaining screw e - Fuel filter element f - Filter cup g - Cool Fuel Module filter reservoir h - Seal, Filter cup 8. Allow any fuel that may be in the filter assembly to drain out through the bottom of the filter assembly and into the Cool Fuel Module filter reservoir. 9. Remove the filter cup from the filter cap by grasping the filter cap and rotating it in a clockwise direction while holding the filter cup stationary. 10. Remove the used water separating fuel filter element from the filter cup, place it in a clean, approved container. 11. Dispose of any water or debris that may be in the filter cup. 12. Install a new water separating fuel filter element into the filter cup. Push the element into the cup until completely seated. 13. Install new O-ring on the filter cup. 14. Attach the filter cap to the filter cup by grasping the filter cap and rotating it in a counter clockwise direction while holding the filter cup stationary, until the filter cap locks securely into place. 15. Install the fuel filter assembly slowly into the Cool Fuel Module to prevent spilling fuel, and align the screws retained in the filter cap with the screw holes in the Cool Fuel Module. Tighten the filter assembly retaining screws until hand tight. 16. Ensure that the filter cap is firmly seated against the Cool Fuel Module and torque each filter assembly retaining screw. 17. Open fuel supply valve, if equipped.
This manual is a comprehensive guide for the MERCURY MERCRUISER GEN III COOL FUEL, suitable for individuals interested in the technical aspects of this brand. It is designed to provide complete information directly from the manufacturer, catering to both maintenance and repairs. The manual includes various equipment, diagrams, and details for diagnostics, repair, and maintenance of the vehicle.
It is a valuable resource for professional mechanics and DIY enthusiasts, offering step-by-step instructions, along with access to pictures, diagrams, assembly, disassembly, cleaning, and repairing of the MERCURY MERCRUISER GEN III COOL FUEL. The manual covers mechanical and technical specifications, introductory mechanics, equipment elevation, collisions, products and supplies, painting, and descriptions of various vehicle parts.
With instant access to this manual, users can easily print each section as needed. Embracing the digital format, it eliminates the need for waiting weeks or months for printed manuals and reduces environmental impact by not relying on paper-based resources. Take advantage of the 21st-century technology to access the information you need without delay.
Recently Viewed
5,521,897Happy Clients
2,594,462eManuals
1,120,453Trusted Sellers
15Years in Business
Price:
Actual Price:
Mercury Mercruiser Gen III Cool Fuel Service repair manual