WASHING MACHINE SERVICE MANUAL Read the safety precautions in the manual before servicing the washer. CAUTION MODEL : WT5001CW / WT5101HW / WT5101HV
SAFETY PRECAUTION! IMPORTANT SAFETY NOTICE! 2 This service information is intended for individuals possessing adequate backgrounds of electrical, electronic, and mechanical experience. Any attempt to repair this appliance may result in personal injury or property damage. The manufacturer or seller can not be responsible for the interpretation of this information, nor can it assume any liability in connection with its use. WARNING: To reduce the risk of fire, electric shock, or personal injury when using this appliance, follow basic precautions, including the following: ·Wear gloves when working. Failure to do this can result in serious injury. ·The appliance is heavy. Two or more people is required when moving the appliance. There is a risk of serious back injury or other injuries. ·Certain internal parts are intentionally not grounded and may present a risk of electric shock only during servicing. Service personnel - Do not contact the following parts while the appliance is energized. : Pump bracket, rotor and heater To reduce the risk of fire, electric shock, or personal injury when using this appliance, follow basic precautions, including the following. ·Disconnect this appliance from the power supply before servicing. Turning the controls to the off position does not disconnect this appliance from the power supply. Failure to do this can result in shock. ·Reconnect all grounded devices after servicing. Failure to do this can result in shock. CONTENTS 1. Specifications ............................................................................................................................. 3 2. Installation Instructions 2-1. How to Adjust Level .............................................................................................................4 2-2. Connerting Water Supply Hose .......................................................................................... 5 2-3. Connert the Drain Hose ...................................................................................................... 7 3. Operating Instructions 3-1. Identification of Parts .......................................................................................................... 8 3-2. Before Starting to Wash ...................................................................................................... 9 3-3. Function of Each Button(WT5101H*) ............................................................................... 16 3-4. Function of Each Button(WT5001C*) ............................................................................... 18 3-5. Washing Programs(WT5101H*) ....................................................................................... 20 3-6. Washing Programs(WT5001C*) ....................................................................................... 21 3-7. Care and Maintenance ..................................................................................................... 22 4. Service Information 4-1. Schemetic Diagram .......................................................................................................... 23 4-2. Wiring Diagram ................................................................................................................. 24 4-3. Program Time Chart ......................................................................................................... 25 4-4. Test Operation Without Water ........................................................................................... 32 4-5. Troubleshooting Methods for Common Washing Problems ............................................. 33 4-6. Troubleshooting Methods According to Error Message ................................................... 34 5. Exploded View ......................................................................................................................... 46 6. Replacement Part List .............................................................................................................. 50
1. SPECIFICATIONS 3 Model WT5101HV WT5101HW WT5001CW Electrical AC 120V , 60Hz Capacity 4.48 cu.ft Finish Stainless Silver Blue White Door lid Glass Lid Inner Tub Stainless Inlet Water Pressure 14.5 ~ 116 PSI (100 ~ 800 kPa) Rating of Fuse 125V, 12A for 100~127V/60Hz Spin Speed 1100 ± 50 Weight 145.5 lbs (66kg) Cycles Cotton/Normal, Bulky/Bedding, Heavy Duty, Perm Press Casual, Sanitary, Baby Wear, Tub Clean, Bright Whites™, Delicates, Pure Color™, Sports Wear, Speed Wash, Wool, Towels Cotton/Normal, Bulky/ Bedding, Heavy Duty, Perm Press Casual, Baby Wear, Tub Clean, Bright Whites™, Pure Color™, Sports Wear, Speed Wash, Wool, Towels Time Delay 1-18Hr Lid Interlock Switch Magnet Sensor Control Lock Yes Softener Dispenser Yes Detergent Dispenser Yes Bleach Inlet Yes Auto Power Off Yes Smart Rinse™with Jet Spray Yes Motor INVERTER Direct Drive Heater Yes No
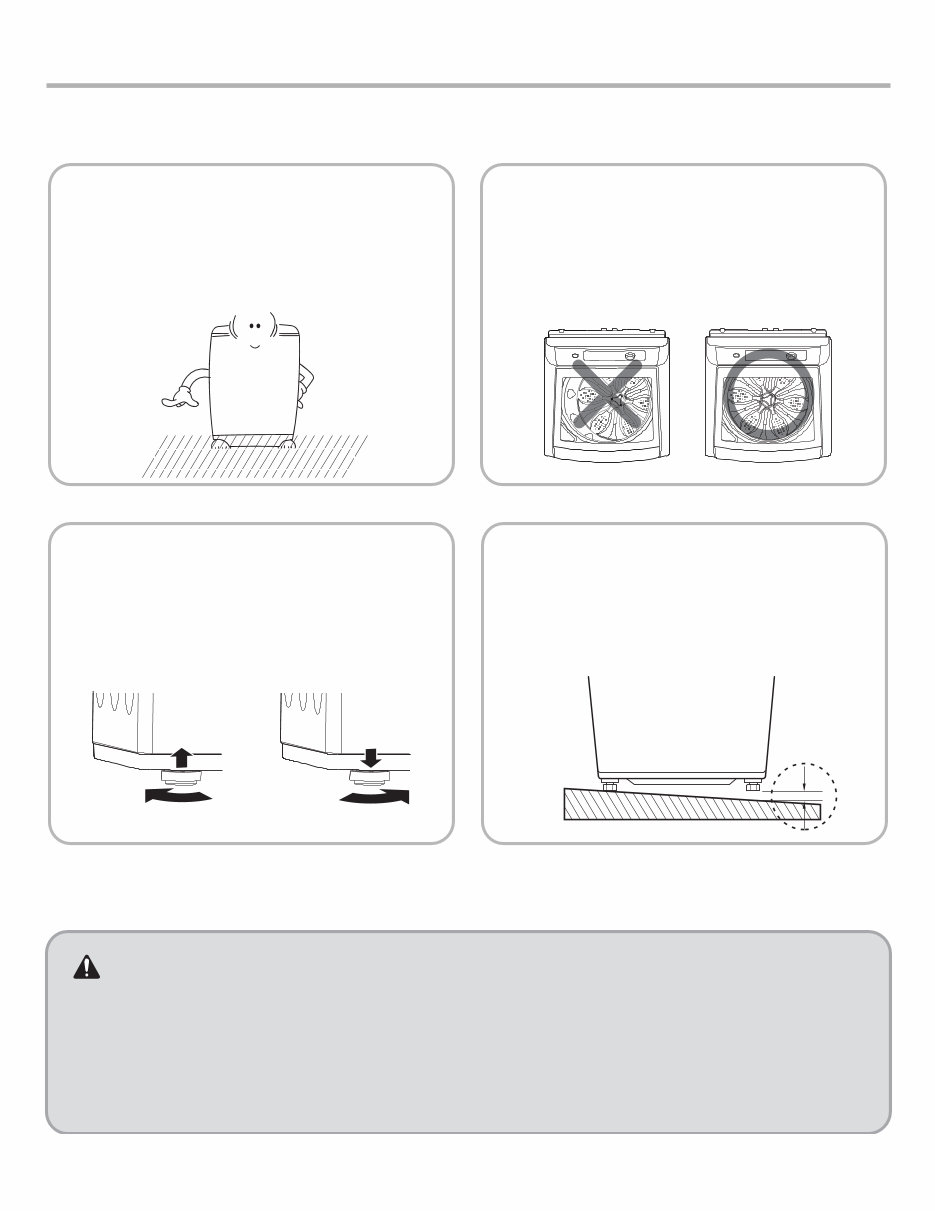
4 2. INSTALLATION INSTRUCTIONS 2-1. HOW TO ADJUST LEVEL 4 Raise Lower CAUTION • The ventilating openings in the base area must not be obstructed by carpeting. • Install the washing machine on a level and firm surface, and tilt should be less than 1˚ • Wooden floors may need reinforcing to prevent the normal vibration which occurs with an unbalanced load. • Do not install the washer on an inclined floor. Improper installation of the washer may cause noise and malfunctioning. 1 Installation area • Install the washer on a firm, flat surface. • If the washer is installed on an unsuitable floor, it could make considerable noise and vibrate. 2 3 Checking level • Open the lid, check if the washer is correctly leveled by looking down from the top. If a gap is seen between the tub and drum, the washer is not level. No shims. It would be dangerous. If the floor is that far from being level, it is a floor problem and not a washer problem. Set Leveling feet • Loosen the locknuts on 2 front leveling feet until you can turn the feet with the included wrench. Turn clockwise to raise the washer or counterclockwise to lower it. Checking slope • If installation surface is tilted, the washer will vibrate. Do not install on a sloping floor.
5 27″ (68.6 cm) 1″ (2.5 cm) 1″ (2.5 cm) 28. 13 /64″ (72.1 cm) 4″ (10 cm) 45. 13 /32″ (115.3 cm) 55. 13 /16″ (141.7 cm) (with lid open) 6 7 5 Lower Raise Confirming level • Place the washer in original position, confirming the level. Horizontal setting • Lift the front of the washer and adjust level by turnings the adjustable legs clockwise or using the adjusting plate. Distance between the drain hose and the wall • Distance between the drain hose and the wall should be more than 4 inches (10 cm), and the distance between any other part and the wall should be more than 1 inches (2.5 cm) Do not install the washer in the following places. • Where the washer is exposed to direct sunlight. • Near a heater or heating appliance. • Where the washer is exposed to freezing temperatures. • In damp environments such as bathrooms or harmful environments.
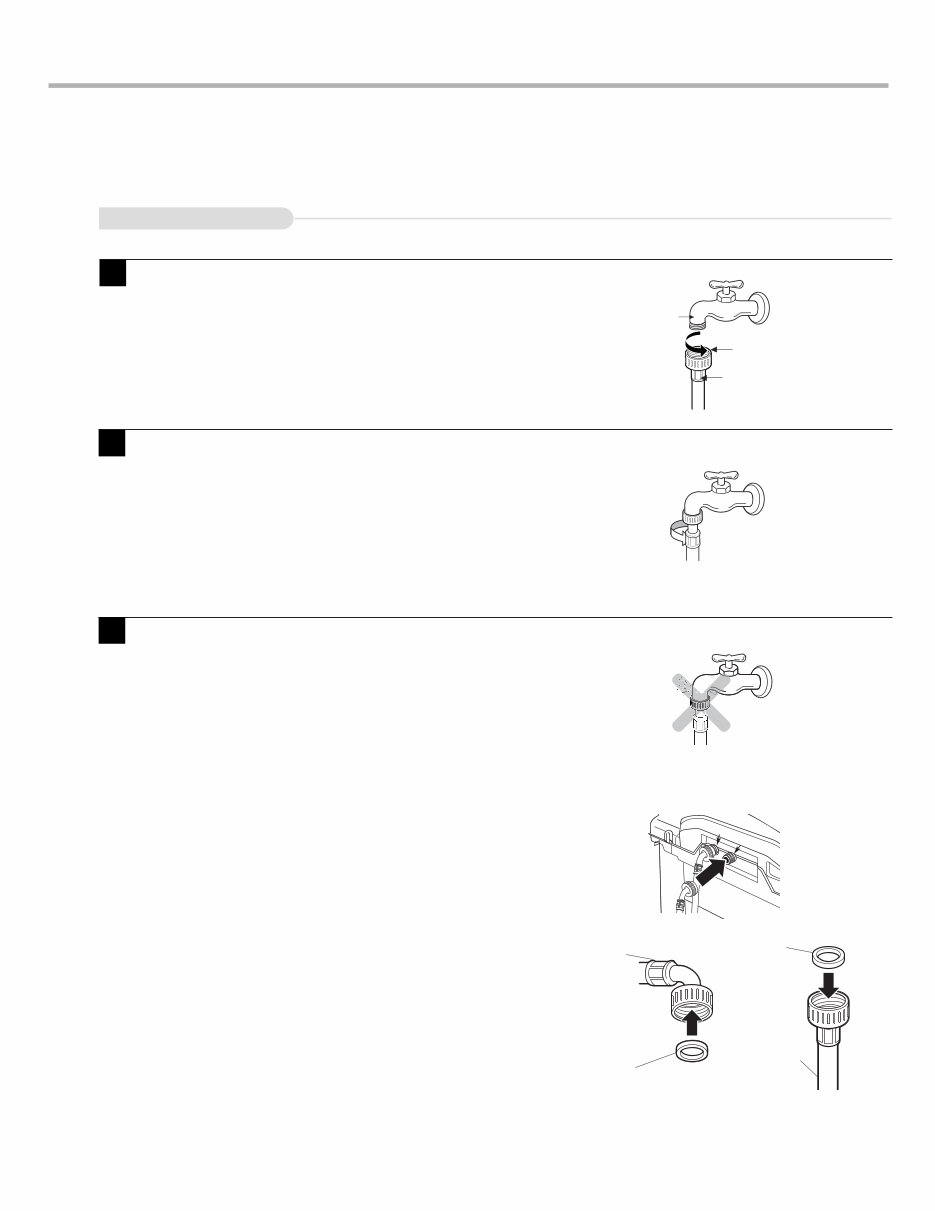
1 Attach the water supply hose to the tap. Push the water supply hose up so that the rubber packing within the hose can adhere completely to the tap. 2 Connect the water supply hose to the tap. Connect the water supply hose to the tap and then tighten it by screwing it to the right. 3 Check water leakage. After connecting the hose, open the tap to check for any water leakage. Check water leakage. After connecting the hose, open the tap to check for any water leakage. Connecting Water Supply Hose to the machine • Connect the water supply hose to inlet valve of the washing machine, and then lock it by turning the hose connecting part. • Check to see if there is a rubber seal inside the connector. • A nwe washing machine should be instailed with new hoses. The old hoses shuld not be reused. Screw Type Hot Cold Water tap Rubber Seal Water Supply Hose Water Hose (to water inlet on washer) Rubber Seal Water Hose (to tap) Rubber Seal 2-2. CONNECTING WATER SUPPLY HOSE 6 Before connecting the Water Supply Hose to the water tap, check the hose type and then choose the correct instruction here under.
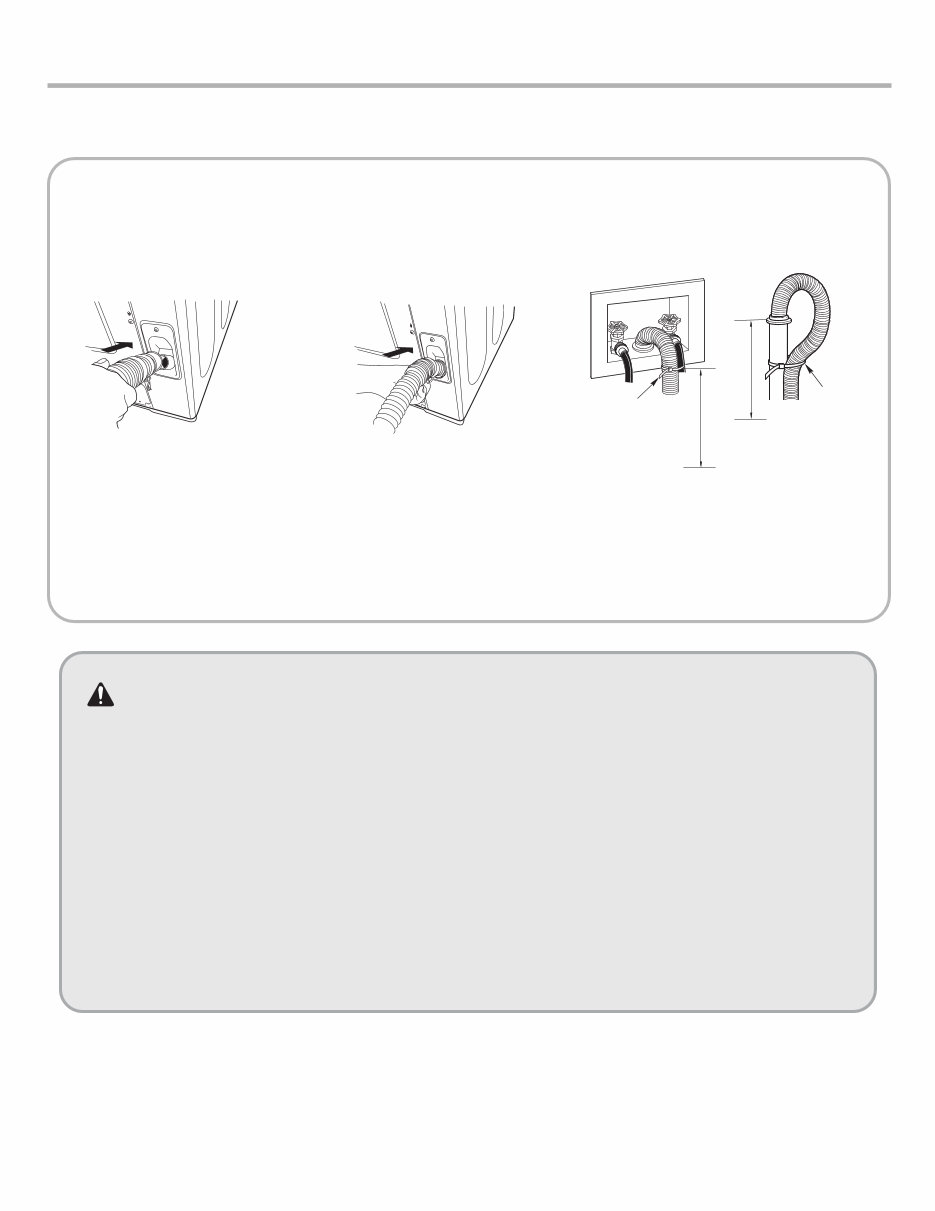
7 2-3. CONNECT THE DRAIN HOSE 39" (99 cm) 39" (99 cm) • Connect the drain hose to the outlet of the drain pump located at the rear of the washing machine. • Attach the clip to the drain hose. And then push it toward the body of the washing machine as indicated by the arrow. • Check that the drain hose is hung up over the edge of the laundry tub. • Do not use an extension hose. NOTE : • The drain hose should always be properly secured. Failure to properly secure the drain hose can result in flooding and property damage. • The end of the drain hose should be placed 39" (99 cm) from the floor. • The drain must be installed in accordance with any applicable local codes and regulations. • Make sure that the water lines are not stretched, pinched, crushed, or kinked. • Do not insert the drain hose more than 12” (30 cm) into the drain pipe to avoid siphoning and odor build-up. Cable Tie Cable Tie WARNING: • The washer should never be installed or stored in a location subject to freezing temperatures. If the washer was exposed to freezing temperatures prior to installation, allow it to stand at room temperature for several hours before use Damage to the water lines and internal mechanisms of the washer can result. • Water supply pressure must be between 14.5 psi and 116 psi (100 ~ 800kPa) If the water supply pressure is more than 116 psi, a pressure reducing valve must be installed. If you have uncontrolled water temperature and pressure you should fit a temperature and pressure relief valve to ensure that wate temperature and water pressure remain within the safe limits. Consult a plumber or electrician if you are unable to adjust water temperature and or pressure. Failure to do so can result in damage to the machine. • Plug the power cord of washer into a properly grounded outlet. Failure to do this can result in shock or serious injury.
8 3. OPERATING INSTRUCTION 3-1. IDENTIFICATION OF PARTS Powder detergent Box for delayed washing/softener additves box INLET HOLE FOR BLEACH Clean regularly to stop linting on the clothes load. Washing Wing (unique with lnner Tub) LEVELLING LEGS Use to level the washing machine for correct balance spin operation. Multi Clean filter TUB HOT WATER SUPPLY HOSE COLD WATER SUPPLY HOSE Make sure the water does not leak. POWER PLUG If the supply cord is damaged, it must be replaced by the manufacturer or its service agents or similarly qualified person in order to avoid a hazard. FUNCTION SELECTOR BASE DRAIN HOSE Be sure the drain hose is properly installed on the drain before operating the washer.
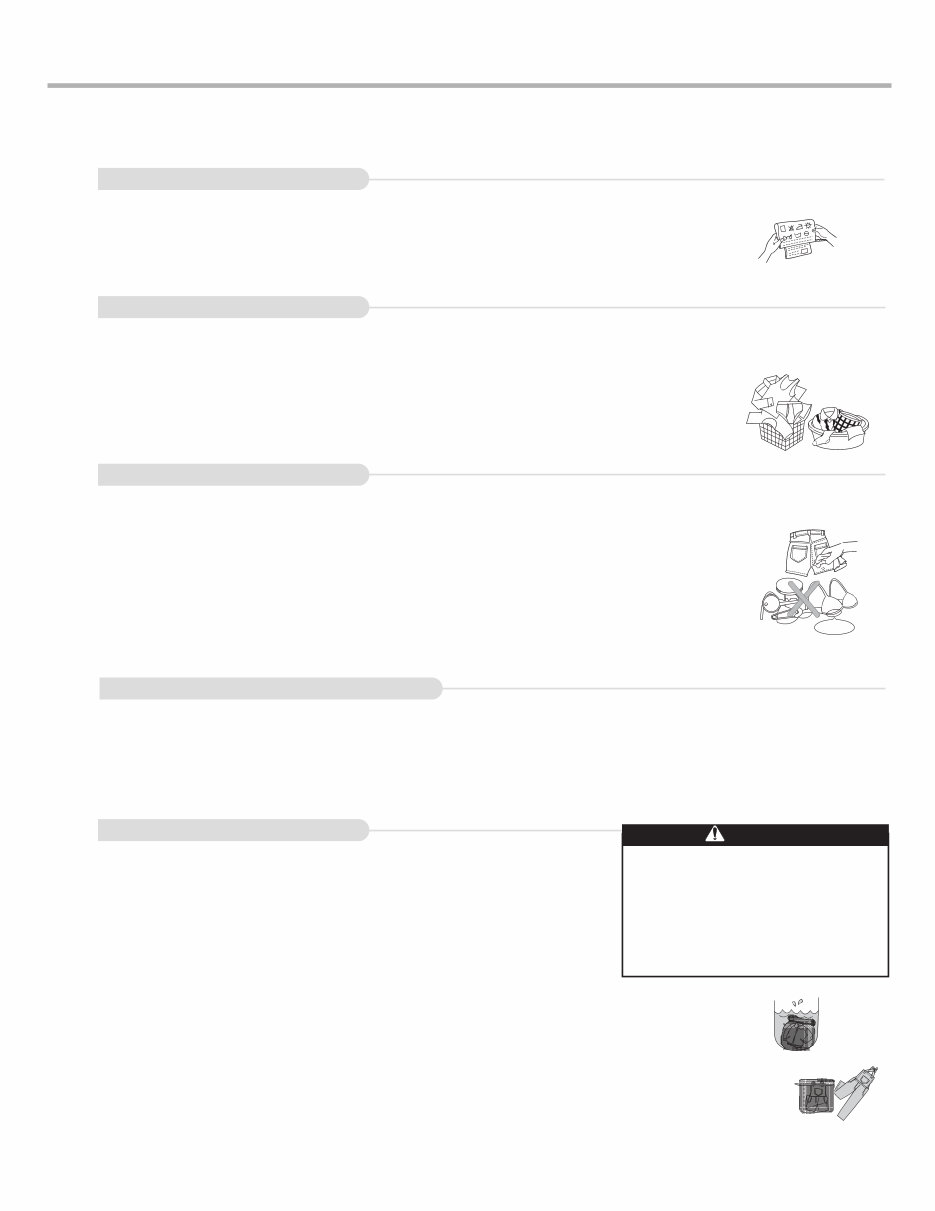
9 3-2. BEFORE STARTING TO WASH Care Labels • Look for a care label on your clothes. This will tell you about the fabric content of your garment and how it should be washed. Sort clothes into loads that can be washed with the same wash cycle, water temperature, and spin speed. Sorting To get the best results, different fabrics need to be washed in different ways. • SOIL (Heavy, Normal, Light) Separate clothes according to the type and amount of soil. • COLOR (Whites, Lights, Darks) Separate white fabrics from colored fabrics. • LINT (Lint producers, Collectors) Separate lint producers and lint collectors. Lint Producers Terry cloth, Chenille, Towels, Diapers Lint Collectors Synthetics, Corduroy, Permanent Press, Socks Check before Loading • Check all pockets to make sure that they are empty. Things such as nails, hairclips, matches, pens, coins, and keys can damage both your washer and your clothes. • Mend any torn garments or loose buttons. Tears or holes may become larger during washing. • Remove belts, underwires, etc. to prevent damage to the machine or your clothes. • Pretreat any dirt and stains. • Make sure the clothes are washable in water. • Check the washing instructions. • Remove any paper or tissue in the pockets. • WIRE Loading Do not wash fabrics containing flammable materials(waxes, cleaning fluids, etc.). Load Size The WATER LEVEL should just cover the clothes. Adjust the load size accordingly. Loosely load clothes no higher than the top row of holes in the washer tub. To add items after washer has started, press the Start button and submerge additional items. Close the lid and press the Start button again to restart. ※ Do not wash waterproofed fabrics (such as skiing outfits, diapers, or nappy auto seat covers.) Light and Large-sized clothing Clothes like downs and woollens are light weight, large and float easily. Use a nylon net and wash them in a small amount of water. If the laundry floats during the wash cycle, it may become damaged. Use dissolved detergent to prevent the detergent from clumping. ※ Do not wash water-proof textilles (Skling outfit, baby diaper, nappy automobile seat covers.) Long laundry items Use nylon bag nets for long, DELICATES items. For laundry with long strings or long length, a bag will prevent tangling during washing. Fasten zippers, hooks, and strings to make sure that these items don't snag on other clothes. ※ The nylon washing bag is not supplied by LG. Pretreatment on stains or heavy soil • Pretreat shirt collars and cuffs with a pre-wash product or liquid Detergent when placing them in the washer. Before washing treat special stains with bar soaps, liquid detergent or a paste of water and granular detergent. • Use a pretreat soil and stain remover. Treat stains AS SOON AS POSSIBLE. The longer they are left, the harder they are to remove. (For more detail refer to page 13) WIRE WARNING Fire Hazard Never place items in the washer that are dampened with gasoline or other flammable fluids. No washer can completely remove oil. Do not dry anything that has ever had any type of oil on it (including cooking oils). Doing so can result in death, explosion, or fire.
10 Using Water Water Temperature • The machine sets the appropriate temperature automatically according to the wash program . You can override the preset selection by pressing the WASH/RINSE temperature. button. • The temperature of the water impacts the effectiveness of all laundry additives and therefore, the cleaning results. • We recommend temperatures of: - HOT 120°F (120-140°F) White items, diapers, underclothing and heavily soiled, colorfast items. - WARM 90°F (85-105°F) Most items - COLD 66°F (65-75°F) Only very bright colors with light soil. • When washing in COLD water additional steps may be needed: - Adjust Detergent amount and pre-dissolve Detergent in WARM water - Pretreat spots and stains - Soak heavily soiled items - Use appropriate bleach * Temperature below 18°C (65°F) will not activate laundry additives and may cause lint, residue, poor cleaning, etc. In addition, detergent manufactures and care labels define COLD water as 26~29°C...(80-85°F). If the temperature of the water in the tub is too cold for your hands, the detergent will not activate and clean effectively. Note If iron is present in the water the clothes may become an all-over yellow or they may be stained with brown or orange spots or streaks. Iron is not always visible. Installation of water softener or an iron filter may be necessary for severe cases.
Why replace while you can upgrade or repair? This service and repair manual is used by the Official Certified LG Technicians. It will help you to troubleshoot and repair your washer!
Contents:
Specifications
Installation Instructions
How to Adjust Level
Connecting Water Supply Hose
Connect the Drain Hose
Operating Instructions
Identification of Parts
Before Starting to Wash
Function of Each Button
Washing Programs
Care and Maintenance
Service Information
Wiring Diagram
Schematic Diagram
Test Operation Without Water
Troubleshooting Methods for Common Washing Problems
Troubleshooting Methods According to Error Message
Troubleshooting Without Error Codes
Exploded View
This service manual is very detailed and illustrated with pictures and step-by-step instructions on how to repair/service this device the best way there is!
Please note this is the OFFICIAL service and repair manual in .PDF format, no scanned-in or bootlegged copy. This manual is made in the highest resolution, so when you print the pages you need it is all in great quality!
You can easily print this manual from any printer and any computer!
***INSTANT access*** After your payment, you will have instant access to your manual. No shipping fee, no waiting on postal delivery, you can start doing your repairs right away!
Specifications* Language: English Format: .PDF Pages: 51 Platform: Windows and MAC
Looking for a service manual but can't find it anywhere? Please contact us with your request! As you can see we've got the largest & most comprehensive service manual database out there, so a good chance we can help you out!