

iRobot Scooba Service Manual
What's Included?
Fast Download Speeds
Online & Offline Access
Access PDF Contents & Bookmarks
Full Search Facility
Print one or all pages of your manual
iRobot Corporation
8 Crosby Drive, Bedford MA 01730 - Tel 781.430.3000 - Fax 781.430.3001 - www.irobot.com
1
iRobot Scooba
®
Service Manual
Published July 2008
EUROPE:
Scooba (grey bumper)
• 385
USA:
Scooba (blue bumper)
• 330/335/340 (5800)
Scooba (grey bumper)
• 350 (6000)
• 380 (6050)

iRobot Corporation
8 Crosby Drive, Bedford MA 01730 - Tel 781.430.3000 - Fax 781.430.3001 - www.irobot.com
2
Table of Contents
Scooba Service Process __________________________________________________________ 4
01: Customer Call _________________________________________________________________________ 4
02: Scooba Return Procedure ________________________________________________________________ 5
03: Incoming Scooba Inspection______________________________________________________________ 6
04: Scooba Software Download ______________________________________________________________ 7
05: Scooba Built-in-Test (BiT) _______________________________________________________________ 7
06: Scooba Built-in-Test Data Capture _________________________________________________________ 7
07: Scooba Service (Fix or Replace)___________________________________________________________ 7
08: Scooba Battery Test ____________________________________________________________________ 8
09: Scooba Power Supply Test _______________________________________________________________ 8
10: Virtual Wall Test_______________________________________________________________________ 8
11. Re-Pack Scooba _______________________________________________________________________ 8
Scooba Floor Washing Robot _____________________________________________________ 9
Scooba Terminology _________________________________________________________________ 9
Normal behavior _________________________________________________________________________ 11
End of cycle – drying mode ________________________________________________________________ 12
Scooba – Bottom Chassis __________________________________________________________________ 13
Scooba – Top Chassis _____________________________________________________________________ 14
Scooba – Tank and Brush __________________________________________________________________ 15
Service Procedure (based on Built-in-Test) _____________________________________________ 17
BiT 0 - Panel LEDS ______________________________________________________________________ 17
BiT 1 – External Watch Dog Test____________________________________________________________ 17
BiT 2 – Bumper switch and Board rev ________________________________________________________ 18
BiT 3 – Side Cliff Sensors _________________________________________________________________ 18
BiT 4 – Front Cliff and Wall Sensors _________________________________________________________ 19
BiT 5 – Side Wheel Drops _________________________________________________________________ 19
BiT 6 – Front Wheel Drop & Stasis __________________________________________________________ 20
BiT 7 – Tank, Filter and Cleaning Head Sensors ________________________________________________ 21
BiT 8 – Light Sensor______________________________________________________________________ 22
BiT 9 – RCON Infrared Receiver ____________________________________________________________ 22
BiT 10 – Main Brush _____________________________________________________________________ 22
BiT 11 – Vacuum ________________________________________________________________________ 23
BiT 12 – Pump __________________________________________________________________________ 24
BiT 13 – Tank Level Sensors _______________________________________________________________ 25
BiT 14 to 15 – Left & Right Wheel __________________________________________________________ 26
BiT 16 – Wheel Encoders __________________________________________________________________ 26
BiT 17 – Charger Detector _________________________________________________________________ 27
BiT 18 – Battery Sensor ___________________________________________________________________ 27
BiT 19 to 23 – Charger tests ________________________________________________________________ 27
BiT 24 – Software Version _________________________________________________________________ 27
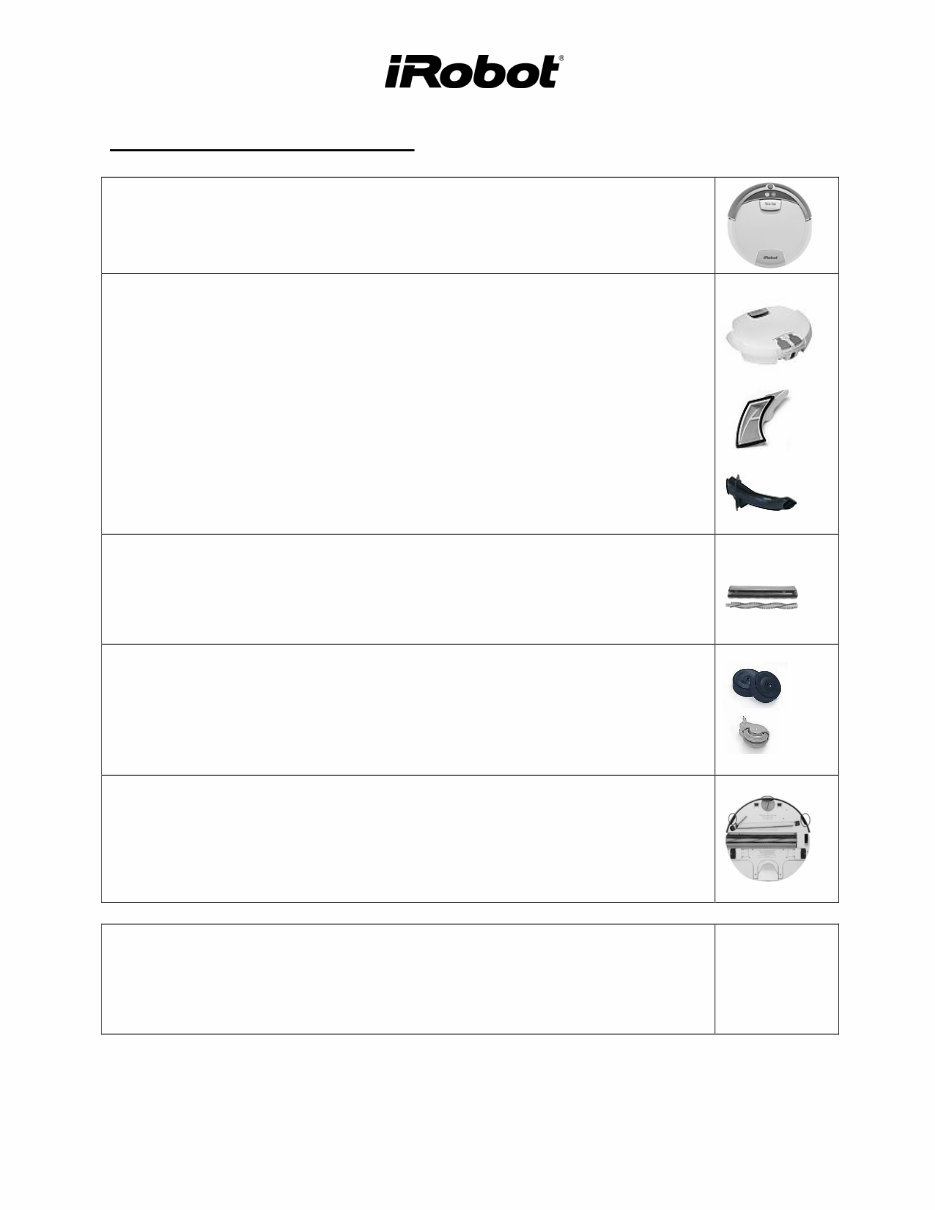
Scooba Accessories ____________________________________________________________ 28
Scooba Battery ____________________________________________________________________ 29
General Battery Maintenance Tips ___________________________________________________________ 30
Battery Troubleshooting ___________________________________________________________________ 30
Scooba Power Supply _______________________________________________________________ 31
Power Supply Troubleshooting______________________________________________________________ 32
Scooba Charger Base _______________________________________________________________ 33

iRobot Corporation
8 Crosby Drive, Bedford MA 01730 - Tel 781.430.3000 - Fax 781.430.3001 - www.irobot.com
3
Charger Base Troubleshooting ______________________________________________________________ 33
Scooba Virtual Wall ________________________________________________________________ 34
Virtual Wall Troubleshooting _______________________________________________________________ 35
Appendix A: Troubleshooting Flowchart via Telephone _______________________________ 36
Appendix B : User Panel Lights __________________________________________________ 37
Service Light____________________________________________________________________________ 37
Power Button and Light ___________________________________________________________________ 37
Clean Button and Light ____________________________________________________________________ 37
Check Tank Light________________________________________________________________________ 38
Check Brush Light _______________________________________________________________________ 38
I’m Stuck Light _________________________________________________________________________ 38
Appendix C: Scooba Serial Number Format ________________________________________ 39
Appendix D: Scooba Error Codes _________________________________________________ 40
Appendix E: Scooba OSMO _____________________________________________________ 45
OSMO Download Procedure _______________________________________________________________ 45
Appendix F: Scooba Built-in-Test_________________________________________________ 46
Scooba Built-in-Test Procedure _____________________________________________________________ 46
iRobot Data Capture ______________________________________________________________________ 50
Alternative Data Capture (without iRobot software) _____________________________________________ 50
Appendix G: Scooba Built-in-Test Limits ___________________________________________ 51
Appendix H: Battery Test Procedure ______________________________________________ 52
Appendix I: Power Supply Test Procedure __________________________________________ 53
Appendix J: Suggested Maintenance Procedure _____________________________________ 54
Scooba Dry Vacuum Squeegee Replacement ___________________________________________________ 54
Scooba Cleaning Head Disassembly__________________________________________________________ 55
Scooba Wheel Replacement ________________________________________________________________ 56
Scooba Chassis Disassembly _______________________________________________________________ 57
Appendix K: Glossary __________________________________________________________ 61
iRobot Corporation
8 Crosby Drive, Bedford MA 01730 - Tel 781.430.3000 - Fax 781.430.3001 - www.irobot.com
4
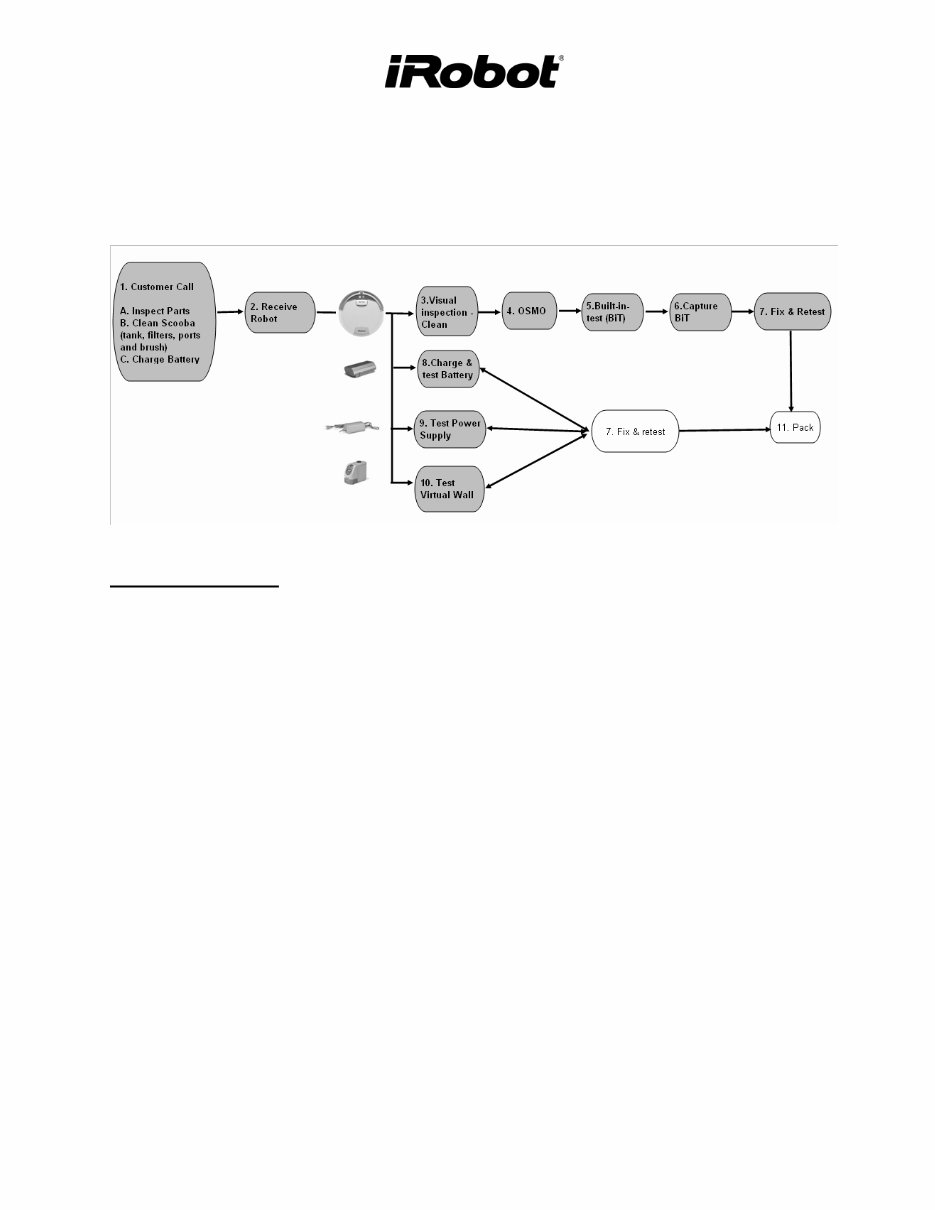
Scooba Service Process
This manual details the steps of a Scooba Service Procedure.
01: Customer Call
Scooba issues can be examined over the telephone by guiding a customer through a
troubleshooting process (see Appendix A and Appendix D). At a minimum, the customer should
be asked to perform the following troubleshooting steps:
A) Inspect proper placement of :
1. Brush, Battery, Filter, Vacuum Flow Tube, and Tank
B) Clean Scooba
1. Clean the cliff sensors under the bumper with compressed air.1
2. Remove any hair or obstruction from the wheels.2
3. Remove any hair or obstruction from the brushes.3
4. Clean out the filter and tube.4
5. Rinse the tank and refill the clean before running. 5
C) Perform a ‘Battery Reset’ (not applicable to customers that use a Charging Base).
1. Unplug Scooba from Power Supply and take the battery out.
2. Press the POWER button for 5 seconds
3. Reseat the Battery.
4. Wait 5 seconds and plug the Power Supply into Scooba.
5. Charge the Battery fully.
iRobot Corporation
8 Crosby Drive, Bedford MA 01730 - Tel 781.430.3000 - Fax 781.430.3001 - www.irobot.com
5
02: Scooba Return Procedure
If the initial troubleshooting steps do not solve the issue, have the customer send the Scooba and
all accessories to a service repair center. The customer should add documentation that provides the
date, their name, address, a reference number and a description of the complaint.
o Avoid receiving a depleted Battery. Ask customer to remove the Battery from Scooba and
place it separately in the box.
o Avoid water leakage during shipment. Ask customer to drain the Tank and place it in a thin
plastic bag before shipping.
1
2
3
4
5
iRobot Corporation
8 Crosby Drive, Bedford MA 01730 - Tel 781.430.3000 - Fax 781.430.3001 - www.irobot.com
6
03: Incoming Scooba Inspection
Perform a general outer visual inspection of Scooba’s condition. Look for wear
on the Bumper and Wheels.
Remove the Tank and ensure that the Filter and the Vacuum Flow Tube are
properly inserted.
Tank:
o Add water into both dirty and clean Tank. Shake and pour out.
o Add water through the four bottom Tank ports. Shake and pour out.
Filter and Tube:
o If dirty, clean the Filter and Tube through running water.
Inspect the Brushes:
o Ensure the cleaning head is properly inserted in the chassis.
o If dirty, open the cleaning head and clean the brush.
Inspect the Wheels:
o Inspect the drive Wheels. Bounce and turn them for equal resistance.
o Inspect front Caster. Make sure it spins freely, pivots and rotates. Remove
the wheel and look for dirt.
Inspect the Cliff and Wall Sensors:
o If dirty, clear them with compressed air.
o Reinsert the Scooba components.
o Insert a charged Battery in Scooba
o Add some water in the clean Tank.
o Run Scooba and see if it ends immediately with an error code.
Appendix D
iRobot Corporation
8 Crosby Drive, Bedford MA 01730 - Tel 781.430.3000 - Fax 781.430.3001 - www.irobot.com
7
04: Scooba Software Download
Download the latest software, if applicable. Make sure Scooba has a charged
Battery.
Appendix E
05: Scooba Built-in-Test (BiT)
It is important that this step only diagnose Scooba failures. For this reason, do not conduct the BiT
test with customer accessories as these can be tested separately.
Insert a charged Battery in Scooba.
Verify that the Filter and Tube are inserted in Scooba.
Insert an empty Tank.
Perform BiT steps. (Use known working Power Supply, Virtual Wall and Remote) Appendix F
06: Scooba Built-in-Test Data Capture
Use ‘iRobot Factory Test Client Version 1.1’ to capture BiT. Appendix F
07: Scooba Service (Fix or Replace)
Repair parts using Built-in-test Fix Steps.
Service
Procedure
chapter
Retest the BiT and continue fixing until BiT passes. Appendix F
iRobot Corporation
8 Crosby Drive, Bedford MA 01730 - Tel 781.430.3000 - Fax 781.430.3001 - www.irobot.com
8
08: Scooba Battery Test
Fully charge the returned Scooba Battery.
Test the returned Battery
o Battery Voltage Test
o Battery Voltage Drop Test
Appendix H
&
Battery
chapter
Optional : Discharge the Battery by running it in a Scooba or using a battery
discharger (discharge the Battery at a constant 2.9V to 1V per cell). The
discharge time should be about 60 minutes. If not, replace the Battery.
09: Scooba Power Supply Test
Test returned Power Supply
o Output Voltage
o Solid green light under load
Appendix I
&
Power Supply
chapter
If the Power Supply light is off or blinking while charging, replace the Power
Supply.
10: Virtual Wall Test
Test returned Virtual Wall
o Insert charged batteries, if its light is blinking
o Clean Virtual Wall (IR emitter)
Troubleshoot
Virtual Wall
(pg 37)
11. Re-Pack Scooba
To avoid depleting the Battery during shipment, do not ship Scooba back with
the Battery inserted in Scooba. Wrap the Battery separately.
Also, remove any water left in the Tank. Use the Scooba Bulb to remove the
water that will not come out
naturally.
iRobot Corporation
8 Crosby Drive, Bedford MA 01730 - Tel 781.430.3000 - Fax 781.430.3001 - www.irobot.com
9
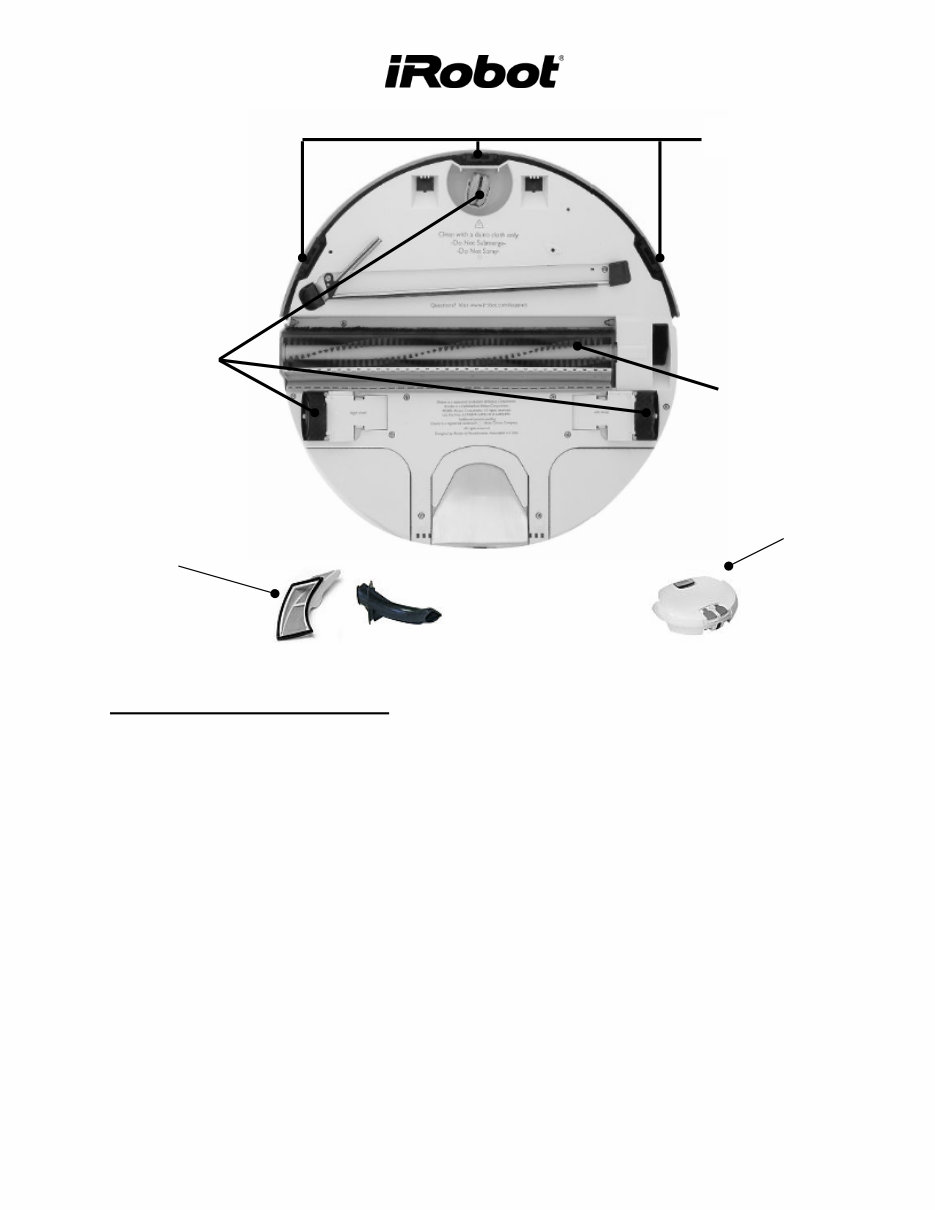
Scooba Floor Washing Robot
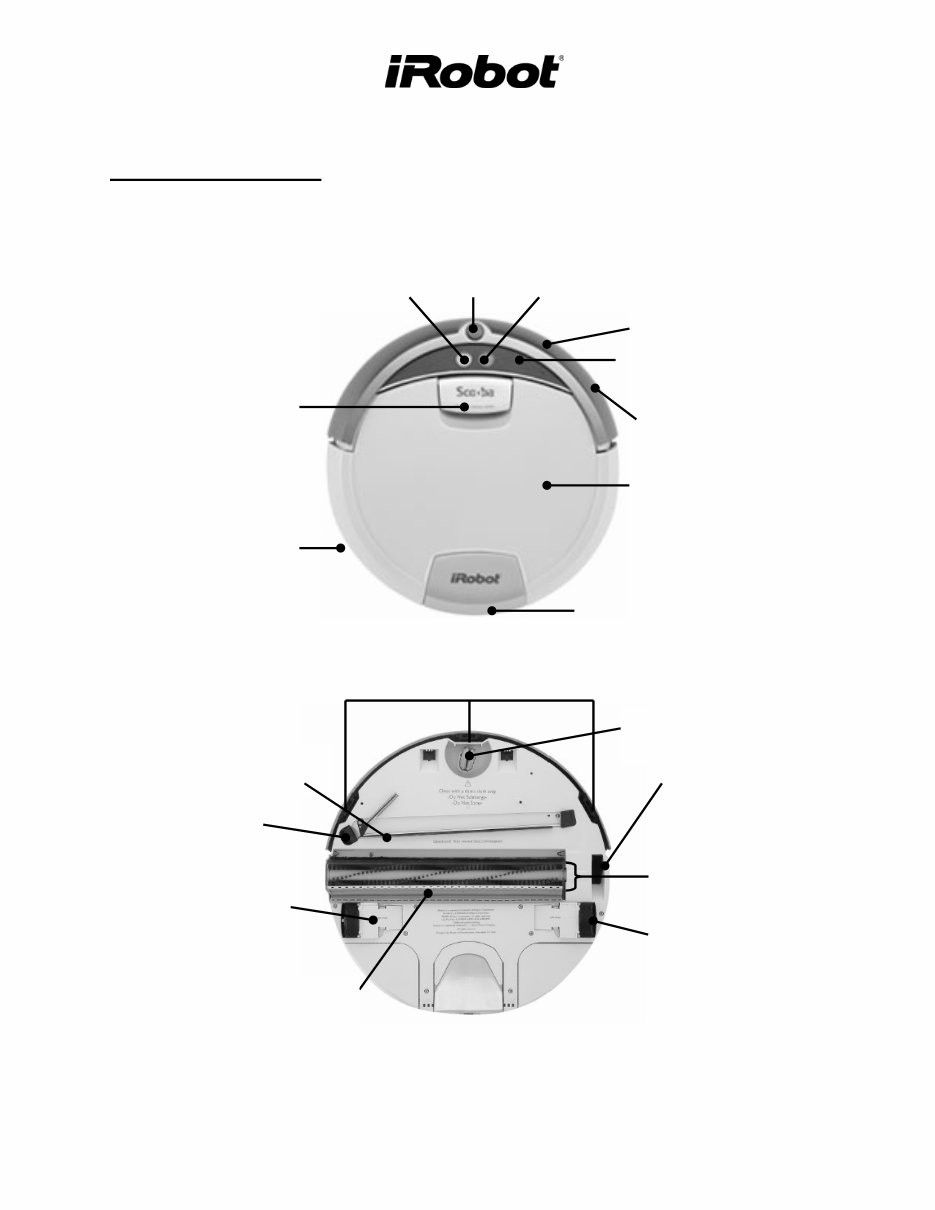
Scooba Terminology
User Interface (UI)
Wall Sensor
Bumper
Clean
button
RCON –
Virtual Wall
Sensor
Power
button
Handle & Tank Release
Charging
Socket
Tank
Receiver
Dry Vacuum
Squeegee
Tire
Wet Vacuum
Squeegee
Cliff Sensors
Dry Vacuum
Port
Drive Wheel
Front Caster
Air Exhaust
Main Brush
iRobot Corporation
8 Crosby Drive, Bedford MA 01730 - Tel 781.430.3000 - Fax 781.430.3001 - www.irobot.com
10
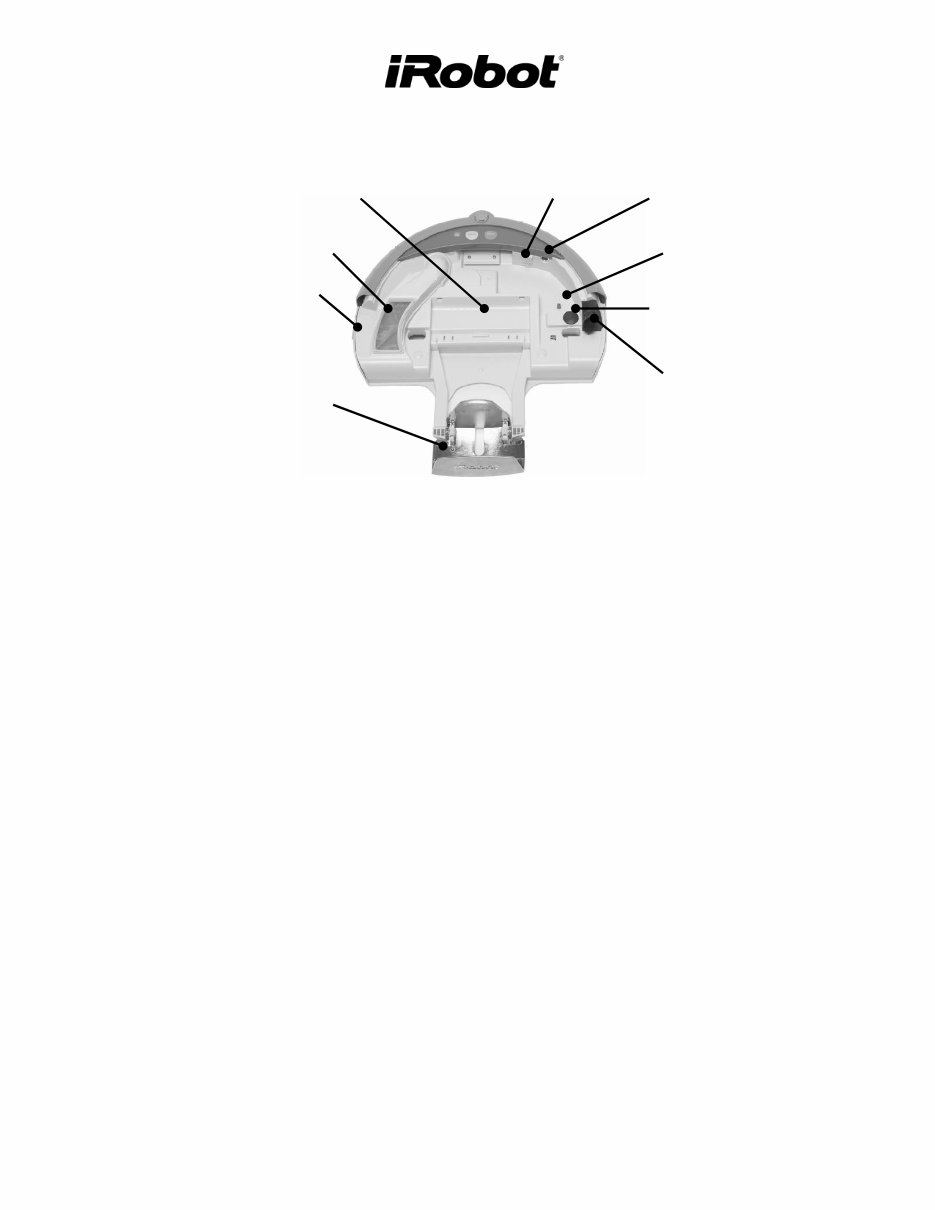
Vacuum Flow
Tube
Brush Eject
Tank Eject
Serial Port
Solution Valve
Sensor
Battery Pocket
Filter
Charging Socket
Tank Receiver
You're Reading a Preview
What's Included?
Fast Download Speeds
Online & Offline Access
Access PDF Contents & Bookmarks
Full Search Facility
Print one or all pages of your manual
$31.99
Viewed 35 Times Today


Secure transaction
What's Included?
Fast Download Speeds
Online & Offline Access
Access PDF Contents & Bookmarks
Full Search Facility
Print one or all pages of your manual
$31.99
The manual covers:
- Europe
- Scooba (grey bumper) 385
- USA
- Scooba (blue bumper) 330/335/340 (5800)
- Scooba (grey bumper) 350 (6000)
- Scooba (grey bumper) 380 (6050)
Need more information to fix or restore your device? This is the perfect manual for you. These manuals are used by experts and technicians and are model specific, not generic. Prevent yourself from being cheated by unethical repairmen by getting this manual.
The manual contains detailed information about your product.
This manual will be made available instantly upon completion of payment. No more waiting for days for unreliable post. Also, print only the pages you need.


