

BAUER COMPRESSOR MASTER Workshop Manual
What's Included?
Fast Download Speeds
Online & Offline Access
Access PDF Contents & Bookmarks
Full Search Facility
Print one or all pages of your manual
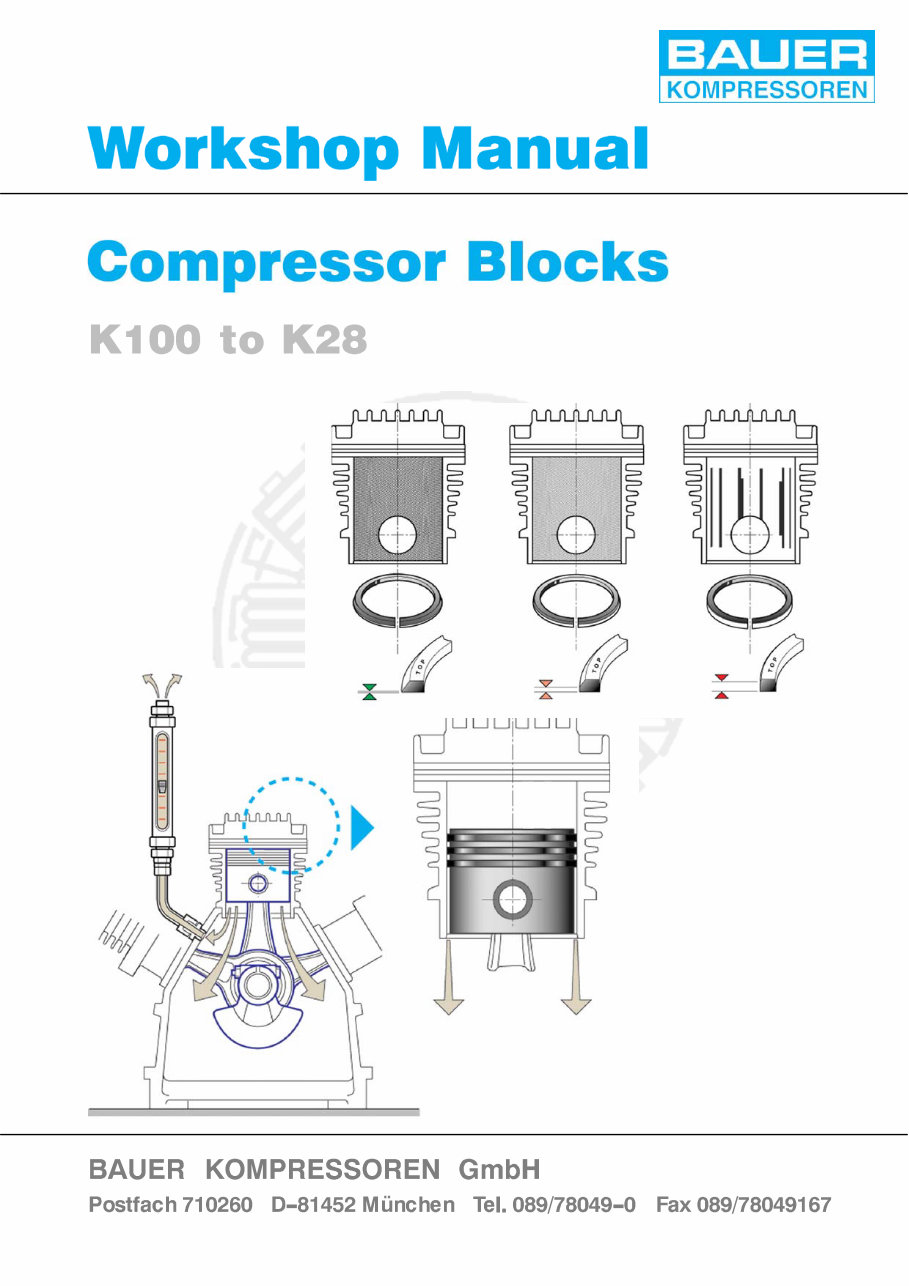


Workshop Manual
3
Table of contents
1. Preface 7 .................................................................
2. Important Notes 8 ........................................................
2.1. Safety notes: 8 ..........................................................................
2.2. For spare parts orders please observe: 8 ...................................................
2.3. Please do not pollute the environment: 8 ....................................................
2.4. Change notice 9 .........................................................................
3. Tables 10 ..................................................................
3.1. Torque values 10 .........................................................................
3.2. TORQUE SEQUENCE 13 .................................................................
3.3. Tubing and pipe connections 14 ............................................................
3.4. LUBRICATION CHART 19 .................................................................
3.5. ADHESIVE AND SEALANT CHART 19 ......................................................
3.6. TESTING AGENTS 19 ....................................................................
3.7. SPECIAL TOOLS 20 ......................................................................
4. Valves 22 ..................................................................
4.1. Valve maintenance -- Wear limits 22 .........................................................
4.2. Valve maintenance -- general notes 23 .......................................................
4.3. Compressor Blocks IK100 II, IK120 II, BK12.2 II; U/C/M II 24 ...................................
4.4. COMPRESSOR BLOCK IK12.14 II 31 .......................................................
4.5. COMPRESSOR BLOCK IK150 mod. 9, IK180 mod. 4 37 ......................................
4.6. COMPRESSOR BLOCK IK18.1 41 .........................................................
4.7. COMPRESSOR BLOCKS IK150 II mod. 10, IK15.1 II mod. 11, IK15.11 II mod. 1, IK180 II mod. 5, IK18.1
II mod. 4 44 ..............................................................................
4.8. COMPRESSOR BLOCK K22 51 ............................................................
4.9. COMPRESSOR BLOCK K23 58 ............................................................
4.10. COMPRESSOR BLOCKS K25, K28 66 ......................................................
4.11. KOMPRESSORBLOCK IK22.2 74 ..........................................................
4.12. COMPRESSOR BLOCK IK22.5 78 .........................................................
4.13. COMPRESSOR BLOCK IK23.4 80 .........................................................
4.14. COMPRESSOR BLOCKS IK25.4, IK28.2 84 .................................................
4.15. COMPRESSOR BLOCK IK25.5, IK28.3 89 ...................................................
5. Wear and tear assessment of piston rings, pistons and cylinders 90 ..........
5.1. Procedure 90 ............................................................................
5.2. Blow--By Test 90 ..........................................................................
5.3. Blow–By Table 92 .........................................................................

Workshop Manual
4
Table of contents
6. Cylinders and Pistons 93 ...................................................
6.1. General 93 ...............................................................................
6.2. Wear characteristics on piston rings: 94 ......................................................
6.3. Wear characteristics on cylinders: 95 ........................................................
6.4. Wear characteristics on pistons: 95 .........................................................
6.5. Piston ring gap test 97 .....................................................................
6.6. Mounting instructions for piston rings 98 .....................................................
7. Oil quantities 99 ...........................................................
8. Condensate valves 100 ......................................................
9. Pressure maintaining valves 105 .............................................

Workshop Manual
5
Table of figures
Fig. 1 Stepped piston 11 .................................................................
Fig. 2 Taper--Lockt bushing 12 ............................................................
Fig. 3 Torque sequence 13 ...............................................................
Fig. 4 Special tools 20 ...................................................................
Fig. 5 Valve head 1st stage, IK100 25 .....................................................
Fig. 6 Valve head 1st stage, IK120 II 25 ...................................................
Fig. 7 Valve, 2nd stage 26 ...............................................................
Fig. 8 Removing the intake valve 27 .......................................................
Fig. 9 Unscrewing the cap nut 28 .........................................................
Fig. 10 Removing the screw--in pressure plug 28 .............................................
Fig. 11 Securing the intake valve 29 ........................................................
Fig. 12 Valve head 3rd stage 30 ...........................................................
Fig. 13 Removal of 3rd stage pressure valve 30 .............................................
Fig. 14 Valves 2nd stage 31 ...............................................................
Fig. 15 Valves 3rd stage 32 ...............................................................
Fig. 16 Removing the intake valve 32 .......................................................
Fig. 17 Unscrewing the cap nut 33 .........................................................
Fig. 18 Removing the screw--in pressure plug 33 .............................................
Fig. 19 Securing the intake valve 34 ........................................................
Fig. 20 Valve head 4th stage 35 ...........................................................
Fig. 21 Removal of 4th stage pressure valve 36 ..............................................
Fig. 23 Valve head and valves, 2nd/3rd stage 38 .............................................
Fig. 24 Valve head and valves, 4th stage 40 .................................................
Fig. 25 Valve head and valves, 2nd stage 41 ................................................
Fig. 26 Valve head 4th/5th stage 42 ........................................................
Fig. 27 Removal of 4th/5th stage pressure valve 43 ..........................................
Fig. 28 Valve head and valves, 1st stage 45 .................................................
Fig. 29 Valve head and valves, 2nd/3rd stage 46 .............................................
Fig. 30 Valve head and valves, 2nd stage IK18.1 II 47 ........................................
Fig. 31 Removing the intake valve 48 .......................................................
Fig. 32 Securing the intake valve 49 ........................................................
Fig. 33 Valve head 4th/5th stage 50 ........................................................
Fig. 34 Removal of 4th/5th stage pressure valve 50 ..........................................
Fig. 35 Valve head and valves, 1st stage 52 .................................................
Fig. 36 Cylinder, 1st/2nd stage with 2nd stage valves 53 ......................................
Fig. 37 Valve head and valves, 3rd stage 55 .................................................
Fig. 38 Valve head and valves, 4th stage 57 .................................................
Fig. 39 Valve head, 1st stage 58 ...........................................................
Fig. 40 Valves, 1st stage 59 ...............................................................
Fig. 41 2nd stage valve head 60 ...........................................................
Fig. 42 2nd stage valves 61 ...............................................................
Fig. 43 Cylinder, 3rd stage and valve head 62 ...............................................
Fig. 44 Valve head and valves, 3rd stage 62 .................................................
Fig. 45 Cylinder and valve head, 4th stage 63 ...............................................
Fig. 46 Valve head and valves, 4th stage 64 .................................................
Fig. 47 Valve head and valves, 1st stage 66 .................................................
Fig. 48 Valve head and valves, 2nd stage 68 ................................................
Fig. 49 Valve head and valves, 3rd stage 70 .................................................

Workshop Manual
6
Table of figures
Fig. 50 Valve head and valves, 4th stage 72 .................................................
Fig. 51 Valve head and valves, 1st stage 75 .................................................
Fig. 52 Valve head and valves, 2nd stage 76 ................................................
Fig. 53 Valve head and valves, 3rd stage 78 .................................................
Fig. 54 Cylinder head 2nd/3rd stage with valve head 2nd stage 80 .............................
Fig. 55 Cylinder 1st/2nd stage with 2nd stage valves 81 ......................................
Fig. 56 Valve head and valves, 3rd stage 82 .................................................
Fig. 57 Valve head 1st stage 84 ............................................................
Fig. 58 Valve head 2nd stage 84 ...........................................................
Fig. 59 Valve head and valves, 1st and 2nd stage 85 .........................................
Fig. 60 Cylinder and valve head 3rd stage 86 ................................................
Fig. 61 Valve head and valves, 3rd stage 87 .................................................
Fig. 62 3rd stage valve head 89 ............................................................
Fig. 63 Blowby test 91 ....................................................................
Fig. 64 Piston rings in a stepped cylinder 93 .................................................
Fig. 65 Wear signs of piston rings 94 .......................................................
Fig. 66 Cylinder wear 96 ..................................................................
Fig. 67 Checking the piston ring gap 98 .....................................................
Fig. 68 Pressure maintaining valve 108 ......................................................
Fig. 69 Pressure maintaining valve, 350 bar units /3600 109 ....................................
Fig. 70 Pressure maintaining valve, 500 bar units 110 .........................................
Fig. 71 Pressure maintaining valve, 90 bar units 111 ..........................................
Workshop Manual
7
1. Preface
This Workshop Manual has been issued for service and repair shops. It describes all dismantling
and assembly procedures required for adjustment and replacement of parts on compressor blocks.
It is presumed that all work is performed by trained specialists. Therefore, all descriptions of basic
procedures have been omitted. The procedures contained in this manual refer to the latest state
of construction of the compressors at date of issue of this manual.
We would like to emphasize that under no circumstances BAUER Kompressoren GmbH will be
held liable for any repair work done by oneself.
For all service and maintenance work please refer to the operating manual applicable for the spe-
cific compressor model.
Not contained in this manual are the BAUER scuba diving compressors Varius, Purus, Utilus 10,
Junior and Oceanus. For those, a separate workshop manual is available.
We reserve the right to make changes to all individual items and accessories according to state
of the art requirements in improving performance or as necessitated by safety or commercial re-
strictions.
Munich,......................January 2003
BAUER--KOMPRESSOREN GmbH
Technical Service Dept.
Technical Documentation Dept.

Workshop Manual
8
2. Important Notes
2.1. Safety notes:
• Always shut down and decompress the complete system prior to carrying out any work on the
compressor.
• Always disconnect electric units from the power supply prior to carrying out any work on the com-
pressor.
• Never repair pressure lines by soldering or welding.
• Never tighten tube connectors under pressure.
2.2. For spare parts orders please observe:
For all spare parts orders the following data are required:
• Type
• Serial no.
• Year of manufacturing
The required data are found on the compressor identification plate of from the the compressor
block number stancelled into the crankcase.
2.3. Please do not pollute the environment:
• The condensate from the filters, and the filter cartridges contain oil and must be disposed of ac-
cording to local regulations.
Workshop Manual
9
2.4. Change notice
Change no. Date of change
0 January 2003; basic edition
Dear customer
We are happy to give you advice on any questions regarding your BAUER compressor and help
as soon as possible with any arising problems.
You can contact us Mondays to Thursdays from 08
00
till 16
30
, Fridays from 08
00
till 14
00
on phone
no. (089) 78049--0.
If you call the following extensions directly, it will save you time and repeated dialling.
Do you want to order spare parts?
. Customer service Phone no: (089) 78049--129 or --149
Fax no: (089) 78049--101
Do you have problems with maintenance or repair work?
. Technical customer service Phone no: (089) 78049--246 or --176
Fax no: (089) 78049--101
Do you need further information regarding your unit, accessories, prices etc.?
. Sales department Phone no: (089) 78049--138, --185, --154, --205 or --202
Fax no: (089) 78049--103
Are you interested in any training courses?
. Training manager Phone no: (089) 78049--175
Fax no: (089) 78049--103
Meet us in the internet at: www.bauer--kompressoren.de
Workshop Manual
10
3. Tables
When doing any repair work please check that at all screws and bolts are tightened with the correct
torque values.
3.1. Torque values
Unless otherwise specified in text, the following torque values apply.
All valve head screws require torque wrench tightening! The indicated
torque values are valid for bolts in greased condition. Replace self--
retaining nuts on reassembly.
Standard Bolts and screws Thread Max. torque
Hex and allen head M6 10 Nm (7 ft.lbs)
Hex and allen head M 8* 25 Nm* (18 ft.lbs)
Hex and allen head M 10 45 Nm (32 ft.lbs)
Hex and allen head M 12 75 Nm (53 ft.lbs)
Hex and allen head M 14 120 Nm (85 ft.lbs)
Hex and allen head M 16 200 Nm (141 ft.lbs)
Special screws Thread Max. torque
Intake valve 07790 M 14x1 30 Nm (21 ft.lbs)
Intake valve fitting 12841 M 28x1,5 60 Nm (42 ft.lbs)
Pressure valve fitting 14124 M 28x1,5 30 Nm (21 ft.lbs)
Studs (pressure valves --small blocks) M 8x1
M 8x1,25
15 Nm (11 ft.lbs)
Studs (Intake/pressure valves -- big
blocks)
M 10 35 Nm (25 ft.lbs)
Studs (Intake/pressure valves -- big
blocks)
M 12 50 Nm (35 ft.lbs)
Studs (Intake/pressure valves -- big
blocks)
M 14 80 Nm (64 ft.lbs)
* Exception: mounting bolts of final pressure safety valve: 10 Nm
You're Reading a Preview
What's Included?
Fast Download Speeds
Online & Offline Access
Access PDF Contents & Bookmarks
Full Search Facility
Print one or all pages of your manual
$41.99
Viewed 44 Times Today


Secure transaction
What's Included?
Fast Download Speeds
Online & Offline Access
Access PDF Contents & Bookmarks
Full Search Facility
Print one or all pages of your manual
$41.99
The Bauer Compressor Master Workshop Manual is a comprehensive guide for car repair, suitable for both professional mechanics and DIY enthusiasts. This manual is available in a printable PDF format, compatible with all versions of Windows, Mac, and Linux operating systems. It provides instant high-speed access and requires Adobe Reader for viewing. The manual is designed to be easy to understand and navigate, making it an essential resource for maintaining and repairing vehicles.


