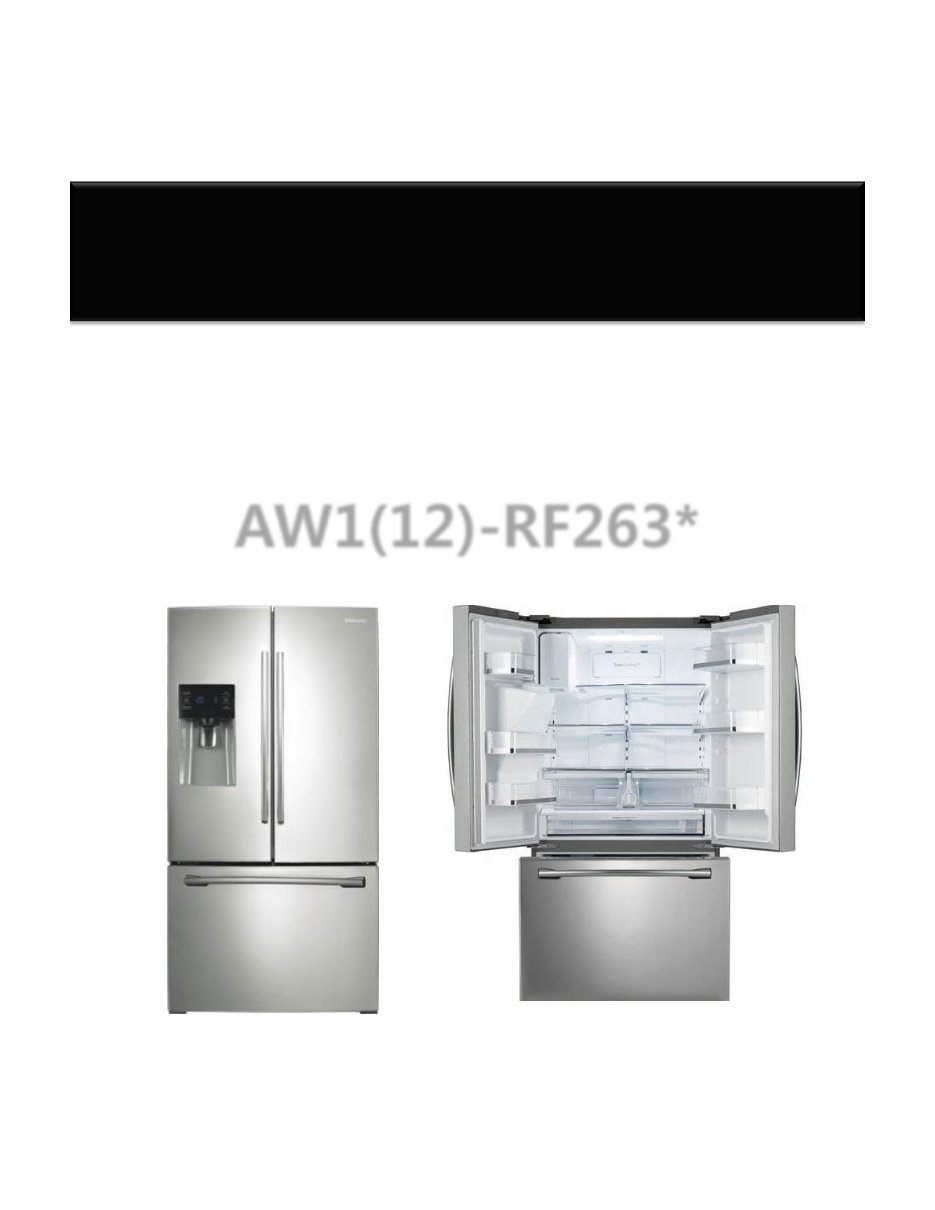
- 1/65 - HA Repair Guide Refrigerator AW1(12)-RF263*
- 2/65 - • NO Ice / Dispensing problem • Not Enough Ice No Ice • No Water / Water Dripping • Water Leak No Water • Evaporator Frost Buildup Defrost • Water Hose Noise • Unit Noise Noise • Weak Cooling (F/R) • Too Much Cooling COOLING • Error Code Detail Error Code AW1(12)PJT Repair Guide [ RF263* ]
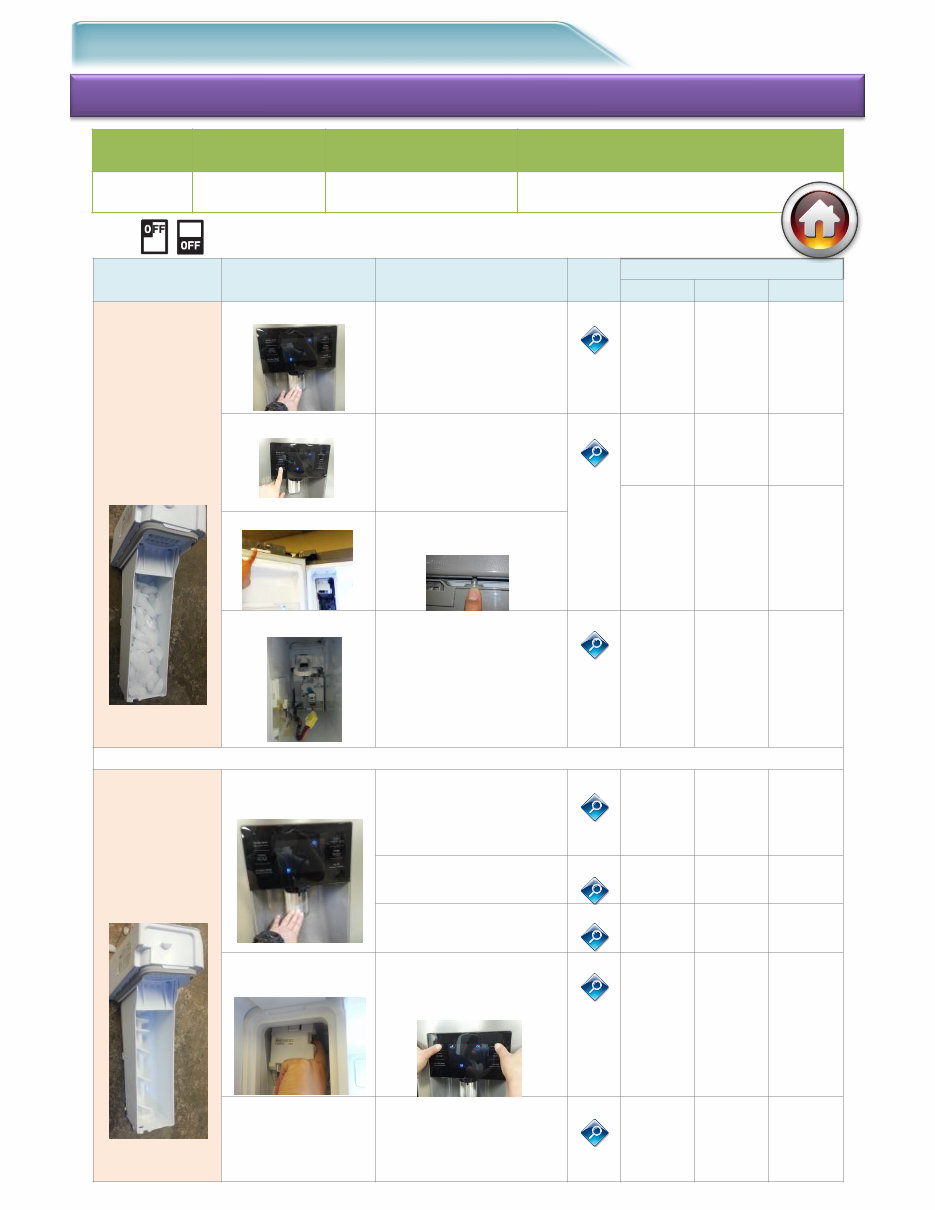
- 3/65 - ● Ice #1. Symptom : No Ice Repair distribution diagram Check-1 Reason Step Check-2 Tip Code Block # 1 # 2 # 3 Ice Bucket Full (Dispensing problem) Display Issue Inspect Display Water & Ice selecting 1-1 Panel- PBA Wire Harness Main PBA Lever S/W problem Inspect Lever S/W operation 1-2 Panel- PBA Wire Harness Ice Bucket Auger Motor S/W Wire Harness Auger S/W failure Inspect Auger Motor S/W operation Auger Motor Prob Inspect ASSY Auger Motor operation 1-3 ASSY Auger Motor Wire Harness Main PBA Ice Bucket Empty (Ice making problem) Ice maker water supply issue Inspect Water connection / supply 2-1 External Conn. (water supply) Water Hose Filter Ice Full sensing failure 2-2 IR Sensor Wire Inspect Ice Valve operation 2-3 Wire Harness Ice Valve Ice maker/ Sensor / Fan Motor issue Self-diagnosis Display “Energy Saver” +”Alarm” 2-4 Ice Maker, Sensor, Fan Damper Wire Harness Main PBA Cooling power failure (Ice melting in Tray) Measure cooling power inspection Comp / Fan motor inspection 2-5 Comp Relay Cycle Shield System C-fan Chassis Project Basic Model Type FDR AW1-12 RF263* Direct Ice Maker ※ Check the Display as “ICE off”
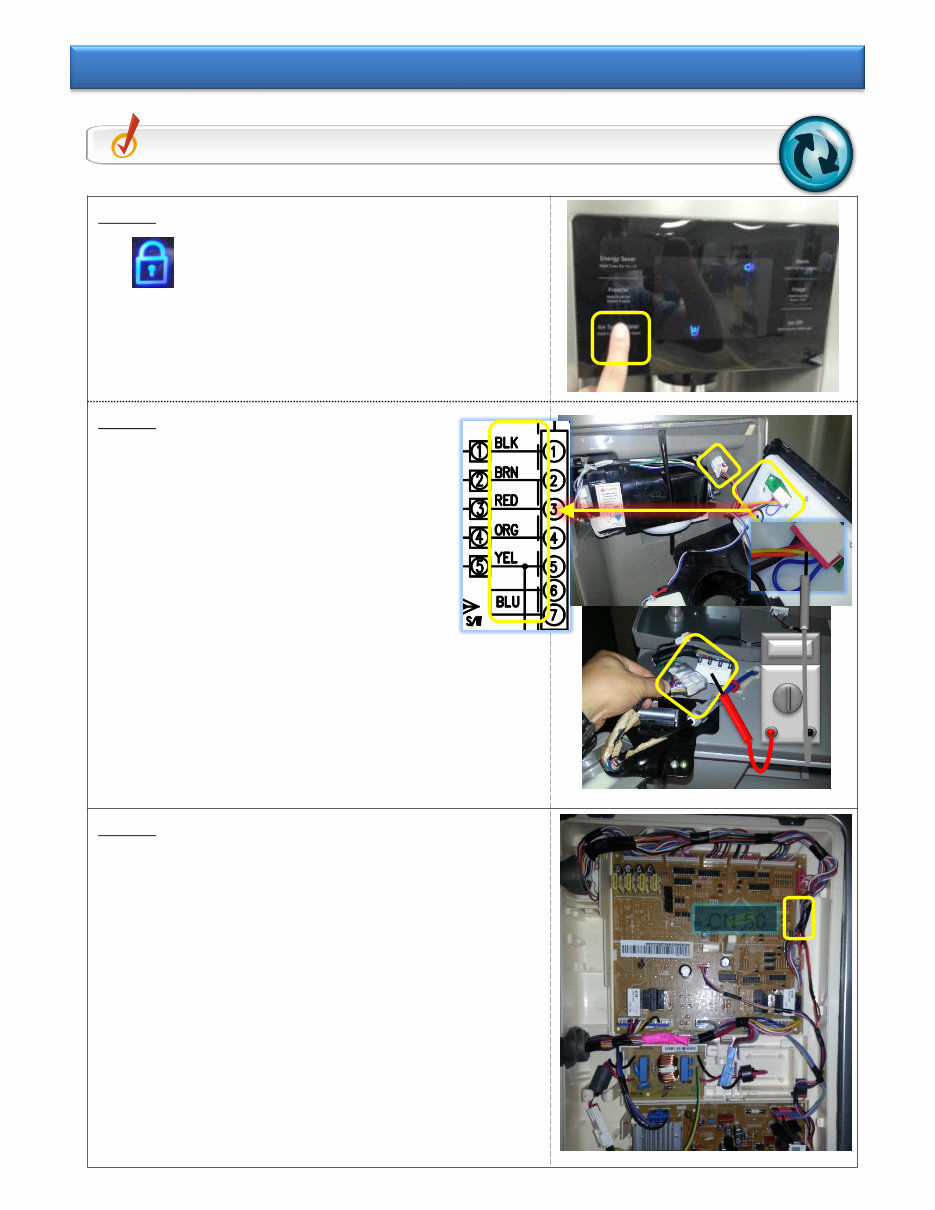
- 4/65 - Step 1 ① Check for “Child Lock” icon ② Check “Ice Type/Water” Key. - If it is normal Inspect “ Tip 1-2” - If it is abnormal Inspect Step 2 Step 2 ① Check PANEL PBA WIRE HARNESS Pin connection / switching - Inspection of 1~5Wire Verify that the wires are in the correct order in the connector ① Disassemble the HINGE-UPP COVER, check the WIRE HARNESS Pin connection/switching connection and verify the correct sequence - Inspect BLK / BRN / RED / ORG / YEL Wire Step 3 ① Disassemble Main PBA Cover in the back Inspect CN50 ①~⑤Wire Pin contacting and switching - BLK / BRN / RED / ORG / YEL Verify that the wires are in the correct order in the connector ① If there is no problem on all, - Replace the PANEL PBA Check Point Check the “Ice Type/Water” Key selecting operation. Tip 1-1. Inspect Display “Ice Type / Water” selecting CN 50
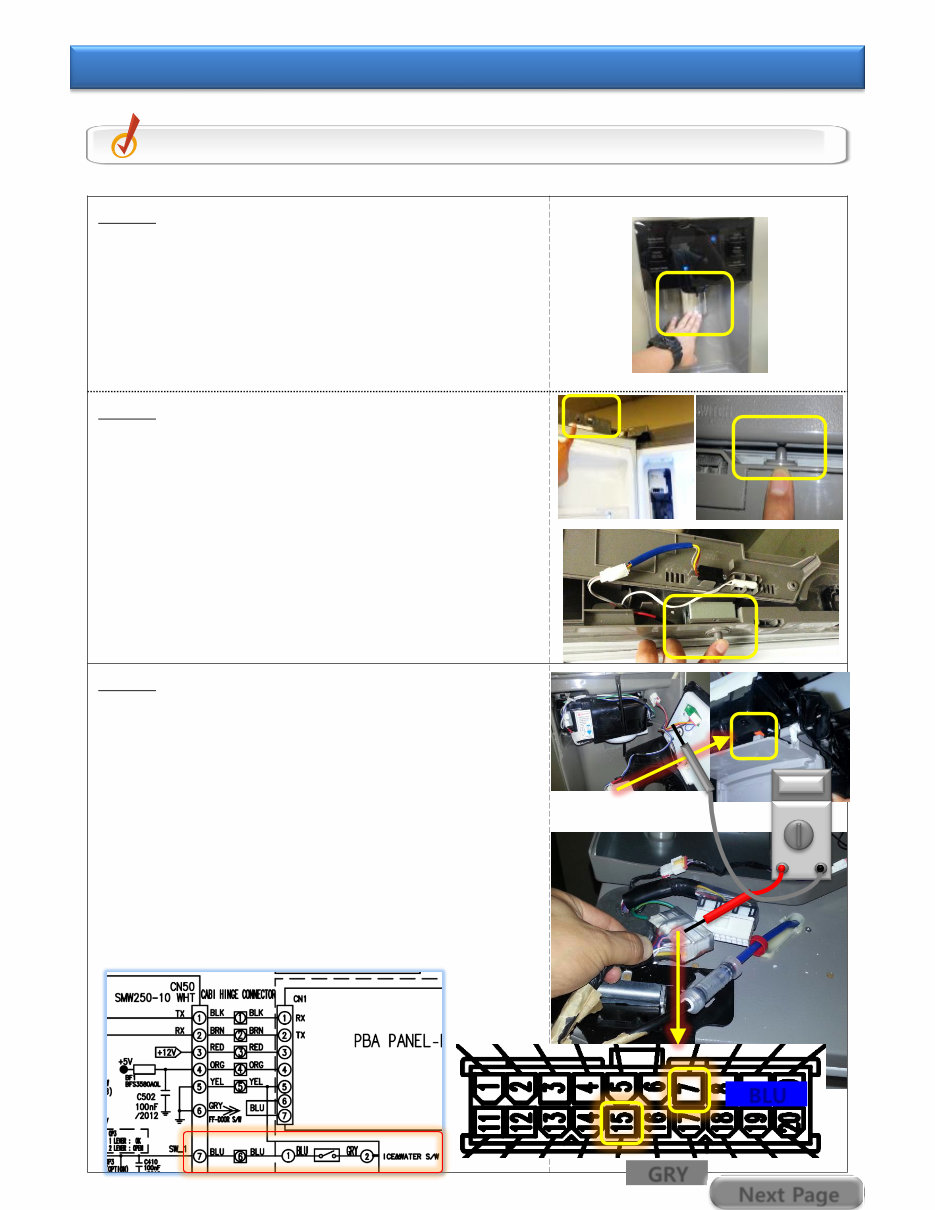
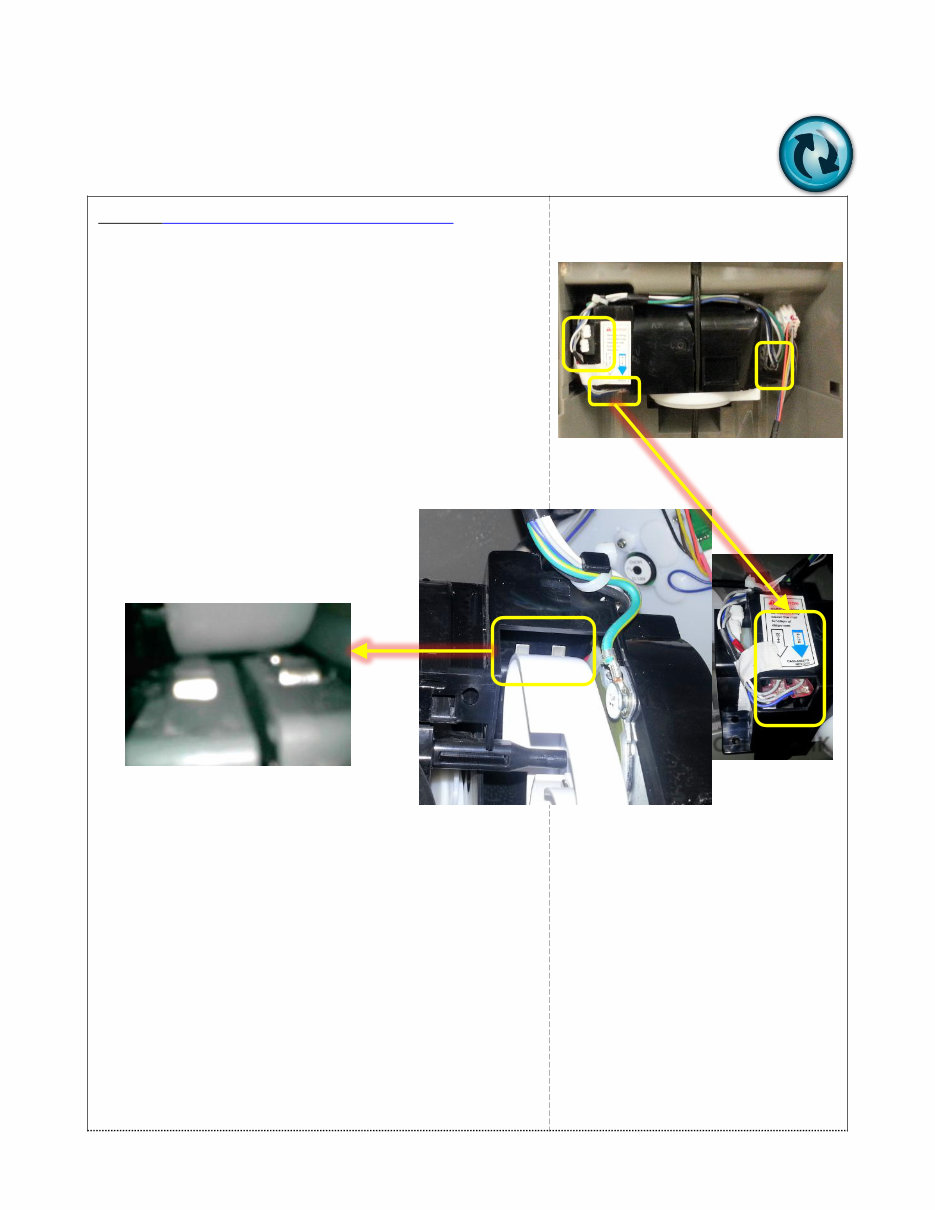
- 5/65 - Step 1 ① Push the DISPENSER LEVER to check Auger Motor rotating sound. Auger motor is in the Ice Room. - If No operation sound, go to Step 2 inspection - If operation sound, go to Step 4 inspection Step 2 ① Check Auger Motor S/W that is on the top of Left FF Section Door. - Inspect S/W with F room door closed ② Using an Ohmmeter, check for“0Ω” with the S/W plunger pushed in by hand. ※ If the door S/W has failed, the auger motor cannot work. Step 3 ① Disassemble the Display and check the Micro LED S/W, located at the back of the Lever. ※ (Check for broken or stuck switches) When there is no problem found, ① Disassemble HINGE-UPP COVER, and check the WIRE HARNESS connection - Inspect CONNECTOR No.7(BLU)+No.15(GRY) ② Inspect Main PBA Connector - Inspect CN50 No.5(YEL) and No.7(BLU) Wire Check Point Inspect the Dispenser Lever S/W operation. Tip 1-2. Inspect Lever S/W & Auger Motor S/W operation BLU GRY Next Page
- 6/65 - Step 3 (COVER ICE ROUTE S/W failure) ① When COVER open as failure of operation ② Inspect the CONNECTOR OPEN ③ Inspect the MOTOR S/W TOUCH failure - Rotate continuously when both 2 S/W are not pushed ④ Inspect BLUE / WHITE S/W exchanging ⑤ Replace ASSY CASE-LEVER DISP . COLOR CHK
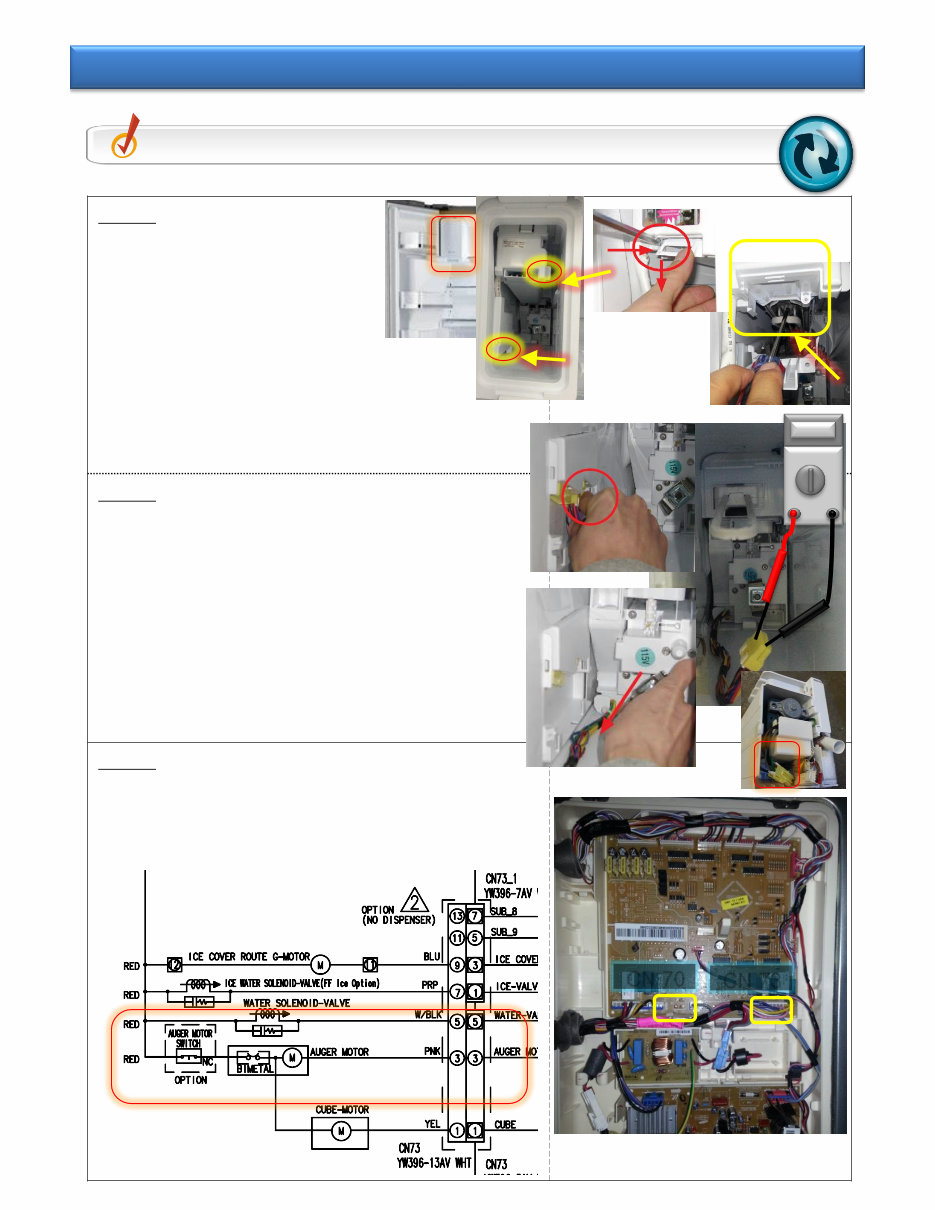
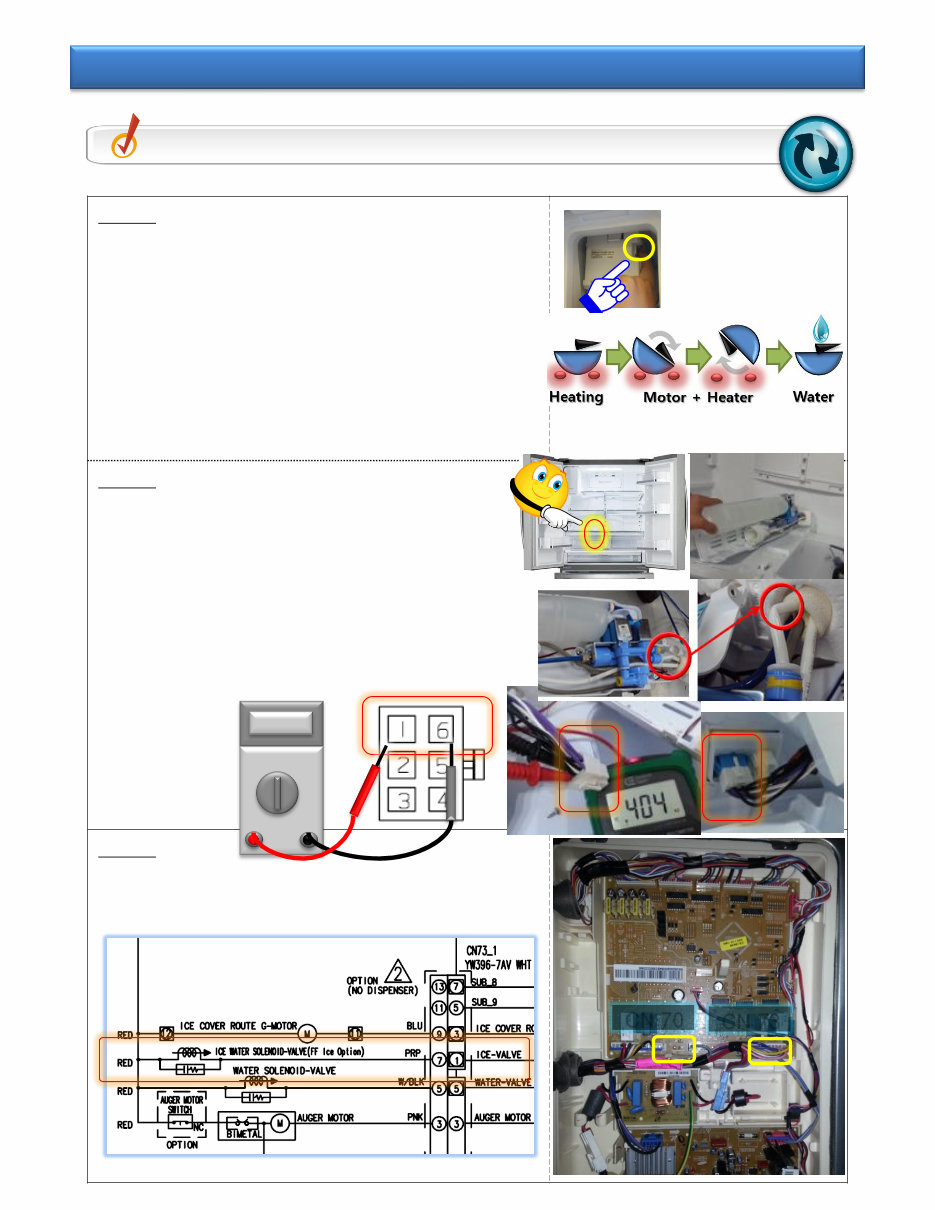
- 7/65 - Step 1 ① Remove the Ice bucket in ice room ① Remove 2 screws as shown ② Remove the ice maker after pulling the cooling pipe which is in the bottom of ice maker. Step 2 ① Remove the Auger Motor and inspect the Motor - Normal = GRY+BLK 3~5 Ω - Defective = Open or 0 Ω Step 3 ① Inspect the Main PBA + CONNECTOR Wire - CN73 No.3(PNK) + CN70 No.5(RED) Check Point Inspect the Auger Motor . Tip 1-3. Inspect ASSY Auger Motor operation CN 73 CN 70
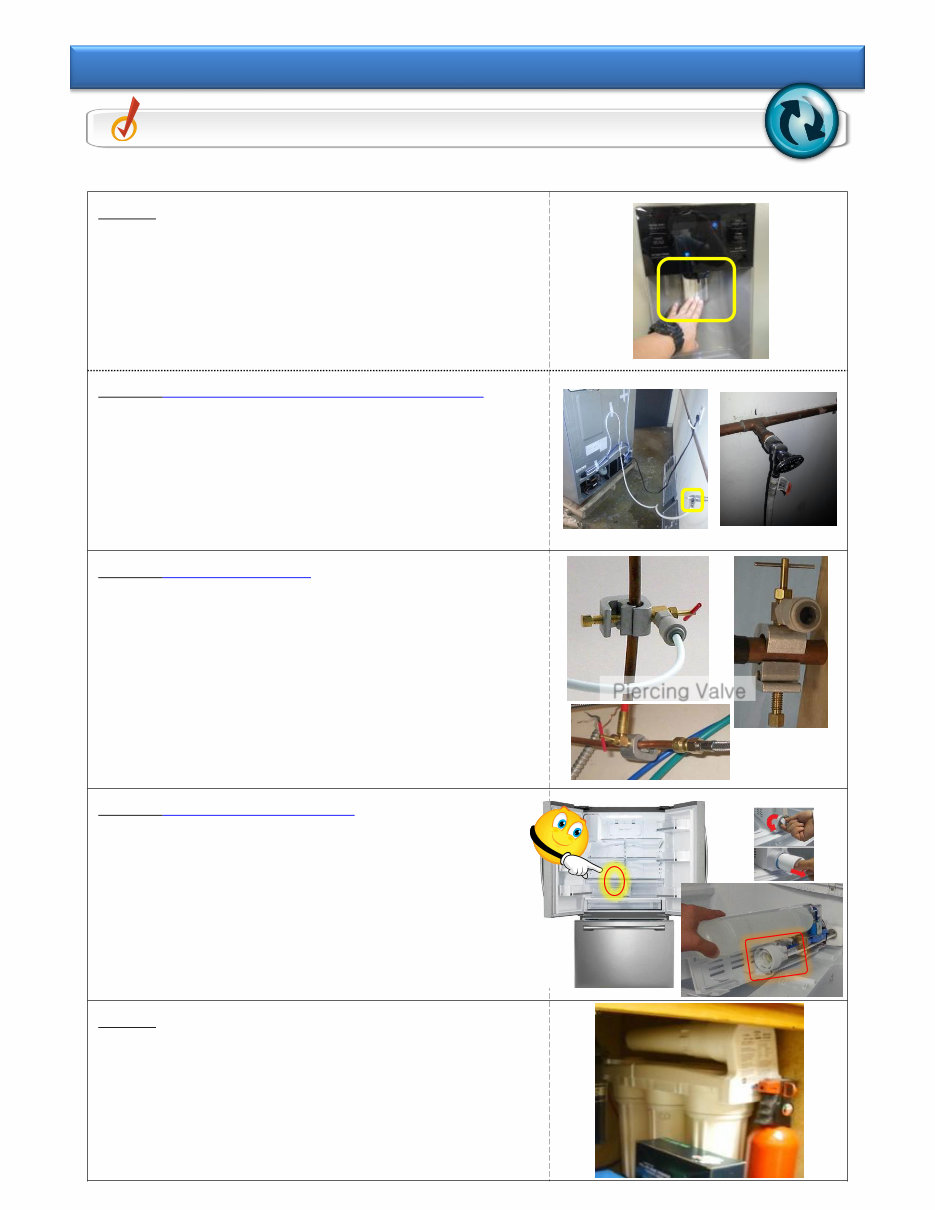
- 8/65 - Step 1 ① Select Water, then check the water dispensing when pressing lever. - When there is no water dispensing Check Step 2 - When the water is dispensing check TIP 2- 4 Step 2 (Connection problem-Hose kinked) ① Inspect connection between external tap and the product - Check if it is connected to water supply - Check if the tap is closed. ② Check for kinked Water supply line Step 3 (Piercing Valve ) ① Check for water with piercing valve open and supply hose disconnected. (Piercing valves are not recommended) Step 4 (Filter Case problem) ① Remove Water Filter and check dispensing. If water dispenses ,try a new filter. If water does not dispense with new filter, replace the Filter Case. Step 5 ① Minimum water supply pressure should be 20 PSI. ② If pressure is low due to external filter (reverse osmosis) remove internal filter. Check Point Inspect Water supplying failure Tip 2-1. Inspect water connection/supplying ※ Before first use and after filter replacement, dispense water for 3 min Piercing Valve
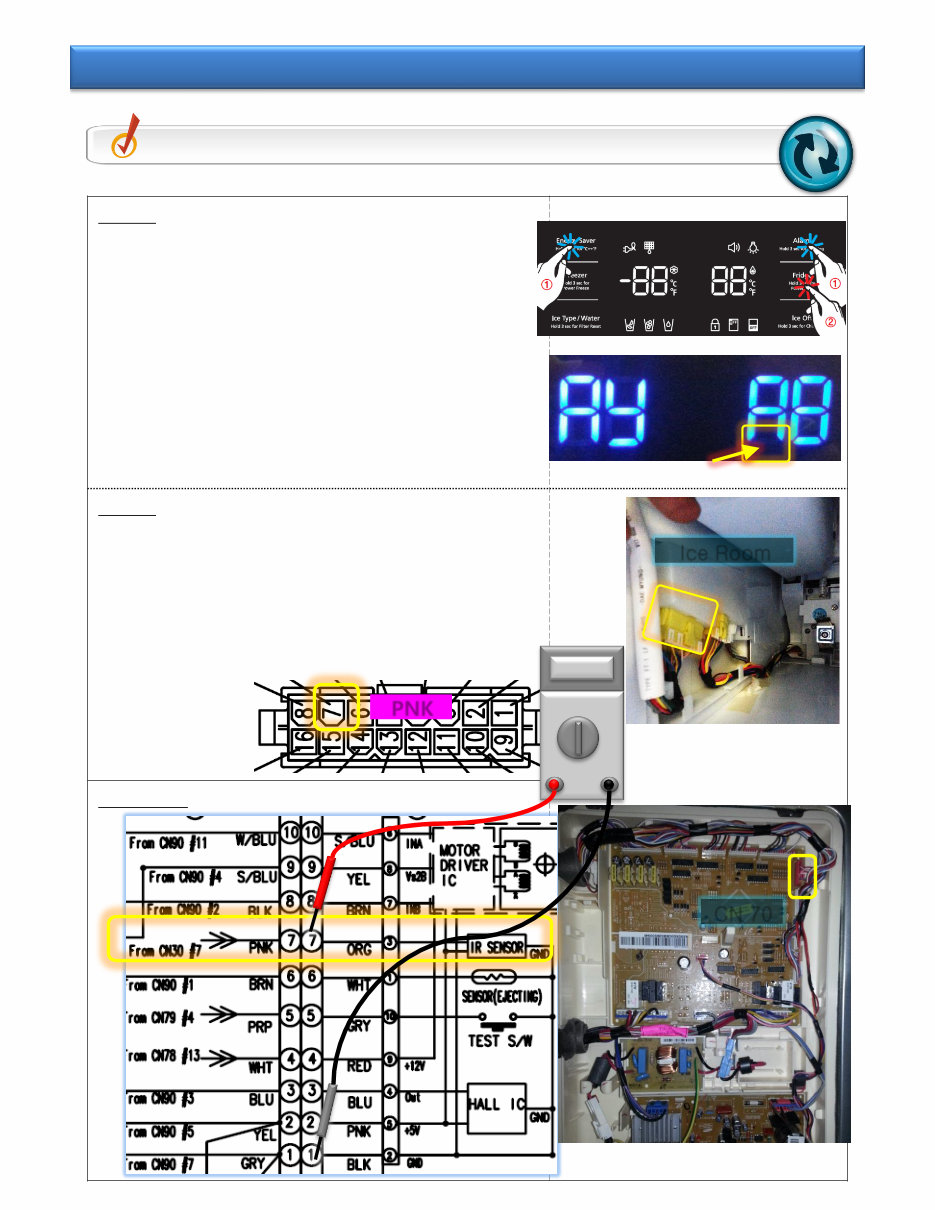
- 9/65 - Step 1 ① Check the ICE Bucket for the presence of ice. ② If no ice, Enter After PANEL PBA “Energy Saver”+”Alarm” Key and touch LED Blink “Fridge” Key. ③ In the case of FF-Display Yellow Blink - Recognized Ice Bucket Full Check STEP 2 - When there is no Blink Check Tip 2-3 Step 2 ① Inspect the “YEL 16-PIN” CONNECTOR No.7(PNK) PIN contact/switching ② Inspect Wire connector - No.7(PNK) + Main PBA CN 30 No.7(PNK) Main PBA Check Point Inspect ice maker Water supply problem Tip 2-2. Inspect Ice Full sensing failure CN 70 Ice Room PNK
- 10/65 - Step 1 ① After disassemble the Ice Bucket and ice maker Right side button on ice maker turns on for 2 sec ① Takes Max “6 Min” (including Heating time) - When the water does not come Check Step 2 - When the water come Check TIP 2-5 Step 2 ① Inspect the WATER HOSE bending ② After disassemble the ASSY Valve, Purple 2 Pin Check - Normal part : 350~450 Ω - Failure part : Open or 0 Ω ③ Check the housing No.1(PRP/BLK) + No.6(PRP/BLK) Step 2 ① Check MAIN PBA + Liner CONNECTOR - Check CN70 No.5(RED)+CN73 No.1(PRP) Check Point Inspect ICE MAKER Water supply problem Tip 2-3. Inspect the Ice Valve operation CN 73 CN 70
Why replace while you can upgrade or repair? This service and repair manual is used by the Official Certified Samsung Technicians. It will help you to troubleshoot and repair your refrigerator!
You will learn about:
Precautions (Safety Warnings)
Product Specifications
Disassembly And Reassembly
Troubleshooting
Exploded View & Parts List
PCB Diagram
Wiring Diagram
Schematic Diagram
Exploded Views
Parts List Catalog
This service manual is very detailed and illustrated with pictures and step-by-step instructions on how to repair/service this device the best way there is! Please note; this is the OFFICIAL and COMPLETE service repair manual in .PDF format, no scanned-in or bootlegged copy. This manual is made in the highest resolution, so when you print the pages you need it is all in great quality! You can easily print this manual from any printer and any computer!
***INSTANT access*** After your payment, you will have instant access to your manual. No shipping fee, no waiting on postal delivery, you can start doing your repairs right away!
Specifications
Language: English
Format: .PDF
Pages: 110
Platform: Windows and MAC
Looking for a service manual but can't find it anywhere? Please contact us with your request! As you can see we've got the largest & most comprehensive service manual database out there, so a good chance we can help you out!