CAUTION PLEASE READ CAREFULLY THE SAFETY PRECAUTIONS OF THIS MANUAL BEFORE CHECK ING OR OPERATING THE REFRIGERATOR. SERVICE MANUAL MODEL : LSC27926** REFRIGERATOR
WARNINGS AND PRECAUTIONS FOR SAFETY ................................................................................................................ 3 SPECIFICATIONS................................................................................................................................................................... 4 PARTS IDENTIFICATION ....................................................................................................................................................... 5 HOW TO INSTALL THE REFRIGERATOR .......................................................................................................................... 6 HOW TO ADJUST DOOR HEIGHT.................................................................................................................................... 6 FILTER................................................................................................................................................................................ 7 HOW TO CONTROL THE ICEMAKER WATER SUPPLY .................................................................................................. 8 MICOM FUNCTION .............................................................................................................................................................. 10 EXPLANATION OF MICOM CIRCUIT .................................................................................................................................. 23 EXPLANATION OF PWB CIRCUIT .....................................................................................................................................23 PWB PARTS DIAGRAM AND LIST .....................................................................................................................................40 PWB CIRCUIT DIAGRAM ...................................................................................................................................................43 ICE MAKER AND DISPENSER WORKING PRINCIPLES AND REPAIR ........................................................................... 46 WORKING PRINCIPLES.................................................................................................................................................... 46 FUNCTION OF ICE MAKER .............................................................................................................................................. 47 ICE MAKER TROUBLESHOOTING................................................................................................................................... 48 ICE MAKER CIRCUIT .........................................................................................................................................................49 CIRCUIT ................................................................................................................................................................................ 53 TROUBLE DIAGNOSIS ........................................................................................................................................................ 54 TROUBLESHOOTING ....................................................................................................................................................... 54 FAULTS .............................................................................................................................................................................. 64 COOLING CYCLE HEAVY REPAIR ................................................................................................................................. 81 HOW TO DEAL WITH CLAIMS ........................................................................................................................................ 88 HOW TO DISASSEMBLE AND ASSEMBLE ..................................................................................................................... 93 DOOR ............................................................................................................................................................................... 93 HANDLE ........................................................................................................................................................................... 94 FAN SHROUD GRILLE .................................................................................................................................................... 95 ICEMAKER ASSEMBLY................................................................................................................................................... 95 DISPENSER ..................................................................................................................................................................... 96 EXPLODED VIEW & REPLACEMENT PARTS LIST ........................................................................................................................................... 98 CONTENTS - 2 -
Please observe the following safety precautions to use the refrigerator safely and correctly and to prevent accident or injury when servicing. 1. Be careful of an electric shock. Disconnect power cord from wall outlet and wait for more than three minutes before replacing PWB parts. Shut off the power whenever replacing and repairing electric components. 2. When connecting power cord, please wait for more than five minutes after power cord was disconnected from the wall outlet. 3. Please check if the power plug is pressed by the refrigerator against the wall. If the power plug was damaged, it could cause fire or electric shock. 4. If the wall outlet is overloaded, it may cause a fire. Please use a dedicated circuit for the refrigerator. 5. Please make sure the outlet is properly grounded. Particularly in a wet or damp area. 6. Use standard electrical components. 7. Make sure hooks are correctly engaged. Remove dust and foreign materials from the housing and connecting parts. 8. Do not fray, damage, run over, kink, bend, pull out, or twist the power cord. 9. Please check for evidence of moisture intrusion in the electrical components. Replace the parts or mask with insulation tape if moisture intrusion was confirmed. 10. Do not touch the icemaker with hands or tools to confirm the operation of geared motor. 11. Do not suggest that customers repair their refrigerator themselves. This work requires special tools and knowledge. Non-professionals could cause fire, injury, or damage to the product. 12. Do not store flammable materials such as ether, benzene, alcohol, chemicals, gas, or medicine in the refrigerator. 13. Do not put anything on top of the refrigerator, especially something containing water, like a vase. 14. Do not put glass bottles with full of water into the freezer. The contents will freeze and break the glass bottles. 15. When you scrap or discard the refrigerator, remove the doors and dispose of it where children are not likely to play in or around it. WARNINGS AND PRECAUTIONS FOR SAFETY - 3 -
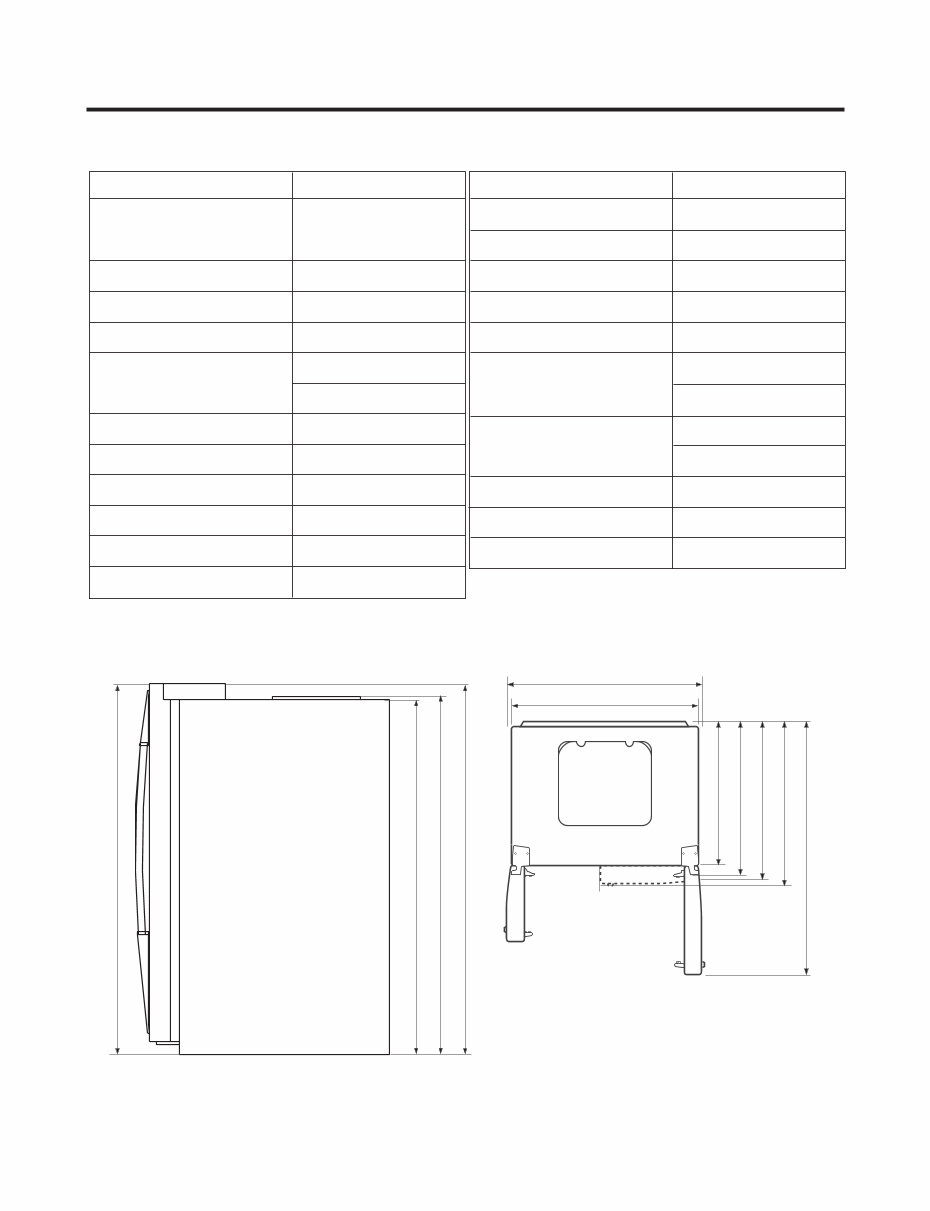
SPECIFICATIONS - 4 - ITEMS SPECIFICATIONS DIMENSIONS 912 X 829 X 1771 mm W X D X (35.9x32.6x69.7in) H ) . s b l ( g k 30 1 T H G I E W T E N COOLING SYSTE Fan Cooling TEMPERATURE CONTROL DEFROSTING SYSTEM Heater Defrost e n a t n e P - o l c y C N O I T A L U S N I COMPRESSOR EVAPORATOR CONDENSER REFRIGERANT ITEMS SPECIFICATIONS 7 - H X E V E I S R A L U C E L O M R E I R D CAPILLA R Y TUBE ID Ø0.8 5 FIRST DEFROST DEFROST CYCLE DEFROSTING DEVICE ANTI-SWEAT HEATER Dispenser Heater ANTI-FREEZING HEATER Damper Heater FREEZER LAMP REFRIGERATOR LAMP DISPENSER LAMP 724 mm (28 1 / 2 in.) 1004 mm (39 1 / 2 in.) 912 mm (35.9in.) 779 mm (30 5 / 8 in.) 829 mm (32 5 / 8 in.) 897 mm (35 5 / 16 in.) 1261 mm (49 5 / 8 in.) 1741.5 mm (68 1 / 2 in.) 1746.5 mm (68 3 / 4 in.) 1771 mm (69 11 / 16 in.) 1771 mm (69 11 / 16 in.) w e i V p o T w e i V t n o r F PTC Starting Type Micom Control Full Automatic Fin Tube Type Wire Condenser R134a(185g)(6.5oz) LUBRICATING OIL FREOL @ 10G(310cc) 4-5 Hours 13-15 Hours Heater, Sheath Dispenser Duct Door Heater Water Tank Heater 40W (1 EA) 40W (4 EA) 15W (1 EA) 286.6
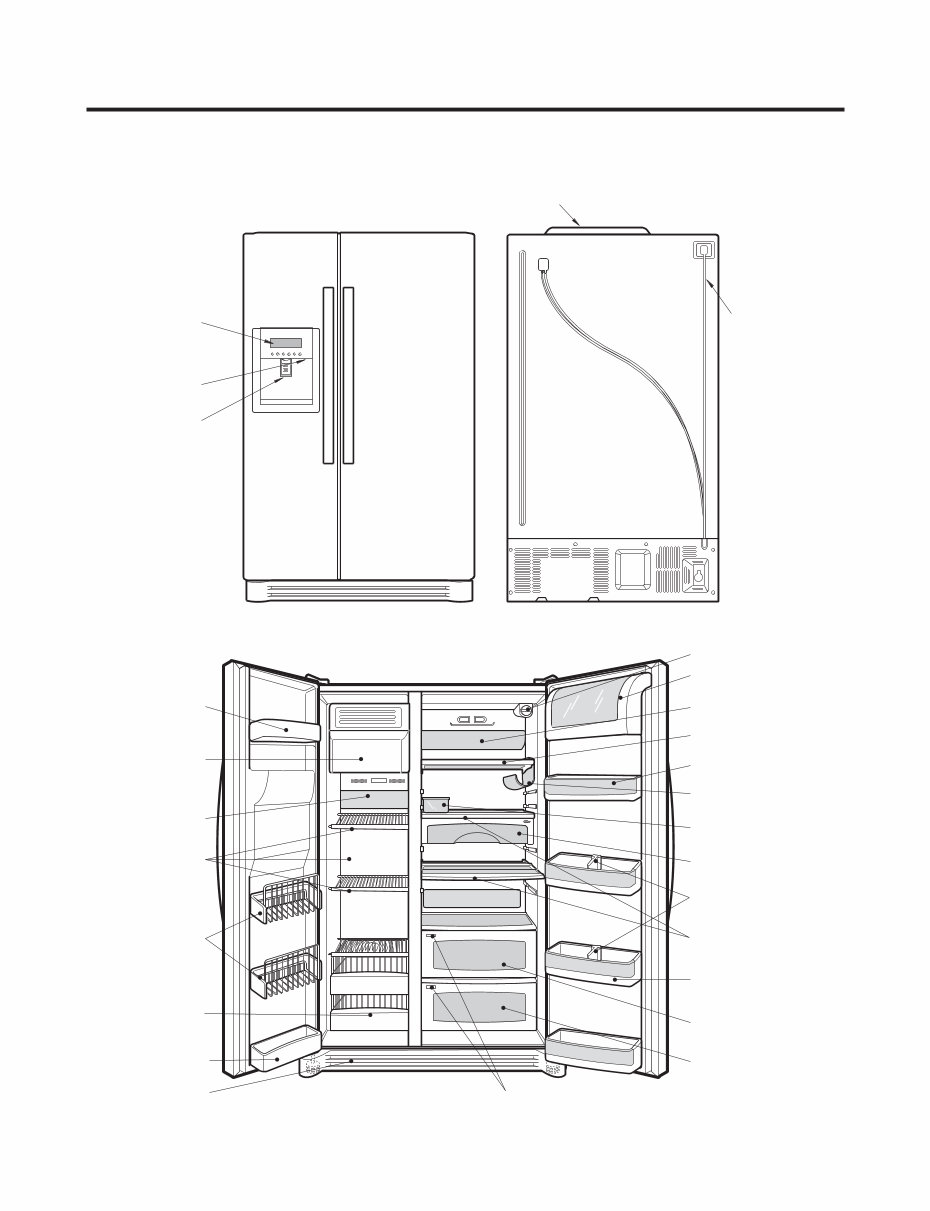
PARTS IDENTIFICATION - 5 - Frame Display Dispenser Lamp Ice & Water Dispenser Button PWB Cover Water Tubes Freezer Compartment Refrigerator Compartment Humidity Switch Lamp Shelf Snack Drawer Vegetable Drawer Vegetable Drawer /Meat Drawer Door Rack Shelf Door Rack Wine Holder Lamp Lower Cover Dairy Product Corner Door Rack Drawer (Wire/Plastic) Automatic Icemaker Door Rack Shelf Bottle Guide Door Rack Water Filter Egg Box
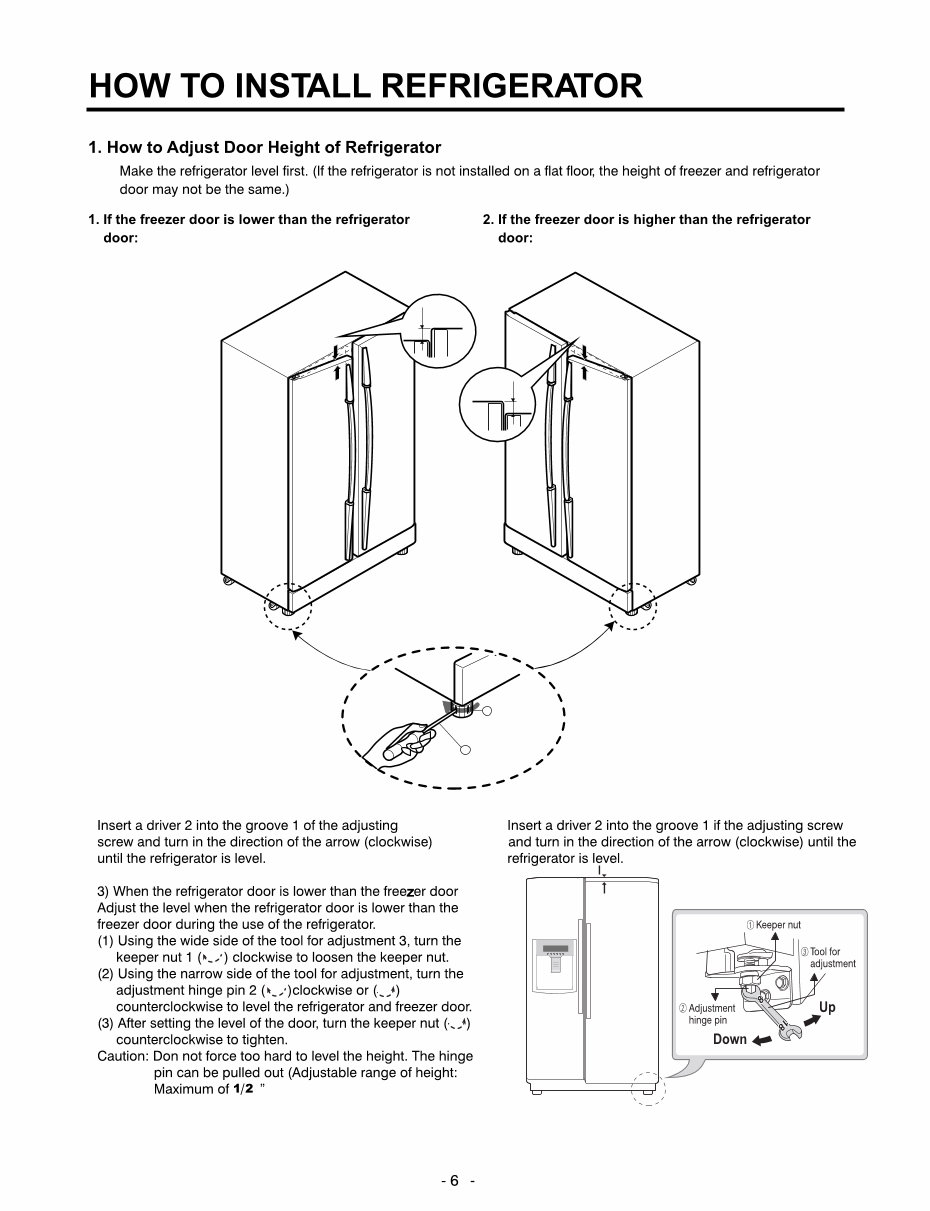
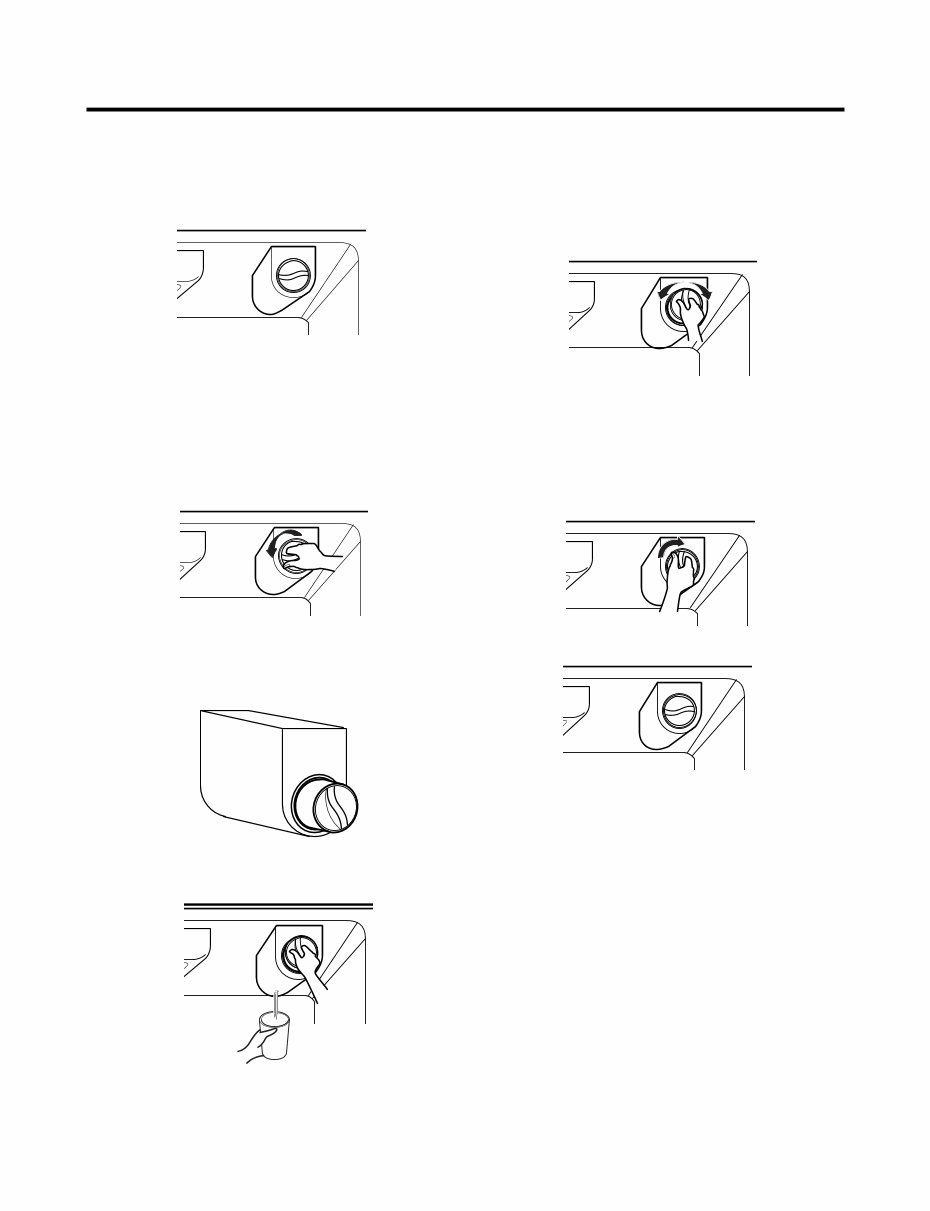
2. Filter Replace the filter when the indicator light comes on or the performance of the icemker or water dispenser decreases noticeably. After changing the water filter cartridge, reset the water filter status display and indicator light by pressing and holding the BUTTON for 3 seconds.(page 18) 1. Remove the old cartridge. Twist the knob of the cartridge counter clockwise. When the cartridge is removed, you will feel it click . Pull out the cartridge. NOTE: There will be some water(25cc) in the filter cartridge. Some spilling may occur. Catch it in a bowl or towel. 2. Replace with a new cartridge. Take the new cartridge out of its packaging and remove protective cover from the o-rings. With cartridge knob in the vertical position, push the new filter cartridge into the cover until it stops. If you can’t turn the filter from side to side, it isn’t fully inserted. Push it in firmly and twist it into place. You will hear the snap when it clicks into place. Using the handle, twist the cartridge clockwise about 1/4 turn. 3. Flush the Water System After Replacing Filter Dispense water through the water dispenser for 3 minutes to purge the system. There may be a little air in the line, causing noise or hissing. Run the water at the dispenser until the hissing stops to purge the air from the system. NOTE: - To purchase replacement water filter cartridges, visit your local appliance dealer or part distributor. - You can also visit our website : www.lgappliances.com or call 1-877-714-7481. HOW TO INSTALL REFRIGERATOR - 7 -
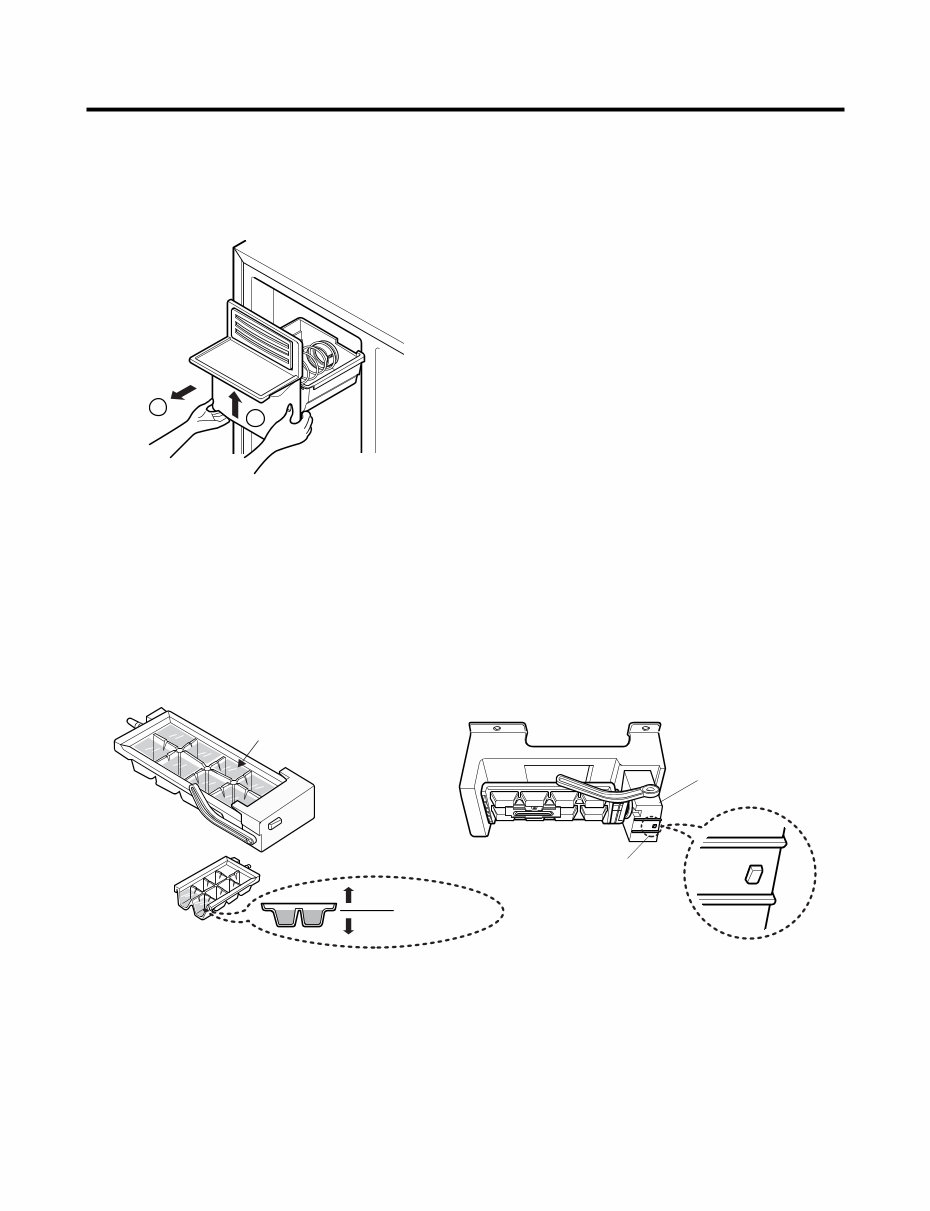
3. How to Control the Amount of Water Supplied to Icemaker. 3-1. Confirm the amount of water supplied to the icemaker. 1. Pull out the ice bin shelf in the upper part of the freezer compartment. Caution : • Do not put hands or tools into the chute to confirm the operation of geared motor. It may damage the refrigerator or hurt your hands. 2. Apply electricity after connecting water pipe. 1) Press test switch under the icemaker for two seconds as shown below. 2) The bell rings(ding~dong) and ice tray rotates and water comes out from the icemaker water tube. 3) The water shall be supplied two or three times into the tray. The amount of water supplied for each time is small. Put a water container under the ice tray and press test switch. 4) When ice tray rotates, the water in it will spill. Collect the spilt water and throw away into the sink. 5) When ice tray has finished rotation, water comes out from the water tube. Confirm the amounts of water in the ice tray. (refer to fig. The optimum amount of water is 110cc) * It is acceptable if the adjusted level of water is a bit smaller than optimum level. HOW TO INSTALL REFRIGERATOR - 8 - 2 1 Test Switch Confirm the amount of water Ice maker Too much Too little Optimum level
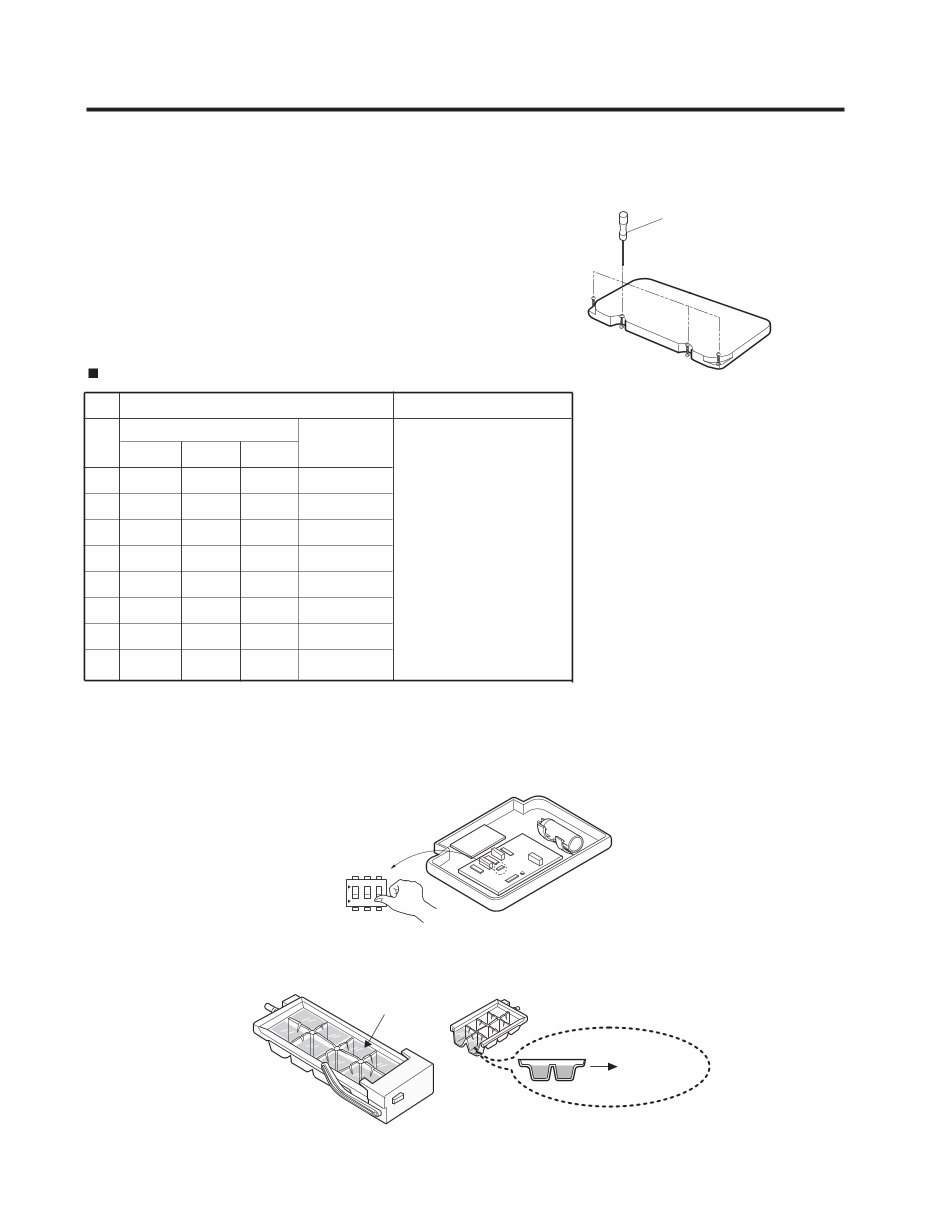
3-2. Control the amount of water supplied to the icemaker. Caution : • Please unplug the power cord from the wall outlet and wait for more than three minutes before disconnecting PWB cover as 310V is applied in the control panel. 1. Disconnect PWB cover from the upper part of the refrigerator. 2. Adjust the amount of water supplied by using DIP switch. Water Supplying Time Control Option 1) The water supplying time is set at five seconds when the refrigerator is delivered. 2) The amount of water supplied depends on the setting time and water pressure (city water pressure). 3) If ice cube is too small, increase the water supplying time. This happens when too small water is supplied into the ice tray . 4) If ice cube sticks together, decrease the water supplying time. This happens when too much water is supplied into the ice tray. Caution : When adjusting the amount of water supplied, adjust step by step. Otherwise the water may spill over. 3. When adjustment of control switch for the amount of water supplied is complete, check the level of water in the ice tray. HOW TO INSTALL REFRIGERATOR - 9 - (+) Driver 1 ON Switch ON Switch OFF 2 3 Confirm the amount of water Optimum level * The quantity of water supplied depends on DIP switch setting conditions and water pressure as it is a direct tap water connection type. (the water supplied is generally 80 cc to 120 cc) * DIP switch is on the main PWB. LSC27926** No DIP SWITCH SETTING S1 S2 S3 1 2 3 4 5 6 7 8 OFF OFF OFF 6.5 SEC ON OFF OFF 5.5 SEC OFF ON OFF 6 SEC ON ON OFF 7 SEC OFF OFF ON 7.5 SEC ON OFF ON 8 SEC OFF ON ON 9 SEC ON ON ON 10 SEC WATER SUPPLY TIME REMARKS
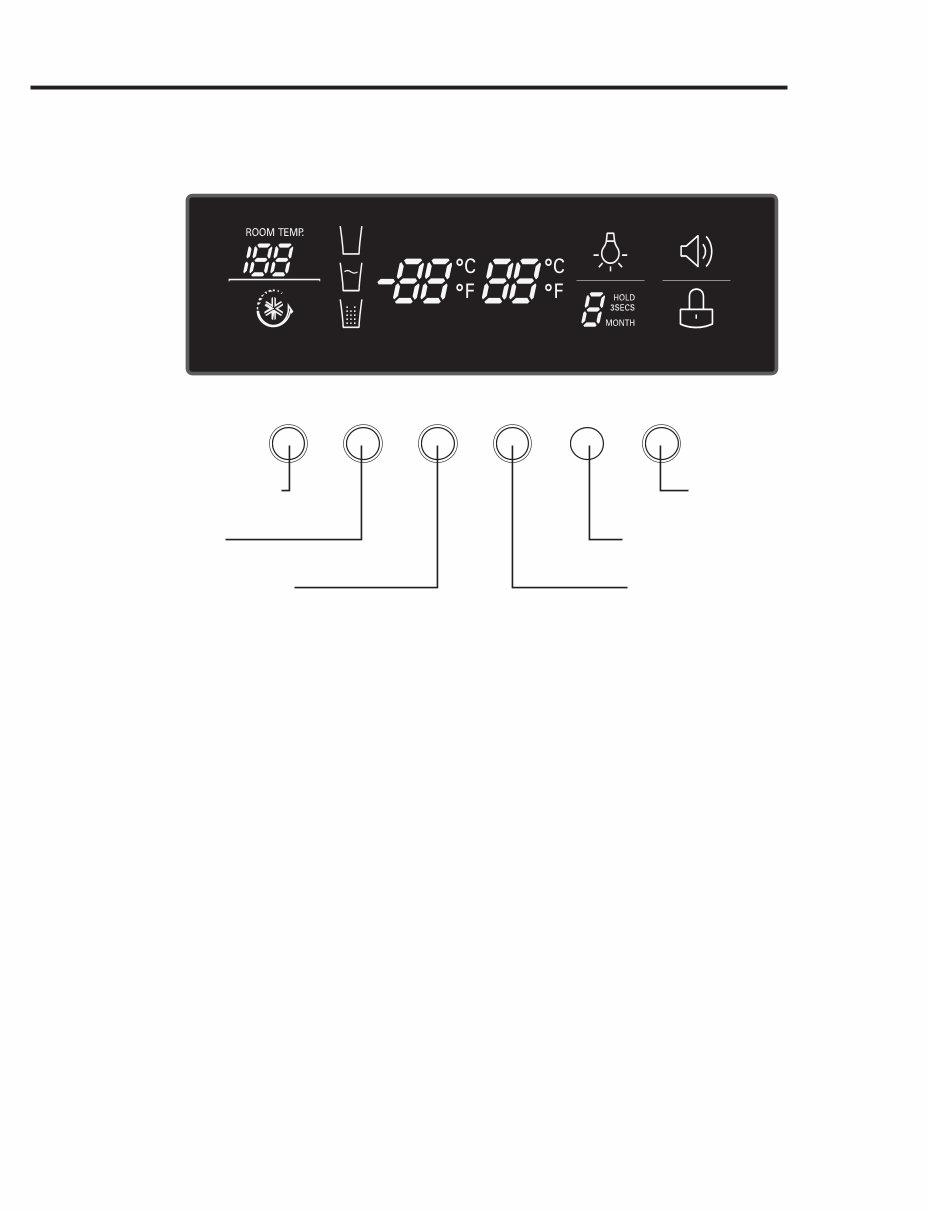
1. Monitor Panel MICOM FUNCTION - 10 - ICE PLUS DISPENSER FREEZER REFRIGERATOR LIGHT/FILTER ALARM/LOCK 3SECS Dispenser selection button Ice Plus function selection button Alarm button and Lock button Lamp On/Off button/ Filter status display RESET button Temperature adjustment button for refrigerator compartment Temperature adjustment button for freezer compartment °C °F
Is your LG LSC27926ST Side By Side Refrigerator letting you down?
Why replace while you can upgrade or repair? This service and repair manual is used by the Official Certified LG Technicians. It will help you to troubleshoot and repair your fridge!
You will learn about:
Product Specifications
Parts Identification
Installation Procedures
Disassembly Instructions
Troubleshooting
Component Testing
Adjustment Procedures
Circuit Diagram
Operation Principle and Repair Method of Ice-maker
Description of Function & Circuits
Exploded Views
This service manual is very detailed and illustrated with pictures and step-by-step instructions on how to repair/service this device the best way there is! Please note; this is the OFFICIAL service and repair manual in .PDF format, no scanned-in or bootlegged copy. This manual is made in the highest resolution, so when you print the pages you need it is all in great quality! You can easily print this manual from any printer and any computer!
***INSTANT access*** After your payment, you will have instant access to your service manual. No shipping fee, no waiting on postal delivery, you can start doing your repairs right away!
Specifications
Language: English
Format: .PDF
Pages: 101
Platform: Windows and MAC
Looking for a service manual but can't find it anywhere? Please contact us with your request! As you can see we've got the largest & most comprehensive service manual database out there, so a good chance we can help you out!