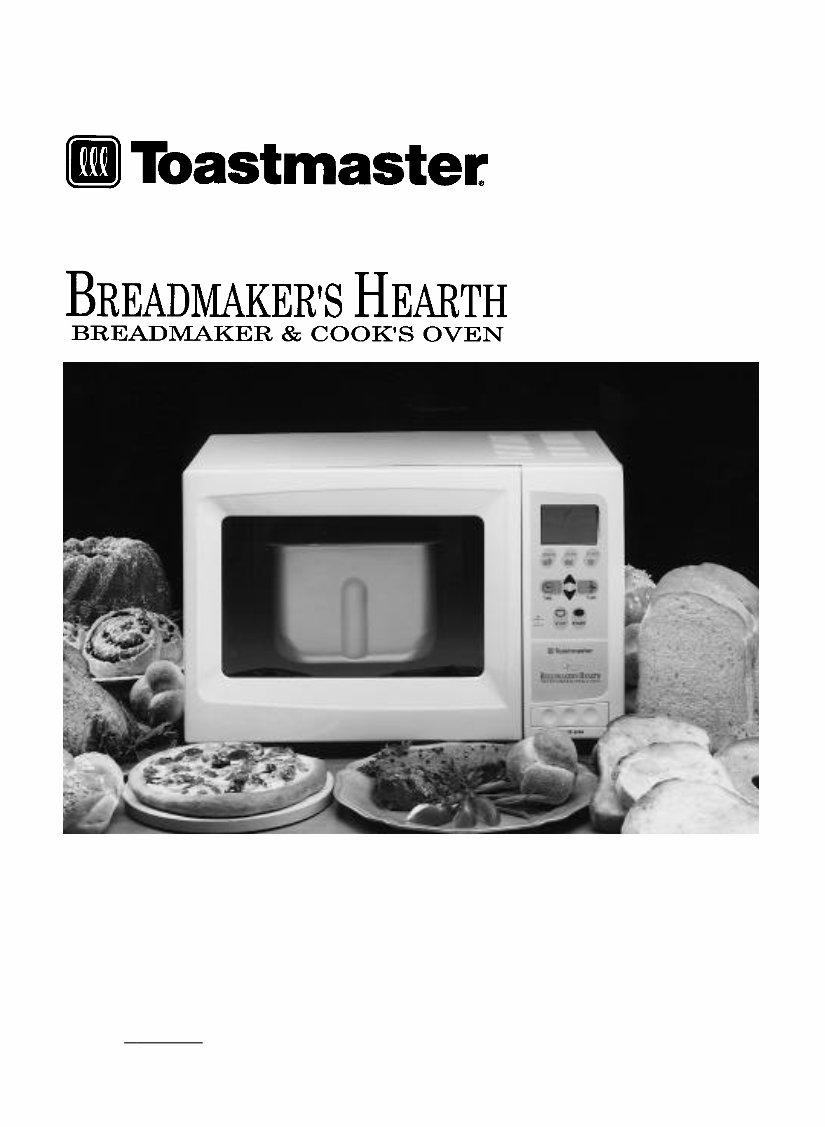
Toastmaster 1143S & 1193 Breadmaker User Guide and Cookbook
What's Included?
Lifetime Access
Fast Download Speeds
Online & Offline Access
Access PDF Contents & Bookmarks
Full Search Facility
Print one or all pages of your manual
READ AND SAVE THESE INSTRUCTIONS Use and Care Guide and Cookbook Models 1143S and 1193 W ARNING: A risk of fire and electrical shock exists in all electrical appliances and may cause personal injury or death. Please follow all safety instructions. T OLL-FREE 1-800-947-3744 and talk to one of Toastmaster’s Experts.
-3- TABLE OF CONTENTS IMPORTANT SAFEGUARDS ................................................................................................................ 4 BEFORE YOUR FIRST USE .................................................................................................................. 5 POWER OUTAGE ... 5 BREADMAKER’S HEARTH INTRODUCTION Parts and Accessories ........................................................................................................................ 6 Control Panel ....... 7 OVEN FUNCTION Programming Preheat Bake, Bake and Broil ...................................................................................... 8 Programming Defrost ........................................................................................................................ 10 Programming Keep Warm ................................................................................................................ 10 TOAST FUNCTION Programming Toast ............................................................................................................................ 11 Programming Top Brown .................................................................................................................. 11 BREADMAKER FUNCTIONS Program Select ... 12 Program Specifications ...................................................................................................................... 13 Ingredients ......... 14 Programming Breadmaker ................................................................................................................ 20 RECIPES Bread . . . . . . . . . . . . . . . . . 23 Day Old Bread ... 29 Dough . . . . . . . . . . . . . . . . . 30 Mixing . . . . . . . . . . . . . . . . . 42 Cake & Quick Bread .......................................................................................................................... 45 Broil . . . . . . . . . . . . . . . . . . . . . 49 Bake . . . . . . . . . . . . . . . . . . . 50 CLEANING INSTRUCTIONS .............................................................................................................. 54 BEFORE CALLING FOR SERVICE .................................................................................................. 55 Bread and Dough Questions and Answers ...................................................................................... 55 Checklist for Bread and Dough .......................................................................................................... 56 Service Information ............................................................................................................................ 58 SPECIFICATIONS .............................................................................................................................. 58 RECIPE INDEX ... 59
-4- IMPORTANT SAFEGUARDS When using electrical appliances, basic safety precautions should always be followed to reduce the risk of fire, electric shock and injury to persons, including the following: • Read all instructions before using appliance. • Do not immerse cord, plug or appliance in water or other liquid (see instructions for cleaning). • Do not touch hot surfaces. Always use oven mitts when handling the hot bread pan and handle or bread. Always use handle with bread pan. • Close supervision is necessary when this appliance is used near children. • This appliance is not for use by children. • Unplug from outlet when not in use and before cleaning.Press STOP button before unplugging.Allow to cool before attaching or removing parts while cleaning. • To unplug with the unit switched off, grip the plug and pull out from the wall outlet. Never pull on the cord. • Do not contact moving parts. Do not insert hand into bread pan during operation. • Do not operate a damaged appliance. Do not operate with a damaged cord or plug or after the appli- ance malfunctions, or has been dropped or damaged in any manner. Return appliance to the nearest authorized service facility for examination, repair, electrical or mechanical adjustment. • Use accessory attachments only if recommended by Toastmaster Inc. • Do not use outdoors or while standing in damp area. • Do not use appliance for other than intended use. • Do not let cord hang over edge of table or counter or touch hot surfaces. • Do not place appliance or cord on or near any hot surface, including a gas or electric burner or heated oven. • Do not leave appliance unattended while broiling or toasting. • Do not clean with metal scouring pads. Pieces can break off the pad and touch electrical parts. • When using this appliance, provide at least 4 inches air space above and on all sides for air circula- tion. Do not use on surfaces where heat may cause a problem. • Extreme caution must be used when moving an appliance containing hot oil or other hot liquids. • Use extreme caution when removing tray or disposing of hot grease. • A fire may occur if this appliance touches or is covered by flammable material, including curtains, draperies, walls, etc., when in operation. • Do not store any materials other than the manufacturer’s recommended accessories in this appliance when not in use. • Do not cover the mixer cover or any part of the oven with metal foil.This will cause overheating of the oven. • Extreme caution should be exercised when using containers constructed of other than metal. • Do not place any flammable material such as paper, cardboard, plastic, etc., next to, on top of, or in the oven. • When broiling, the bake/broil tray and toast/broil rack must be used. • Oversized foods or utensils must not be inserted into the oven. SAVE THESE INSTRUCTIONS THIS PRODUCT IS FOR HOUSEHOLD USE ONLY. CAUTION: A short power supply cord is provided to reduce the risk of personal injury resulting from becoming entangled in or tripping over a longer cord. Extension cords are available from local hardware stores and may be used if care is exercised in their use. If an extension cord is required, special care and caution is necessary. Also the cord must be: (1) marked with an electrical rating of 125 V, and at least 13 A., 1625 W., and (2) the cord must be arranged so that it will not drape over the countertop or tabletop where it can be pulled on by children or tripped over accidentally. ELECTRIC POWER: If electric circuit is overloaded with other appliances, your Breadmaker’s Hearth may not operate properly. The Breadmaker’s Hearth should be operated on a separate electrical circuit from other operating appliances. POLARIZED PLUG: This appliance has a polarized plug, (one blade is wider than the other). As a safety feature to reduce the risk of electrical shock, this plug is intended to fit in a polarized outlet only one way. If the plug does not fit fully in the outlet, reverse the plug.If it still does not fit, contact a qualified electrician.Do not attempt to defeat this safety feature.
-5- BEFORE YOUR FIRST USE Carefully unpack the Breadmaker’s Hearth Automatic Breadmaker and Cook’s Oven removing all packaging materials.To remove any dust that may have accumulated during packaging, wash the bread pan, kneading blade, bake/broil pan, wire rack and mixer cover. Do not immerse bread pan (see cleaning instructions).Wipe the outside of the machine with a damp cloth.Do not use harsh or abrasive cleaners on any part of the machine. Place on a dry, stable surface away from burners and away from areas where cooking grease or water may splatter onto it. Plug into a 120 V ~ 60 Hz outlet. IMPORTANT SAFETY TIPS • The oven cavity, mixer cover, kneading blade, bread pan handle, bake/broil pan, wire rack and food will be very hot after use. Use oven mitts. • Unplug unit and allow to cool before cleaning. Remove any flour, bread crumbs or other materials from the inside the oven using a damp sponge, cloth or a small, portable vacuum cleaner. • The breadmaker will bake up to a 2 pound loaf of bread. Do not put a larger quantity of ingredients into the bread pan than recommended. If you do so, the bread may not mix or bake correctly and the breadmaker may be damaged.The maximum amount of flour to be used in recipes other than the ones included in this recipe book is as follows: BAKE settings — approximately 4 cups Cakes and prepackaged bread mixes — 4 cups MIXING and DOUGH setting — 4 2/3 cups • Handle hot bread pan with care using pot holders or oven mitts. Remove the bread pan by pulling straight out using the bread pan handle. • Anytime the door is opened during a breadmaker program and it is in a kneading process, the mixing mechanism will pulse three times.Wait for this to finish before removing the bread pan. POWER OUTAGE During the bread programs if the machine loses power before the second rise, you can try starting the machine at the beginning of the program again. Refer to Program Specifications chart. This may not always produce an acceptable loaf. If you are not sure when the outage occurred, remove the dough ball from the bread pan and place in an oven-safe baking container. Allow to double in size and place in a preheated 350°F/177°C oven for 30-45 minutes or until done.The bread should sound hollow when tapped on the top of the loaf when it is done. If the bread has already begun to bake when the outage occurs, you must begin with new ingredients.
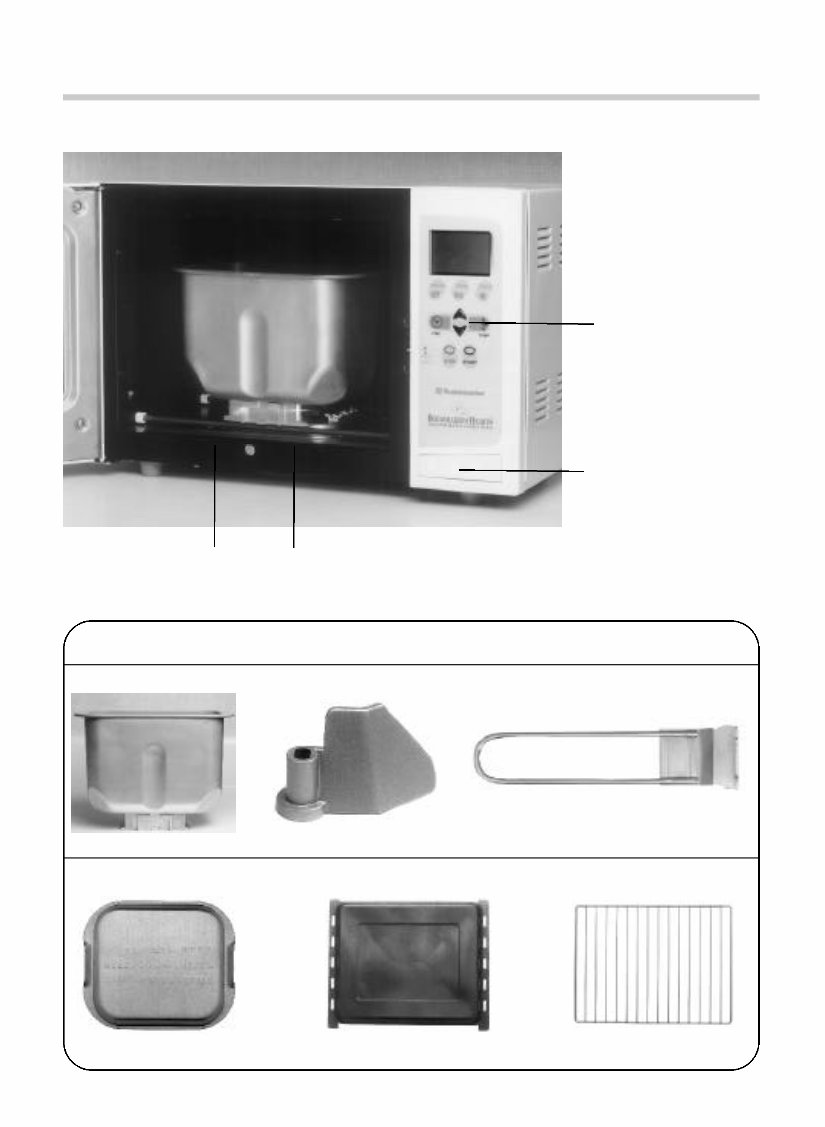
-6- BREADMAKER’S HEARTH INTRODUCTION n Parts and Accessories CONTROL PANEL DOOR RELEASE PUSH TO OPEN SLIDE BREAD PAN UNDER RAILS FOR BREADMAKER FUNCTION BREADMAKER TOASTER-OVEN-BROILER Bread Pan Kneading Blade Bread Pan Handle Accessories Mixer Cover Bake/Broil Pan Wire Rack
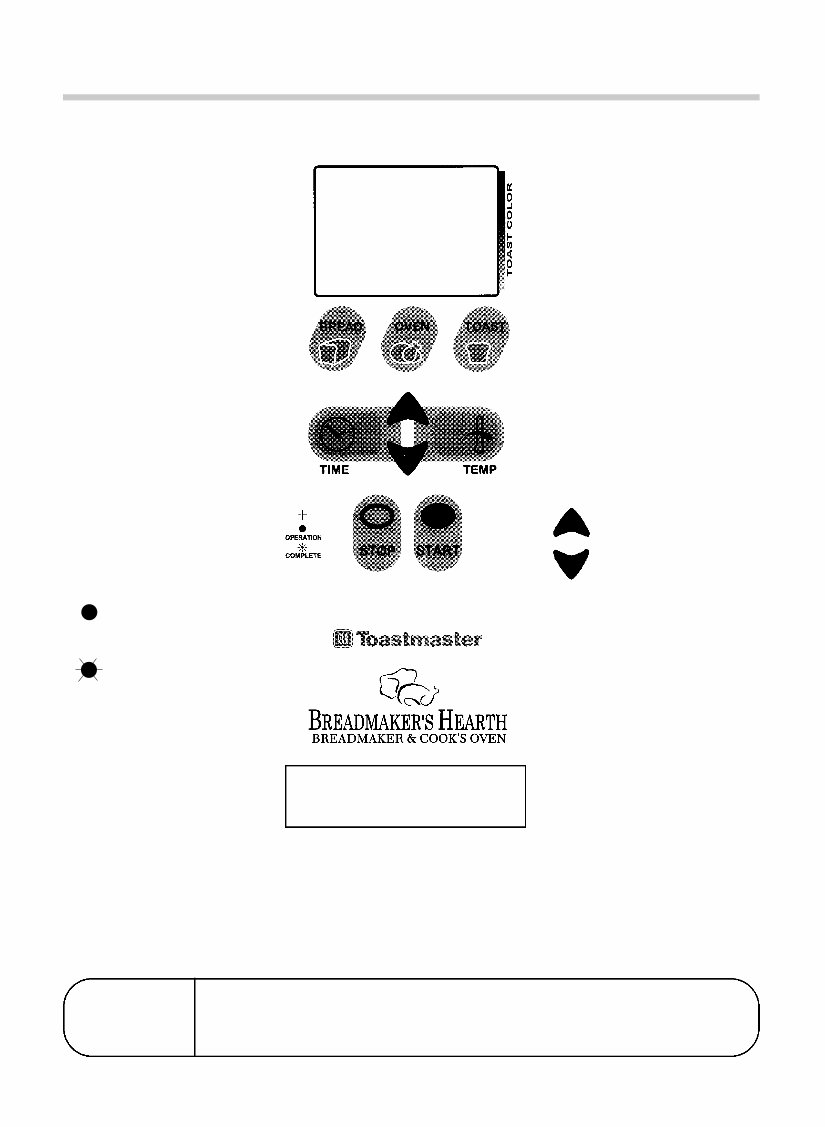
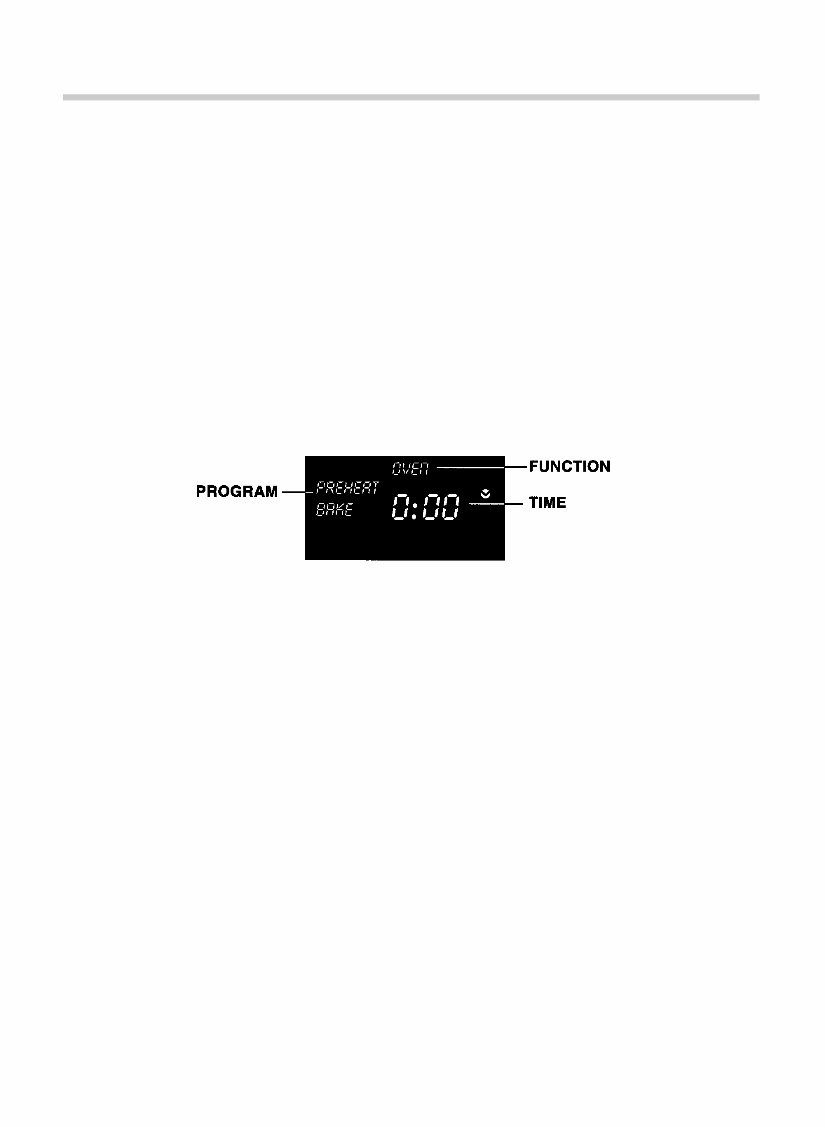
-7- n Control Panel DISPLAY WINDOW Indicates program in process and amount of time left for completion of program. Indicates display signals (see page 56). BREAD FUNCTION BUTTON Press to select breadmaker programs. TIME Press to select timer before using arrow keys to adjust. Must be set to BAKE, BROIL, or to delay star t BREAD. STOP Press for more than 2 seconds during use to cancel a program. OVEN FUNCTION BUTTON Press to select PREHEAT BAKE, BAKE or BROIL programs. TOAST FUNCTION BUTTON Press to select 4 or 2 slices toast programs. TEMP Press to display temperature for PREHEAT BAKE, BAKE or BROIL. ARROW KEYS Press to adjust temperature for PREHEAT BAKE or BAKE. Or, press to adjust color of TOAST. DOOR RELEASE Press to open door. PROGRAM CANCEL If you want to cancel the selected program, press the STOP pad and hold it down for more than 2 seconds at any time during the program. When a Breadmaker’s Hearth is packaged for shipment, a clear plastic film is placed over the control panel as protection.This film may either be removed or left on. You may choose to leave it on, but it will come off with use. PUSH TO OPEN OPERATION light will be on to show unit is in operation. COMPLETE operation light will flash continually when program is complete. When door is opened the light will turn off.
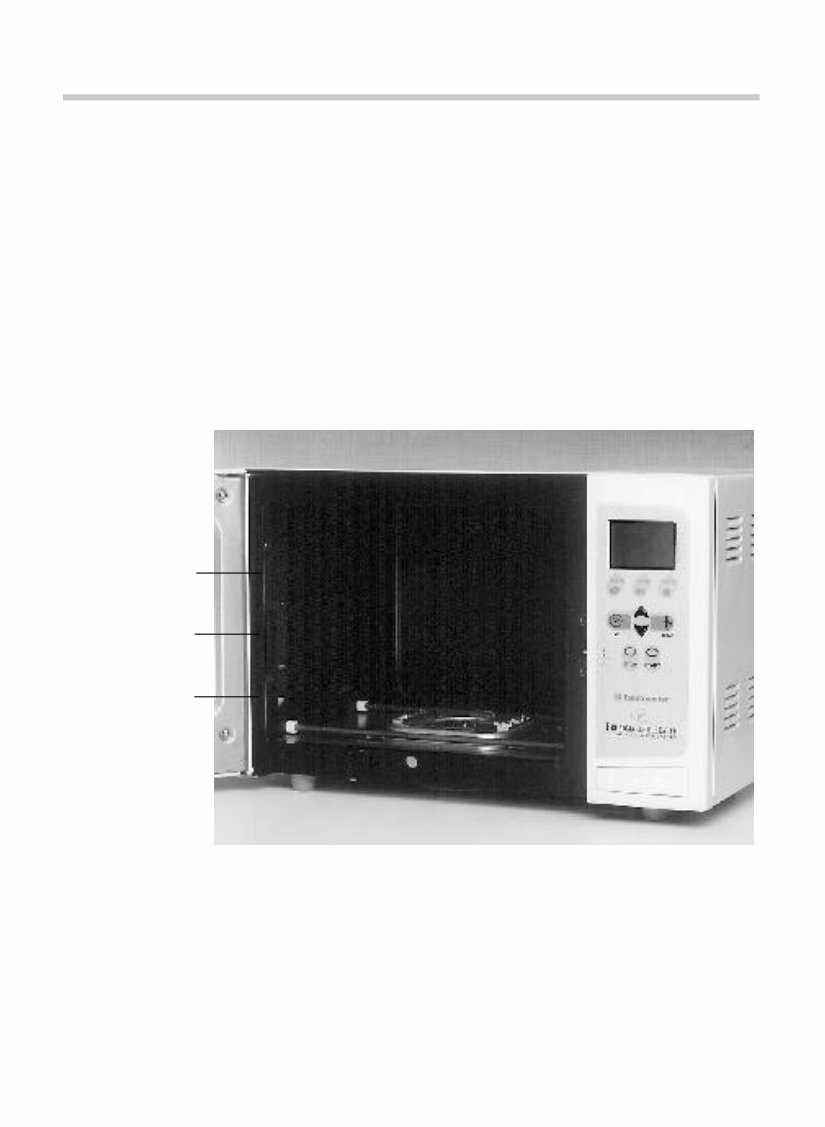
-8- n Bake/Broil Pan, Wire Rack and Bread Pan For best results use pan to bake, defrost, top brown, keep warm and to minimize clean up due to spills. When toasting, place bread directly onto wire rack. Place into oven position #2.The mixer cover must be used. When baking, you may either use the bake pan or wire rack and your own pan. Place into oven posi- tion #2 unless more height is required and then place into position #1.The mixer cover must be used. When broiling, both the broil pan and the wire rack must be used. Place into oven position # 2 or #3 depending on thickness of food. The mixer cover must be used. When using breadmaker programs remove mixer cover. Place kneading blade in bread pan. Slide bread pan under rails in bottom of oven with the FRONT ▼ pointing towards the door. Always use the bread pan handle and oven mitts to remove the bread pan. POSITION 3 POSITION 2 POSITION 1 CAUTION: APPLIANCE SURFACES ARE HOT DURING AND AFTER USE. CAUTION: Always wear protective, insulated oven mitts on hands when touching hot oven or hot dishes and food, or when inserting or removing rack, pans or baking dishes. NOTE: THE MIXER COVER MUST BE PLACED OVER THE MIXER MECHANISM WHEN THIS FUNCTION IS USED.
-9- OVEN FUNCTION n Oven Function n Programming PREHEAT BAKE, BAKE and BROIL The BAKE and BROIL programs of your new oven have the versatility to bake, broil, defrost and keep foods warm. The oven has an adjustable thermostat with temperatures ranging from 100°F up to 500°F which allows you to prepare your favorite recipes according to package or recipe directions. The bake program has a 4 hour timer and the broil program a 1 hour timer.The OPERATION light on the control panel will be on while the unit is operating. The OPERATION light will flash continually when program is COMPLETE and when the door is opened the light will turn off. Ovenware manufacturers do not recommend using see through glass containers or lids in this oven. Glass-ceramic baking containers may be used. Do not use oven roasting bags in this oven, as they may come in contact with the heating elements. 1. Place mixer cover over mixer mechanism. Plug unit into a 120 V ~ 60 Hz outlet. 2. Press OVEN button to select an oven program. If pressed once, the PREHEAT BAKE program is selected. If pressed twice, the BAKE program is selected. If pressed three times, the BROIL program is selected. 3. When any oven program is chosen, the clock will appear in the window first. Set the bake time by pressing the UP or DOWN ARROW to move to the desired time.To move the time along more quickly, hold the arrow and it will advance in 10 minute intervals. When using the PREHEAT BAKE program, the time will not begin to count down until the oven goes into the BAKE program. If you prefer, you may program your time after the preheat is complete and when you place your food into the oven. 4. Press the TEMP button.The default temperature for the PREHEAT BAKE and BAKE functions is 300°F (this will show in the display window). To change the temperature for PREHEAT BAKE and BAKE, press the UP or DOWN ARROW to move to the desired temperature. The temperature will go up or down by 5°F at a time. The preset temperature for the BROIL function is 500°F (this can not be adjusted). Preheating the oven is not necessary for BROIL. 5. If you are using the PREHEAT BAKE program, when the desired temperature has been chosen, press START.Once the oven has reached its pre-selected temperature, it will beep and the temperature will flash in the display window. The OPERATION light will be on. 6. Open the door and place your food in the oven and press START.PREHEAT BAKE will change to BAKE.The OPERATION light will come on and the time counter will begin to count down.The colons in the time counter will flash. If you don’t open the door and place your food in the oven right away, it will continue to maintain the preheat temperature for up to 30 minutes. If you have not opened the door within this time, the oven will turn off automatically.
- 10 - 7. The unit will beep 3 times and the OPERATION light will flash continually to indicate the program is COMPLETE.When the door is opened the light will turn off. 8. Unplug and allow to cool completely before cleaning. HINTS FOR BAKE AND BROIL • If no time is selected and the START button is pressed, the unit will beep 5 times to indicate that no time has been selected. Unit will not bake or broil unless a time is selected. • The time and temperature (BAKE only) can be changed at any time during the BAKE or BROIL functions. Press the UP ARROW to increase the time. Press the DOWN ARROW to decrease the time. • Press the STOP button at any time to stop the unit. • The oven will PAUSE for up to 10 minutes when the door is opened. If longer than 10 minutes it will turn off. n Programming DEFROST DO NOT USE THIS METHOD FOR MEAT, POULTRY OR FISH. To defrost using your Breadmaker’s Hearth follow the BAKE instructions setting the thermostat at 150°F. Defrost will take approximately 1/3 of the time recommended on the package for defrosting at room temperature. Once completed, serve or bake according to directions. HINTS FOR DEFROST • Do not cover food. • Brush frozen dough with oil to prevent drying out during DEFROST, remove and preheat oven before baking. n Programming KEEP WARM To keep food warm using your Breadmaker’s Hearth follow the BAKE instructions setting the thermo- stat at 150°F. HINTS FOR KEEP WARM • Use for short periods of time after food is cooked. • To heat frozen foods, see instructions for defrost.
The Toastmaster 1143S & 1193 Breadmaker User Guide and Cookbook is a comprehensive manual designed for bread lovers and home baking enthusiasts. It provides detailed instructions for making delicious, freshly baked bread in the comfort of your own kitchen. This user guide is suitable for both beginners and experienced bakers, offering a wide variety of bread recipes, including classic white, whole wheat, cinnamon raisin, and honey oat. The cookbook section features recipes for sweet treats like banana bread and savory delights such as pizza dough and herb bread. Additionally, the guide includes valuable tips, tricks, and troubleshooting advice to help customize bread, along with maintenance and care instructions for the breadmaker. Whether for breakfast, lunch, or dinner, this user guide is the perfect companion for creating wholesome, delicious bread at home.
Format: PDF
Language: English
Compatibility: PC, Mac, Android, Apple devices, etc.
Requirements: Adobe Reader (free)
Recently Viewed
5,521,897Happy Clients
2,594,462eManuals
1,120,453Trusted Sellers
15Years in Business
Price:
Actual Price:
Toastmaster 1143S & 1193 Breadmaker User Guide and Cookbook