- 3 - IMPORTANT SAFEGUARDS When using electrical appliances, basic safety precautions should always be followed to reduce the risk of fire, electric shock and injury to persons, including the following: 1. Read all instructions before using this appliance. 2. To protect against electric shock do not immerse cord, plug, or appliance in water or other liquid (see instructions for cleaning). 3. Do not touch hot surfaces. Always use oven mitts when handling the hot bread pan or bread. 4. Close supervision is necessary when this appliance is used near children. 5. This appliance is not for use by children. Keep out of reach of children. 6. Unplug from outlet when not in use and before cleaning. Allow to cool before attaching or removing parts. 7. Avoid touching moving parts. Do not remove the bread pan or insert hand into the bread pan during operation. Stop pad must be pressed if bread pan is to be removed before completion. 8. Do not operate the appliance with a damaged cord or plug, or after the appliance malfunctions, or has been dropped or damaged in any manner. Return appliance to the nearest authorized service facility for examination, repair, electrical or mechanical adjustment. 9. Do not use outdoors or while standing in damp area. 10. Do not let cord hang over edge of table or counter or touch hot surfaces. 11. Do not place on or near hot gas or electric burner or in a heated oven. 12. To unplug with unit switched off, grip the plug and pull out from the wall outlet. Never pull on the cord. 13. Do not use appliance for other than intended use. 14. This product is intended for household use only. 15. Use of accessory attachments not recommended by Toastmaster Inc. may cause injuries. 16. Do not clean with metal scouring pads. Pieces can break off the pad and touch electrical parts, creating a risk of electrical shock. 17. Bread machine must be placed at least 4 inches (10.2 cm) from walls and edge of counter. 18. Do not cover bread machine with anything which would prevent the steam from escaping. This may cause warpage, discoloration, malfunction or even fire. SAVE THESE INSTRUCTIONS THIS PRODUCT FOR HOUSEHOLD USE ONLY CAUTION: A short power supply cord is provided to reduce the risk of personal injury resulting from becoming entangled in or tripping over a longer cord.Extension cords are available from local hardware stores and may be used if care is exercised in their use. If an extension cord is required, special care and caution is necessary. Also the cord must be: (1) marked with an electrical rating of 125 V, and at least 13 A., 1625 W., and (2) the cord must be arranged so that it will not drape over the countertop or tabletop where it can be pulled on by children or tripped over accidentally. ELECTRIC POWER: If electric circuit is overloaded with other appliances, your bread machine may not operate properly. The bread machine should be operated on a separate electrical circuit from other operating appliances. POLARIZED PLUG: This appliance has a polarized plug (one blade is wider than the other). As a safety feature to reduce the risk of electrical shock, this plug is intended to fit in a polarized outlet only one way. If the plug does not fit fully in the outlet, reverse the plug. If it still does not fit, contact a qualified electrician. Do not attempt to defeat this safety feature.
- 4 - BEFORE YOUR FIRST USE Carefully unpack the bread machine and remove all packaging materials.To remove any dust that may have accumulated during packaging, wash the bread pan and kneading blade. Do not immerse. (See cleaning instructions on page 9.) Wipe the outside of the bread machine with a damp cloth. Do not use harsh or abrasive cleaners on any part of the bread machine. Place the bread machine on a dry, stable surface away from burners and away from areas where cooking grease or water may splatter onto it. Plug the bread machine into a 120 V ~ 60 Hz outlet. The illustrations in this manual are for general information purposes only. You may find your bread machine looks different; however, the steps for operation are the same. IMPORTANT SAFETY TIPS • Unplug unit and allow to cool. Remove any flour, bread crumbs or other materials from the inside of the oven interior using a damp sponge, cloth or a small, portable vacuum cleaner. • The bread machine will bake up to a 2 1/2 pound loaf of bread. Do not put a larger quantity of i n gr e d i e n t s into the bread pan than recommended. If you do so, the bread may not mix or bake correctly and the bread machine may be damaged.The maximum amount of flour to be used is as follows: BAKE settings — approximately 5 cups Prepackaged bread mixes — 5 cups DOUGH setting — 5 2/3 cups • Handle the bread pan with care. Remove the bread pan by turning counter clockwise and pulling straight up on the handle. Do not turn or shake the bread pan while taking it out. If the bread pan is damaged or bent, the temperature sensor will not work properly. Handle hot bread pan using pot holders or oven mitts.
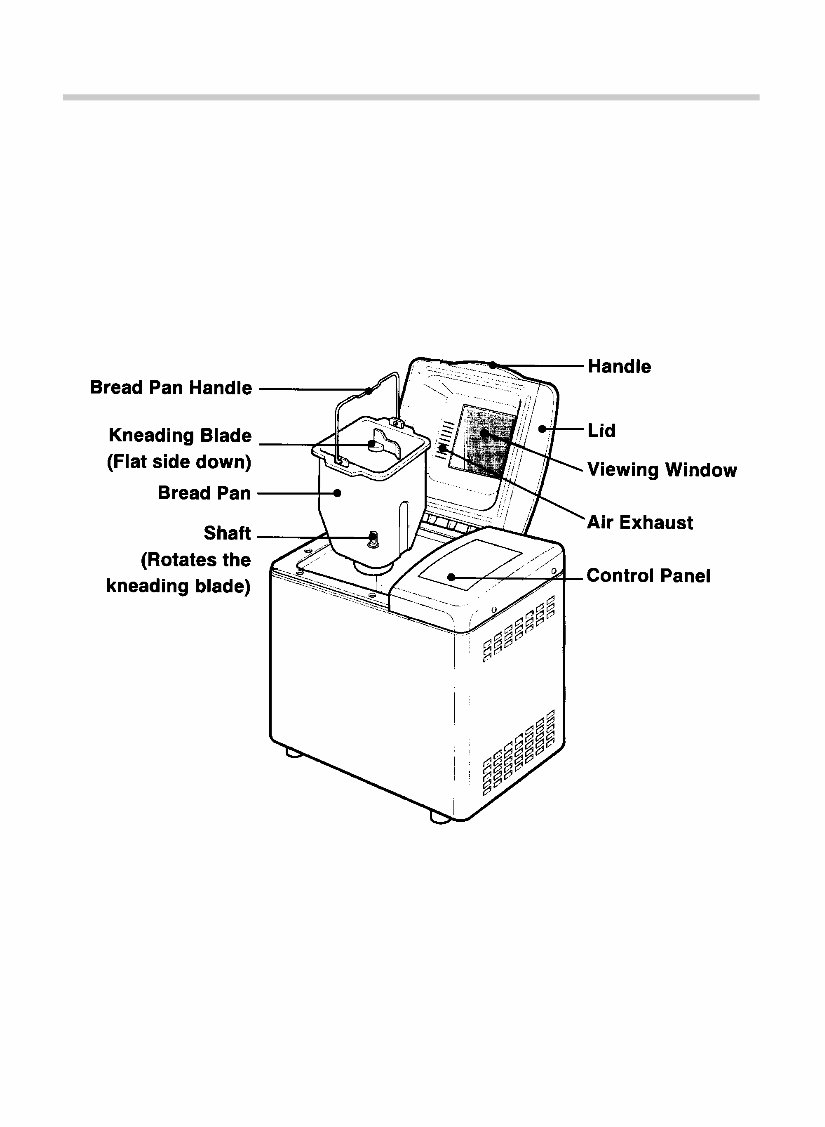
- 5 - BREAD MACHINE INTRODUCTION The illustrations in this instruction manual are for information purposes only.You may find your bread machine looks different, however, the steps of operation are the same. Insert bread pan until it fits securely into bottom of bread machine, turn clockwise to lock into place. n Parts
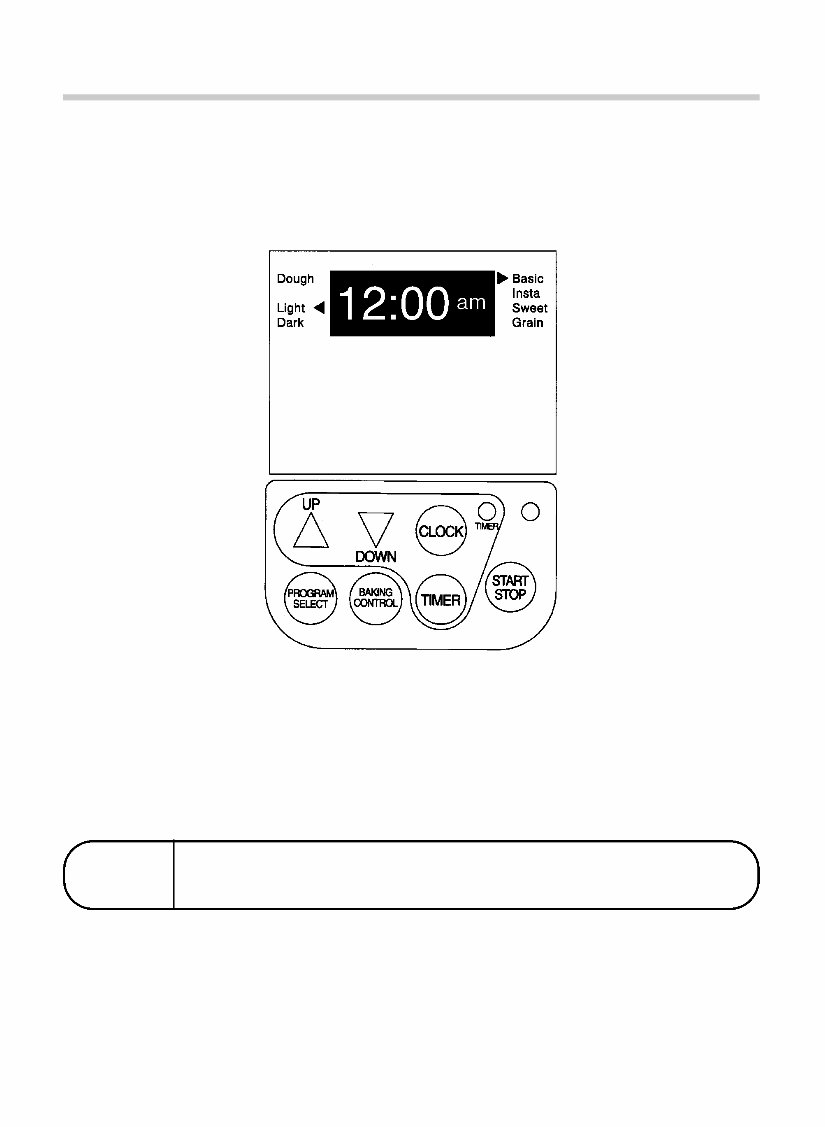
- 6 - n Control Panel If you want to cancel the selected program, press the STOP pad and hold it down for more than 5 seconds at any time during the cycle. PROGRAM CANCEL TIMER Press TIMER pad to delay program. The time will advance by 1 minute intervals. Clock must be set to use delay program. DELAY TIMER INDICATOR After setting the delay time, press the TIMER pad.The timer light will come on. DISPLAY WINDOW Indicates the program, crust color and amount of time left for completion of program or the time of day. Indicates display signals. (See page 32.) PROGRAM SELECT Press the select the program. BAKING CONTROL Press to select light or dark crust for the Basic, Insta or Sweet programs. Use light crust for breads high in sugar. START/STOP After selecting the program and timer (if needed), press to star t the program or timer count down. Press for more than 5 seconds during the cycle to cancel a program. OPERATION LIGHT Red light is lit when in operation or flashes red when in keep warm process.
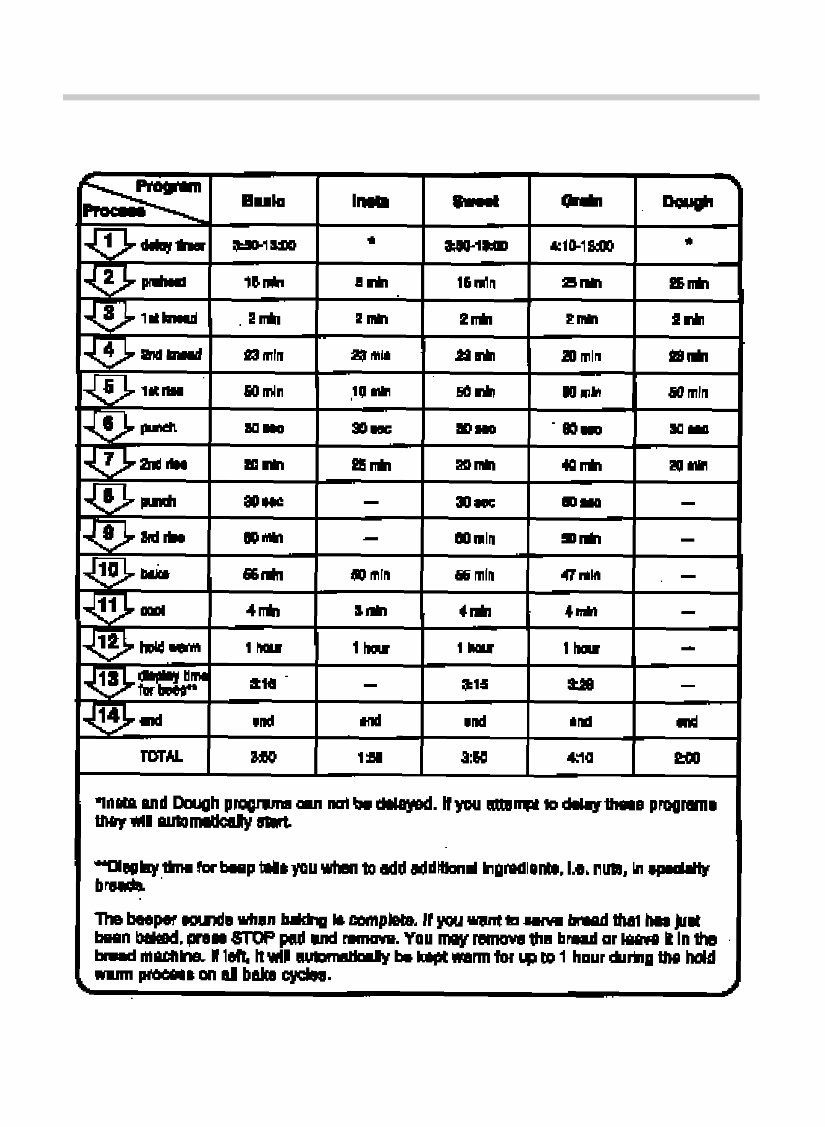
- 7 - n Basic Features PROGRAM SELECT The control panel will let you choose different programs. The Basic, Sweet and Grain programs contain an audible signal to add additional ingredients (i.e., nuts). • Basic . . . . . . . . . . . . . . . . . . . . . . . . . . . . Use this program for basic bread recipes. During the first 15 minutes the bread machine is preheating prior to the first knead. • Insta . . . . . . . . . . . . . . . . . . . . . . . . . . . . . Save time by using this program.The bread may be shorter and more dense. During the first 5 minutes the bread machine is pre- heating prior to the first knead. • Sweet . . . . . . . . . . . . . . . . . . . . . . . . . . . . This program works best if a recipe is high in sugar or fat or burns easily. During the first 15 minutes the bread machine is preheating prior to the first knead. • Grain . . . . . . . . . . . . . . . . . . . . . . . . . . . . If a recipe contains more than 50% whole wheat flour, use this program. During the first 25 minutes the bread machine is preheating prior to first knead. • Dough . . . . . . . . . . . . . . . . . . . . . . . . . . . . This program is used to prepare dough for making bread or rolls which are shaped before baking in a conventional oven. During the first 25 minutes the bread machine is preheating prior to the first knead.
- 8 - n Program Specifications
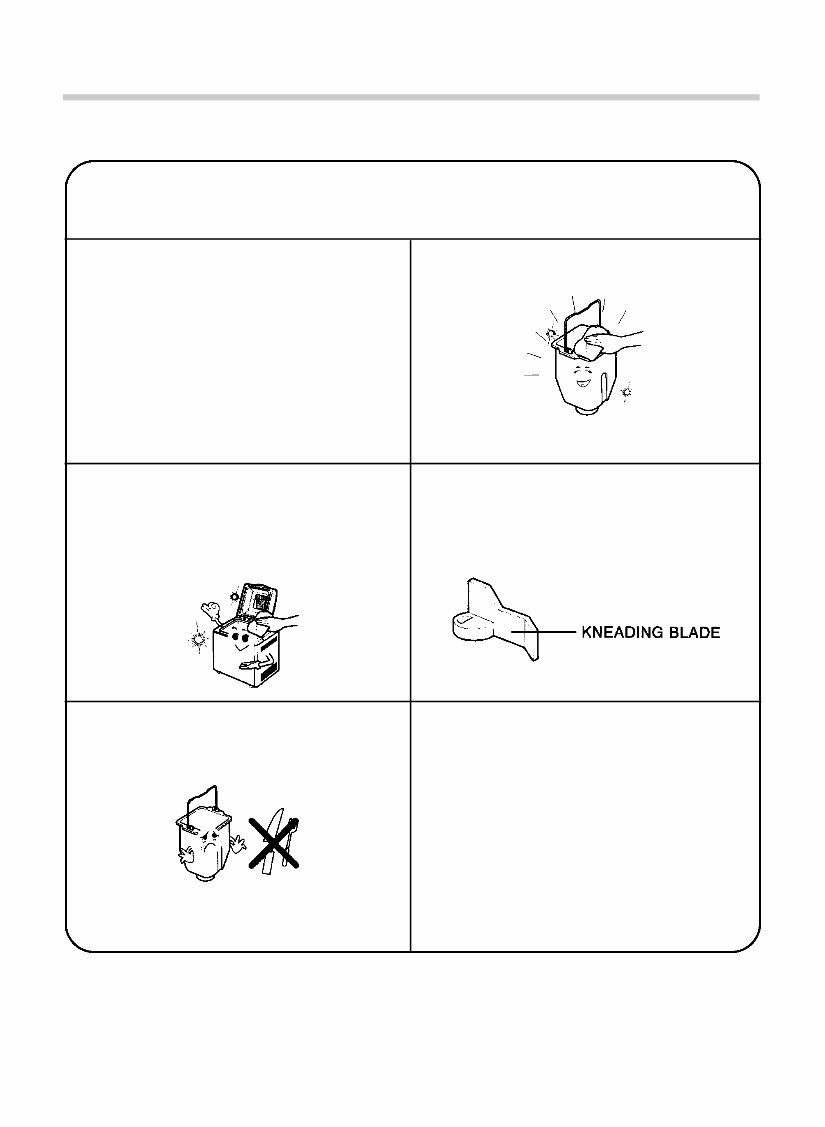
- 9 - CLEANING INSTRUCTIONS CLEANING (Always unplug unit) ANY SERVICING REQUIRING DISASSEMBLY, OTHER THAN THE CLEANING DESCRIBED BELOW, SHOULD BE PERFORMED BY AN AUTHORIZED SERVICE REPRESENTATIVE. • Avoid using any cleaning agents other than dish detergent. • Do not use steel wool or other abrasive materials. • Do not wash any parts in the dishwasher. • It is not necessary to remove the kneading blade for cleaning. Wash it with a soft brush or cloth and dry thoroughly. • Do not use metal utensils inside the machine. They will damage the non-stick coating. If the bread sticks to the lid, use a plastic pancake turner to clean. NOTE: The non-stick coating may change color over time. This is caused by moisture and steam and in no way affects performance. • Wipe the exterior with a damp dishcloth after each use. • Do not immerse in or splash with water. • After using, cool and wipe out the oven interior with a damp dishcloth or plastic scouring pad. • Do not immerse the bread pan in water. Wipe clean with a damp cloth, then dry thoroughly. • Do not place bread pan in conventional oven. STORING • Be sure bread machine is completely cooled before storing. • All removable parts should be thoroughly cleaned and dried. • Store bread machine with lid closed. The illustrations in this instruction manual are for information purposes only.You may find your bread machine looks different, however, the steps of operation are the same.
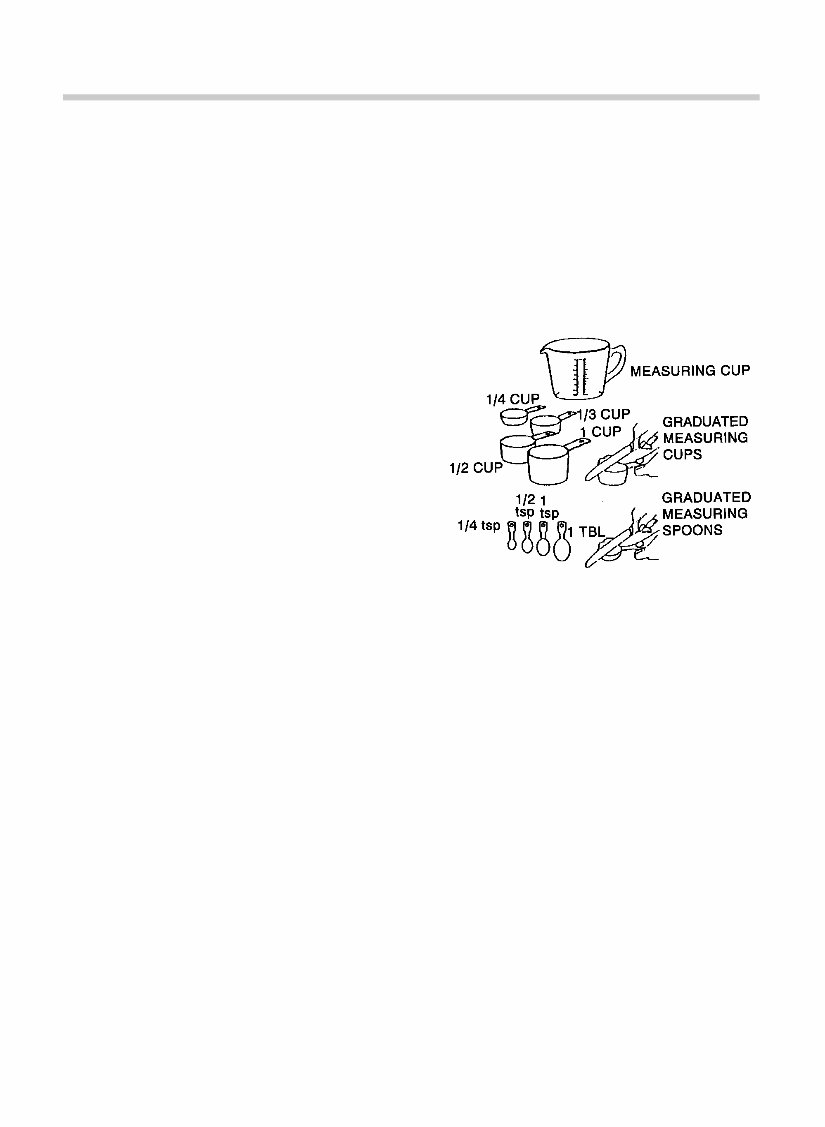
- 10 - INGREDIENTS Congratulations! You have just acquired a TOASTMASTER ® Bread Machine.Toastmaster Inc. has become a household name you can count on, as has RED STAR ® Yeast.The home economists at RED STAR ® Yeast and TOASTMASTER have combined their efforts to provide the recipes in this cookbook. Many hours of developing and testing these recipes were necessary to assure you, the home baker, a variety of delicious homemade breads. Read the following information before you shop for ingredients.This bread machine will bake up to a 2 pound loaf of fresh bread containing approximately 4 cups of flour. All ingredients except water should be at room temperature. Place ingredients in bread pan in the order listed in recipe: liquids, dry and then yeast. Measure accurately for successful bread machine bread loaves. Mis-measuring, even slightly, can make a big difference in your results. Measure each ingredient precisely before pacing it into the bread pan. • To measure liquids, use a clear glass or plastic liquid measuring cup. Read the measurement at eye level. • To measure flour, spoon into a standard dry ingredient measuring cup and level with a straight edge. Do not sift flour or pack in measuring cup. • Use standard measuring spoons and level with a straight edge. n Yeast: The Number One Ingredient RED STAR ® Active DryYeast was used in developing all the recipes in this book. However, RED STAR ® QUICK RISE Yeast may also be used. We found that we did not have to vary the amount used when we substituted one for the other. Follow package directions if using Bread Machine Yeast.Do not use compressed yeast. A 1/4 oz. package of RED STAR ® Yeast contains approximately 2 1/4 level teaspoons of yeast.The activity of yeast will deteriorate when it is exposed to oxygen, moisture or warmth.Therefore, yeast needs to be stored airtight and refrigerated or frozen. Measure out amount needed and allow it to come to room temperature before using — approximately 15 minutes. Use yeast before expiration date. If using bulk yeast, keep refrigerated or frozen. If using jarred yeast and it has been open more than 2 months, check its freshness with the following test. To test yeast, use a liquid measuring cup and fill to the 1/2 cup level with warm water (110°-115°F). Add 1 teaspoon granulated sugar and stir. Sprinkle 2 1/4 teaspoons of yeast on top of sugar water. In 3 or 4 minutes, it will have absorbed enough liquid to activate and will start rising to the surface. If at the end of 10 minutes, the yeast has multiplied to the 1 cup mark, it is very active. The yeast mixture may be used immediately in your Toastmaster Bread Machine in any recipe calling for 2 1/4 teaspoons of yeast. (Remember to adjust your recipe for the 1/2 cup of water used in the test and do not add additional yeast.) Add mixture with liquid ingredients; do not use to delay bread. n Flour: Bread Flour is Essential All types of flour are affected by many factors, such as milling grades, moisture content, length of storage, and manufacturing processes. Adjustments to the recipes may need to be made to compensate for climactic changes in different regions to ensure an excellent loaf. Bread flour is a definite necessity. Milled from hard winter or spring wheat, it has a higher protein content that makes it more durable than all-purpose flour. The protein, when mixed with liquid,
If you are in need of the instruction manual and recipes for the Toastmaster Bread Machine Parts model 1190, you have come to the right place. These manuals are invaluable resources for both professional mechanics and DIY enthusiasts alike. The manual is available in .PDF format, providing comprehensive guidance on operating and maintaining your bread machine. Additionally, it includes a variety of recipes to help you make the most of your machine's capabilities.
With the instruction manual, you will gain insights into the various parts of the bread machine, its functions, and how to troubleshoot common issues. The included recipes offer a wide range of options for creating delicious bread and other baked goods. Whether you are a seasoned baker or just starting out, these resources will prove to be indispensable in your culinary endeavors.
Recently Viewed
5,521,897Happy Clients
2,594,462eManuals
1,120,453Trusted Sellers
15Years in Business
Price:
Actual Price:
Toastmaster Bread Machine Parts model 1190 instruction manual recipes