

Viking Husqvarna 6460 Operating Manual
What's Included?
Fast Download Speeds
Online & Offline Access
Access PDF Contents & Bookmarks
Full Search Facility
Print one or all pages of your manual

1
downloaded from paulderey on ebay

For you and your
new Viking
We have prepared this booklet to help you
learn how to operate your new Viking
sewing machine and how to make use of
all its sewing possibilities.
We hope you will get many pleasant hours
with your new sewing machine.
HUSQVARNA AB. SWEDEN
US Factory Subsidiary:
Viking Sewing Machine Co. Inc..
2300 Louisiana Ave. North.
Minneapolis, Minn. 55427.
In countries other than the U.S.A. and
the U.K., Viking sewing machines are
sold under the name ‘‘Husqvarna”. For
practical reasons the illustrations in this
manual show machines with the
Husqvarna name.
2
downloaded from paulderey on ebay
3
downloaded from paulderey on ebay
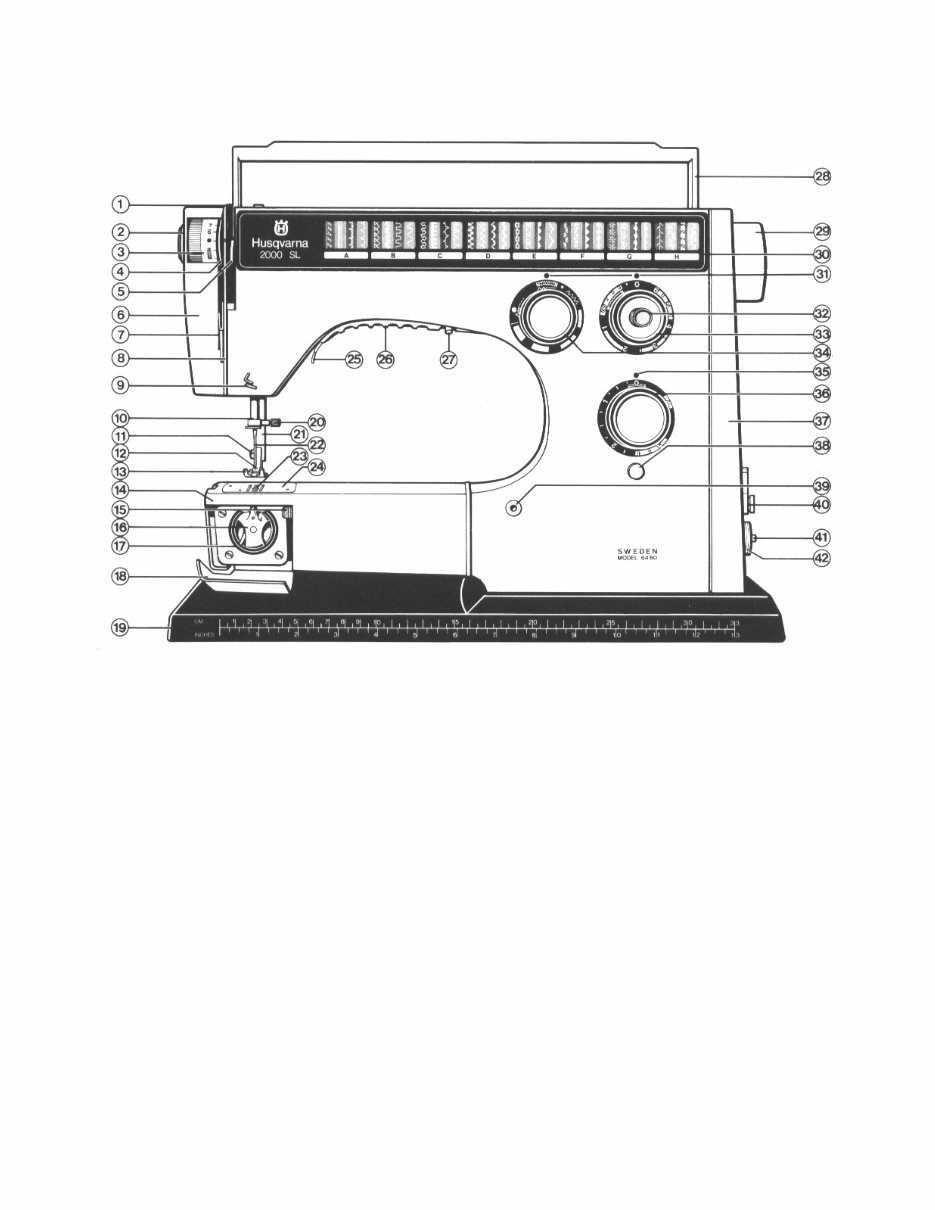
1. Top thread guide
2. Dial for the presser foot
pressure
3. Upper thread tension dial
4. Thread tension discs
5. Thread take‐up lever
6. Face plate
7. Thread guide
8. Thread take‐up spring
9. Front thread guide
10. Needle bar
11. Presser foot screw
12. Presser foot ankle
13. Presser foot sole
14. Free Arm
15. Key for throat plate
16. Bobbin case
17. Shuttle (hook)
18. Door for shuttle (hook)
19. Base plate
20. Needle clamp screw
21. Presser bar
22. Needle
23. Feed dog
24. Needle plate (throat plate)
25. Finger grip for lowering
light
26. Light guard
27. Light switch
28. Handle
29. Hand wheel
30. Pattern scale
31. Setting dot
32. Reverse feeding button
33. Stitch length dial
34. Stitch selector
35. Setting dot
36. Stitch width dial
37. End cover
38. Drop feed button
39. Hole for attaching extension
table
40. Thread guide for bobbin
winding
41. Bobbin winding spindle
42. Gearshift dial
4
downloaded from paulderey on ebay
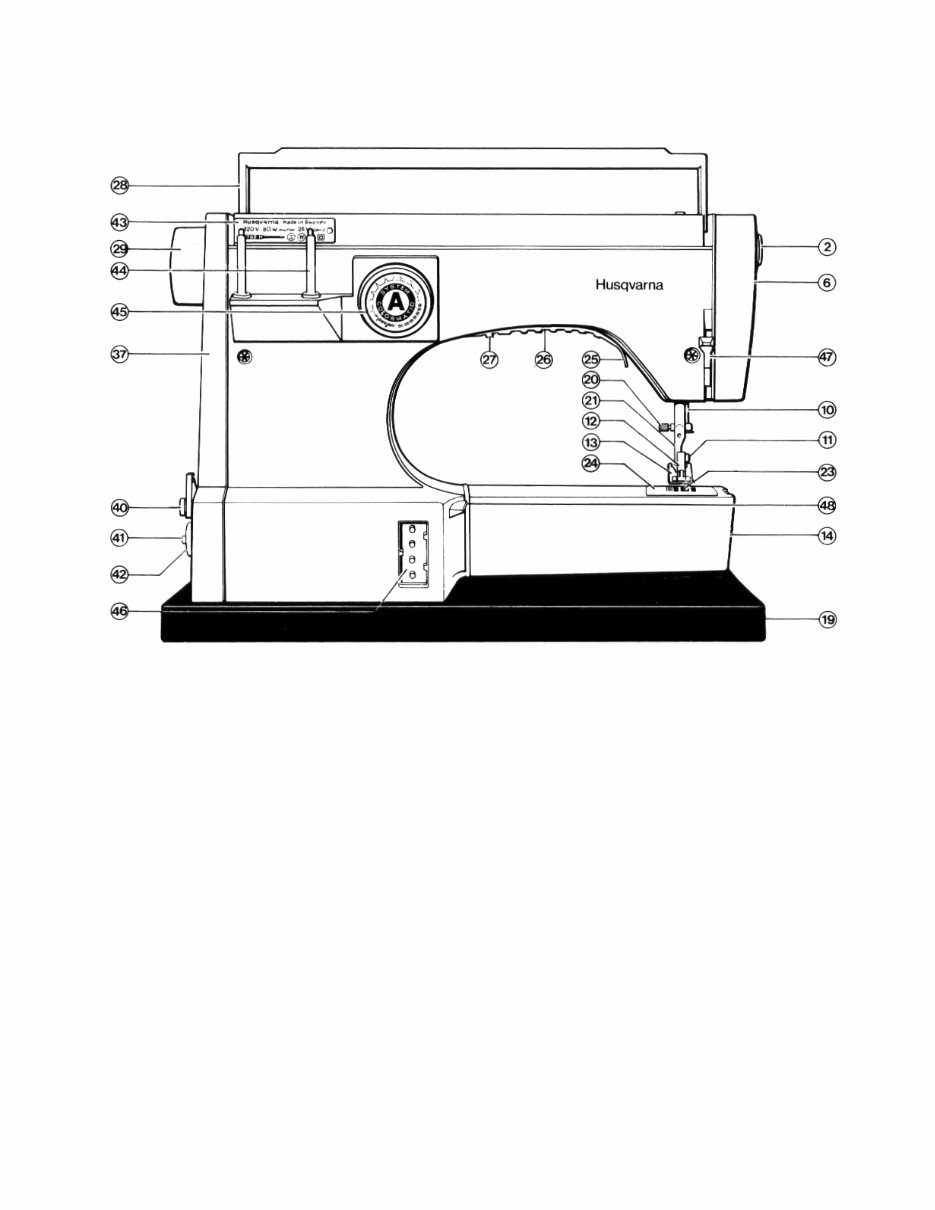
2. Dial for the presser
foot pressure
6. Face plate
10. Needle bar
11. Presser foot screw
12. Presser foot ankle
13. Presser foot sole
14. Free arm
19. Base plate
20. Needle clamp screw
40. Thread guide for bobbin
winding
41. Bobbin winding spindle
42. Gearshift dial
43. Type plate
44. Spool pins
45. Stitch programmer
46. Socket for foot control
47. Presser bar handle
48. support for extension table
21. Presser bar
23. Feed dog
24. Needle plate (throat plate)
25. Finger grip for lowering the
light
26. Light guard
27. Light switch
28. Handle
29. Hand wheel
37. End cover
5
downloaded from paulderey on ebay
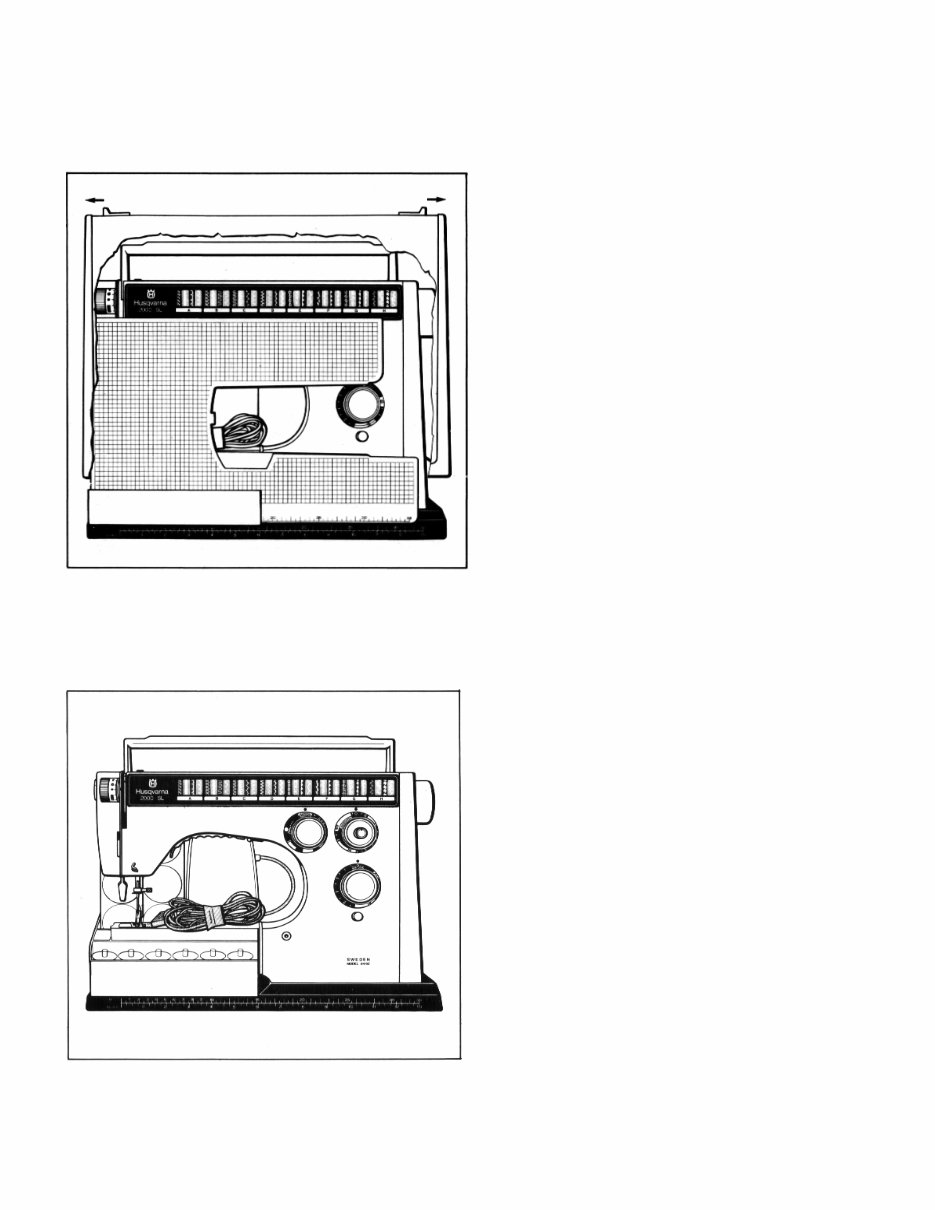
Unpacking the machine
Place the machine on the table with the
little mark on top of the cover facing you.
Pull the locking lips from the handle, lift
off the cover and put it aside. Remove the
extension table and the foot control. Lift
the accessory box somewhat and slide it to
the left from the machine.
In order to protect the machine during
transport it has undergone an anti‐
corrosive treatment. Therefore wipe the
machine clean before you start sewing. Be
especially careful when cleaning the throat
plate and the space round the needle. First
test sew on a scrap of fabric.
Putting the machine away
Pull the plugs out of the wall outlet and the
socket of the machine. Wind the leads around
your hand, starting at the control and put on
the lead holder. Press the foot control together
and place it in its compartment with the thick
end down. The bottom of the foot control
should be turned toward the machine.
Lower the presser foot. Make sure that all
accessories are correctly placed in the box.
Slide the accessory box into place and put the
extension table into the box. Lift the handle
and put on the cover. Make sure that the
locking lips are inserted into the notches of the
handle.
6
downloaded from paulderey on ebay
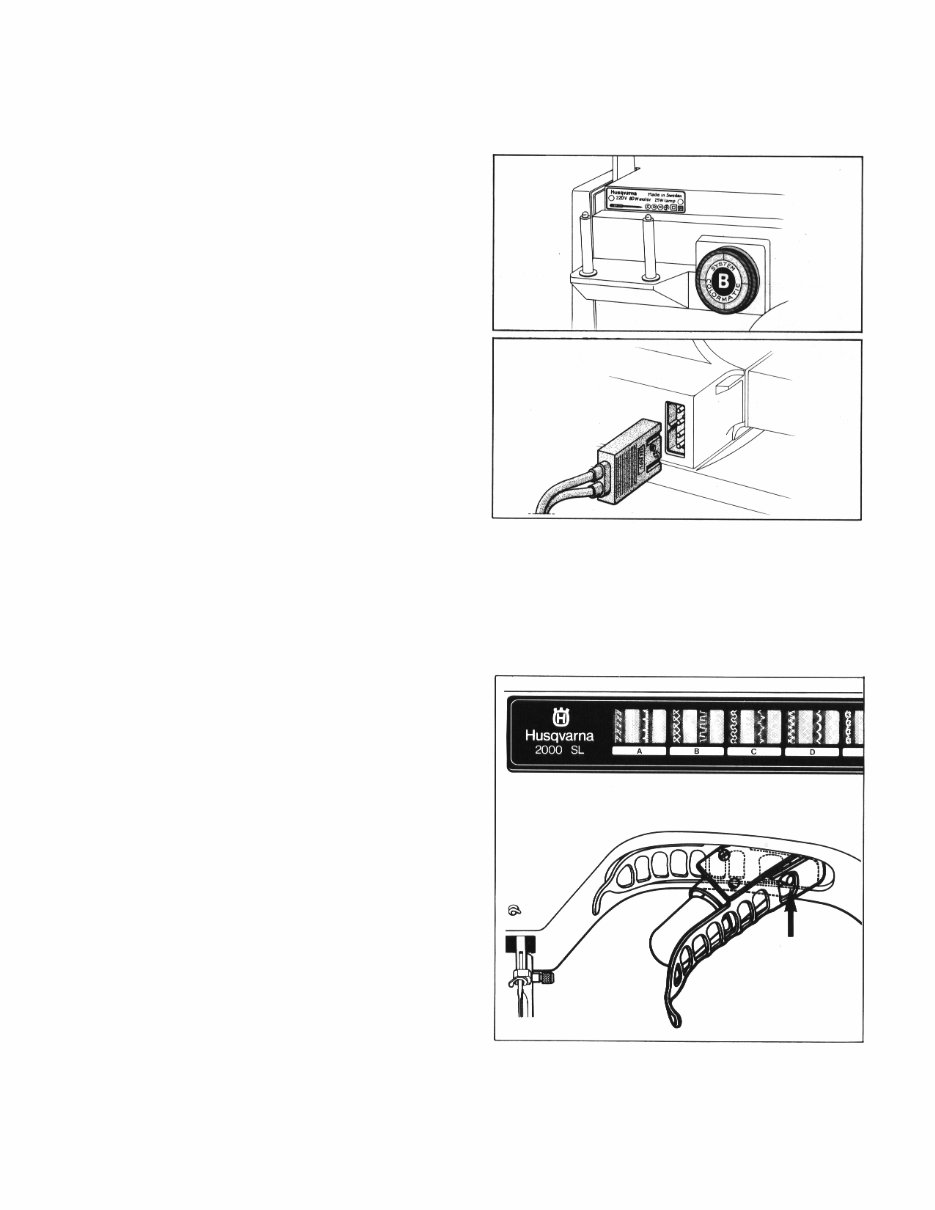
Connection to wall outlet
The voltage of the machine is given on a plate
at the back of the machine, under the handle.
Ensure that the wall outlet voltage is the same
as that of the machine. Then connect the
machine to the proper wall outlet.
Connecting the foot control
Remove the lead holder. Place the foot control
under the table. Insert the foot control plug
into the socket at the back of the machine.
Lighting
The switch for the light is on the underside of
the upper arm of the machine. To lower the
light assembly in order to have more light for
detail work or for changing the light bulb, pull
downward on the projection at the left of the
light guard. For changing the light bulb, see
page 46.
7
downloaded from paulderey on ebay
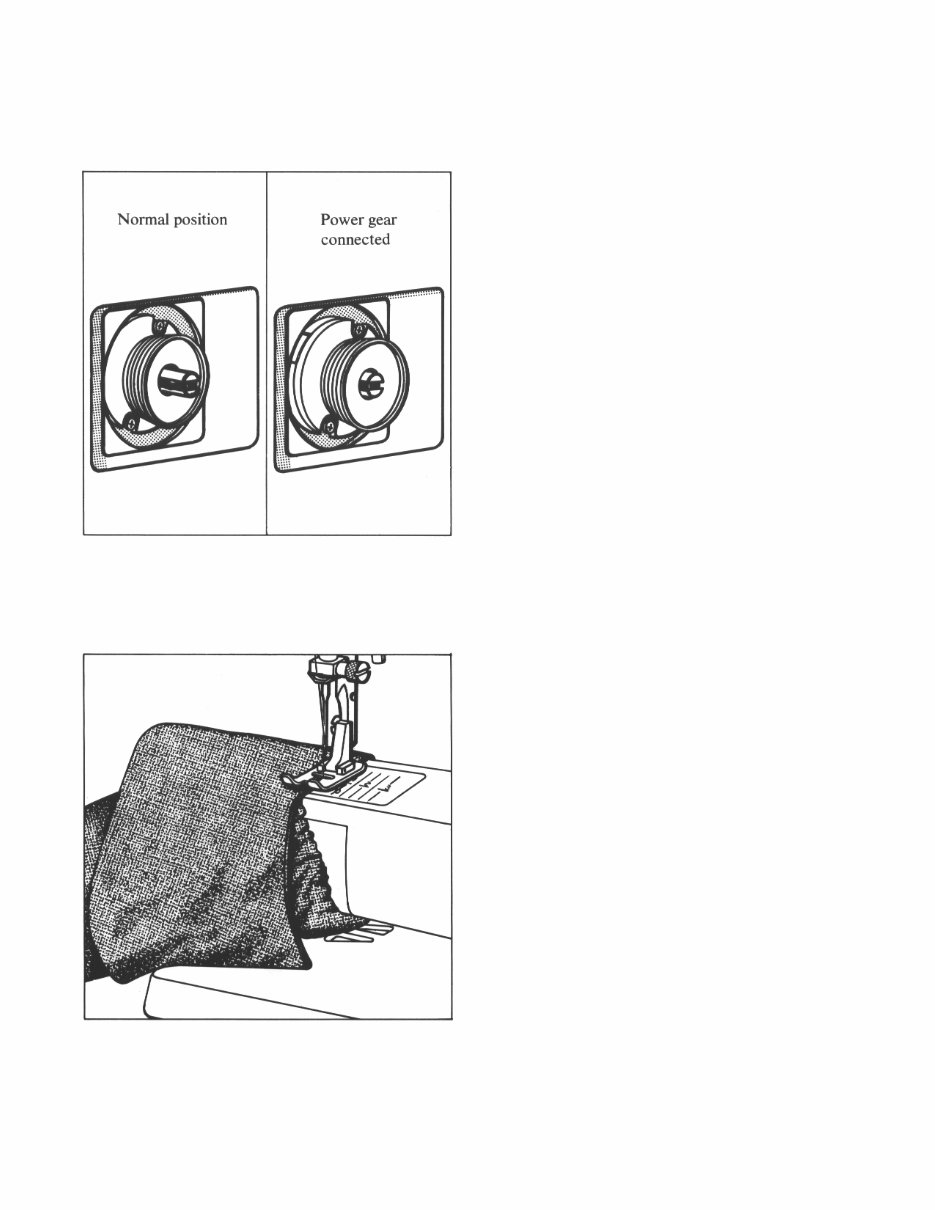
Power gear
or the “low gear” or “gearshift” as it is also
called, is a practical feature. If you grasp the
little wheel, which is located on the bobbin
spindle on the right side of the machine, and
pull it outward, the machine will sew only 1/5
as fast as usual, preserving full motor power.
This low speed is of advantage if you wish to
sew slowly stitch by stitch, for example when
blind stitching.
Free arm
Trouser legs and sleeves can be drawn onto
the free arm making it easy to sew, mend or
patch these parts. The free arm also makes it
much easier to attach collars and cuffs as well
as sew small children’s clothes, or darn socks
and stockings on the machine.
8
downloaded from paulderey on ebay
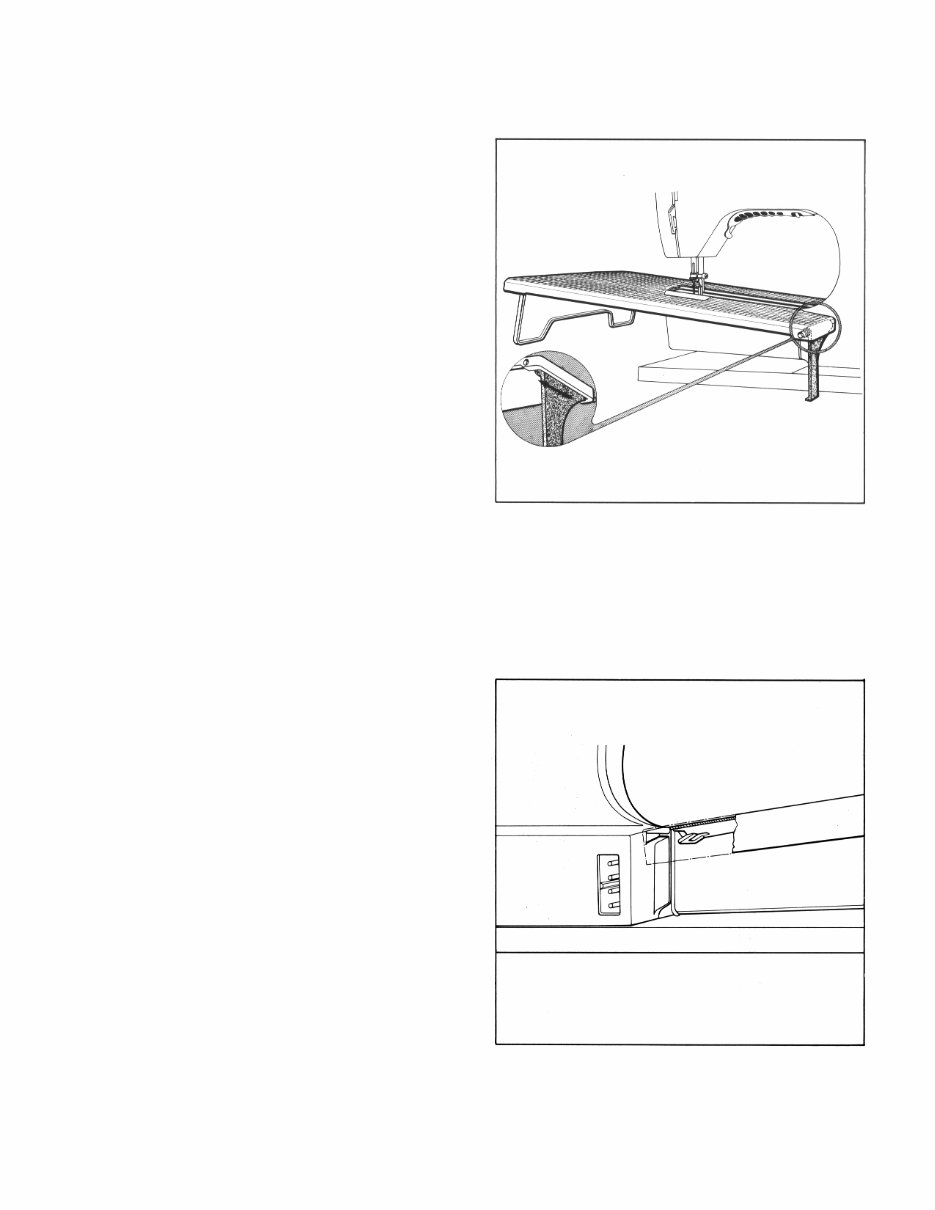
Extension table
When you need a larger working surface, attach
the extension table. Pull out the catch on the
underside of the extension table with the index
finger of your right hand and with your left
hand lower the extension table legs.
There is a notch underneath the extension
table which should be fitted into a
corresponding lip on the back of the sewing
machine. You can also use the extension table
with the support legs turned up, when
hemming skirts or sewing in larger tubular
parts of garments.
9
downloaded from paulderey on ebay
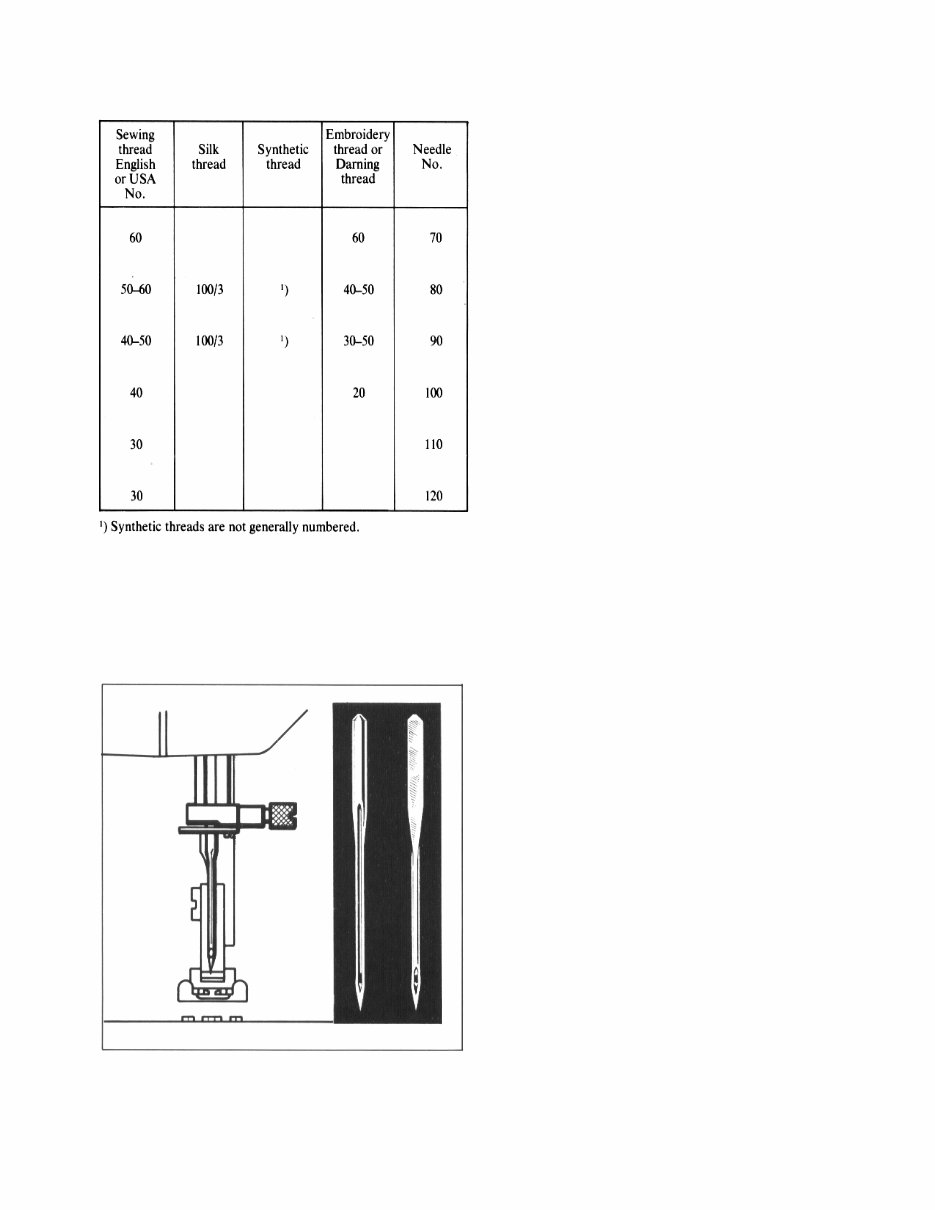
Needle and thread
Mercerized cotton thread as well as
synthetic thread is used for all sorts of
fabrics.
Special embroidery or darning thread
could be used for decorative stitching.
As the name implies, it is, of course,
also used for embroidery and darning.
The needle system has number 705H
and is adapted to modern material
such as jersey, etc. Use only needles
marked in this way. The machine is
fitted with needle No. 80. You will also
find a number of extra needles of
various sizes in the accessory box.
With regard to the size of the needle, it
may be generally said that No. 80‐90
can be used for most fabrics. For a
finer thread and for sheer and tightly
woven fabrics
a finer needle should be used. For very
heavy and stiff fabrics a coarse needle
must be used. The higher the number,
the coarser the needle. The sizes of
thread and needle to be used are
shown on the table.
Regarding special needles; see “Extra
accessories”.
Changing the needle
Loosen the needle clamp screw and
remove the needle which is to be
changed. When you insert the new
needle, turn the flat side away from
you and push the needle up into the
needle socket as far as it will go.
Tighten the screw so that the needle is
held firmly.
10
downloaded from paulderey on ebay
You're Reading a Preview
What's Included?
Fast Download Speeds
Online & Offline Access
Access PDF Contents & Bookmarks
Full Search Facility
Print one or all pages of your manual
$31.99
Viewed 17 Times Today


Secure transaction
What's Included?
Fast Download Speeds
Online & Offline Access
Access PDF Contents & Bookmarks
Full Search Facility
Print one or all pages of your manual
$31.99
The operating and instruction manual for the Viking Husqvarna 6460 model sewing machine provides essential guidance for maintaining and repairing the machine. It contains detailed information on the machine's components, functions, and troubleshooting procedures. This manual is invaluable for both professional mechanics and DIY enthusiasts, offering comprehensive insights into the sewing machine's operation and maintenance.


