

Scania DC16 & Di16 Dc Di 16 Diesel Engine Full Service & Repair Manual
What's Included?
Fast Download Speeds
Online & Offline Access
Access PDF Contents & Bookmarks
Full Search Facility
Print one or all pages of your manual

©
Scania CV AB 2002-09:3
Issue 3 en
Part No.
1 588 778
01:05-02
Work description-
16-litre engine
Industrial and marine engines

2
©
Scania CV AB 2002-09:3 01:05-02
Use a container to avoid spills when draining the
coolant and oil.
Dispose of used coolant and oil through an
authorised waste disposal contractor.

01:05-02
©
Scania CV AB 2002-09:3 3
General . . . . . . . . . . . . . . . . . . . . . . . . . . . . . . . . 4
Specifications . . . . . . . . . . . . . . . . . . . . . . . . . 4
General tightening torques . . . . . . . . . . . . . . . 5
Removing and lifting the engine . . . . . . . . . . . . 6
Special tools . . . . . . . . . . . . . . . . . . . . . . . . . . 6
Lifting and fitting the engine . . . . . . . . . . . . . . . 8
Mounting the engine in a universal stand . . . . . 9
Special tools . . . . . . . . . . . . . . . . . . . . . . . . . . 9
Cylinder head . . . . . . . . . . . . . . . . . . . . . . . . . . 10
Adjusting the valve clearance and unit injectors11
Adjusting the valve clearance . . . . . . . . . . . . 12
Adjusting the unit injector . . . . . . . . . . . . . . . 12
Order of adjustment . . . . . . . . . . . . . . . . . . . . 15
Renewing the upper rocker cover gasket . . . 16
Renewing the lower rocker cover gasket . . . 16
Cylinder head . . . . . . . . . . . . . . . . . . . . . . . . . . 20
Removal . . . . . . . . . . . . . . . . . . . . . . . . . . . . 20
Fitting . . . . . . . . . . . . . . . . . . . . . . . . . . . . . . 24
Valves. . . . . . . . . . . . . . . . . . . . . . . . . . . . . . . . 30
Removal . . . . . . . . . . . . . . . . . . . . . . . . . . . . 30
Fitting . . . . . . . . . . . . . . . . . . . . . . . . . . . . . . 30
Checking and machining . . . . . . . . . . . . . . . . 31
Valve stem seal . . . . . . . . . . . . . . . . . . . . . . . . 32
Renewal . . . . . . . . . . . . . . . . . . . . . . . . . . . . . 32
Valve seats . . . . . . . . . . . . . . . . . . . . . . . . . . . . 33
Renewal . . . . . . . . . . . . . . . . . . . . . . . . . . . . . 33
Machining the cylinder head . . . . . . . . . . . . . . 35
Specifications . . . . . . . . . . . . . . . . . . . . . . . . 35
Work description . . . . . . . . . . . . . . . . . . . . . . 37
Valve guides . . . . . . . . . . . . . . . . . . . . . . . . . . . 39
Renewal . . . . . . . . . . . . . . . . . . . . . . . . . . . . . 39
Sleeves for unit injectors . . . . . . . . . . . . . . . . . 40
Renewal . . . . . . . . . . . . . . . . . . . . . . . . . . . . . 40
Cylinder block . . . . . . . . . . . . . . . . . . . . . . . . . 42
Overhaul . . . . . . . . . . . . . . . . . . . . . . . . . . . . 42
Cylinder liner . . . . . . . . . . . . . . . . . . . . . . . . . . 43
Removal . . . . . . . . . . . . . . . . . . . . . . . . . . . . 43
Fitting . . . . . . . . . . . . . . . . . . . . . . . . . . . . . . 44
Measuring the cylinder liner height . . . . . . . 45
Machining cylinder liner height . . . . . . . . . . 47
Rear crankshaft seal . . . . . . . . . . . . . . . . . . . . . 52
Renewal . . . . . . . . . . . . . . . . . . . . . . . . . . . . . 52
Flywheel housing . . . . . . . . . . . . . . . . . . . . . . . 53
Removal . . . . . . . . . . . . . . . . . . . . . . . . . . . . 53
Fitting . . . . . . . . . . . . . . . . . . . . . . . . . . . . . . 54
Closed crankcase ventilation . . . . . . . . . . . . . . 56
Front timing gear casing . . . . . . . . . . . . . . . . . . 58
Removal . . . . . . . . . . . . . . . . . . . . . . . . . . . . . 58
Fitting. . . . . . . . . . . . . . . . . . . . . . . . . . . . . . . 59
Front crankshaft seal . . . . . . . . . . . . . . . . . . . . 60
Renewal . . . . . . . . . . . . . . . . . . . . . . . . . . . . . 60
Crank mechanism . . . . . . . . . . . . . . . . . . . . . . . 62
Piston and connecting rod . . . . . . . . . . . . . . . . 63
Removal . . . . . . . . . . . . . . . . . . . . . . . . . . . . . 63
Fitting. . . . . . . . . . . . . . . . . . . . . . . . . . . . . . . 64
Renewing a piston . . . . . . . . . . . . . . . . . . . . . 66
Connecting rod . . . . . . . . . . . . . . . . . . . . . . . . . 69
Checking . . . . . . . . . . . . . . . . . . . . . . . . . . . . 69
Renewal of bearing bushing in connecting rod. 71
Flywheel . . . . . . . . . . . . . . . . . . . . . . . . . . . . . . 73
Removal . . . . . . . . . . . . . . . . . . . . . . . . . . . . . 73
Fitting. . . . . . . . . . . . . . . . . . . . . . . . . . . . . . . 74
Support bearing . . . . . . . . . . . . . . . . . . . . . . . 75
Ring gear . . . . . . . . . . . . . . . . . . . . . . . . . . . . 76
Crankshaft . . . . . . . . . . . . . . . . . . . . . . . . . . . . 77
Removal . . . . . . . . . . . . . . . . . . . . . . . . . . . . . 77
Fitting. . . . . . . . . . . . . . . . . . . . . . . . . . . . . . . 79
Checking and machining the crankshaft . . . . 82
Timing gear . . . . . . . . . . . . . . . . . . . . . . . . . . . 84
Gear drive . . . . . . . . . . . . . . . . . . . . . . . . . . . 84
Intermediate gear . . . . . . . . . . . . . . . . . . . . . . . 86
Removal . . . . . . . . . . . . . . . . . . . . . . . . . . . . . 86
Fitting. . . . . . . . . . . . . . . . . . . . . . . . . . . . . . . 88
Bearing in intermediate gear . . . . . . . . . . . . . 89
Camshaft gear . . . . . . . . . . . . . . . . . . . . . . . . . . 92
Crankshaft gear. . . . . . . . . . . . . . . . . . . . . . . . . 93
Camshaft . . . . . . . . . . . . . . . . . . . . . . . . . . . . . . 95
Removal . . . . . . . . . . . . . . . . . . . . . . . . . . . . . 95
Fitting. . . . . . . . . . . . . . . . . . . . . . . . . . . . . . . 98
Checking camshaft setting . . . . . . . . . . . . . . 101
Removing the camshaft bearing . . . . . . . . . 102
Fitting the camshaft bearing . . . . . . . . . . . . 106
Fan drive . . . . . . . . . . . . . . . . . . . . . . . . . . . . . 110
Lubrication system . . . . . . . . . . . . . . . . . . . . . 114
Oil filter . . . . . . . . . . . . . . . . . . . . . . . . . . . . 114
Oil cooler . . . . . . . . . . . . . . . . . . . . . . . . . . . 116
Oil cleaner . . . . . . . . . . . . . . . . . . . . . . . . . . 118
Oil pump . . . . . . . . . . . . . . . . . . . . . . . . . . . 122
Exhaust manifold . . . . . . . . . . . . . . . . . . . . . . 124
Turbocharger . . . . . . . . . . . . . . . . . . . . . . . . . 125
Contents
4
©
Scania CV AB 2002-09:3 01:05-02
General
Specifications
Cylinder bore 127.0 mm
Stroke 154.0 mm
Displacement 15.6 dm
3
No. of main bearings 5
Firing sequence 1-5-4-2-6-3-7-8
Compression ratio 18:1
Direction of rotation (engine viewed from behind) Anticlockwise
Engine speed, low idling (all-speed) 500 rpm
Engine speed, high idling (all-speed) 2400 rpm
Oil volume 35 litre
Oil grade see booklet 00:03-01
Weight (without oil, coolant, radiator; with fan) 1,346 kg
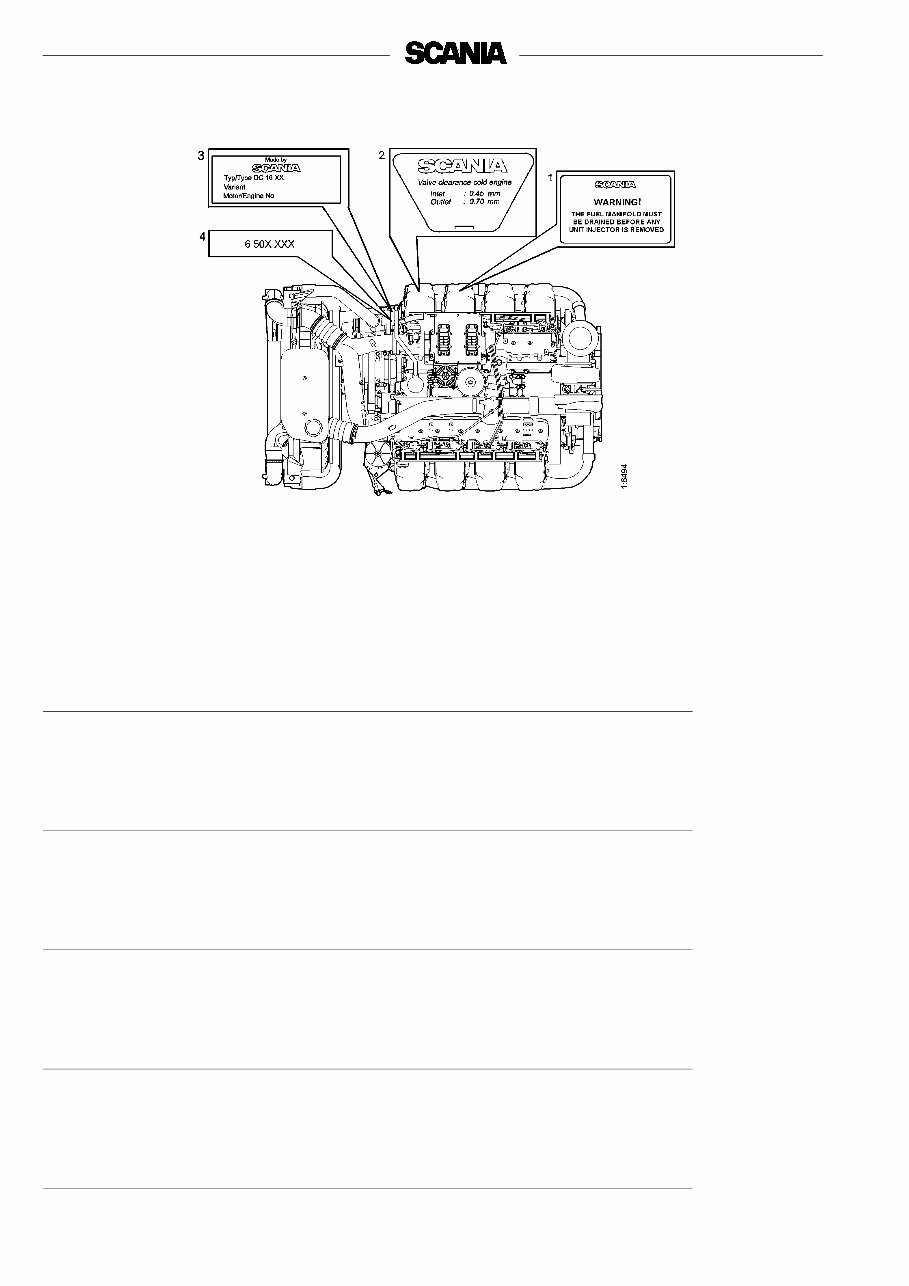
1. Warning plates
2. Instruction plate: Valve clearance
3. Type plate: Engine type, Engine serial
number
4. Engine serial number, stamped
DC16 engine shown. Di 16: same location

01:05-02
©
Scania CV AB 2002-09:3 5
General tightening torques
*) A tolerance of +/- 15% applies to the specified tightening torques unless stated otherwise.
The following tightening torques apply in
general unless otherwise specified:*)
Flange bolt M6 8.6 Nm
Flange bolt M8 26 Nm
Flange bolt M10 50 Nm
Flange bolt M12 92 Nm
Stud in casting M8 13 Nm
Stud in casting M10 25 Nm
6
©
Scania CV AB 2002-09:3 01:05-02
Removing and lifting the engine
Special tools
1. Drain the oil and coolant.
Help protect our environment! Use a
suitable container. Dispose of used
coolant and oil through an authorised
waste disposal contractor.
DC engine:
- Remove the air filter and the inlet pipe
between the turbocharger and the air filter.
- Undo the connections for coolant, charge air
pipes between engine and charge air cooler,
and ventilation line to the expansion tank.
- Remove the cables with cable clamp ring on
the rear right-hand side.
DI engine:
- Disassemble the engine and reverse gear.
- Detach the pipe between the seawater pump
and heat exchanger. Remove the seawater
pump.
- Remove the turbocharger oil pipes.
2. Disconnect the negative battery cable.
3. Remove the starter motor and alternator wir-
ing
4. Remove the wiring to the control unit.
5. Remove the fuel connection.
Number Description Illustration Tool board
99 398 Lifting eyes
1 360 442 Lifting eyes
1 512 730 Lifting eye
98 094 Lifting chain
587 308 Lever block
01:05-02
©
Scania CV AB 2002-09:3 7
DC engine:
- Disconnect the filter housing for the
crankcase ventilation and place to one side so
that it is free from the lifting chain.
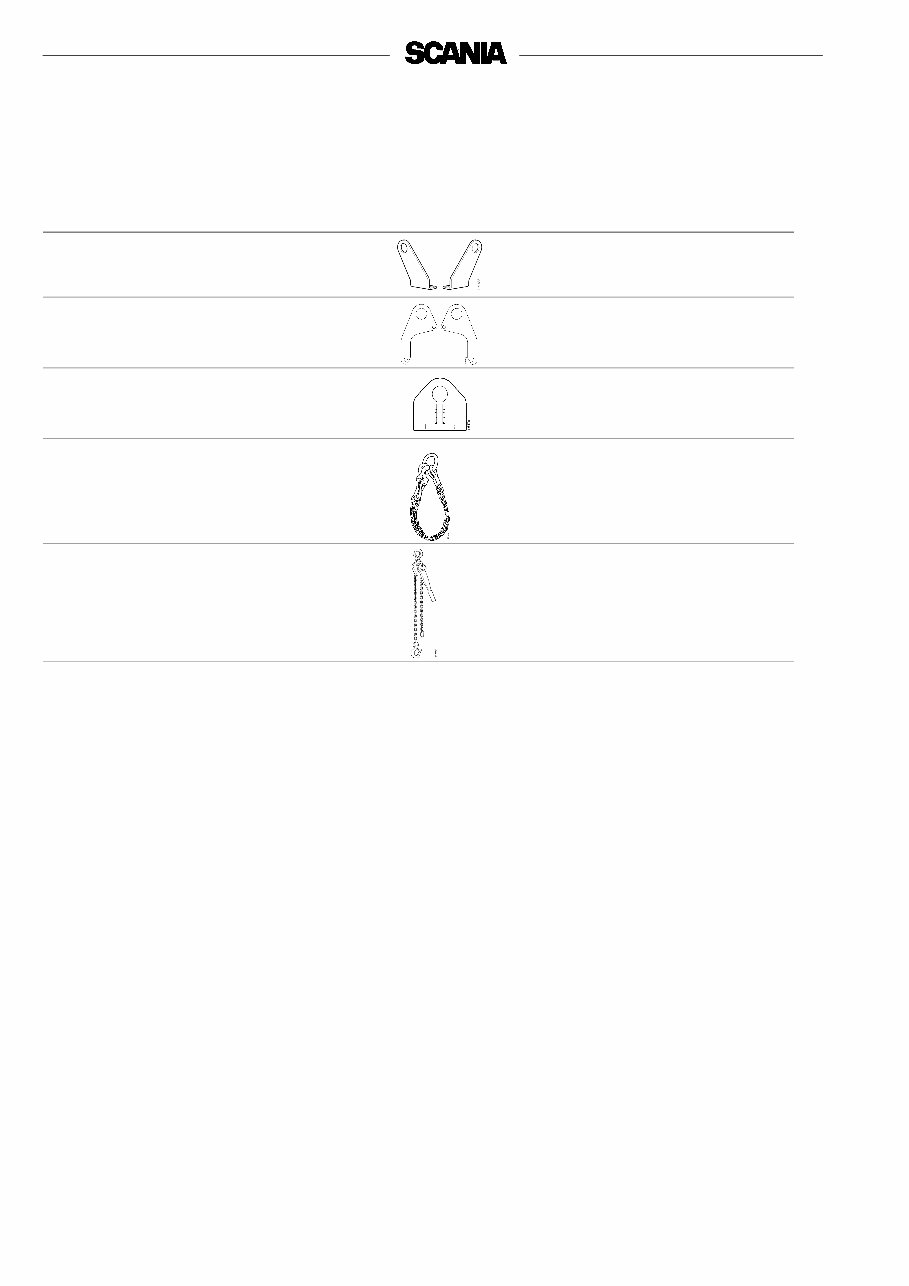
- Undo the AC compressor and move to one
side.
- Screw lifting eyes 99 398 onto the engine
using flange bolts M12x30 (4).
DI engine:
- Fit the front lifting eye 1512730 with two
M12 x ? mm bolts through the expansion
tank. Turn the lifting eye towards the centre
of the engine.
- Screw two lifting eyes 1360442 into the
flywheel housing over the centre in the ten to
two position.
6. Fasten the lifting chain 98 094 to the rear lift-
ing eyes.
7. Fasten the lever block (587 308) to the front
lifting eye.
Note: The engine lifting eyes are sized for
lifting the engine only, not the
engine together with connected
equipment (high-current generator,
gearbox, reverse gear, etc.) or
frame. All three lifting eyes must be
used.
8. Undo the connecting pipe to the gearbox
cooler or reversing gear oil cooler.
9. Undo the connection to the gearbox or
reverse gear.
10. Undo all the engine brackets and lift
away/out the engine.
Note: The lifting eyes are dimensioned for
a maximum inclination angle of 20°
when lifting the engine.
DC16 engine
DC16 engine

8
©
Scania CV AB 2002-09:3 01:05-02
Lifting and fitting the engine
DC engine:
- Screw lifting eyes 99 398 onto the engine
using flange bolts M12x30 (4).
- Disconnect the filter housing for the
crankcase ventilation and place to one side so
that it is free from the lifting chain.
DI engine:
- Screw two lifting eyes 1360442 into the
flywheel housing over the centre in the ten to
two position. The seawater pump, the heater
exchanger pipe and the turbocharger oil pipes
must be removed.
- Remove the closed crankcase ventilation
filter.
- Fit the front lifting eye 1512730 with two
M12 x ? mm bolts through the expansion
tank. Turn the lifting eye towards the centre
of the engine.
1. Fasten the lifting chain 98 094 to the rear
lifting eyes.
2. Fasten the lever block (587 308) to the front
lifting eye.
3. Lift the engine in position and bolt it to the
front engine suspension.
4. DI16: Remove the rear lifting eyes.
5. Bolt together the engine and gearbox or
reverse gear.
6. Bolt the engine to the rear engine suspension.
7. Remove the lifting eyes.
8. DC16: Fit the filter housing for the crankcase
ventilation.
9. Fit the connecting pipes to the gearbox cooler
or reverse gear oil cooler.
10. Connect the wiring to the control unit and
starter motor/alternator.
11. Fit the fuel pipe.
DC engine:
- Fit the coolant connections, charge air lines
between the charge air cooler and the engine.
- Fit the ventilation line and static line. Fit the
inlet pipe to the turbocharger and refit the air
filter.
DI engine:
- Fit the turbocharger oil pipes and the
seawater pump and pipe from the pump to the
heat exchanger.
- Fit the closed crankcase ventilation filter.
12. Connect the negative battery cable.
13. Fill with oil and coolant as directed in book-
let 00:03-01.
14. Test run the engine to check that no leakage
occurs. Top up with coolant if necessary.
01:05-02
©
Scania CV AB 2002-09:3 9
Mounting the engine in a universal stand
Special tools
DI engine:
- Remove the heat exchanger pipe connections
and remove the entire heat exchanger.
- Remove the exhaust manifolds.
- Remove the control unit connectors.
DC and DI engines:
1. Remove the side covers and the gaskets on
the right and left-hand sides.
2. Undo the clamps on any obstructing wiring.
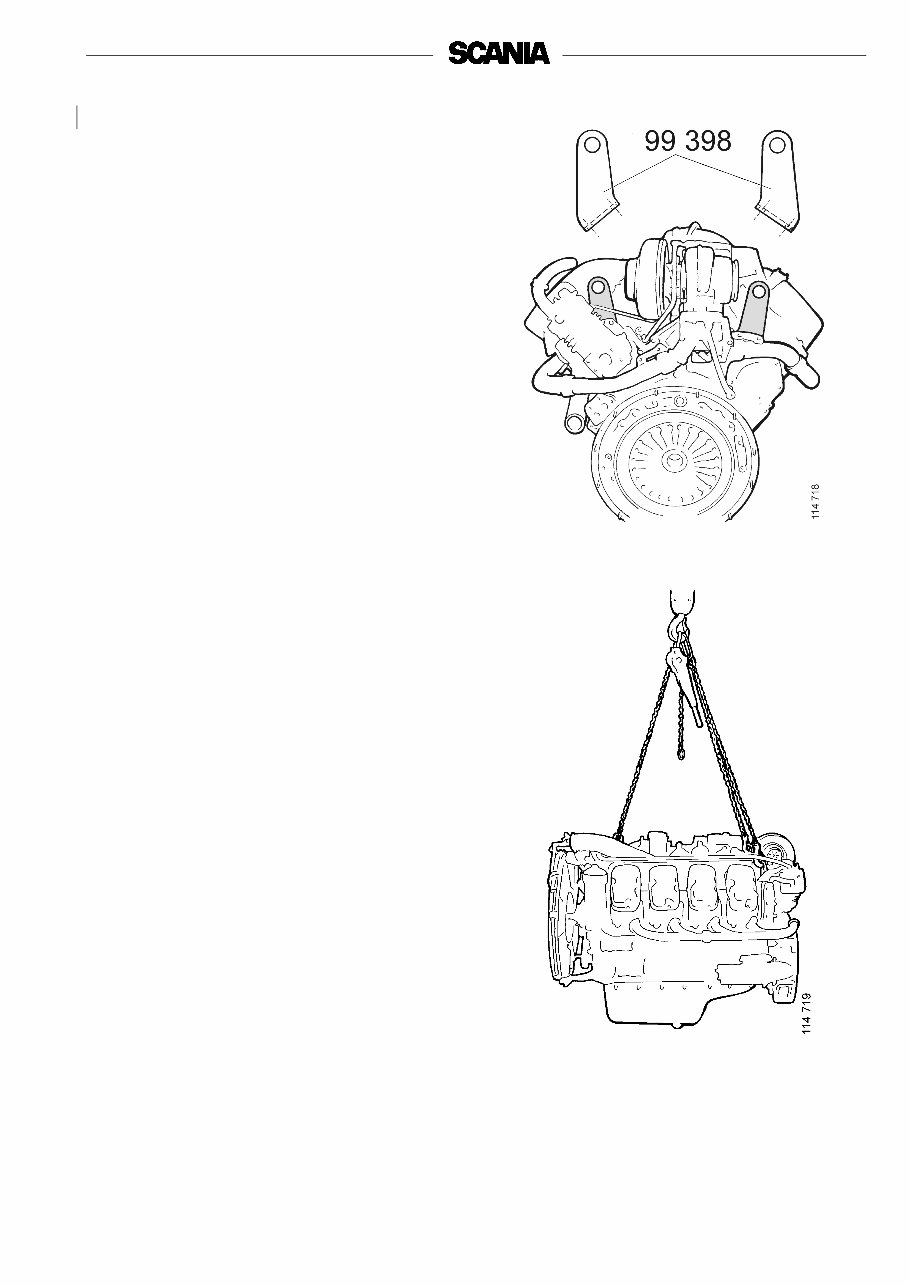
3. Bolt spacer 99 349 onto the right and left-
hand sides. Use the bolts for the side covers.
4. Screw fixture 98 163 onto the spacers. Use
M8 x 25 bolts and M8 washers.
5. Screw the fixture to the universal stand and
place the fixture's support on the opposite
side as illustrated.
Number Description Illustration Tool board
99 349 Spacer
98 163 Fixture
587 692 Universal stand
DC16
10
©
Scania CV AB 2002-09:3 01:05-02
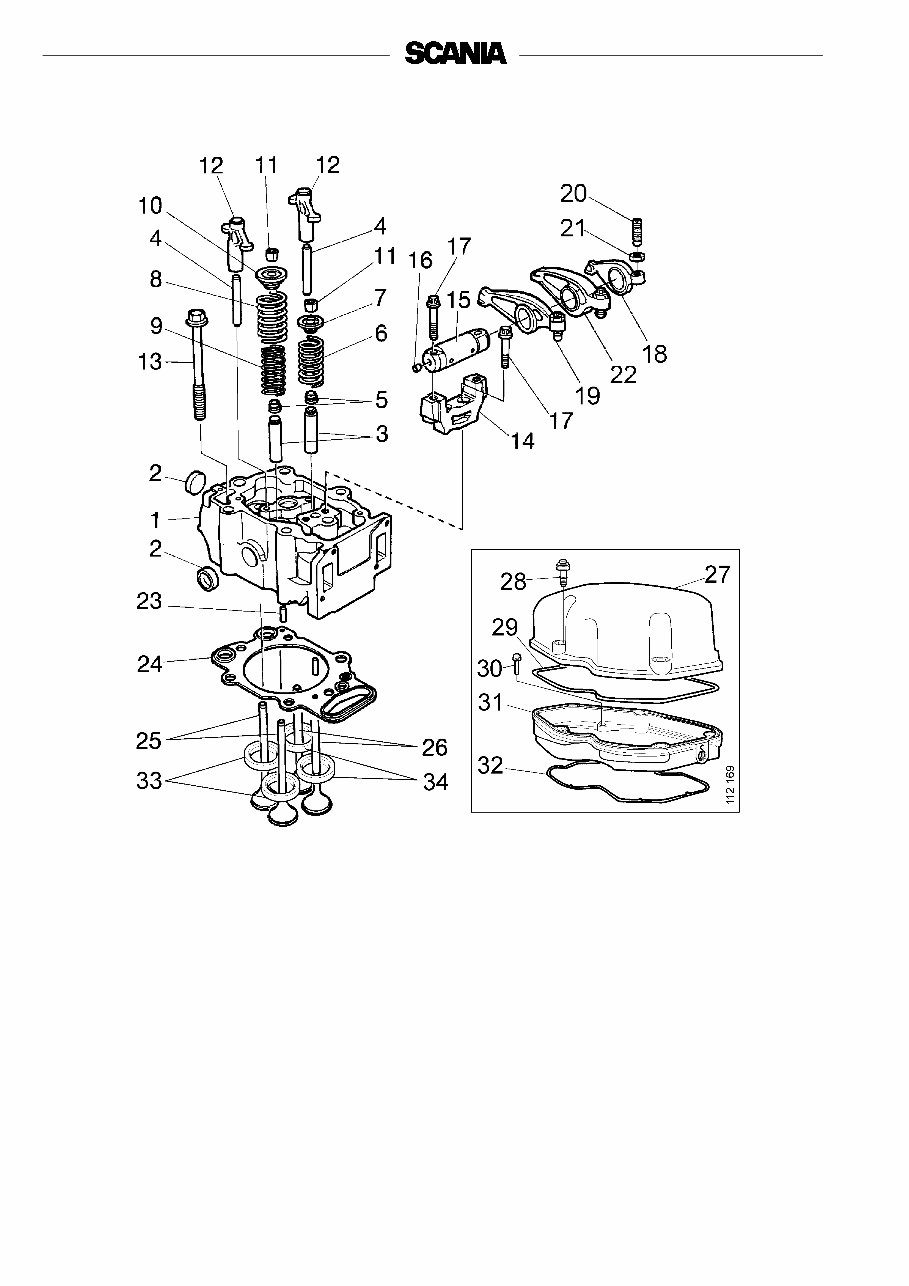
Cylinder head
1. Cylinder head
2. Core plug
3. Valve guide
4. Pin
5. Valve stem seal
6. Valve spring, intake
7. Valve spring collar
8. Valve spring, exhaust
9. Valve spring, exhaust
10. Valve spring collar
11. Valve collet
12. Valve bridge
13. Bolt
14. Bearing bracket
15. Rocker arm shaft
16. Rivet plug
17. Tight-fit screw
18. Rocker arm, intake
19. Rocker arm, exhaust
20. Adjusting screw
21. Lock nut
22. Rocker arm, unit
injector
23. Guide pin
24. Cylinder head gasket
25. Exhaust valve
26. Intake valve
27. Rocker cover
28. Flange bolt
29. Rocker cover gasket
30. Flange bolt
31. Rocker cover
32. Rocker cover gasket
33. Valve seat insert,
exhaust
34. Valve seat insert,
intake
You're Reading a Preview
What's Included?
Fast Download Speeds
Online & Offline Access
Access PDF Contents & Bookmarks
Full Search Facility
Print one or all pages of your manual
$39.99
Viewed 11 Times Today


Secure transaction
What's Included?
Fast Download Speeds
Online & Offline Access
Access PDF Contents & Bookmarks
Full Search Facility
Print one or all pages of your manual
$39.99
This is a comprehensive factory service repair workshop manual for the Scania DC16 & Di16 Dc Di 16 Diesel Engine. It is available for instant access on your computer, tablet, or smartphone. The manual covers all repairs, servicing, and troubleshooting procedures with detailed photos, diagrams, and step-by-step instructions. It is designed for use by professional mechanics and technicians, as well as DIY enthusiasts.
Key Features:
- Complete factory service repair workshop manual
- No extra fees or expiry dates
- Can be printed out in part or in full
- Unlimited use on multiple computers
- Full version without limitations or trial periods
- Compatible with Windows and MAC computers
Whether you are a professional mechanic or a DIY enthusiast, this manual provides the necessary guidance to complete every job correctly. It is a valuable resource for anyone looking to maintain or repair the Scania DC16 & Di16 Dc Di 16 Diesel Engine.


