

Caterpillar 3208 Marine Engine Maintenance Intervals
What's Included?
Fast Download Speeds
Online & Offline Access
Access PDF Contents & Bookmarks
Full Search Facility
Print one or all pages of your manual

SAFETY.CAT.COM
3208
MARINE ENGINE
Maintenance Intervals
Excerpted from Operation & Maintenance Manual (SEBU6090-03-01)
© 2007 Caterpillar
All Rights Reserved

56
Maintenance Section
Maintenance Interval Schedule
i00917973
Maintenance Interval Schedule
SMCS Code: 1000; 7500
Note: Ensure that the Safety Information, warnings,
and instructions are read and understood before
operation or maintenance procedures are performed.
Before each consecutive interval is performed, all
of the maintenance requirements from the previous
interval must also be performed.
Note: For engines that are equipped with
AIRSEP® engine air cleaners, the turbocharger
should be inspected every 1000 service hours.
When Required
Belt - Inspect/Adjust/Replace ................................ 59
Battery - Recycle .................................................. 61
Battery or Battery Cable - Disconnect .................. 62
Engine Oil Level Gauge - Calibrate ...................... 78
Fuel System - Prime ............................................. 87
Daily
Cooling System Coolant Level - Check ................ 66
Engine Air Cleaner Service Indicator - Inspect ..... 75
Engine Oil Level - Check ...................................... 77
Fuel System Water Separator - Drain ................... 90
Marine Transmission Oil Level - Check ................ 95
Walk-Around Inspection ...................................... 102
Every 1900 L (500 US gal) of Fuel or 50
Service Hours
Aftercooler Drain Plug - Inspect ............................ 57
Engine Air Cleaner Element (Foam) -
Clean/Replace .................................................... 71
Zinc Rods - Inspect/Replace ............................... 104
Initial 9000 L (2400 US gal) of Fuel or 250
Service Hours or 1 Year
Engine Valve Lash - Inspect/Adjust ...................... 84
Every 9000 L (2400 US gal) of Fuel or 250
Service Hours or Yearly
Auxiliary Water Pump - Inspect ............................. 59
Belt - Inspect/Adjust/Replace ................................ 59
Battery Electrolyte Level - Check .......................... 61
Cooling System Supplemental Coolant Additive
(SCA) - Test/Add ................................................. 67
Engine Air Cleaner Element - Clean/Replace ....... 72
Engine Crankcase Breather - Clean ..................... 76
Engine Oil Sample - Obtain .................................. 81
Engine Oil and Filter - Change ............................. 82
Engine Protective Devices - Check ...................... 83
Exhaust Restrictor - Inspect/Adjust ....................... 84
Fuel System Primary Filter/Water Separator Element
- Replace ............................................................. 88
Fuel System Secondary Filter - Replace .............. 89
Fuel Tank Water and Sediment - Drain ................. 91
Hoses and Clamps - Inspect/Replace .................. 93
Magnetic Pickups - Clean/Inspect ........................ 94
Oil Fumes Filter - Replace .................................... 95
Sea Water Strainer - Clean/Inspect .................... 100
Every 36 000 L (9000 US gal) of Fuel or 1000
Service Hours or 2 Years
Aftercooler Core - Clean/Test ............................... 57
Cooling System Coolant (DEAC) - Change .......... 62
Cooling System Water Temperature Regulator -
Replace ............................................................... 69
Engine - Clean ...................................................... 71
Governor Housing - Drain ..................................... 92
Marine Transmission Oil Cooler - Clean/Inspect .. 94
PCV Valve - Inspect .............................................. 99
Every 72 000 L (19 000 US gal) of Fuel or
2000 Service Hours
Alternator - Inspect ............................................... 58
Crankshaft Vibration Damper - Inspect ................. 70
Engine Mounts - Inspect ....................................... 77
Engine Valve Lash - Inspect/Adjust ...................... 84
Fuel Injection Nozzles - Test/Exchange ................ 86
Fuel Ratio Control - Inspect/Adjust ....................... 87
Heat Exchanger - Inspect ..................................... 92
Starting Motor - Inspect ...................................... 101
Turbocharger - Inspect ........................................ 101
Every 108 000 L (28 500 US gal) of Fuel or
3000 Service Hours or 2 Years
Cooling System Coolant Extender (ELC) - Add .... 66
Water Pump - Inspect ......................................... 103
Every 114 000 L (30 000 US gal) of Fuel
Overhaul Considerations ...................................... 96
Every 216 000 L (57 000 US gal) of Fuel or
6000 Service Hours or 4 Years
Cooling System Coolant (ELC) - Change ............. 64
57
Maintenance Section
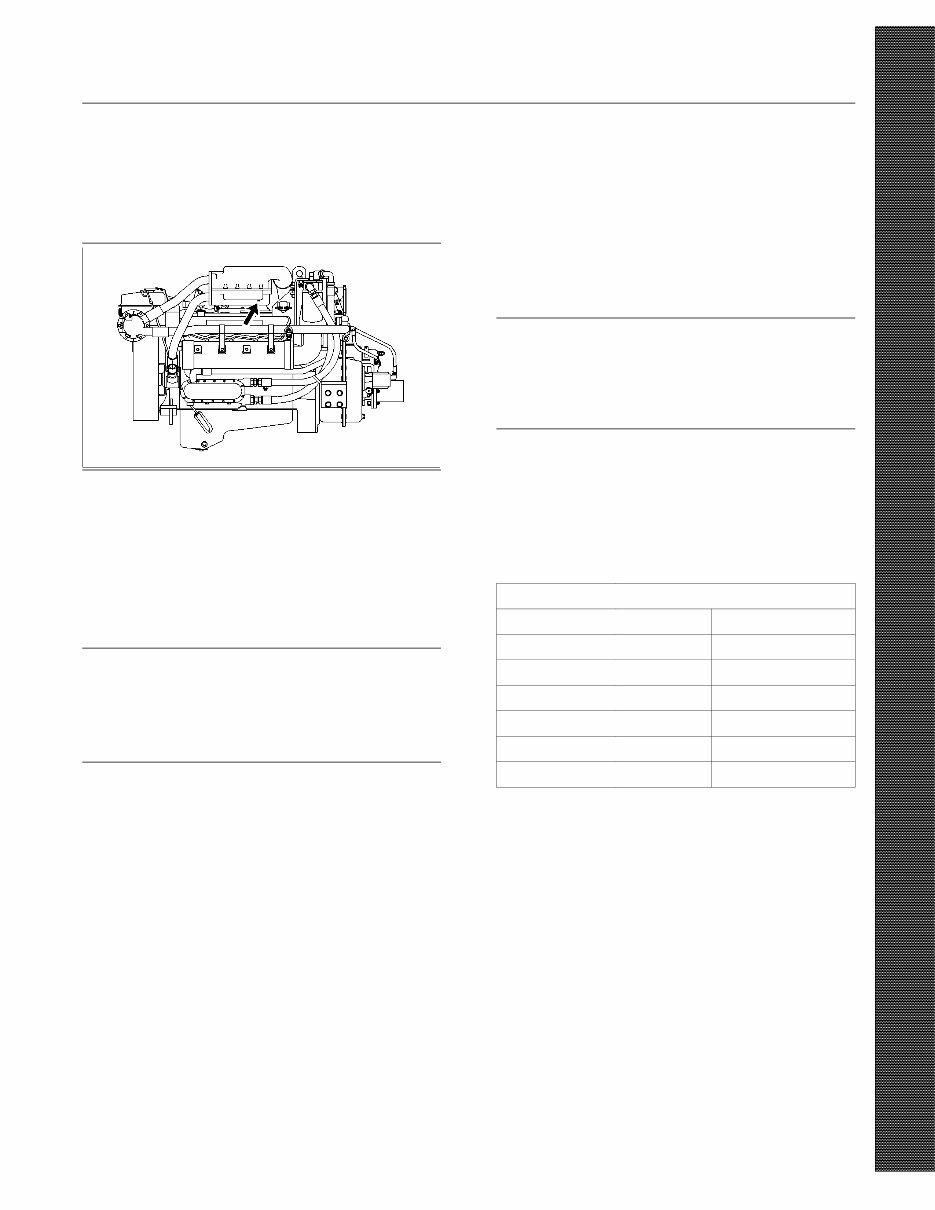
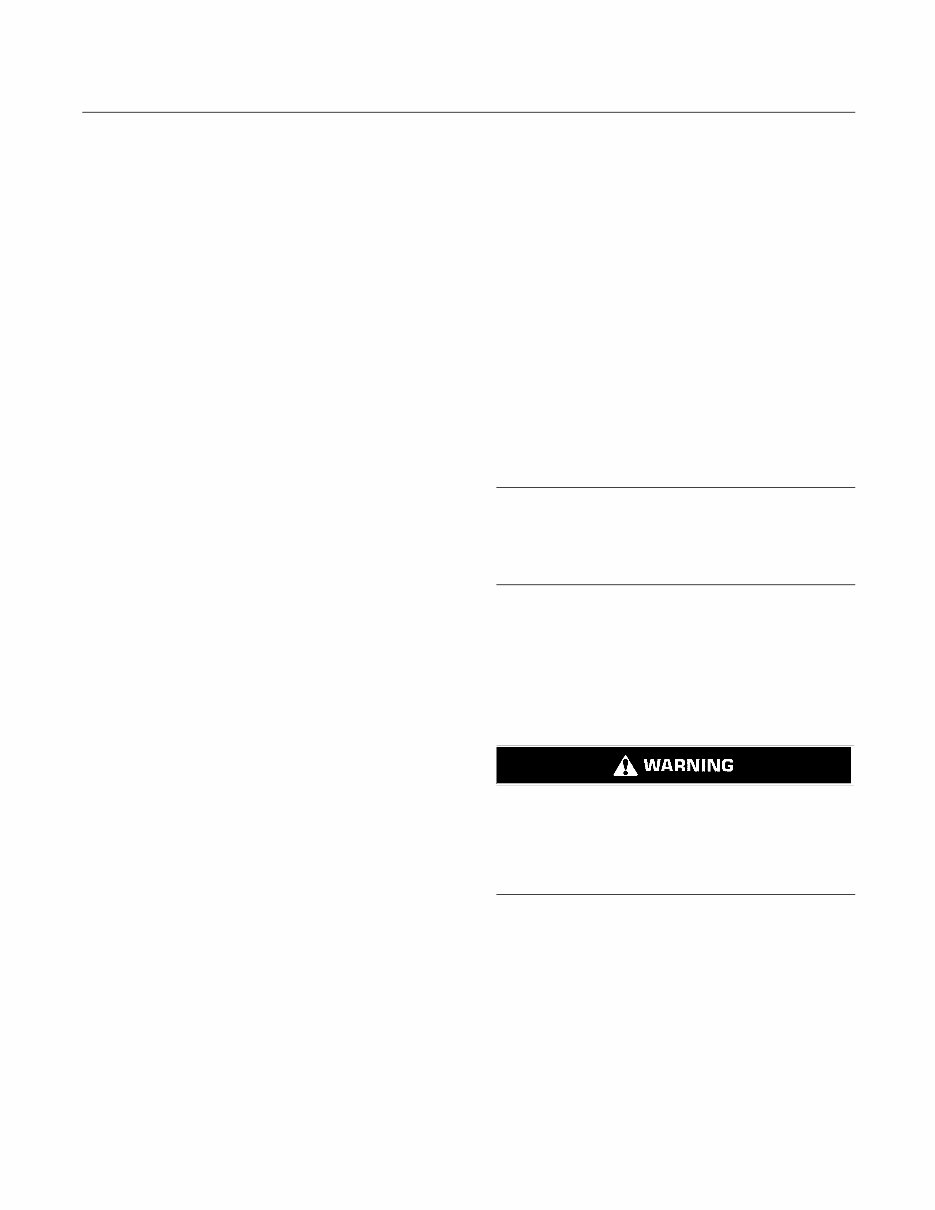
Aftercooler Drain Plug - Inspect
i00913406
Aftercooler Drain Plug -
Inspect
SMCS Code: 1063-040
g00466348
Illustration 15
Typical location of aftercooler drain
Inspect the plug for the aftercooler drain (if equipped).
Ensure that the plug is one of the following plugs:
•
101-3713 Tethered Plug
•
9x-8406 Plug (stainless steel)
NOTICE
A failed aftercooler drain plug can cause the engine
compartment to fill with sea water. Any plugs used
in the aftercooler drain port, other than those recom-
mended above, may corrode. Use only those recom-
mended plugs.
i00744980
Aftercooler Core - Clean/Test
SMCS Code: 1064-070; 1064-081
1. Remove the core. Refer to the Service Manual
for the procedure.
2. Turn the aftercooler core upside-down in order
to remove debris.
NOTICE
Do not use a high concentration of caustic cleaner to
clean the core. A high concentration of caustic cleaner
can attack the internal metals of the core and cause
leakage. Only use the recommended concentration of
cleaner.
3. Back flush the core with cleaner.
Caterpillar recommends the use of Hydrosolv
liquid cleaner. Table 23 lists Hydrosolv liquid
cleaners that are available from your Caterpillar
dealer.
Table 23
Hydrosolv Liquid Cleaners
(1)
Description Container
1U-8812 Hydrosolv 4165 4 L (1 US gal)
1U-5490 Hydrosolv 4165 19 L (5 US gal)
8T-7570 Hydrosolv 4165 208 L (55 US gal)
1U-8804 Hydrosolv 100 4 L (1 US gal)
1U-5492 Hydrosolv 100 19 L (5 US gal)
8T-7571 Hydrosolv 100 208 L (55 US gal)
(1)
Use a two to five percent concentration of the cleaner at
temperatures up to 93°C (200°F). Refer to Application
Guide, NEHS0526 or consult your Caterpillar dealer for more
information.
4. Steam clean the core in order to remove any
residue. Flush the fins of the aftercooler core.
Remove any other trapped debris.
5. Wash the core with hot, soapy water. Rinse the
core thoroughly with clean water.
58
Maintenance Section
Alternator - Inspect
Personal injury can result from air pressure.
Personal injury can result without following prop-
er procedure. When using pressure air, wear a pro-
tective face shield and protective clothing.
Maximum air pressure at the nozzle must be less
than 205 kPa (30 psi) for cleaning purposes.
6. Dry the core with compressed air. Direct the air in
the reverse direction of the normal flow.
7. Inspect the core in order to ensure cleanliness.
Pressure test the core. Many shops that service
radiators are equipped to perform pressure tests.
If necessary, repair the core.
8. Install the core. Refer to the Service Manual for
the procedure.
For more information on cleaning the core, consult
your Caterpillar dealer.
i00997205
Alternator - Inspect
SMCS Code: 1405-040
Note: This engine is equipped with an alternator
circuit breaker. Note the location of the alternator
circuit breaker for your particular application. If the
alternator circuit breaker trips, you will need to reset
the breaker in order for the charging system to
operate. Refer to the information that is provided by
the OEM for more information.
Caterpillar recommends a scheduled inspection
of the alternator. Inspect the alternator for loose
connections and proper battery charging. Inspect the
ammeter (if equipped) during engine operation in
order to ensure proper battery performance and/or
proper performance of the electrical system. Make
repairs, as required. Refer to the Service Manual.
Check the alternator and the battery charger for
proper operation. If the batteries are properly
charged, the ammeter reading should be very near
zero. All batteries should be kept charged. The
batteries should be kept warm because temperature
affects the cranking power. If the battery is too cold,
the battery will not crank the engine. The battery will
not crank the engine, even if the engine is warm.
When the engine is not run for long periods of time
or if the engine is run for short periods, the batteries
may not fully charge. A battery with a low charge will
freeze more easily than a battery with a full charge.

59
Maintenance Section
Auxiliary Water Pump - Inspect
i00911249
Auxiliary Water Pump - Inspect
SMCS Code: 1371-040
Impellers and seals require periodic inspection.
Impellers have a service life that is limited. The
service life depends on the engine operating
conditions.
Inspect the components more frequently when the
pump is exposed to debris, sand, or other abrasive
materials. Inspect the components if the pump is
operating at a differential pressure of more than
103 kPa (15 psi).
Check the following components for wear or damage:
•
Bearings
•
Cam
•
Impeller
•
Seals
•
Wear plate
If wear or damage is found, replace the components
which are worn or damaged. Use the proper repair
kit for the pump. Refer to the Disassembly and
Assembly for more information on servicing the
auxiliary water pump.
i00912007
Belt - Inspect/Adjust/Replace
SMCS Code: 1357-039
Inspection
Belt tension should be checked initially between
the first 20 to 40 hours of engine operation.
After the initial check, the belt tension should be
checked at Every 250 Service Hours or Three
Months.
To maximize the engine performance, inspect the
belts for wear and for cracking. Replace belts that are
worn or damaged.
For applications that require multiple drive belts,
replace the belts in matched sets. Replacing only
one belt of a matched set will cause the new belt to
carry more load because the older belt is stretched.
The additional load on the new belt could cause the
new belt to break.
If the belts are too loose, vibration causes
unnecessary wear on the belts and pulleys. Loose
belts may slip enough to cause overheating.
If the belts are too tight, unnecessary stresses are
placed on the pulley bearings and on the belts. This
may shorten the service life of the components.
Remove the belt guard. Inspect the condition and
adjustment of the alternator belts and accessory
drive belts (if equipped).
If the belts do not require replacement or adjustment,
install the belt guard. If the belts require adjustment
or replacement, perform the following procedure to
adjust the belt tension.
60
Maintenance Section
Belt - Inspect/Adjust/Replace
Adjustment
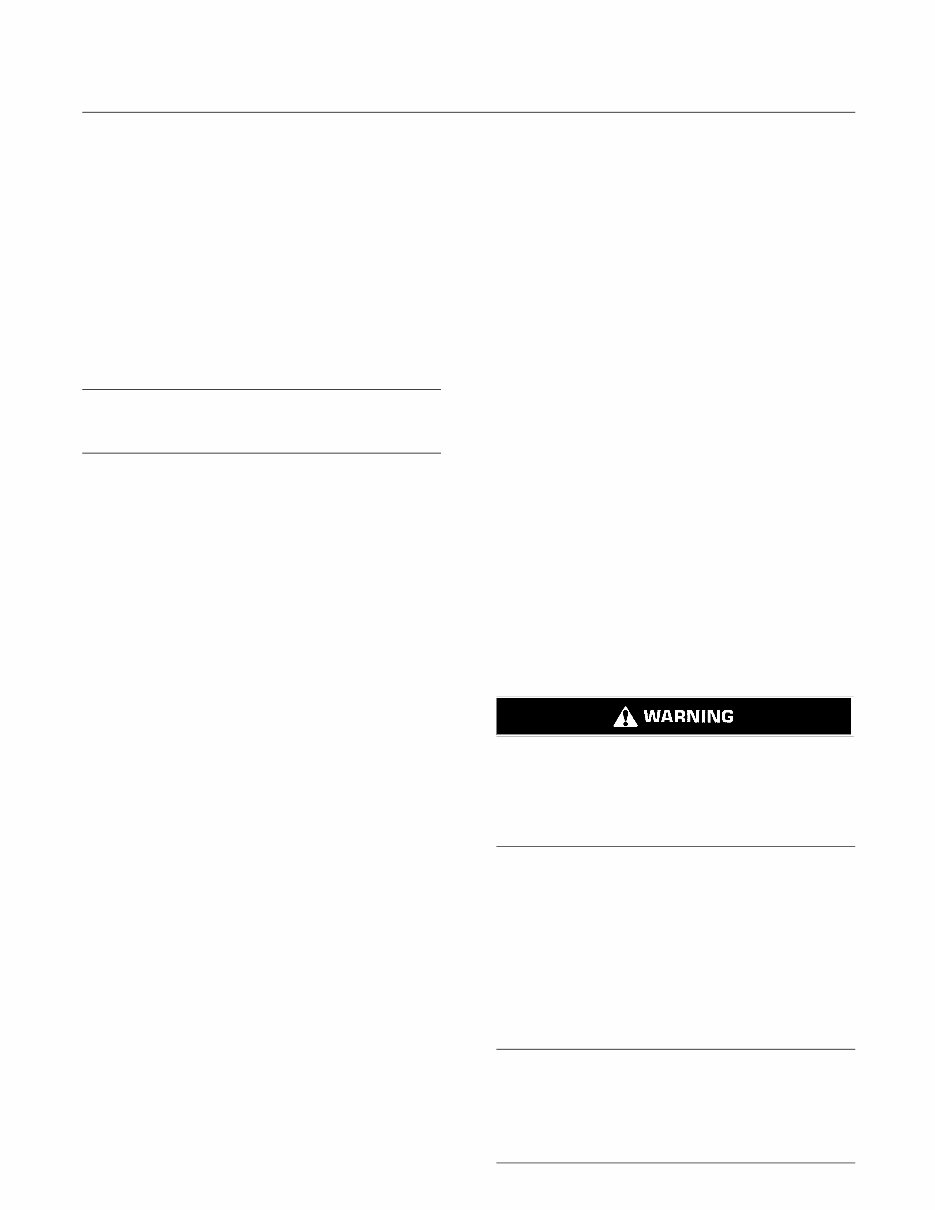
Alternator Belt
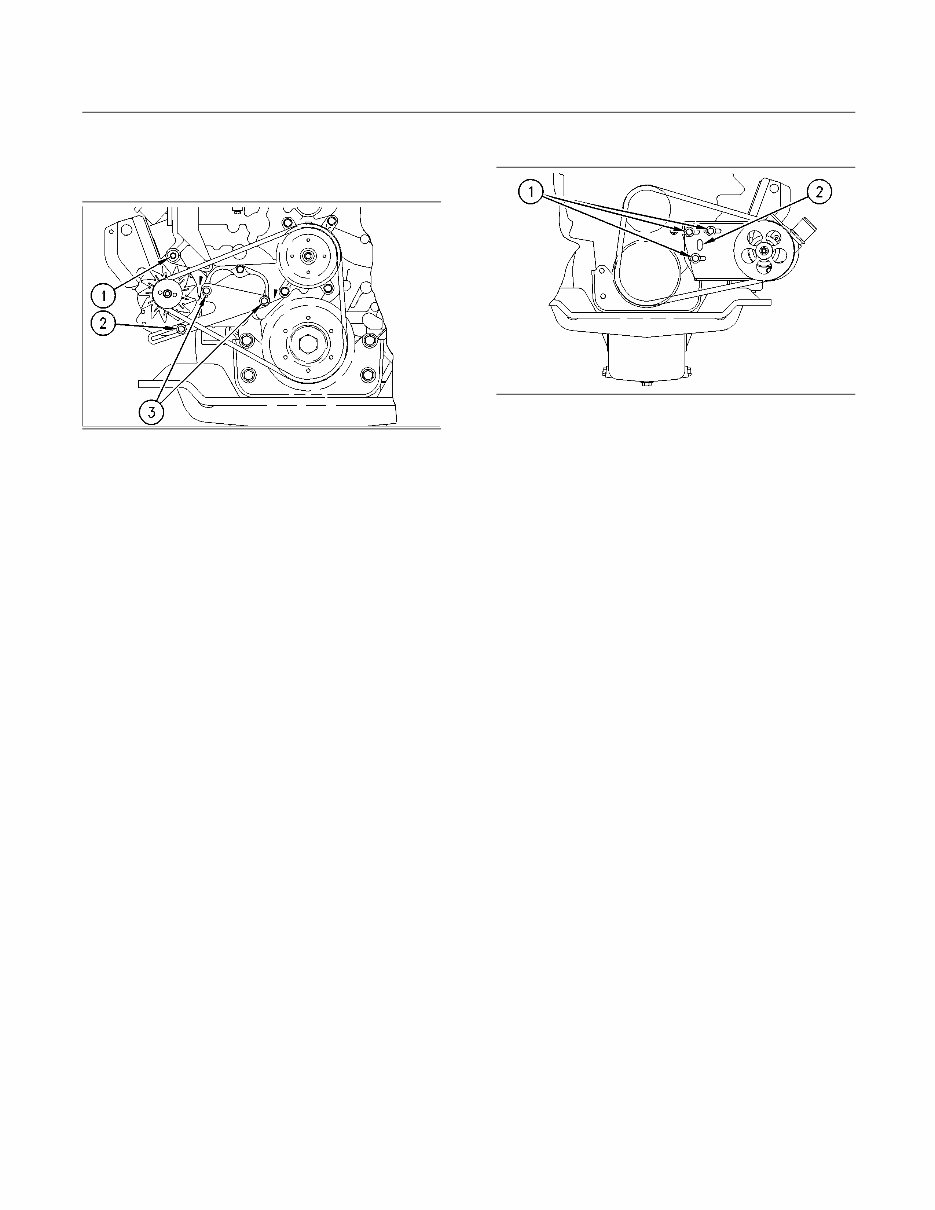
g00465617
Illustration 16
Typical illustration
(1) Mounting bolt
(2) Adjustment bolt
(3) Bracket bolts
1. Slightly loosen mounting bolt (1) and adjusting
bolt (2).
2. Move the alternator in order to adjust the belt
tension. If the alternator will not adjust, it may be
necessary to slightly loosen bracket bolts (3).
Refer to the Specifications, “Belt Tension Chart”
topic.
3. Tighten adjusting bolt (2) and mounting bolt (1).
Tighten bracket bolts (3) if the bracket bolts
were loosened. Refer to the Operation and
Maintenance Manual, “Torque Specifications”
topic (Maintenance Section).
4. Install the belt guard.
If new belts are installed, check the belt tension again
after 30 minutes of engine operation at the rated rpm.
Auxiliary Water Pump Belt
g00465541
Illustration 17
Typical illustration
(1) Mounting bolts
(2) Slotted hole
1. Slightly loosen mounting bolts (1).
2. Adjust the belt tension with a pry bar in slotted
hole (2). Refer to the Specifications, “Belt Tension
Chart” topic.
3. Tighten mounting bolts (2). Refer to the Operation
and Maintenance Manual, “Torque Specifications”
topic (Maintenance Section).
4. Install the belt guard.
If new belts are installed, check the belt tension again
after 30 minutes of engine operation at the rated rpm.
61
Maintenance Section
Battery - Recycle
i00037658
Battery - Recycle
SMCS Code: 1401-561
1. Always recycle a battery. Never discard a battery.
2. Always return used batteries to one of the
following locations.
•
A battery supplier
•
An authorized battery collection facility
•
Recycling facility
i00914454
Battery Electrolyte Level -
Check
SMCS Code: 1401-081
When the engine is not run for long periods of time or
when the engine is run for short periods, the batteries
may not fully recharge. Ensure a full charge in order
to help prevent the battery from freezing. If batteries
are properly charged, ammeter reading should be
very near zero.
All lead-acid batteries contain sulfuric acid which
can burn the skin and clothing. Always wear a face
shield and protective clothing when working on or
near batteries.
1. Remove the filler caps. Maintain the electrolyte
level to the “FULL” mark on the battery.
If the addition of water is necessary, use distilled
water. If distilled water is not available use clean
water that is low in minerals. Do not use artificially
softened water.
2. Check the condition of the electrolyte with the
1U-7298 Coolant/Battery Tester (°C) or the
1U-7297 Coolant/Battery Tester (°F).
3. Keep the batteries clean.
Clean the battery case with one of the following
cleaning solutions:
•
A mixture of 0.1 L (.12 qt) of baking soda and
1 L (1 qt) of clean water
•
A mixture of 0.1 L (.12 qt) of ammonia and 1 L
(1 qt) of clean water
Thoroughly rinse the battery case with clean water.
Use a fine grade of sandpaper to clean the
terminals and the cable clamps. Clean the items
until the surfaces are bright or shiny. DO NOT
remove material excessively. Excessive removal
of material can cause the clamps to not fit properly.
Coat the clamps and the terminals with 5N-5561
Lubrication Compound, petroleum jelly or MPGM
grease.
62
Maintenance Section
Battery or Battery Cable - Disconnect
i00095575
Battery or Battery Cable -
Disconnect
SMCS Code: 1402-029
1. Turn the start switch to the OFF position. Turn the
ignition switch (if equipped) to the OFF position
and remove the key and all electrical loads.
2. Disconnect the negative battery terminal at the
battery that goes to the start switch. Ensure that
the cable cannot contact the terminal. When four
12 volt batteries are involved, the negative side of
two batteries must be disconnected.
3. Tape the leads in order to help prevent accidental
starting.
4. Proceed with necessary system repairs. Reverse
the steps in order to reconnect all of the cables.
i00906400
Cooling System Coolant
(DEAC) - Change
SMCS Code: 1350-070; 1395-044
Clean the cooling system and flush the cooling
system before the recommended maintenance
interval if the following conditions exist:
•
The engine overheats frequently.
•
Foaming is observed.
•
The oil has entered the cooling system and the
coolant is contaminated.
•
The fuel has entered the cooling system and the
coolant is contaminated.
NOTICE
Use of commercially available cooling system clean-
ers may cause damage to cooling system compo-
nents. Use only cooling system cleaners that are ap-
proved for Caterpillar engines.
Note: Inspect the water pump and the water
temperature regulator after the cooling system has
been drained. This is a good opportunity to replace
the water pump, the water temperature regulator and
the hoses, if necessary.
Drain
Pressurized System: Hot coolant can cause seri-
ous burns. To open the cooling system filler cap,
stop the engine and wait until the cooling system
components are cool. Loosen the cooling system
pressure cap slowly in order to relieve the pres-
sure.
1. Stop the engine and allow the engine to cool.
Loosen the cooling system filler cap slowly in
order to relieve any pressure. Remove the cooling
system filler cap.
2. Open the cooling system drain valve (if equipped).
If the cooling system is not equipped with a drain
valve, remove one of the drain plugs.
Allow the coolant to drain.

63
Maintenance Section
Cooling System Coolant (DEAC) - Change
NOTICE
Dispose of used engine coolant properly or recycle.
Various methods have been proposed to reclaim used
coolant for reuse in engine cooling systems. The full
distillation procedure is the only method acceptable by
Caterpillar to reclaim the used coolant.
For information regarding the disposal and the
recycling of used coolant, consult your Caterpillar
dealer or consult Caterpillar Service Technology
Group:
Outside Illinois: 1-800-542-TOOL
Inside Illinois: 1-800-541-TOOL
Canada: 1-800-523-TOOL
Flush
1. Flush the cooling system with clean water in order
to remove any debris.
2. Close the drain valve (if equipped). Clean the
drain plugs. Install the drain plugs. Refer to the
Operation and Maintenance Manual, “Torque
Specifications” topic (Maintenance Section) for
more information on the proper torques.
NOTICE
Fill the cooling system no faster than 19 L (5 US gal)
per minute to avoid air locks.
3. Fill the cooling system with a mixture of clean
water and Caterpillar Fast Acting Cooling System
Cleaner. Add .5 L (1 pint) of cleaner per 15 L
(4 US gal) of the cooling system capacity. Install
the cooling system filler cap.
4. Start and run the engine at low idle for a minimum
of 30 minutes. The coolant temperature should be
at least 82 °C (180 °F).
NOTICE
Improper or incomplete rinsing of the cooling system
can result in damage to copper and other metal com-
ponents.
To avoid damage to the cooling system, make sure
to completely flush the cooling system with clear wa-
ter. Continue to flush the system until all signs of the
cleaning agent are gone.
5. Stop the engine and allow the engine to cool.
Loosen the cooling system filler cap slowly
in order to relieve any pressure. Remove the
cooling system filler cap. Open the drain valve
(if equipped) or remove the cooling system
drain plugs. Allow the water to drain. Flush the
cooling system with clean water. Close the drain
valve (if equipped). Clean the drain plugs. Install
the drain plugs. Refer to the Operation and
Maintenance Manual, “Torque Specifications”
topic (Maintenance Section) for more information
on the proper torques.
Cooling Systems with Heavy
Deposits or Plugging
Note: For the following procedure to be effective,
there must be some active flow through the cooling
system components.
1. Flush the cooling system with clean water in order
to remove any debris.
2. Close the drain valve (if equipped). Clean the
drain plugs. Install the drain plugs. Refer to the
Operation and Maintenance Manual, “Torque
Specifications” topic (Maintenance Section) for
more information on the proper torques.
NOTICE
Fill the cooling system no faster than 19 L (5 US gal)
per minute to avoid air locks.
3. Fill the cooling system with a mixture of clean
water and Caterpillar Fast Acting Cooling System
Cleaner. Add .5 L (1 pint) of cleaner per 3.8 to 7.6 L
(1 to 2 US gal) of the cooling system capacity.
Install the cooling system filler cap.
4. Start and run the engine at low idle for a minimum
of 90 minutes. The coolant temperature should be
at least 82 °C (180 °F).
NOTICE
Improper or incomplete rinsing of the cooling system
can result in damage to copper and other metal com-
ponents.
To avoid damage to the cooling system, make sure
to completely flush the cooling system with clear wa-
ter. Continue to flush the system until all signs of the
cleaning agent are gone.
64
Maintenance Section
Cooling System Coolant (ELC) - Change
5. Stop the engine and allow the engine to cool.
Loosen the cooling system filler cap slowly
in order to relieve any pressure. Remove the
cooling system filler cap. Open the drain valve
(if equipped) or remove the cooling system
drain plugs. Allow the water to drain. Flush the
cooling system with clean water. Close the drain
valve (if equipped). Clean the drain plugs. Install
the drain plugs. Refer to the Operation and
Maintenance Manual, “Torque Specifications”
topic (Maintenance Section) for more information
on the proper torques.
Fill
NOTICE
Fill the cooling system no faster than 19 L (5 US gal)
per minute to avoid air locks.
1. Fill the cooling system with coolant/antifreeze.
Refer to the Operation and Maintenance
Manual, “Cooling System Specifications” topic
(Maintenance Section) for more information on
cooling system specifications. Do not install the
cooling system filler cap.
2. Start and run the engine at low idle. Increase the
engine rpm to 1500 rpm. Run the engine at high
idle for one minute in order to purge the air from
the cavities of the engine block. Stop the engine.
3. Check the coolant level. Maintain the coolant level
within 13 mm (.5 inch) below the bottom of the
pipe for filling. Maintain the coolant level within
13 mm (.5 inch) to the proper level on the sight
glass (if equipped).
4. Clean the cooling system filler cap. Inspect the
gasket that is on the cooling system filler cap. If
the gasket that is on the cooling system filler cap
is damaged, discard the old cooling system filler
cap and install a new cooling system filler cap.
If the gasket that is on the cooling system filler
cap is not damaged, perform a pressure test. A
9S-8140 Pressurizing Pump is used to perform
the pressure test. The correct pressure for the
cooling system filler cap is stamped on the face of
the cooling system filler cap. If the cooling system
filler cap does not retain the correct pressure,
install a new cooling system filler cap.
5. Start the engine. Inspect the cooling system for
leaks and for proper operating temperature.
i00906586
Cooling System Coolant (ELC)
- Change
SMCS Code: 1350-070; 1395-044
Clean the cooling system and flush the cooling
system before the recommended maintenance
interval if the following conditions exist:
•
The engine overheats frequently.
•
Foaming is observed.
•
The oil has entered the cooling system and the
coolant is contaminated.
•
The fuel has entered the cooling system and the
coolant is contaminated.
Note: When the cooling system is cleaned, only
clean water is needed when the ELC is drained and
replaced.
Note: Inspect the water pump and the water
temperature regulator after the cooling system has
been drained. This is a good opportunity to replace
the water pump, the water temperature regulator and
the hoses, if necessary.
Drain
Pressurized System: Hot coolant can cause seri-
ous burns. To open the cooling system filler cap,
stop the engine and wait until the cooling system
components are cool. Loosen the cooling system
pressure cap slowly in order to relieve the pres-
sure.
1. Stop the engine and allow the engine to cool.
Loosen the cooling system filler cap slowly in
order to relieve any pressure. Remove the cooling
system filler cap.
2. Open the cooling system drain valve (if equipped).
If the cooling system is not equipped with a drain
valve, remove the cooling system drain plugs.
Allow the coolant to drain.
NOTICE
Dispose of used engine coolant properly or recycle.
Various methods have been proposed to reclaim used
coolant for reuse in engine cooling systems. The full
distillation procedure is the only method acceptable by
Caterpillar to reclaim the used coolant.
You're Reading a Preview
What's Included?
Fast Download Speeds
Online & Offline Access
Access PDF Contents & Bookmarks
Full Search Facility
Print one or all pages of your manual
$31.99
Viewed 98 Times Today


Secure transaction
What's Included?
Fast Download Speeds
Online & Offline Access
Access PDF Contents & Bookmarks
Full Search Facility
Print one or all pages of your manual
$31.99
Get your hands on the comprehensive Maintenance Intervals manual for the 2007 Marine Engine. This manual is an invaluable resource for both professional mechanics and DIY enthusiasts. It provides detailed guidance on maintenance schedules, including crucial intervals for servicing various components. Whether you're looking to ensure optimal performance or extend the lifespan of your marine engine, this manual equips you with the necessary information to keep your engine running smoothly.


