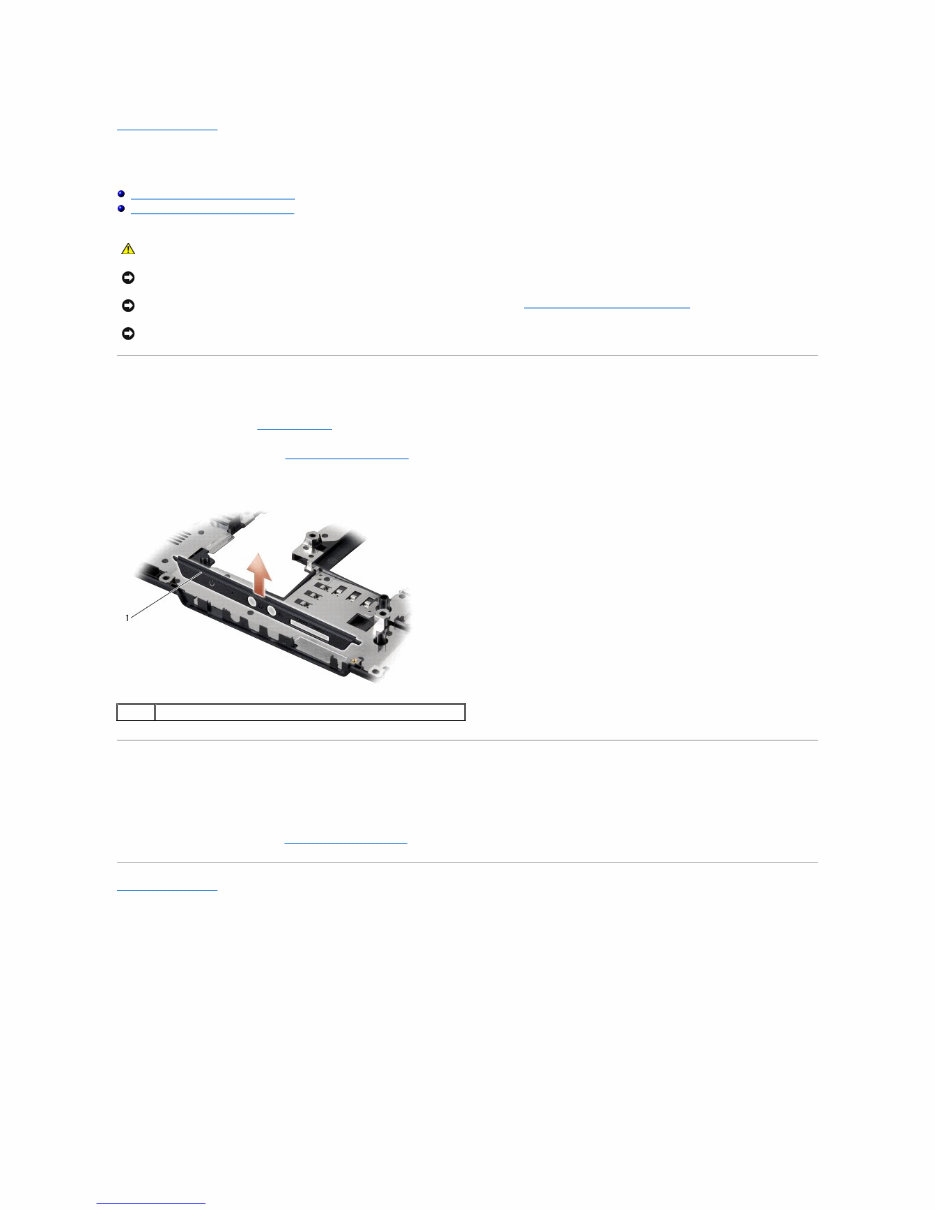
Back to Contents Page Audio Connector Cover Dell™ Inspiron™ 1545 Service Manual Removing the Audio Connector Cover Replacing the Audio Connector Cover Removing the Audio Connector Cover 1. Follow the instructions in Before You Begin . 2. Remove the system board (see Removing the System Board ). 3. Lift the audio connector cover and remove it from the computer. Replacing the Audio Connector Cover 1. Place the audio connector cover in the computer base. 2. Replace the system board (see Replacing the System Board ). Back to Contents Page CAUTION: Before working inside your computer, read the safety information that shipped with your computer. For additional safety best practices information, see the Regulatory Compliance Homepage at www.dell.com/regulatory_compliance. NOTICE: To avoid electrostatic discharge, ground yourself by using a wrist grounding strap or by periodically touching an unpainted metal surface (such as a connector on the back of the computer). NOTICE: To help prevent damage to the system board, remove the main battery (see Before Working Inside Your Computer ) before working inside the computer. NOTICE: Only a certified service technician should perform repairs on your computer. Damage due to servicing that is not authorized by Dell™ is not covered by your warranty. 1 audio connector cover Downloaded from www.Manualslib.com manuals search engine
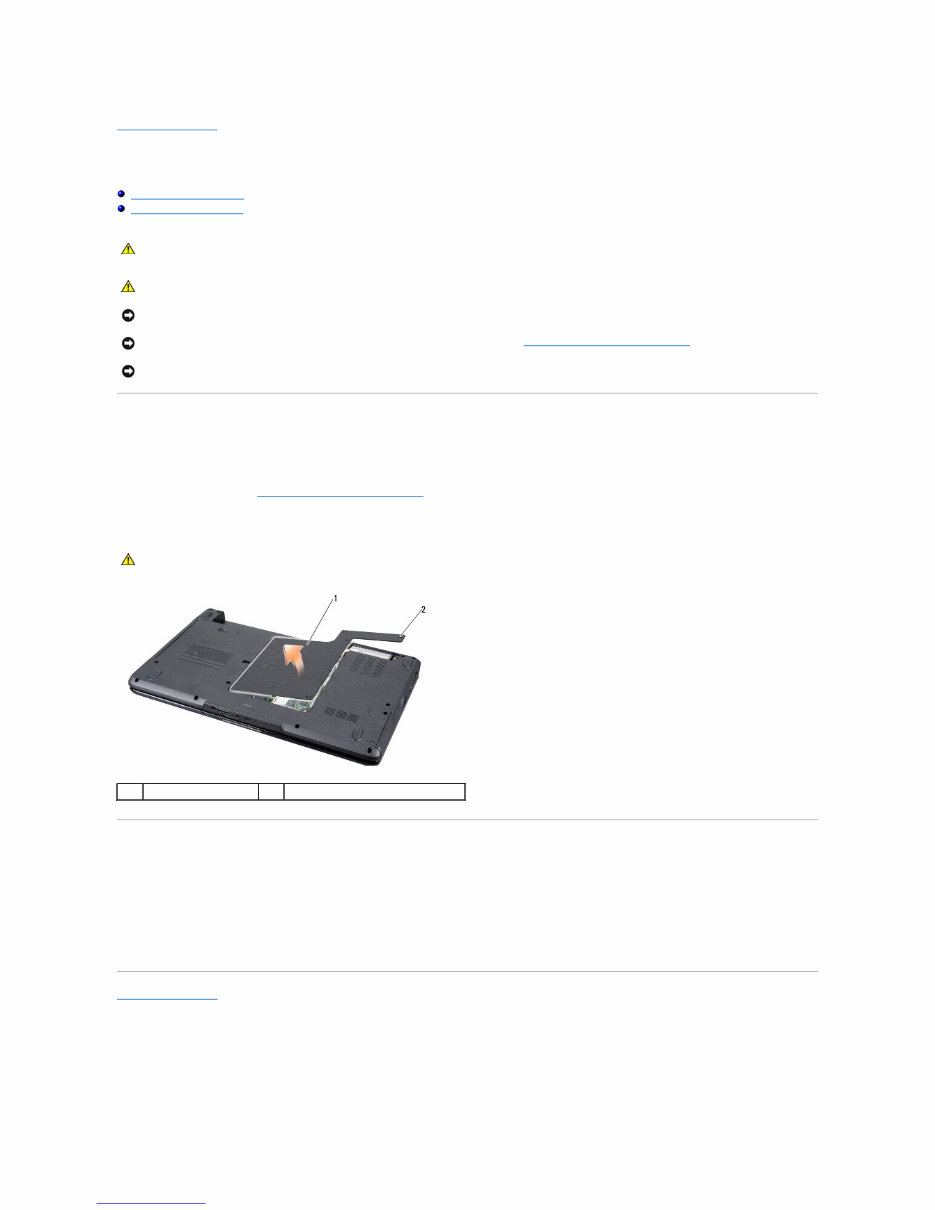
Back to Contents Page Base Cover Dell™ Inspiron™ 1545 Service Manual Removing the Base Cover Replacing the Base Cover Removing the Base Cover 1. Ensure that the computer is turned off. 2. Remove the battery (see Before Working Inside Your Computer ). 3. Loosen the four captive screws on the base cover and lift the cover away from the computer at an angle as shown in the figure. Replacing the Base Cover 1. Align the tabs on the base cover to the bottom of the computer. 2. Tighten the four captive screws on the base cover. 3. Slide the battery into the battery bay until it clicks into place. Back to Contents Page CAUTION: Before working inside your computer, read the safety information that shipped with your computer. For additional safety best practices information, see the Regulatory Compliance Homepage at www.dell.com/regulatory_compliance. CAUTION: Before performing this procedures, turn off the computer, disconnect the AC adapter from the electrical outlet and the computer, disconnect the modem from the wall connector and the computer, and remove any other external cables from the computer. NOTICE: To avoid electrostatic discharge, ground yourself by using a wrist grounding strap or by periodically touching an unpainted metal surface (such as a connector on the back of the computer). NOTICE: To help prevent damage to the system board, remove the main battery (see Before Working Inside Your Computer ) before working inside the computer. NOTICE: Only a certified service technician should perform repairs on your computer. Damage due to servicing that is not authorized by Dell™ is not covered by your warranty. CAUTION: Do not touch the processor heat sink. Processor components should be removed only by trained support personnel. 1 base cover 2 captive screws (4) Downloaded from www.Manualslib.com manuals search engine
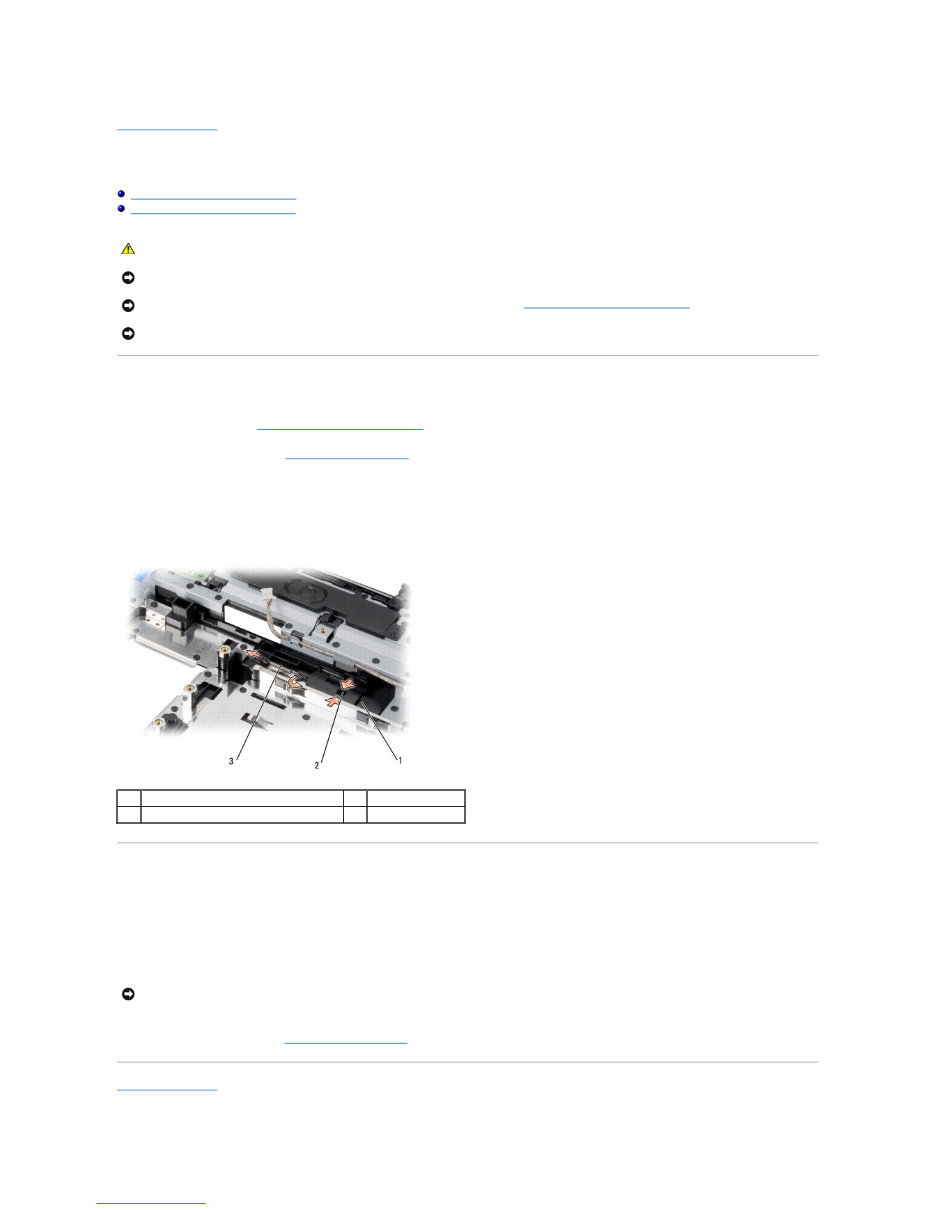
Back to Contents Page Battery Latch Assembly Dell™ Inspiron™ 1545 Service Manual Removing the Battery Latch Assembly Replacing the Battery Latch Assembly Removing the Battery Latch Assembly 1. Follow the instructions in Before Working Inside Your Computer . 2. Remove the system board (see Removing the System Board ). 3. Squeeze the plastic clip to release the battery latch assembly. 4. Remove the spring from the hook that holds it in place. 5. Lift the assembly out of the computer base. Replacing the Battery Latch Assembly 1. Place the latch assembly in the channel on the computer base. 2. Using a small screwdriver, place the spring over the hook on the computer base. Ensure that the newly installed latch moves smoothly and freely when pushed and released. 3. Replace the system board (see Replacing the System Board ). Back to Contents Page CAUTION: Before working inside your computer, read the safety information that shipped with your computer. For additional safety best practices information, see the Regulatory Compliance Homepage at www.dell.com/regulatory_compliance. NOTICE: To avoid electrostatic discharge, ground yourself by using a wrist grounding strap or by periodically touching an unpainted metal surface (such as a connector on the back of the computer). NOTICE: To help prevent damage to the system board, remove the main battery (see Before Working Inside Your Computer ) before working inside the computer. NOTICE: Only a certified service technician should perform repairs on your computer. Damage due to servicing that is not authorized by Dell™ is not covered by your warranty. 1 battery latch assembly 2 plastic clip 3 spring NOTICE: Before turning on the computer, replace all screws and ensure that no stray screws remain inside the computer. Failure to do so may result in damage to the computer. Downloaded from www.Manualslib.com manuals search engine
Downloaded from www.Manualslib.com manuals search engine
Back to Contents Page Before You Begin Dell™ Inspiron™ 1545 Service Manual Recommended Tools Turning Off Your Computer Before Working Inside Your Computer This section provides procedures for removing and installing the components in your computer. Unless otherwise noted, each procedure assumes that the following conditions exist: l You have performed the steps in Turning Off Your Computer and Before Working Inside Your Computer . l You have read the safety information that shipped with your computer. l A component can be replaced or—if purchased separately—installed by performing the removal procedure in reverse order. Recommended Tools The procedures in this document may require the following tools: l Small flat-blade screwdriver l Phillips screwdriver l Processor extraction tool l BIOS upgrade CD Turning Off Your Computer 1. Save and close all open files and exit all open programs. 2. In Windows Vista ® , click Start , click the arrow , and then click Shut Down. The computer turns off after the operating system shutdown process finishes. 3. Ensure that the computer and any attached devices are turned off. If your computer and attached devices did not automatically turn off when you shut down your operating system, press and hold the power button for at least 8 to 10 seconds until the computer turns off. Before Working Inside Your Computer Use the following safety guidelines to help protect your computer from potential damage and to help to ensure your own personal safety. 1. Ensure that the work surface is flat and clean to prevent the computer cover from being scratched. 2. Turn off your computer (see Turning Off Your Computer ). 3. If the computer is connected to a docking device (docked), undock it. See the documentation that came with your docking device for instructions. NOTICE: To avoid losing data, save and close all open files and exit all open programs before you turn off your computer. CAUTION: Before working inside your computer, read the safety information that shipped with your computer. For additional safety best practices information, see the Regulatory Compliance Homepage at www.dell.com/regulatory_compliance. NOTICE: Handle components and cards with care. Do not touch the components or contacts on a card. Hold a card by its edges or by its metal mounting bracket. Hold a component such as a processor by its edges, not by its pins. NOTICE: Only a certified service technician should perform repairs on your computer. Damage due to servicing that is not authorized by Dell™ is not covered by your warranty. NOTICE: When you disconnect a cable, pull on its connector or on its pull-tab, not on the cable itself. Some cables have connectors with locking tabs; if you are disconnecting this type of cable, press in on the locking tabs before you disconnect the cable. As you pull connectors apart, keep them evenly aligned to avoid bending any connector pins. Also, before you connect a cable, ensure that both connectors are correctly oriented and aligned. NOTICE: To avoid damaging the computer, perform the following steps before you begin working inside the computer. NOTICE: To disconnect a network cable, first unplug the cable from your computer and then unplug the cable from the network device. Downloaded from www.Manualslib.com manuals search engine
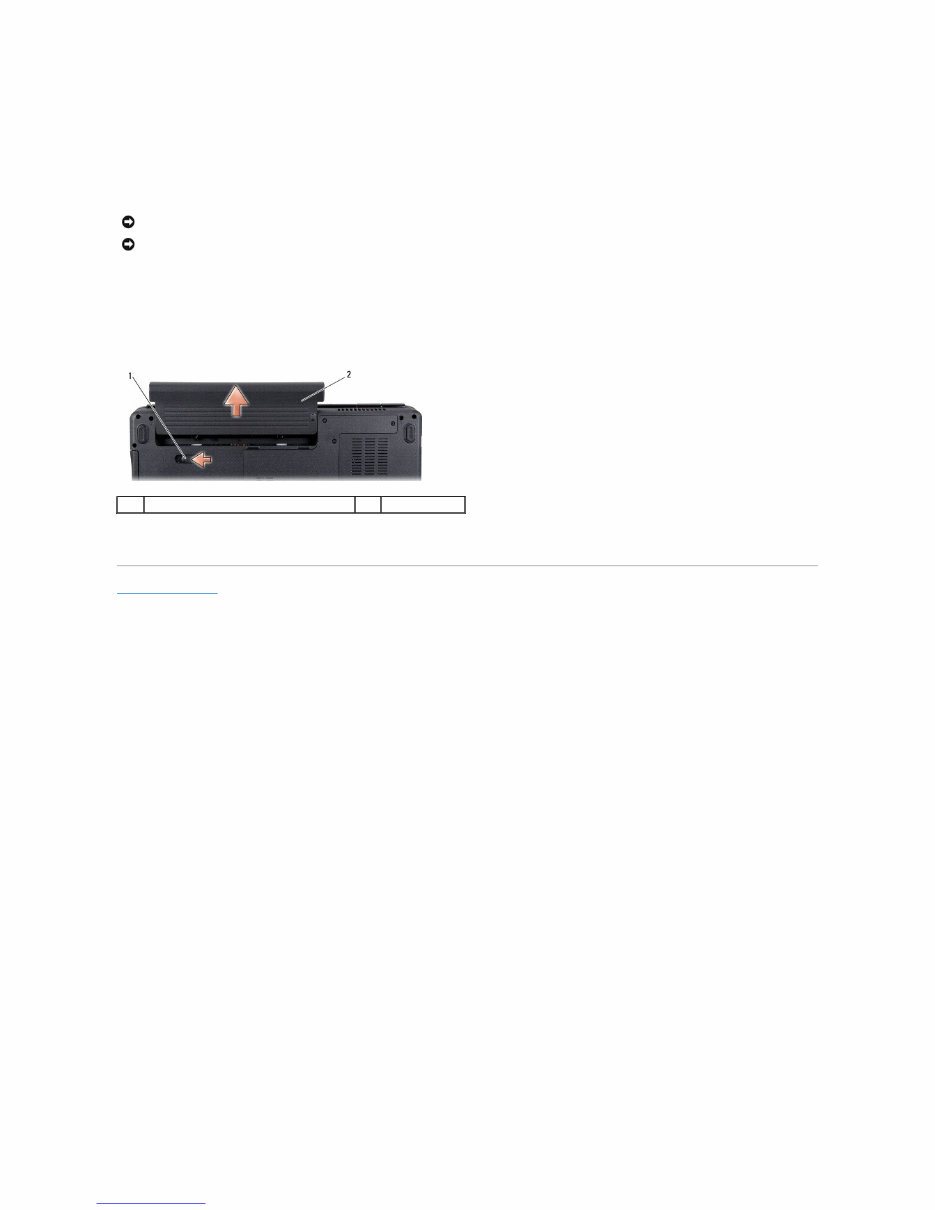
4. Disconnect all telephone or network cables from the computer. 5. Press and eject any installed cards from the ExpressCard slot and the 8-in-1 memory card reader. 6. Disconnect your computer and all attached devices from their electrical outlets. 7. Turn the computer over. 8. Slide and hold the battery release latch. 9. Slide the battery out of the battery bay. 10. Press the power button to ground the system board. Back to Contents Page NOTICE: To help prevent damage to the system board, you must remove the battery from the battery bay before you service the computer. NOTICE: To avoid damage to the computer, use only the battery designed for this particular Dell computer. Do not use batteries designed for other Dell computers. 1 battery release latch 2 battery Downloaded from www.Manualslib.com manuals search engine
Back to Contents Page Flashing the BIOS Dell™ Inspiron™ 1545 Service Manual Flashing the BIOS From a CD Flashing the BIOS From the Hard Drive If a BIOS upgrade CD is provided with the new processor or new system board, flash the BIOS from the CD. If you do not have a BIOS upgrade CD, flash the BIOS from the hard drive. Flashing the BIOS From a CD 1. Ensure that the AC adapter is plugged in and that the main battery is installed properly. 2. Insert the BIOS upgrade CD, and restart the computer. Follow the instructions that appear on the screen. The computer continues to boot and updates the new BIOS. When the flash update is complete, the computer will automatically reboot. 3. Press <F2> during POST to enter the system setup program. 4. Click Load Defaults and click OK in pop-up window to reset the computer defaults. 5. Remove the BIOS upgrade CD from the drive. 6. Press <Esc> and click Yes in the pop-up window to save configuration changes. 7. The BIOS upgrade finishes and the computer restarts automatically. Flashing the BIOS From the Hard Drive 1. Ensure that the AC adapter is plugged in, the main battery is properly installed, and a network cable is attached. 2. Turn on the computer. 3. Locate the latest BIOS update file for your computer at support.dell.com. 4. Click Download Now to download the file. 5. If the Export Compliance Disclaimer window appears, click Yes, I Accept this Agreement. The File Download window appears. 6. Click Save this program to disk and then click OK. The Save In window appears. 7. Click the down arrow to view the Save In menu, select Desktop, and then click Save. The file downloads to your desktop. 8. Click Close if the Download Complete window appears. The file icon appears on your desktop and is titled the same as the downloaded BIOS update file. 9. Double-click the file icon on the desktop and follow the instructions on the screen. Back to Contents Page NOTE: If you use a BIOS upgrade CD to flash the BIOS, set up the computer to boot from a CD before inserting the CD. Downloaded from www.Manualslib.com manuals search engine
Downloaded from www.Manualslib.com manuals search engine
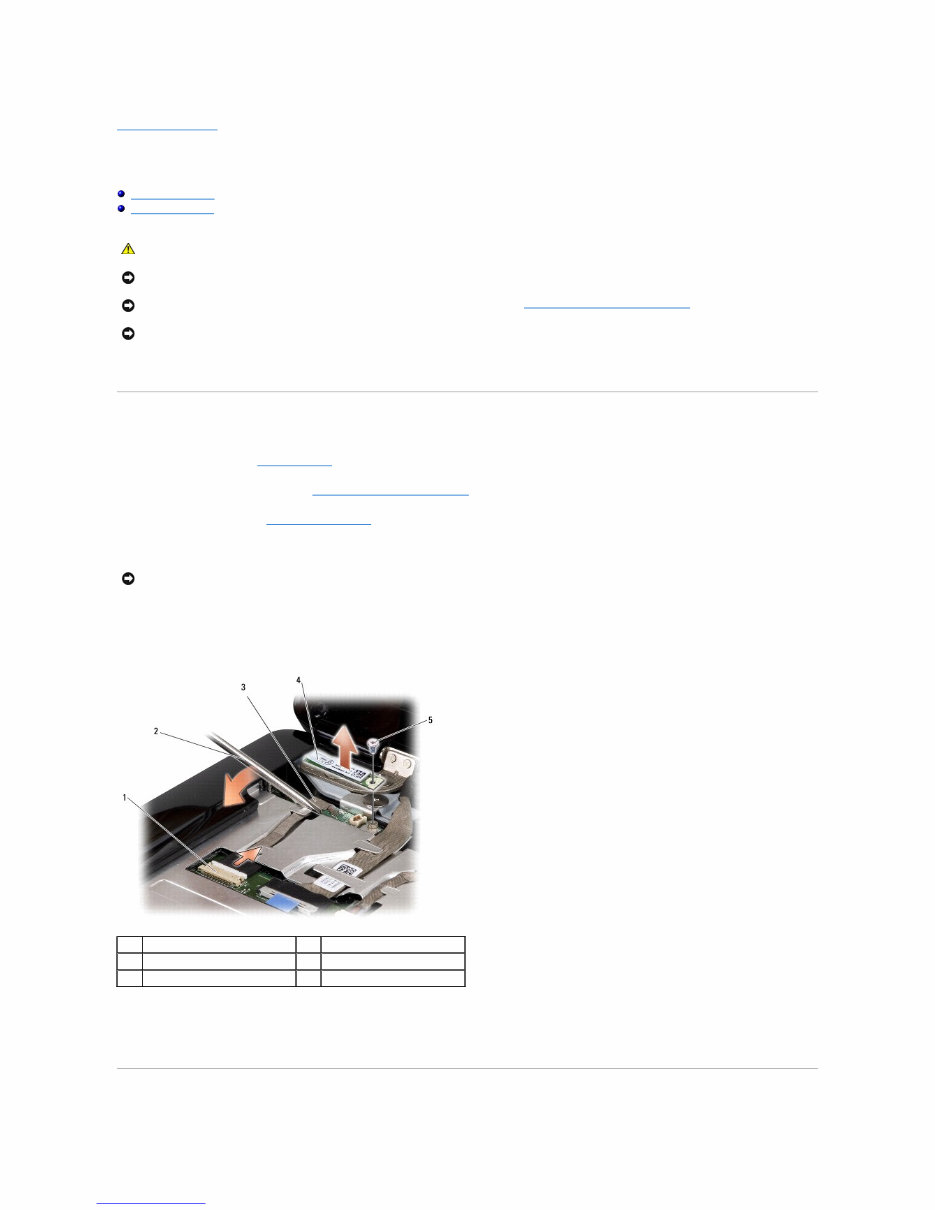
Back to Contents Page Internal Card With Bluetooth® Wireless Technology Dell™ Inspiron™ 1545 Service Manual Removing the Card Replacing the Card If you ordered a card with Bluetooth wireless technology with your computer, it is already installed. Removing the Card 1. Follow the instructions in Before You Begin . 2. Remove the center control cover (see Removing the Center Control Cover ). 3. Remove the keyboard (see Removing the Keyboard ). 4. Remove the screw that secures the Bluetooth card and lift the card off the computer. 5. Use a plastic scribe or screwdriver to pry the cable board off the computer. 6. Remove the cable from its routing. 7. Disconnect the cable from the system board connector. 8. Remove the cable board from the computer. CAUTION: Before working inside your computer, read the safety information that shipped with your computer. For additional safety best practices information, see the Regulatory Compliance Homepage at www.dell.com/regulatory_compliance. NOTICE: To avoid electrostatic discharge, ground yourself by using a wrist grounding strap or by periodically touching an unpainted metal surface (such as a connector on the back of the computer). NOTICE: To help prevent damage to the system board, remove the main battery (see Before Working Inside Your Computer ) before working inside the computer. NOTICE: Only a certified service technician should perform repairs on your computer. Damage due to servicing that is not authorized by Dell™ is not covered by your warranty. NOTICE: Be extremely careful when removing the cable board. The cable board is glued to the computer. Do not pull on the cable to loosen the cable board. 1 cable connector 2 screwdriver 3 cable board 4 Bluetooth card 5 screw Downloaded from www.Manualslib.com manuals search engine
The Inspiron 1545 Service Manual provides comprehensive instructions for repairing and replacing internal parts of your laptop. This manual includes text and high-quality graphics to assist with disassembly/reassembly, repair and upgrade, part replacement, troubleshooting, service information, software updating, and adjustments/corrections. It is a detailed resource utilized by professional technicians and DIY enthusiasts alike.
Key features of this manual:
Step-by-step disassembly/reassembly instructions
Part replacement notices
Troubleshooting guidance
Software updating procedures
Illustrated with pictures for visual aid
Printable pages for convenience
With this manual, you can perform your own repairs, saving both time and money. It can also be used to earn money by offering laptop repair services to others or for modifying your laptop according to your needs. Additionally, it provides valuable insights into your laptop's internal parts.