Panasonic HC-V180 V180K Service Manual Repair Guide
What's Included?
Lifetime Access
Fast Download Speeds
Online & Offline Access
Access PDF Contents & Bookmarks
Full Search Facility
Print one or all pages of your manual
Operating Instructions High Definition Video Camera Model No. HC-V180 Please read these instructions carefully before using this product, and save this manual for future use. SQW0502
- 2 - ∫ About the recording format for recording motion pictures You can select from AVCHD *1 , MP4 or iFrame recording formats to record motion pictures using this unit. (l 61) *1 It is compatible with the AVCHD Progressive (1080/50p). AVCHD: It is suitable for viewing on a high-definition TV or for saving to disc *2 . *2 The following methods are available for saving an image recorded in 1080/50p: j Copy the image to a disc using the HD Writer LE 3.0. j Copy the image to a Panasonic Blu-ray disc recorder that supports AVCHD Progressive. MP4: This is a recording format suitable for playing back or editing on a PC. ≥ It is not compatible with motion pictures recorded in AVCHD format. iFrame: This is a recording format suitable for playing back or editing on a Mac (iMovie etc.). ≥ It is not compatible with motion pictures recorded in AVCHD format. ∫ Indemnity about recorded content Panasonic does not accept any responsibility for damages directly or indirectly due to any type of problems that result in loss of recording or edited content, and does not guarantee any content if recording or editing does not work properly. Likewise, the above also applies in a case where any type of repair is made to the unit. ∫ About Condensation (When the lens or the LCD monitor is fogged up) Condensation occurs when there is a change in temperature or humidity, such as when the unit is taken from outside or a cold room to a warm room. Please be careful, as it may cause the lens or LCD monitor to become soiled, moldy, or damaged. When taking the unit to a place which has a different temperature, if the unit is accustomed to the room temperature of the destination for about one hour, condensation can be prevented. (When the difference in temperature is severe, place the unit in a plastic bag or the like, remove air from the bag, and seal the bag.) When condensation has occurred, remove the battery and/or the AC adapter and leave the unit like that for about one hour. When the unit becomes accustomed to the surrounding temperature, fogginess will disappear naturally. ∫ Cards that you can use with this unit SD Memory Card, SDHC Memory Card and SDXC Memory Card ≥ 4 GB or more Memory Cards that do not have the SDHC logo or 48 GB or more Memory Cards that do not have the SDXC logo are not based on SD Memory Card Specifications. ≥ Refer to page 12 for more details on SD cards. Read this first
- 3 - ∫ For the purposes of these operating instructions ≥ SD Memory Card, SDHC Memory Card and SDXC Memory Card are referred to as the “SD card”. ≥ The smartphone and tablet are indicated as “smartphone”. ≥ Function that can be used for Motion Picture Recording Mode: Function that can be used for Still Picture Recording Mode: ≥ Function that can be used for the Playback Mode: Function that can be used for the Playback Mode (motion pictures only): Function that can be used for the Playback Mode (still pictures only): ≥ Scene(s) recorded in the recording format [AVCHD]: “AVCHD scene(s)” ≥ Scene(s) recorded in the recording format [MP4/iFrame], scene(s) saved in MP4 (1280k720/25p) or MP4 (640k360/ 25p): “MP4/iFrame scene(s)” ≥ Pages for reference are indicated by an arrow, for example: l 00
- 4 - Read this first ................................................. 2 Preparation Names and Functions of Main Parts ............ 6 Power supply.................................................. 9 Inserting/removing the battery ................. 9 Charging the battery .............................. 10 Charging and recording time ................. 11 Recording to a card ..................................... 12 Cards that you can use with this unit ..... 12 Inserting/removing an SD card .............. 13 Turning the unit on/off ................................. 14 Selecting a mode ......................................... 15 Switching this unit between Recording Mode and Playback Mode ..................... 15 Switching this unit between Motion Picture Recording Mode and Still Picture Recording Mode ................. 15 How to use the touch screen ...................... 16 About the Touch Menu........................... 17 Setting date and time................................... 18 Basic Before recording .......................................... 19 Recording motion pictures ......................... 20 Recording still pictures ............................... 21 Recording still pictures in Motion Picture Recording Mode ............ 23 Motion picture/Still picture playback ......... 24 Using the menu screen ............................... 27 Using the Setup Menu ................................. 28 Advanced (Recording) Using the zoom ............................................ 37 Zoom ratio during the Still Picture Recording Mode ................. 37 Level Shot Function..................................... 38 Changing the Recording Mode ................... 39 Intelligent Auto ....................................... 40 Intelligent Auto Plus ............................... 42 Creative Control ..................................... 42 Scene Mode .......................................... 45 Endless Loop Recording ....................... 46 Manual recording ......................................... 47 White Balance........................................ 48 Manual shutter speed/iris adjustment .... 49 Manual Focus adjustment ...................... 50 Recording with the Touch Function ........... 51 Touch function icons .............................. 51 Recording functions of operation icons .... 56 Operation icons...................................... 56 Recording functions of menus ...................60 Advanced (Playback) Playback Operations.................................... 68 Motion picture playback using operation icon ........................................ 68 Creating still picture from motion picture ........................................ 69 Highlight & Time Frame Index ............... 70 Repeat Playback.................................... 70 Resuming the previous playback ........... 71 Zooming in on a still picture during playback (Playback zoom) ..................... 71 Various playback functions......................... 72 Playing back motion pictures/ still pictures by date ............................... 72 Highlight Playback ................................. 73 Manual Edit ............................................ 79 Baby Calendar ....................................... 82 Changing the playback settings and playing back the slide show ................... 84 Deleting scenes/still pictures...................... 85 Deleting part of a scene (AVCHD) ......... 86 Dividing a scene (AVCHD) ..................... 87 Dividing a scene to partially delete (MP4/iFrame) ......................................... 88 Protecting scenes/still pictures............... 88 Convert to MP4 .............................................89 Watching Video/Pictures on your TV ......... 90 Connecting with an HDMI mini cable ..... 92 Playback using VIERA Link......................... 93 Contents
- 5 - Copy/Dubbing Copying/playing back with a USB HDD ..... 95 Preparing for copying/playing back ....... 95 Simple copy ........................................... 97 Copy selected files ................................ 98 Playing back the USB HDD ................... 99 Dubbing with a Blu-ray disc recorder, video device, etc. ....................................... 100 Using the Eye-Fi™ card............................. 104 With a PC What you can do with a PC ....................... 107 Before Installing HD Writer LE 3.0 ....... 109 Operating environment ............................. 111 Installation .................................................. 113 Connecting to a PC.................................... 114 About the PC display ........................... 116 Starting HD Writer LE 3.0 .......................... 117 Reading the operating instructions of the software applications ................. 117 If using Mac (mass storage)...................... 118 Others Indications .................................................. 119 Messages.................................................... 122 About recovery .................................... 122 Troubleshooting......................................... 123 Cautions for use......................................... 128 About copyright ......................................... 132 Recording modes/approximate recordable time .......................................... 133 Approximate number of recordable pictures.................................... 134 Optional accessories ................................. 135 About the Remote Pan Tilt Cradle ....... 136
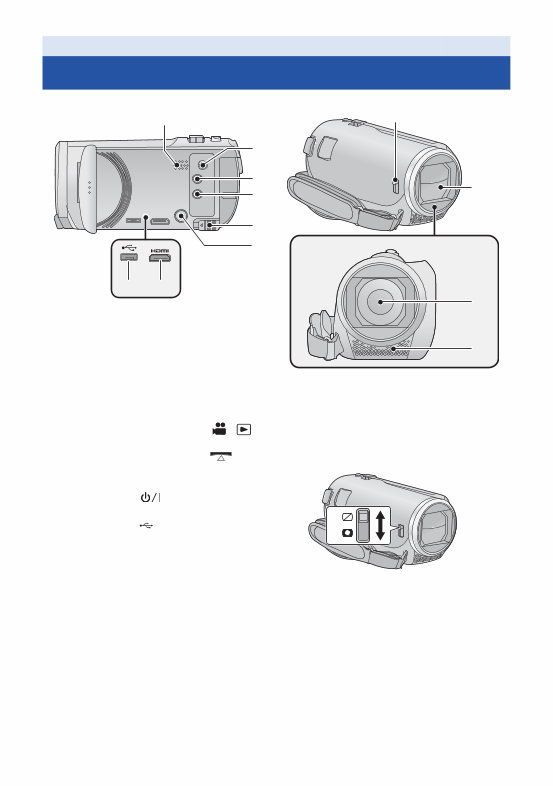
- 6 - 1 Speaker 2 A/V connector [A/V] (l 90, 103) 3 Recording/playback button [ / ] (l 15) 4 Level Shot Function button [ ] (l 38) 5 Battery release lever [BATT] (l 9) 6 Power button [ ] (l 14) 7 HDMI mini connector [HDMI] (l 90) 8 USB terminal [ ] (l 95, 101, 114) 9 Lens cover opening/closing switch When not using the unit, close the lens cover to protect the lens. ≥ Slide the opening/closing switch to open/ close the cover. 10 Lens cover 11 Lens 12 Internal stereo microphones Preparation Names and Functions of Main Parts 1 2 3 4 5 6 7 8 10 9 11 12
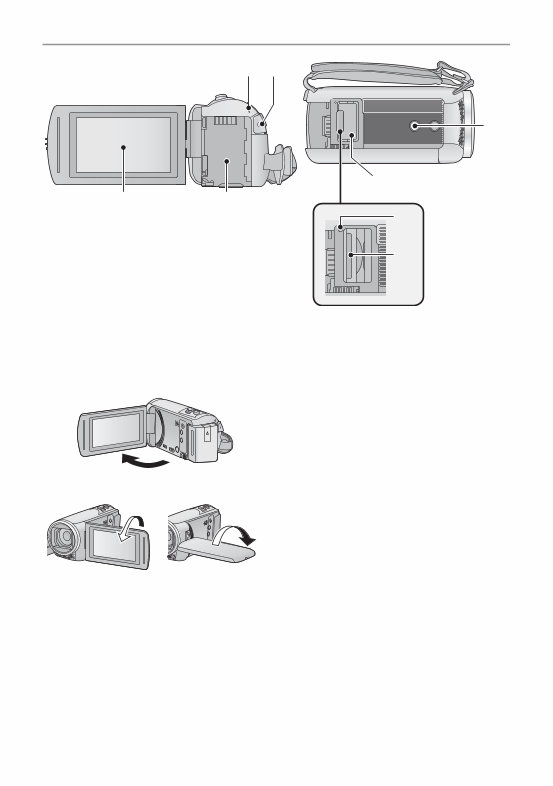
- 7 - 13 Status indicator (l 14) 14 Recording start/stop button (l 20) 15 Battery holder (l 9) 16 LCD monitor (Touch screen) (l 16) ≥ It can open up to 90o. ≥ It can rotate up to 180o A towards the lens or 90o B towards the opposite direction. 17 Tripod receptacle ≥ Attaching a tripod with a screw length of 5.5 mm or more may damage the unit. 18 SD card cover (l 13) 19 Access lamp [ACCESS] (l 13) 20 Card slot (l 13) 17 18 19 20 13 14 15 16
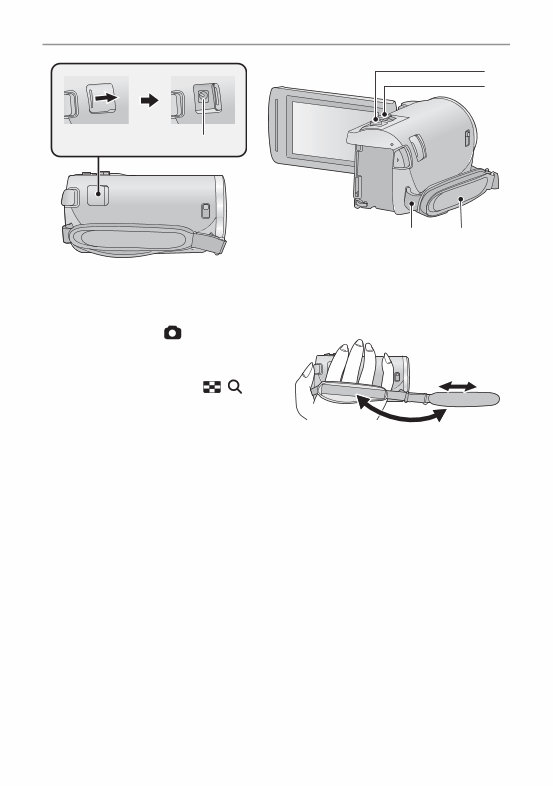
- 8 - 21 DC input terminal [DC IN] (l 10) ≥ Do not use any other AC adaptors except the supplied one. 22 Photoshot button [ ] (l 21) 23 Zoom lever [W/T] (In Motion Picture Recording Mode or Still Picture Recording Mode) (l 37)/ Thumbnail display switch [ / ] (l 25)/ Volume lever [sVOLr] (In Playback Mode) (l 26) 24 Grip belt Adjust the length of the grip belt so that it fits your hand. 1 Flip the belt. 2 Adjust the length. 3 Replace the belt. 25 Shoulder strap fixture 22 23 24 25 21
- 9 - ∫ About batteries that you can use with this unit The battery that can be used with this unit is VW-VBT190/VW-VBT380. ≥ The unit has a function for distinguishing batteries which can be used safely. The dedicated battery (VW-VBT190/VW-VBT380) supports this function. The only batteries suitable for use with this unit are genuine Panasonic products and batteries manufactured by other companies and certified by Panasonic. Panasonic cannot in any way guarantee the quality, performance or safety of batteries which have been manufactured by other companies and are not genuine Panasonic products. Inserting/removing the battery ≥ Press the power button to turn off the unit. (l 14) Install the battery by inserting it in the direction shown in the figure. Preparation Power supply It has been found that counterfeit battery packs which look very similar to the genuine product are made available to purchase in some markets. Some of these battery packs are not adequately protected with internal protection to meet the requirements of appropriate safety standards. There is a possibility that these battery packs may lead to fire or explosion. Please be advised that we are not liable for any accident or failure occurring as a result of use of a counterfeit battery pack. To ensure that safe products are used we would recommend that a genuine Panasonic battery pack is used. Removing the battery Be sure to hold down the power button until the status indicator goes off. Then remove the battery while supporting the unit to prevent it from dropping. Move the battery release lever in the direction indicated by the arrow and remove the battery when unlocked. Insert the battery until it clicks and locks.
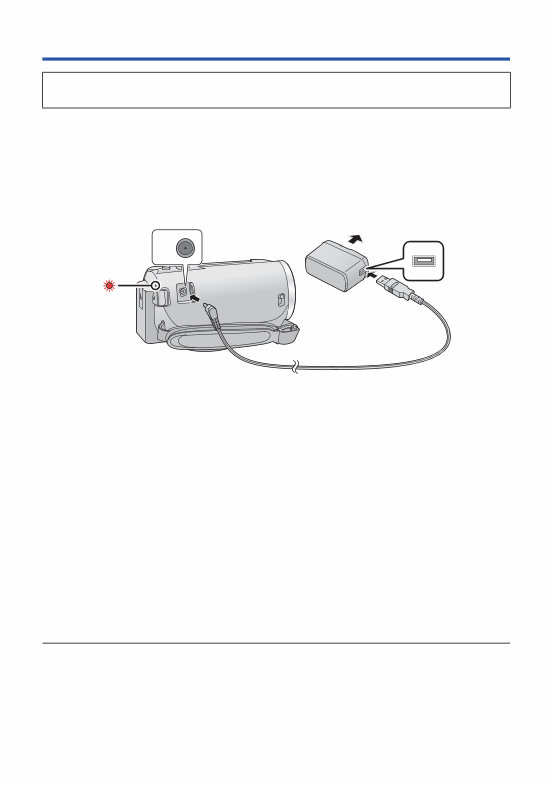
- 10 - Charging the battery The unit is in the standby condition when the AC adaptor is connected. The primary circuit is always “live” as long as the AC adaptor is connected to an electrical outlet. Important: ≥ Do not use the AC adaptor/DC cable with any other equipment as it is designed only for this unit. Also, do not use the AC adaptor/DC cable from other equipment with this unit. ≥ The battery will not be charged if the unit is turned on. ≥ It is recommended to charge the battery in a temperature between 10 oC and 30 oC. (The battery temperature should also be the same.) A DC input terminal 1 Connect the DC cable to the AC adaptor and to the DC input terminal of this unit. ≥ Insert the plugs as far as they will go. 2 Insert the AC adaptor into an AC outlet. ≥ The status indicator will flash red at an interval of approximately 2 seconds (approximately 1 second on, approximately 1 second off), indicating that charging has begun. It will turn off when the charging is completed. ∫ Connecting to the AC outlet It is possible to use this unit with power supplied from the AC outlet by turning on the unit with the AC adaptor connected. Even when you use the AC adaptor for recording images, keep the battery connected. This allows you to continue the recording even if a power failure occurs or the AC adaptor is unplugged from the AC outlet by accident. ∫ To charge by connecting to other device It is possible to charge by connecting to other device with the USB cable (supplied). Please refer to page 115. ≥ If the status indicator flashes at a particularly fast or slow rate, refer to page 130. ≥ We recommend using Panasonic batteries (l 11). ≥ If you use other batteries, we cannot guarantee the quality of this product. ≥ Do not heat or expose to flame. ≥ Do not leave the battery(ies) in a car exposed to direct sunlight for a long period of time with doors and windows closed. When this unit is purchased, the battery is not charged. Charge the battery fully before using this unit for the first time.
This service and repair manual for the Panasonic HC V180 Full HD Camcorder is an essential resource for both professional technicians and DIY enthusiasts. It is the official manual used by authorized Panasonic technicians and maintenance employees, providing comprehensive guidance for troubleshooting and repairing the video camera.
The manual includes:
Safety precautions
Warnings
Service navigation
Specifications
Location of controls and components
Service mode
Service fixture & tools
Disassembly and assembly instructions
Measurements and adjustments
Factory settings
Block diagram
Wiring connection diagram
In addition, the manual includes schematics, circuit boards, exploded views, and a full parts catalog, providing detailed information not typically found in standard service manuals.
This comprehensive manual covers all worldwide models of the HC-V180, ensuring its relevance for a wide range of users. It is presented in high resolution, ensuring that the included pictures and step-by-step instructions are of the highest quality.
Instant access to the manual eliminates the need for shipping and waiting on postal delivery, allowing users to commence repairs within minutes of obtaining the manual.
Specifications:
Language: English
Format: PDF
Pages: 95
Recently Viewed
5,521,897Happy Clients
2,594,462eManuals
1,120,453Trusted Sellers
15Years in Business
Price:
Actual Price:
Panasonic HC-V180 V180K Service Manual Repair Guide