Toyota 1PZ/1HZ/1HD-T Engines OEM Service & Repair Manual
What's Included?
Lifetime Access
Fast Download Speeds
Online & Offline Access
Access PDF Contents & Bookmarks
Full Search Facility
Print one or all pages of your manual
FOREWORD This repair manual has been prepared to provide information covering general service repairs for the 1 PZ, 1 HZ and 1HD-T engines equipped on the TOYOTA LAND CRUISER and COASTER. Applicable models: PZJ70, 73, 75 series HZJ70, 73, 75, 80 series HDJ80 series HZB30 series HDB30 series Please note that the publications below have also been prepared as relevant service manuals for the components and system in this engine. All information in this manual is based on the latest product information at the time of publication. However, specifications and procedures are subject to change without notice. TOYOTA MOTOR CORPORATION Manual Name Land Cruiser (Wagon) New Car Features Pub. No. NCF064E
CAUTION This manual does not include all the necessary items about repair and service, this manual is made for the purpose of the use for the persons who have special techniques and certifications. In the cases that non-specialized or uncertified technicians perform repair or service only using this manu- al or without proper equipment or tool, that may cause severe injury to you or other people around and also cause damage to your customer's vehicle. In order to prevent dangerous operation and damages to your customer's vehicle, be sure to follow the instruction shown below. Must read this manual thoroughly. It is especially important to have good understanding all the contents written in the PRECAUTION of "IN" section. The service method written in this manual is very effective to perform repair and service. When performing the operations following the procedures using this manual, be sure to use tools spe- cified and recommended. If using non-specified or recommended tools and service method, be sure to confirm safety of the technicians and any possibility of causing personal injury or damage to the customer's vehicle before starting the operation. If part replacement is necessary, must replace the part with the same part number or equivalent part. Do not replace it with inferior quality. It is important to note that this manual contains various "Cautions" and "Notices" that must be carefully observed in order to reduce the risk of personal injury during service or repair, or the possibility that improper service or repair may damage the vehicle or render it unsafe. It is also important to understand that these "Cautions" and "Notices" are not exhaustive, because it is important to warn of all the possible hazardous consequences that might result from failure to follow these instructions.
IN-1 INTRODUCTION Page HOW TO USE THIS MANUAL IN-2 IDENTIFICATION INFORMATION IN-4 GENERAL REPAIR INSTRUCTIONS IN-4 ABBREVIATIONS USED IN THIS MANUAL IN-7
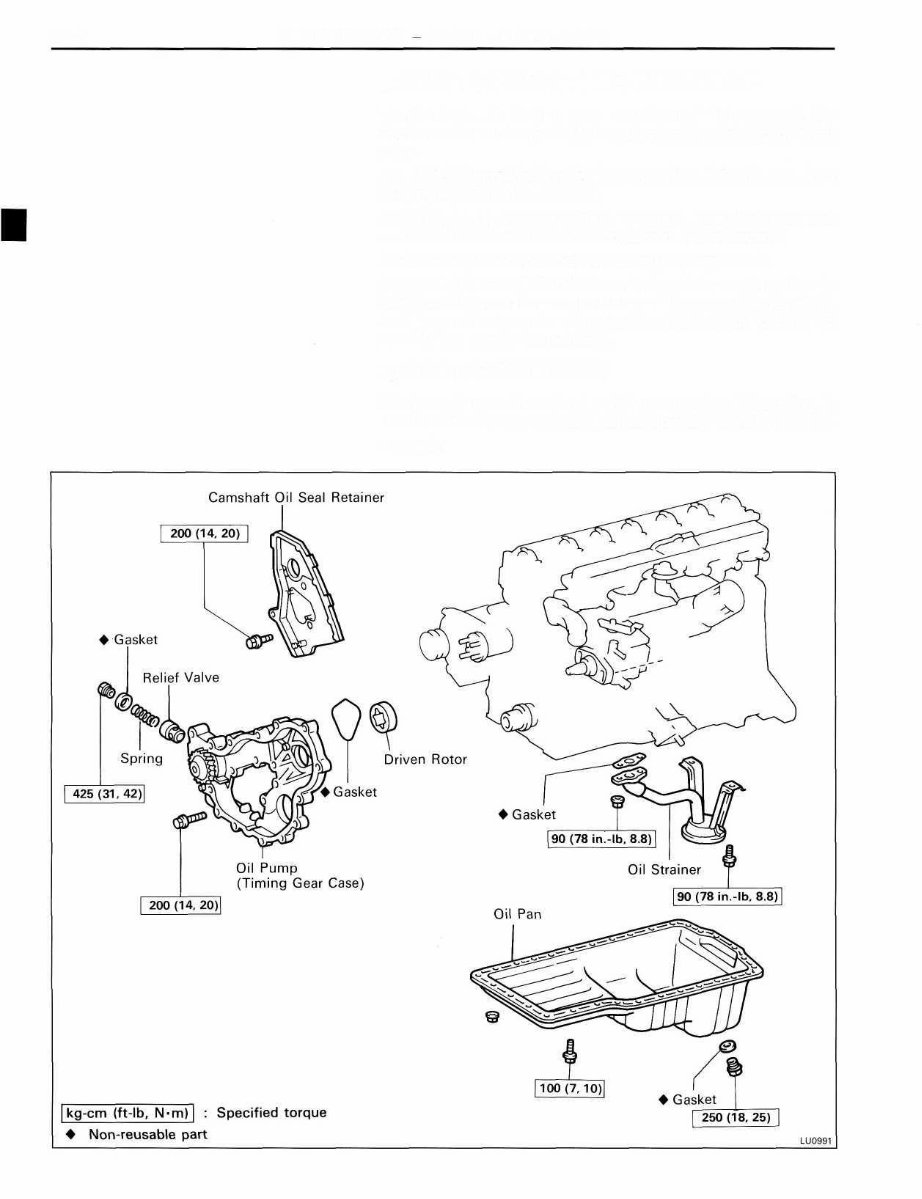
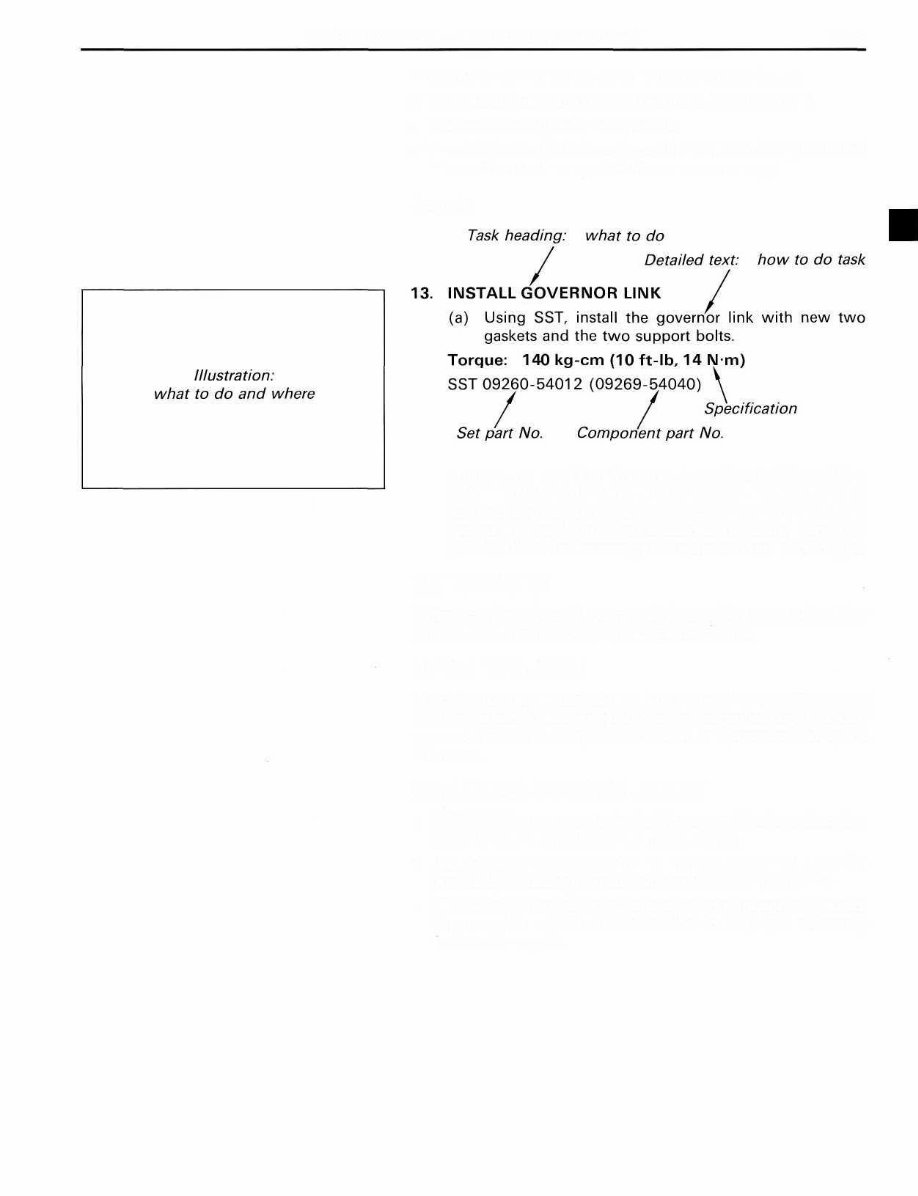
IIM-2 INTRODUCTION How to Use This Manual HOW TO USE THIS MANUAL To assist you in finding your way through this manual, the Section Title and major heading are given at the top of every page. An INDEX is provided on the 1st page of each section to guide you to the item to be repaired. At the beginning of each section, PRECAUTIONS are given that pertain to all repair operations contained in that section. Read these precautions before starting any repair task. TROUBLESHOOTING tables are included for each system to help you diagnose the problem and find the cause. The repair for each possible cause is referenced in the remedy column to quickly lead you to the solution. REPAIR PROCEDURES Most repair operations begin with an overview illustration. It identifies the components and shows how the parts fit together. Example:
IN-3 INTRODUCTION - How to Use This Manual The procedures are presented in a step-by-step format: • The illustration shows what to do and whereto do it. • The task heading tells what to do. • The detailed text tells how to perform the task and gives other information such as specifications and warnings. Example: This format provides the experienced technician with a FAST TRACK to the information needed. The upper case task heading can be read at a glance when necessary, and the text below it provides detailed information. Important specifications and warnings always stand out in bold type. REFERENCES References have been kept to a minimum. However, when they are required, you are given the page to refer to. SPECIFICATIONS Specifications are presented in bold type throughout the text where needed. You never have to leave the procedure to look up your specifications. They are also found in Appendix A for quick reference. CAUTIONS, NOTICES, HINTS: • CAUTIONS are presented in bold type, and indicate there is a possibility of injury to you or other people. • NOTICES are also presented in bold type, and indicate the possibility of damage to the components being repaired. • HINTS are separated from the text but do not appear in bold. They provide additional information to help you efficiently perform the repair.
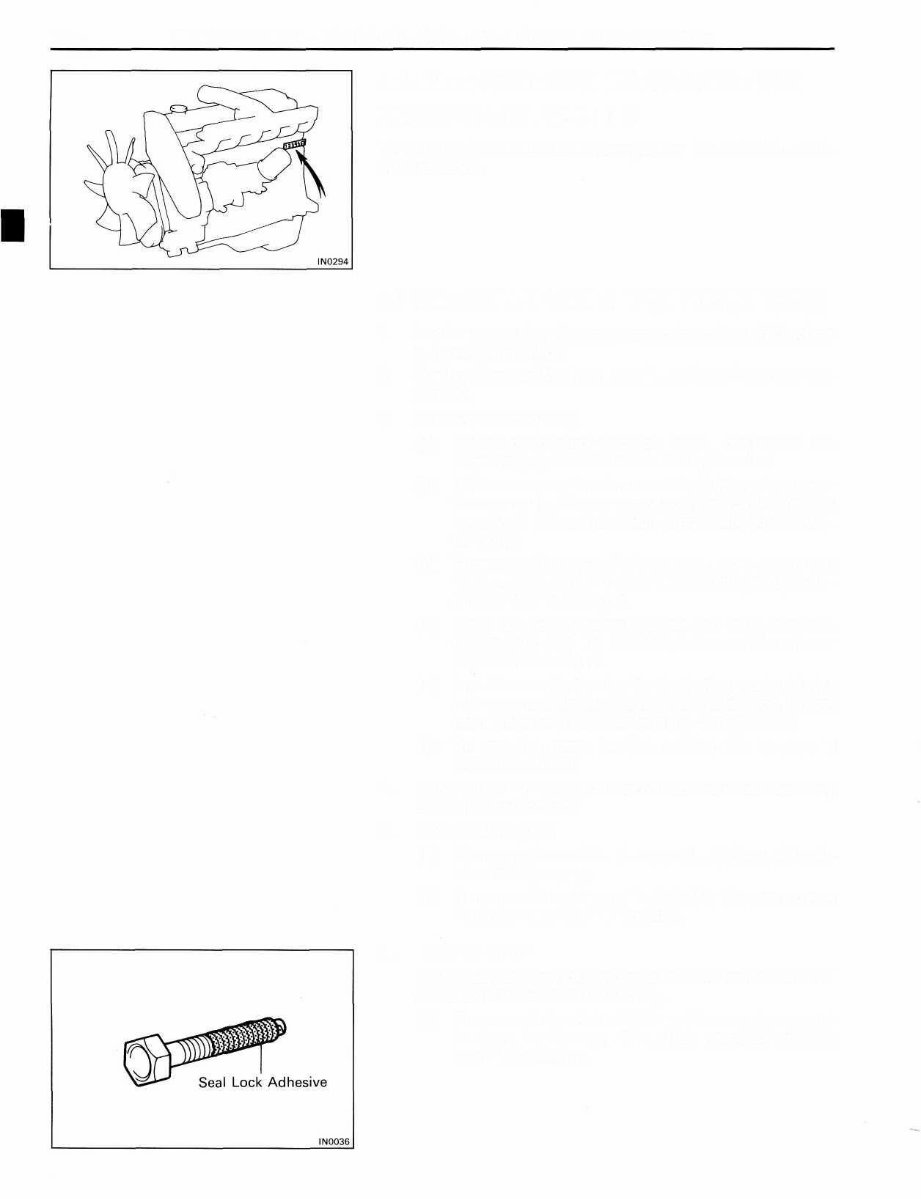
IIM-4 INTRODUCTION - Identification Information, General Repair Instructions IDENTIFICATION INFORMATION ENGINE SERIAL NUMBER The engine serial number is stamped on the left side of the cylinder block. GENERAL REPAIR INSTRUCTIONS 1. Use fender, seat and floor covers to keep the vehicle clean and prevent damage. 2. During disassembly, keep parts in order to facilitate reas- sembly. 3. Observe the following: (a) Before performing electrical work, disconnect the negative ( —) cable from the battery terminal. (b) If it is necessary to disconnect the battery for inspec- tion or repair, always disconnect the cable from the negative ( —) terminal which is grounded to the vehi- cle body. (c) To prevent damage to the battery terminal post, loosen the terminal nut and raise the cable straight up with- out twisting or prying it. (d) Clean the battery terminal posts and cable terminals with a shop rag. Do not scrape them with a file or other abrasive object. (e) Install the cable terminal to the battery post with the nut loose, and tighten the nut after installation. Do not use a hammer to tap the terminal onto the post. (f) Be sure the cover for the positive ( + ) terminal is properly in place. 4. Check hose and wiring connectors to make sure that they are secure and correct. 5. Non-reusable parts (a) Always replace cotter pins gaskets, O-rings, oil seals, etc. with new ones. (b) Non-reusable parts are indicated in the component illustrations by the " • " symbol. 6. Precoated Parts Precoated parts are bolts and nuts, etc. that are coated with a seal lock adhesive at the factory. (a) If a precoated part is retightened, loosened or caused to move in any way, it must be recoated with the specified adhesive.
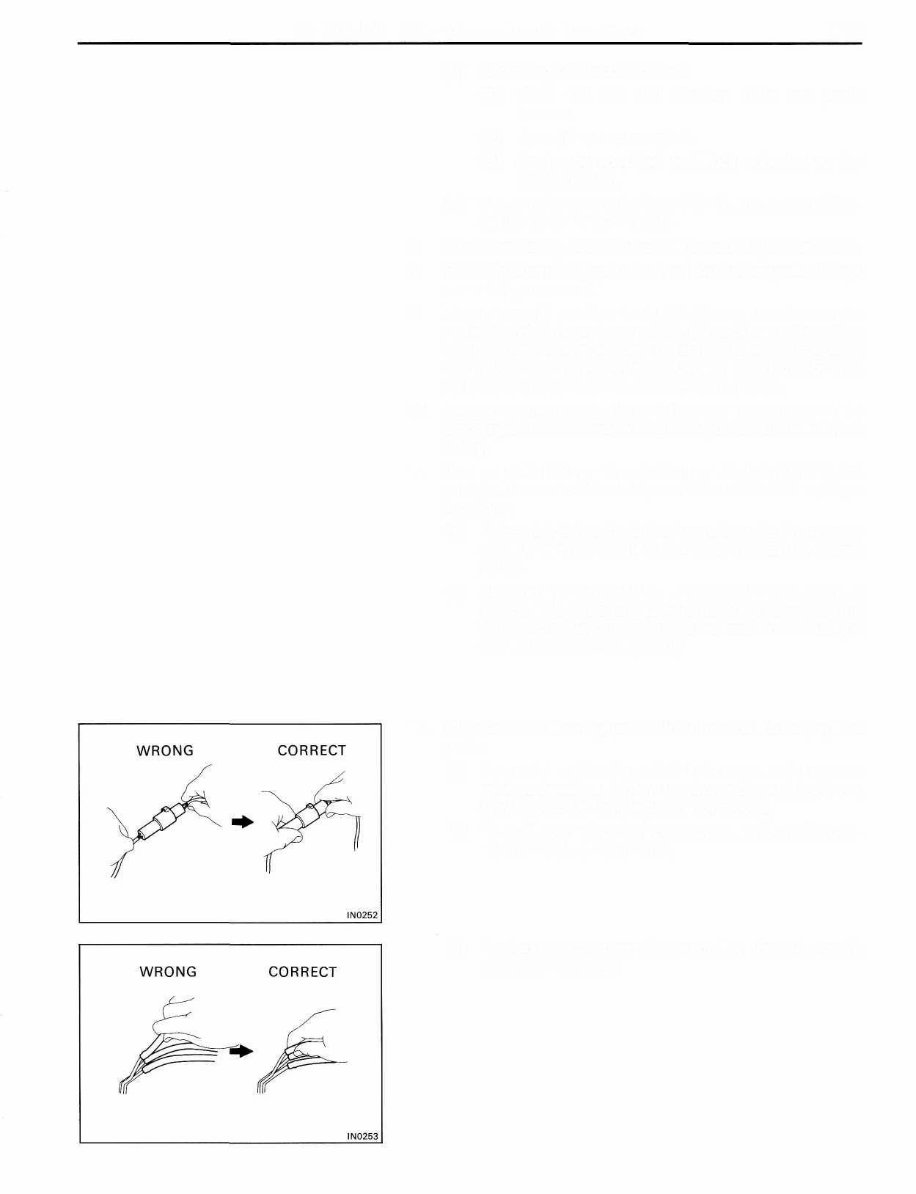
IN-5 INTRODUCTION - General Repair Instructions (b) Recoating of Precoated Parts (1) Clean off the old adhesive from the part's threads. (2) Dry with compressed air. (3) Apply the specified seal lock adhesive to the part's threads. (c) Precoated parts are indicated in the component illus- trations by the "*" symbol. 7. When necessary, use a sealer on gaskets to prevent leaks. 8. Carefully observe all specifications for bolt torques. Always use a torque wrench. 9. Use of special service tools (SST) and special service materials (SSM) may be required, depending on the nature of the repair. Be sure to use SST and SSM where specified and follow the proper work procedure. A list of SST and SSM can be found at the back of this manual. 10. When replacing fuses, be sure the new fuse is the correct amperage. DO NOT exceed the rating or use one of a lower rating. 11. Care must be taken when jacking up and supporting the vehicle. Be sure to lift and support the vehicle at the proper locations. (a) If the vehicle is to be jacked up only at the front or rear end, be sure to block the wheels in order to ensure safety. (b) After the vehicle is jacked up, be sure to support it on stands. It is extremely dangerous to do any work on the vehicle raised on a jack alone, even for a small job that can be finished quickly. 12. Observe the following precautions to avoid damaging the parts: (a) Be careful not to drop electrical components, such as sensors or relays. If they are dropped on a hard floor, they should be replaced and not reused. (b) To pull apart electrical connectors, pull on the con- nector itself, not the wires. (c) To disconnect vacuum hoses, pull on the end, not the middle of the hose.
IIM-6 INTRODUCTION General Repair Instructions (d) When steam cleaning an engine, protect the air filter, and injection pump from water. (e) Never use an impact wrench to remove or install temp, switches or temp, sensors. (f) When checking continuity at the wire connector, insert the tester probe carefully to prevent terminals from bending. (g) When using a vacuum gauge, never force the hose onto a connector that is too large. Use a step-down adapter instead. Once the hose has been stretched, it may leak. 13. After removing and reinstalling the injection pump and fuel hoses, clean off the fuel on engine components. In partic- ular, be sure to check the radiator hose and by-pass hose, because they deteriorate easily if they come into contact with fuel.
For those seeking to service or repair their TOYOTA Land CRUISER or COASTER vehicles, the Toyota 1PZ/1HZ/1HD-T Engines OEM Service & Repair Manual is an indispensable resource. This manual provides comprehensive, model-specific instructions and technical information designed to guide both professional mechanics and dedicated DIY enthusiasts through maintenance and repair tasks for the designated engine models.
The manual includes clear, step-by-step instructions accompanied by detailed diagrams, troubleshooting techniques, and important tips for working on the 1hd, 1hz, and 1pz-t engine variants found in both TOYOTA Land CRUISER and TOYOTA COASTER vehicles. It covers a wide range of repair and routine maintenance tasks, ensuring you have all the necessary information for oil changes, filter replacements, and more complex engine repairs.
Designed with precision and clarity, the Toyota 1PZ/1HZ/1HD-T Engines OEM Service & Repair Manual equips you with essential technical knowledge on engine components, recommended tools, and systematic repair procedures to keep your vehicle running smoothly and efficiently.
Invest in the Toyota 1PZ/1HZ/1HD-T Engines OEM Service & Repair Manual and take control of your vehicle's engine performance and longevity with this expertly detailed and reliable guide.
Recently Viewed
5,521,897Happy Clients
2,594,462eManuals
1,120,453Trusted Sellers
15Years in Business
Price:
Actual Price:
Toyota 1PZ/1HZ/1HD-T Engines OEM Service & Repair Manual