2006-07 ENGINE Basic Engine 4-Cylinder Petrol - 9-3 (9440) REPAIR INSTRUCTIONS POWER TRAIN REMOVAL To Remove 1. Place the car on a lift and apply wing covers. 2. Open the cap on the expansion tank. 3. Raise the car slightly and remove the front wheels. 4. Remove the lower spoiler shield. Unplug and remove the connector. Fig. 1: Removing Lower Spoiler Shield Courtesy of SAAB-SCANIA OF AMERICA, INC. 5. Place a receptacle under the car, connect a hose to the radiator and drain the coolant. WARNING: There is a large number of cables, hoses, wires, etc., that are secured with hard plastic cable ties. After tightening, the loose ends of these cable ties are cut off and may leave more or less sharp edges at fixing points. Pay attention to the risk of cuts caused by these sharp ends! 2006 Saab 9-3 Aero 2006-07 ENGINE Basic Engine 4-Cylinder Petrol - 9-3 (9440) 2006 Saab 9-3 Aero 2006-07 ENGINE Basic Engine 4-Cylinder Petrol - 9-3 (9440)
Fig. 2: Connecting Hose To Radiator & Draining Coolant Courtesy of SAAB-SCANIA OF AMERICA, INC. 6. Remove the wing liners from both front wheel housings and the cover by the gearbox. Fig. 3: Removing Wing Liners From Front Wheel Housings Courtesy of SAAB-SCANIA OF AMERICA, INC. 7. Detach the hose for the headlamp washers and drain the washer fluid reservoir. 2006 Saab 9-3 Aero 2006-07 ENGINE Basic Engine 4-Cylinder Petrol - 9-3 (9440)
This manual is sold and compiled by Fixyourcar2008@aol.com. Duplication and resell is not permitted.
Fig. 4: Removing Headlamp Washer Hose & Draining Washer Fluid Reservoir Courtesy of SAAB-SCANIA OF AMERICA, INC. 8. Lower the car slightly and remove the bumper. Fig. 5: Removing Front Bumper Courtesy of SAAB-SCANIA OF AMERICA, INC. 9. Remove the cover on the left-hand side and the charge air hose between the charge air pipe and the charge air cooler. 2006 Saab 9-3 Aero 2006-07 ENGINE Basic Engine 4-Cylinder Petrol - 9-3 (9440)
Fig. 6: Removing Left - Hand Side Cover & Lower Charge Air Pipe Bracket Courtesy of SAAB-SCANIA OF AMERICA, INC. 10. Remove the lower charge air pipe bracket from the fan cowling. 11. Remove the cover on the right-hand side and the hose between the charge air cooler and the charge air pipe. Fig. 7: Removing Right - Hand Side Cover & Dryer Filter Bolts Courtesy of SAAB-SCANIA OF AMERICA, INC. 12. Remove the dryer filter bolts from the radiator. 13. Remove the lower seal between the charge air cooler and the radiator. 14. Lower the car and remove the upper engine cover. 2006 Saab 9-3 Aero 2006-07 ENGINE Basic Engine 4-Cylinder Petrol - 9-3 (9440)
Fig. 8: Removing Upper Engine Cover, Battery Cover & Battery Cooler Pipe Courtesy of SAAB-SCANIA OF AMERICA, INC. 15. Remove the battery cover and the battery cooler pipe. 16. Undo the bonnet cable quick-release coupling by first undoing the clip in the body and then separating the quick-release coupling. Use a screwdriver. Fig. 9: Removing Bonnet Cable Quick - Release Coupling By Removing Clip In Body Courtesy of SAAB-SCANIA OF AMERICA, INC. 17. Remove the upper radiator member. 18. Unplug the connector to the pressure/temperature sensor and disconnect the bypass valve hose. 2006 Saab 9-3 Aero 2006-07 ENGINE Basic Engine 4-Cylinder Petrol - 9-3 (9440)
Fig. 10: Removing Charge Air Hose & Upper Charge Air Pipe Bracket Courtesy of SAAB-SCANIA OF AMERICA, INC. 19. Detach the charge air hose from the throttle body and undo the upper charge air pipe bracket from the fan cowling. Remove the pipe with hose. 20. Remove the battery. 21. Detach the ventilation hose from the radiator. 22. Detach the vacuum hose quick-release coupling from the vacuum pump. Fig. 11: Removing Vacuum Hose Quick - Release Coupling Form Vacuum Pump Courtesy of SAAB-SCANIA OF AMERICA, INC. 23. Auto: Unplug the connector to the TCM. Remove the cover with the control module. Unplug the connector under the control module. 2006 Saab 9-3 Aero 2006-07 ENGINE Basic Engine 4-Cylinder Petrol - 9-3 (9440)
Fig. 12: Unplugging TCM Connector Courtesy of SAAB-SCANIA OF AMERICA, INC. 24. Undo the main fuse box in front of the battery tray and move it aside. 25. Unplug the bonnet switch connector, undo the cable clip and remove the battery tray. 26. Unplug the connector and undo the clips securing the cables on the fan cowling. Fig. 13: Removing Connector & Clips Securing Cables On Fan Cowling Courtesy of SAAB-SCANIA OF AMERICA, INC. 27. Unplug the reversing light switch connector. 28. Remove the seal over the radiator core. 2006 Saab 9-3 Aero 2006-07 ENGINE Basic Engine 4-Cylinder Petrol - 9-3 (9440)
Fig. 14: Removing Upper Radiator Brackets Courtesy of SAAB-SCANIA OF AMERICA, INC. 29. Remove the upper radiator brackets from the body. 30. Unplug both connectors from the left-hand structural member. Auto: Detach the oil pipes from the fluid cooler. Use 87 92 806 Removal tool, automatic transmission oil pipes. Fig. 15: Removing Oil Pipes From Fluid Cooler Courtesy of SAAB-SCANIA OF AMERICA, INC. 2006 Saab 9-3 Aero 2006-07 ENGINE Basic Engine 4-Cylinder Petrol - 9-3 (9440)
Fig. 16: Removing Left - Hand Structural Member Connectors & Fan Cowling Retaining Bolts Courtesy of SAAB-SCANIA OF AMERICA, INC. 31. Remove the fan cowling retaining bolts and loosen the cowling slightly. 32. Secure the condenser and the charge air cooler to the body with cable ties. 33. Remove the fan cowling. Carefully detach the A/C pipes from their retaining clips on the right structural member. Fig. 17: Removing Fan Cowling Courtesy of SAAB-SCANIA OF AMERICA, INC. 34. Place a receptacle under the radiator and remove the lower radiator hose. 2006 Saab 9-3 Aero 2006-07 ENGINE Basic Engine 4-Cylinder Petrol - 9-3 (9440)
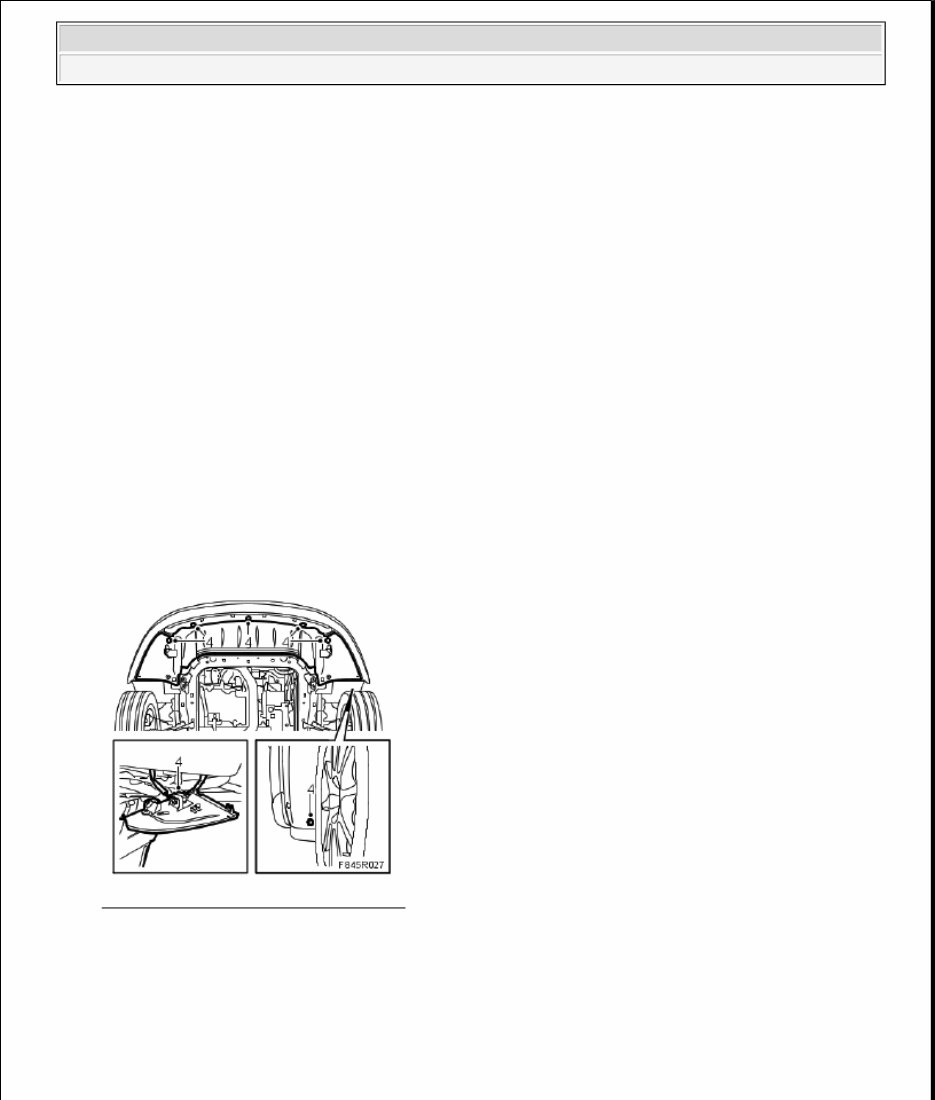
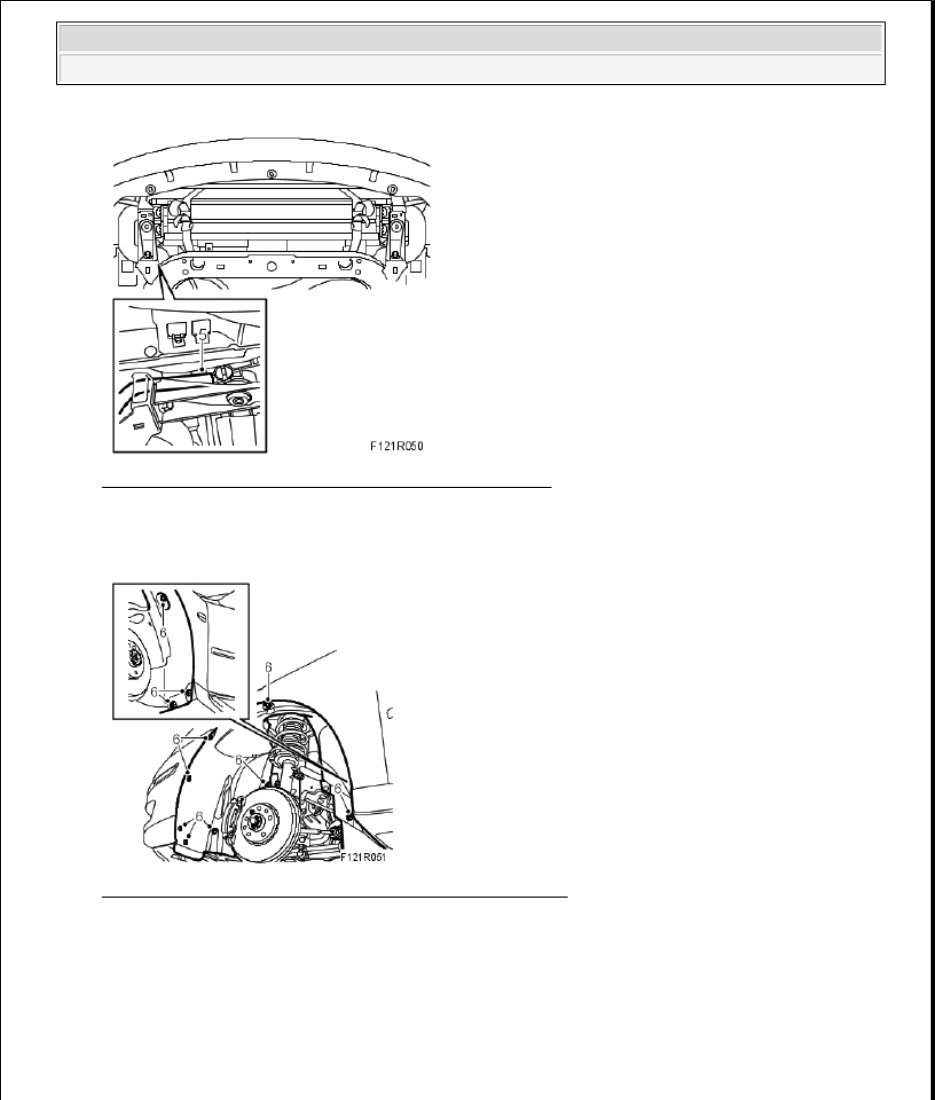
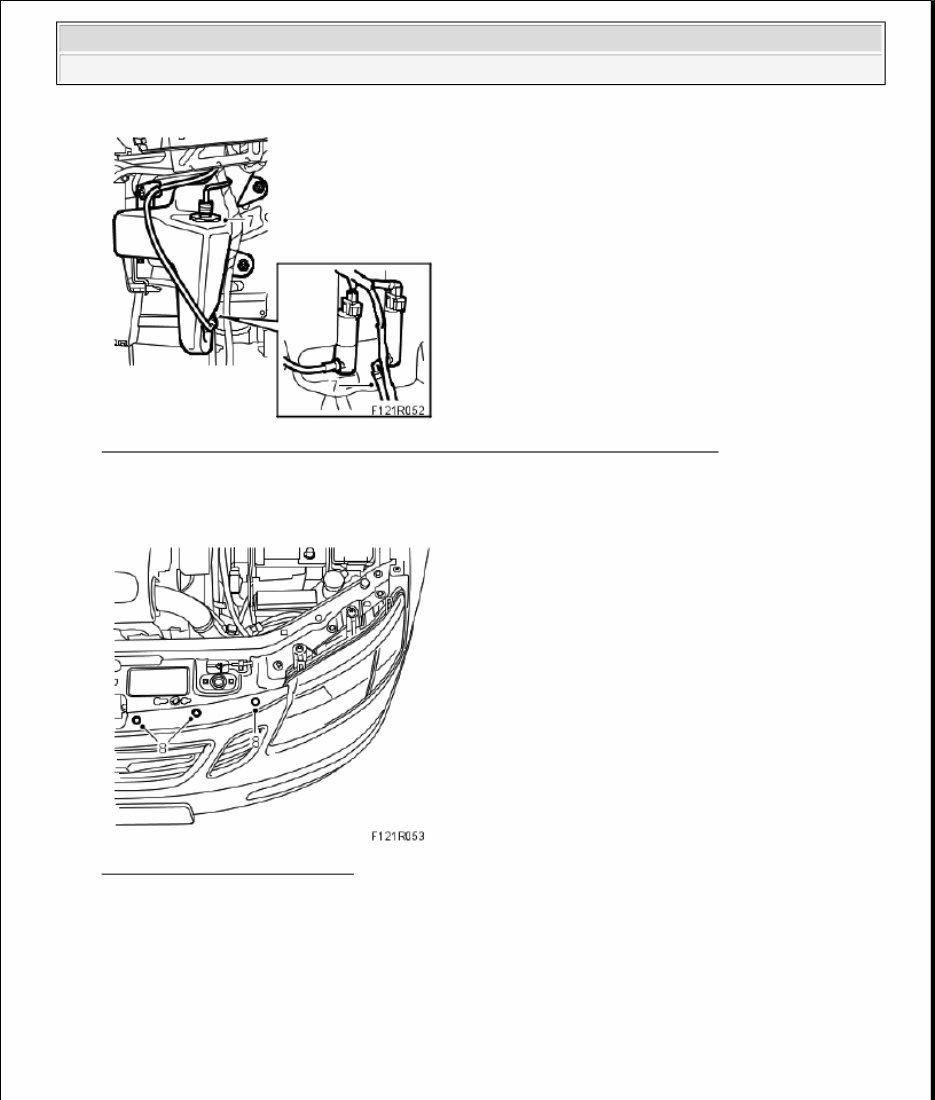
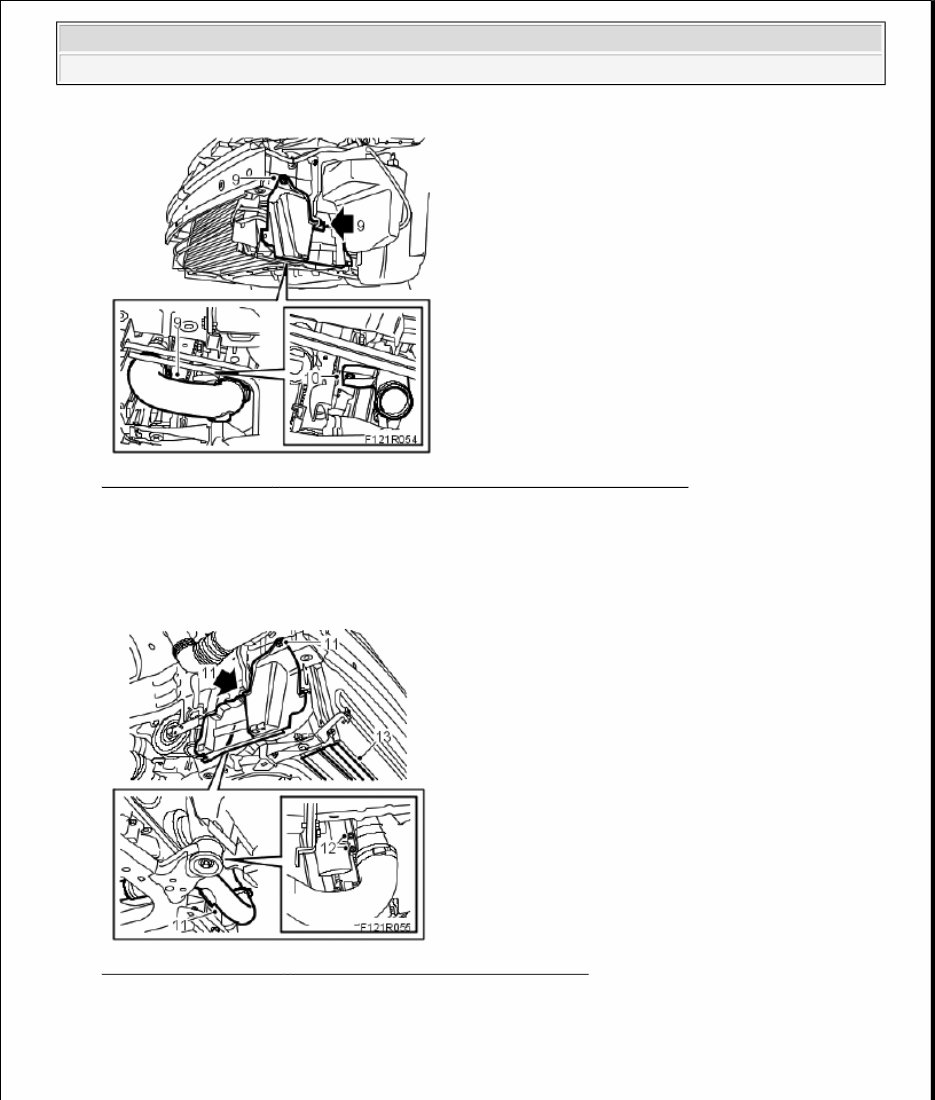
Auto Repair Manuals are essential for fixing problems in your vehicle, whether you are a professional mechanic or a DIY enthusiast. These manuals provide comprehensive instructions and procedures to help you address issues with your car. They contain technical data, diagrams, a complete list of car parts, and pictures, making it easy for even novice car mechanics to follow the step-by-step guides. The manuals cover various sections including maintenance, engine, control system, mechanical, fuel service specifications, emission control, and much more.
Whether you need a .PDF manual or a .OVA file manual, these resources are invaluable for maintaining, servicing, diagnosing, and repairing your vehicle. They are not only user-friendly but also compatible with Windows Vista32 and 64, XP, ME, 98, NT, 2000, and Mac. The manuals also include information on engine coolant, drive shaft, differential case assembly, cylinder head assembly, cooling system, clutch unit, brake system, body repair, steering system, and much more.
With these manuals, you can save time and money by gaining the knowledge and confidence to perform repairs on your own. The information contained in the manuals is the same as that used by the engineers of the company, ensuring reliability and accuracy. Additionally, the manuals are printable, allowing you to keep a clean and accessible copy on your PC for quick reference. Whether you need to replace simple car parts or enhance the performance of your engine, these manuals provide the necessary guidance and support.
For any make and model, these manuals offer a valuable resource for car owners and enthusiasts. They are available in English and can be easily accessed using Adobe Reader and Win. By having a trusty repair manual, you not only save money but also get to experience the fun of do-it-yourself projects, making car repair an enjoyable and rewarding activity.
Comprehensive instructions and procedures for fixing vehicle problems
Useful for professional mechanics and DIY enthusiasts
Contain technical data, diagrams, and a complete list of car parts
Compatible with Windows Vista32 and 64, XP, ME, 98, NT, 2000, and Mac