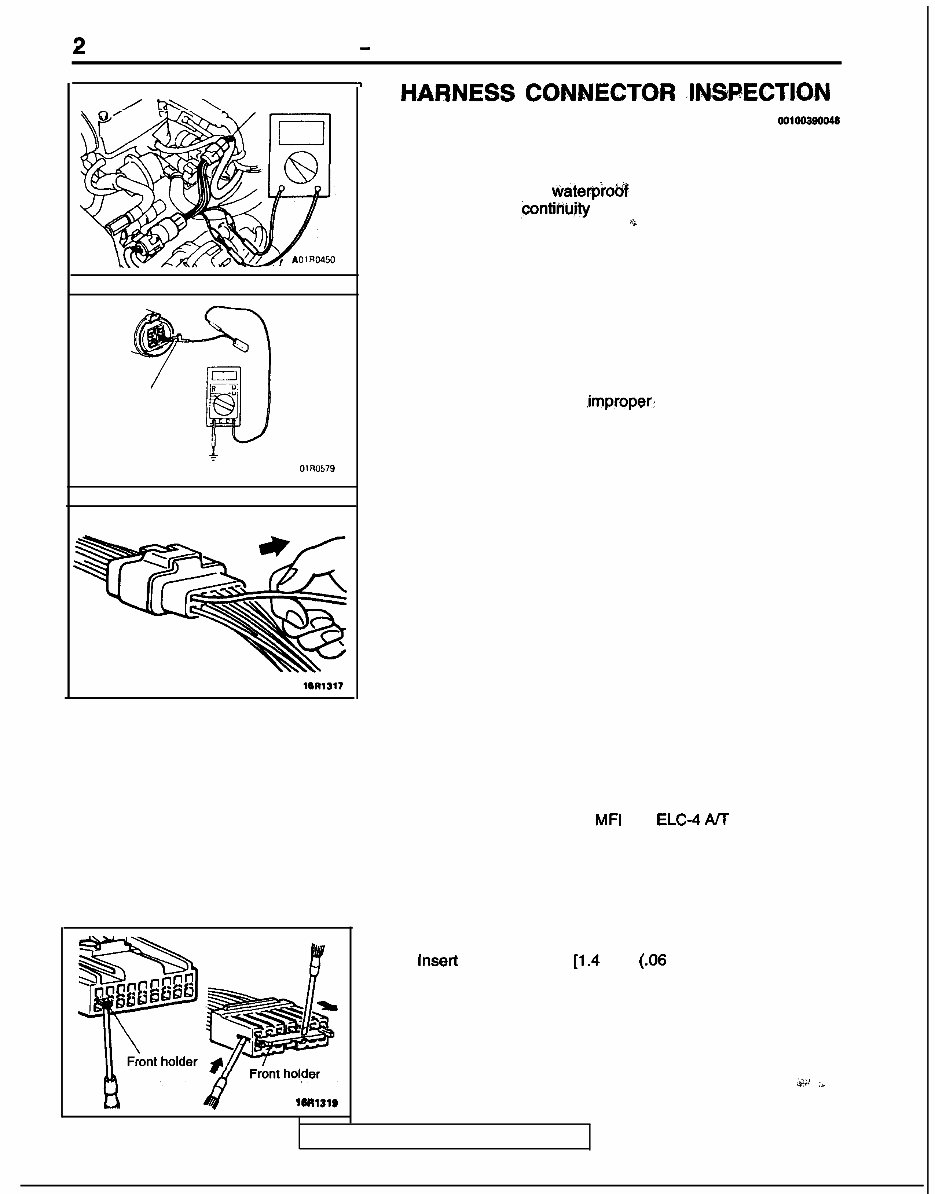
2 GENERAL - Harness Connector Inspection Harness connector’ Harness for checking the contact pressure of connector pins A 01 A0579 -I HARNESS CONNECTOR <INSPECTION ooiooa9oo48 CONNECTOR CONTINUITY AND VOLTAGE TEST Follow the steps below to avoid causing poor connector con- tact and/or reduced waterproof performance of connectors when checking ,@ontinu/ty and/or voltage at connectors of waterproof connectors.. “a (1) If checking is performed with the circuit in the state of continuity, be sure to use the special tool (harness connec- tor). Never insert a test bar from the harness side, because to do so will reduce the waterproof performance and result in corrosion. (2) If the connector is disconnected for checking and the facing part is the female pin side, the harness for checking the contact pressure of connector pins should be used. Never force the insertion of a test bar, because to do so will cause poor or .improper, contact. (3) If the facing part is the male pin side, contact the test bar directly to the pins. Care must be taken not to short-cir- cuit the connector pins. IMPROPER TERMINAL ENGAGEMENT CHECK When the terminal stopper of the connector is out of order, engagement of the male and female terminals becomes im- proper even when the connector itself is engaged perfectly and terminal sometimes slips out to rear side of connector. Make sure, that each terminal does not come off the connector by pulling each harness wire. CONNECTOR TERMINAL ENGAGEMENT AND DISENGAGEMENT A connector that engages loosely can be repaired by removing the female terminal from the connector housing and raising its lance to establish securer engagement. Removal of the connector terminal used for MFI and ELC4 AK control circuit can be done in the following manner. COMPUTER CONNECTOR (1) Insert a screwdriver [1.4 mm (.06 in.) width] as shown in the figure, disengage front holder, and remove it. . . . , &i :,” TSB Revision ‘I
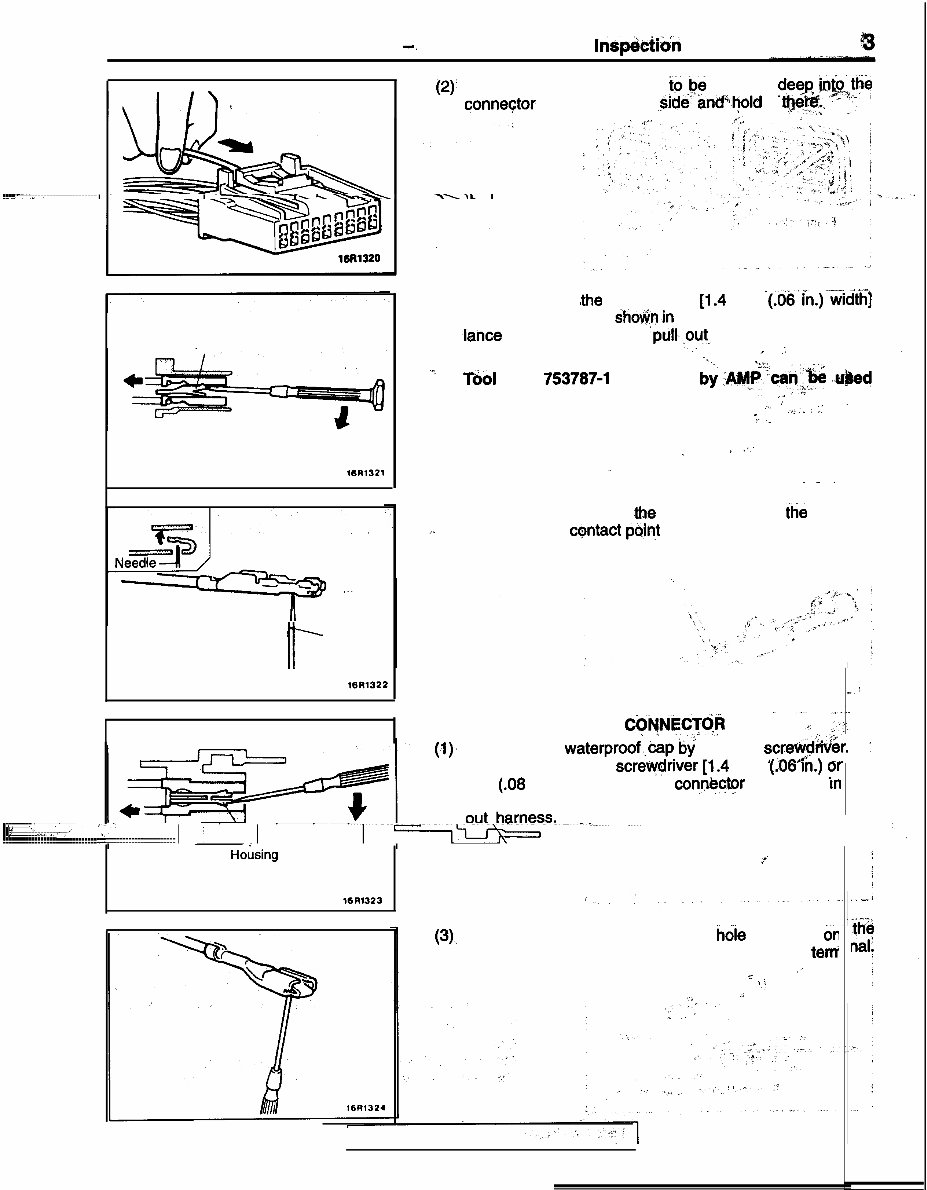
GENERAL -’ Harness Connector Inspdibn Housing lance 16R1321 P Needle II 16R1322 Ho&sing lance 16Rl323 16Rl324 (2); Insert the harness terminal tv,Je repaired deeR jnt&Jffe conneqtor from harness side- and%.nold it t&T:, I” :’ I ,+ #‘,i * (3) Insert the tip of Rhe screwdriver [1.4 mm ~(.06’in.)‘~k%kh”] into the connector as sho$nin the figure, raise the housing .lance slightly with it, and ‘pull”,out, the harness. ..; Caution I ,; “, T6ol ‘No. 753787-l supplied b;i AM$c&$ ,&kc! instead of screwdriver. ,. ,,” ,,. ,‘I .L, ,’ ; ._ . . _ ” ,,.:r,. < ., ‘. , -I_’ _ , ^ ,_ _ (4) Insert a needle through .the hole provided on tfe terminal _“I and raise the centact paint of the male terminal. _’ ROUND WATERPROOF Ci)NNEC’$fk - ..‘.I ,+ (1). Remove the waterproofYkap by using a screv$$&r. : (2) Insert the tip of the screM$friver [1.4 mm (06 In.) ?r 2.0 mm (.08 in.) width] into the connec$r as shown tn the figure, raise the housing lance slightly, with it, and pull I--_ _=-. I ““’ TSB Revision (3), Insert a screwdriver through the hdie provided en terminal and raise the contact point of the male tern’ -2 ,’ 1 :, ,” .i ,‘,,
Introducing the 1998 Mitsubishi Eclipse Service & Repair Manual! This comprehensive manual is designed to provide you with all the necessary information and guidance to effectively service and repair your 1998 Mitsubishi Eclipse.
With detailed step-by-step instructions, accompanied by clear diagrams and illustrations, this manual is the ultimate tool for any Eclipse owner. Whether you are a professional mechanic or a DIY enthusiast, this manual is perfect for all skill levels.
This manual covers a wide range of topics, including:
Engine
Transmission
Suspension
Brakes
Electrical system
Body
And much more!
With this manual, you will have access to detailed information on maintenance procedures, troubleshooting guides, and repair instructions. Say goodbye to costly visits to the mechanic and take control of your car's maintenance.
Don't let a minor issue escalate into a major problem. Arm yourself with the knowledge and confidence to tackle any repair or service task. Get your hands on the 1998 Mitsubishi Eclipse Service & Repair Manual today!