141D0–01 A78700 SST A78701 SST – ENGINE MECHANICAL PARTIAL ENGINE ASSY (1MZ–FE/3MZ–FE) 14–45 LEXUS RX330/RX300 REPAIR MANUAL (RM1024E) OVERHAUL 1. REMOVE SPARK PLUG 2. REMOVE OIL FILLER CAP SUB–ASSY 3. REMOVE OIL FILLER CAP GASKET 4. REMOVE CYLINDER HEAD COVER SUB–ASSY LH 5. REMOVE CYLINDER HEAD COVER GASKET NO.2 6. REMOVE CYLINDER HEAD COVER SUB–ASSY 7. REMOVE CYLINDER HEAD COVER GASKET 8. REMOVE VENTILATION VALVE SUB–ASSY 9. REMOVE CAMSHAFT TIMING OIL CONTROL VALVE ASSY 10. REMOVE VVT SENSOR (a) Remove both the camshaft oil control valves. (b) Remove the O–ring from each camshaft oil control valve. 11. REMOVE OIL LEVEL GAGE SUB–ASSY 12. REMOVE OIL LEVEL GAGE GUIDE 13. REMOVE CRANKSHAFT PULLEY (a) Using SST, loosen the pulley bolt. SST 09213–54015 (91651–60855), 09330–00021 (b) Using SST and the pulley bolt, remove the pulley. SST 09950–50013 (09951–05010, 09952–05010, 09953–05020, 09954–05031) NOTICE: Before using SST, apply lubricating oil on the threads and tip of the center bolt 150. 14. REMOVE TIMING BELT NO.1 COVER 15. REMOVE TIMING BELT NO.2 COVER 16. REMOVE ENGINE MOUNTING BRACKET RH 17. REMOVE TIMING BELT GUIDE NO.2
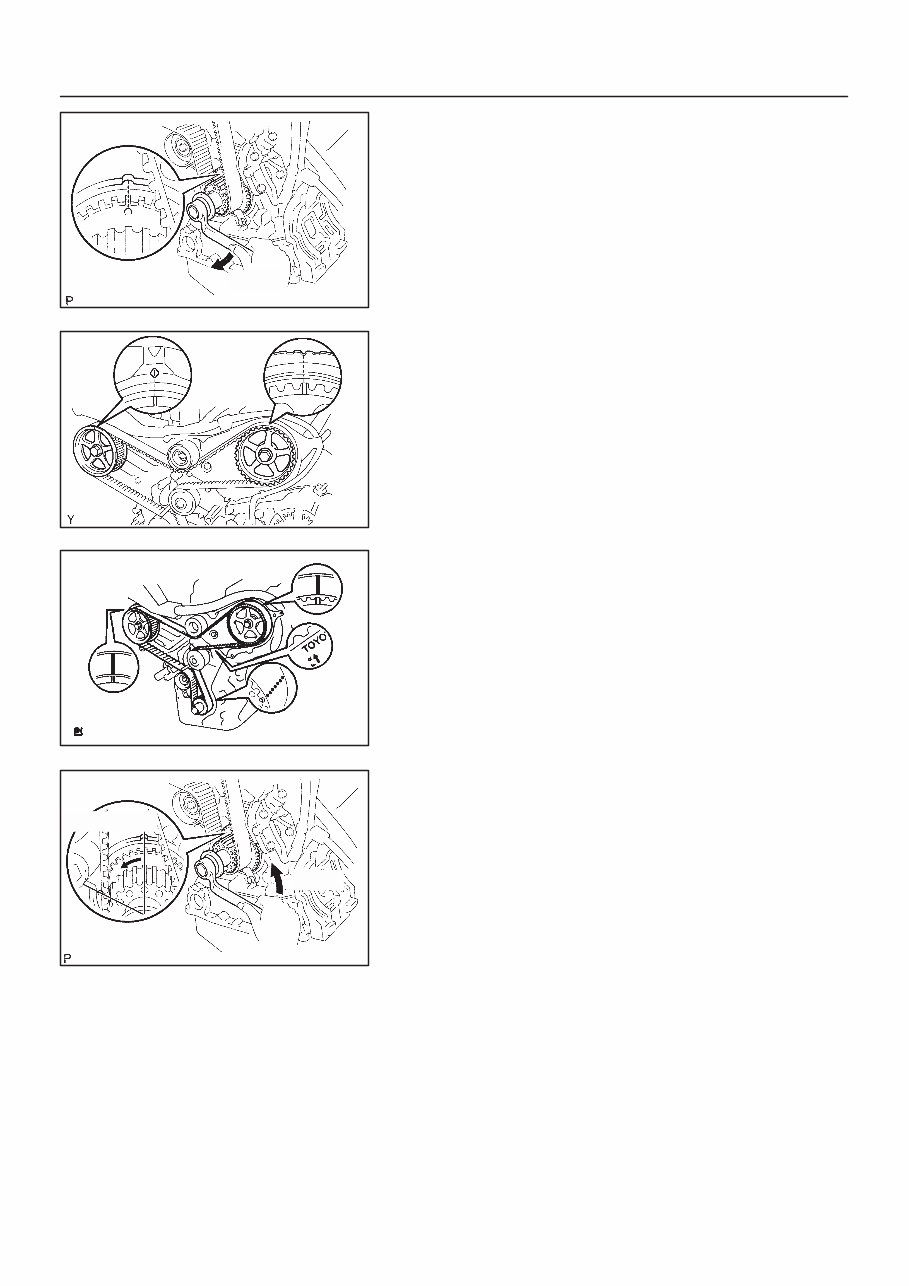
A78326 Turn A05052 A52840 A78327 Approx. 60_ Turn 3MZ–FE: 14–46 – ENGINE MECHANICAL PARTIAL ENGINE ASSY (1MZ–FE/3MZ–FE) LEXUS RX330/RX300 REPAIR MANUAL (RM1024E) 18. REMOVE TIMING BELT (a) Set No. 1 cylinder to TDC/compression. (1) Temporarily install the crankshaft pulley bolt and washer to the crankshaft. (2) Turn the crankshaft clockwise, and align the timing mark of the crankshaft timing pulley with the oil pump body. (3) Check that timing marks of the camshaft timing pul- leys and No. 3 timing belt cover are aligned. If not, turn the crankshaft 1 revolution (360_). (4) Remove the crankshaft pulley bolt. (b) If re–using the timing belt, check that there are 3 installa- tion marks on the timing belt as shown in the illustration. (1) If the installation marks have disappeared, put new installation marks on the timing belt before remov- ing. (c) 3MZ–FE: Set No. 1 cylinder to approximately 60_BTDC/ compres- sion. (1) Turn the crankshaft counterclockwise by approxi- mately 60_. NOTICE: If the timing belt is disengaged, having the crankshaft pulley at the wrong angle can cause the piston head and valve head to come into contact with each other when you remove the camshaft timing pulley and camshaft, causing damage. So always set the crankshaft pulley at the correct angle. (d) Remove the timing belt tensioner. NOTICE: Do not reinstall the tensioner with its plunger extended.
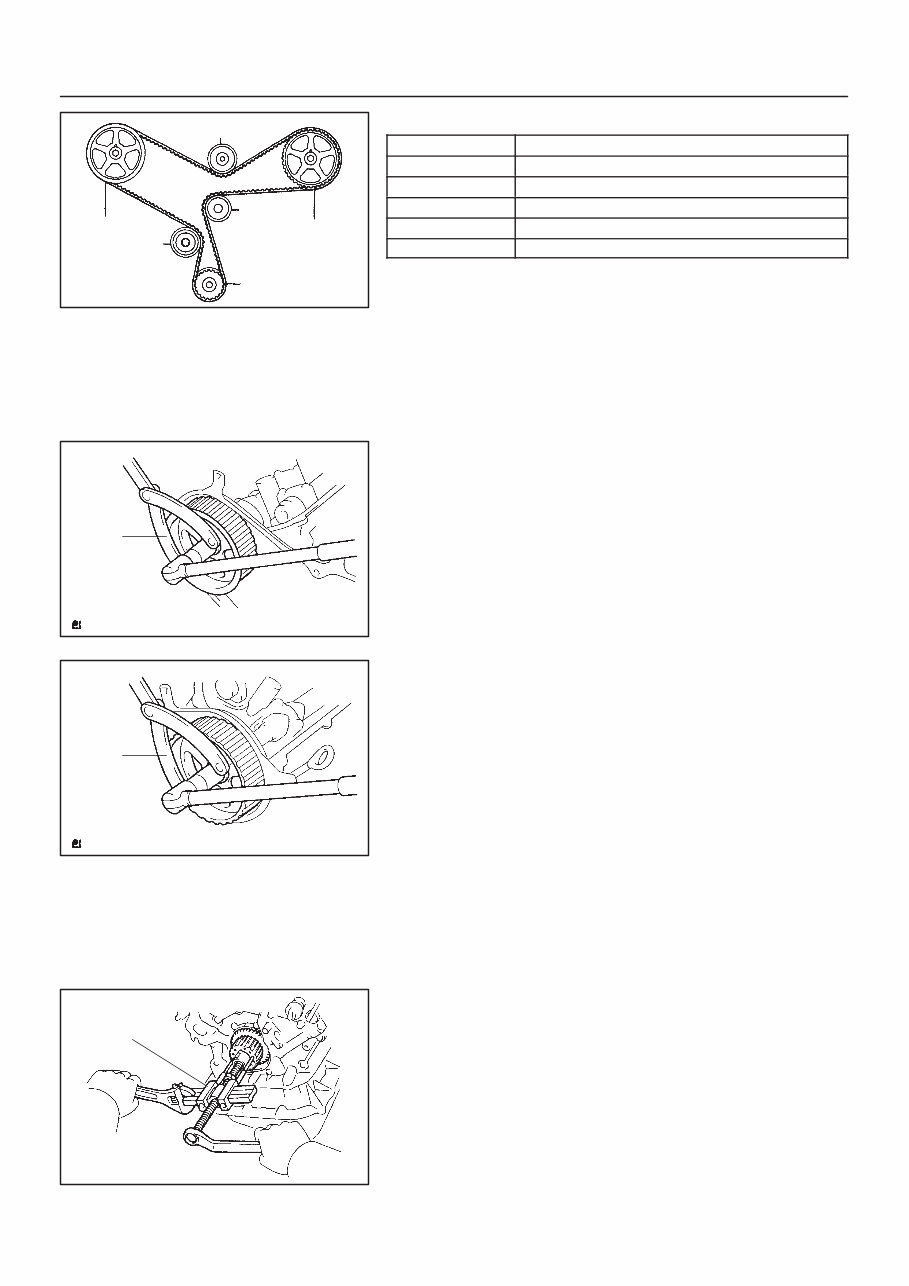
A78702 (5) (6) (1) (4) (2) (3) A78703 SST A78704 SST A78705 SST – ENGINE MECHANICAL PARTIAL ENGINE ASSY (1MZ–FE/3MZ–FE) 14–47 LEXUS RX330/RX300 REPAIR MANUAL (RM1024E) (e) Remove the timing belt in this order. 1st No. 1 idler pulley 2nd RH camshaft timing pulley 3rd No. 2 idler pulley 4th LH camshaft timing pulley 5th Water pump pulley 6th Crankshaft timing pulley 19. REMOVE TIMING BELT IDLER SUB–ASSY NO.1 (a) Using a socket hexagon wrench 10, remove the pivot bolt, timing belt idler No. 1 and plate washer. 20. REMOVE TIMING BELT IDLER SUB–ASSY NO.2 21. REMOVE CRANKSHAFT POSITION SENSOR 22. REMOVE CAMSHAFT TIMING PULLEY (a) Using SST, remove the bolt and the RH timing pulley. SST 09960–10010 (09962–01000, 09963–01000) (b) Using SST, remove the bolt and the LH timing pulley. SST 09960–10010 (09962–01000, 09963–01000) HINT: Arrange the camshaft timing pulleys (RH and LH sides) so that they can be returned to the original locations when re–assem- bling. 23. REMOVE TIMING BELT NO.3 COVER 24. REMOVE TIMING BELT IDLER BRACKET 25. REMOVE CRANKSHAFT TIMING PULLEY (a) Remove the bolt and the timing belt plate. (b) Install the pulley bolt to the crankshaft. (c) Using SST, remove the crankshaft timing pulley. SST 09950–50013 (09951–05010, 09952–05010, 09953–05020, 09954–05011) NOTICE: S Do not scratch the sensor part of the crankshaft tim- ing pulley. S Before using SST, apply lubricating oil on the threads and tip of the center bolt 150.
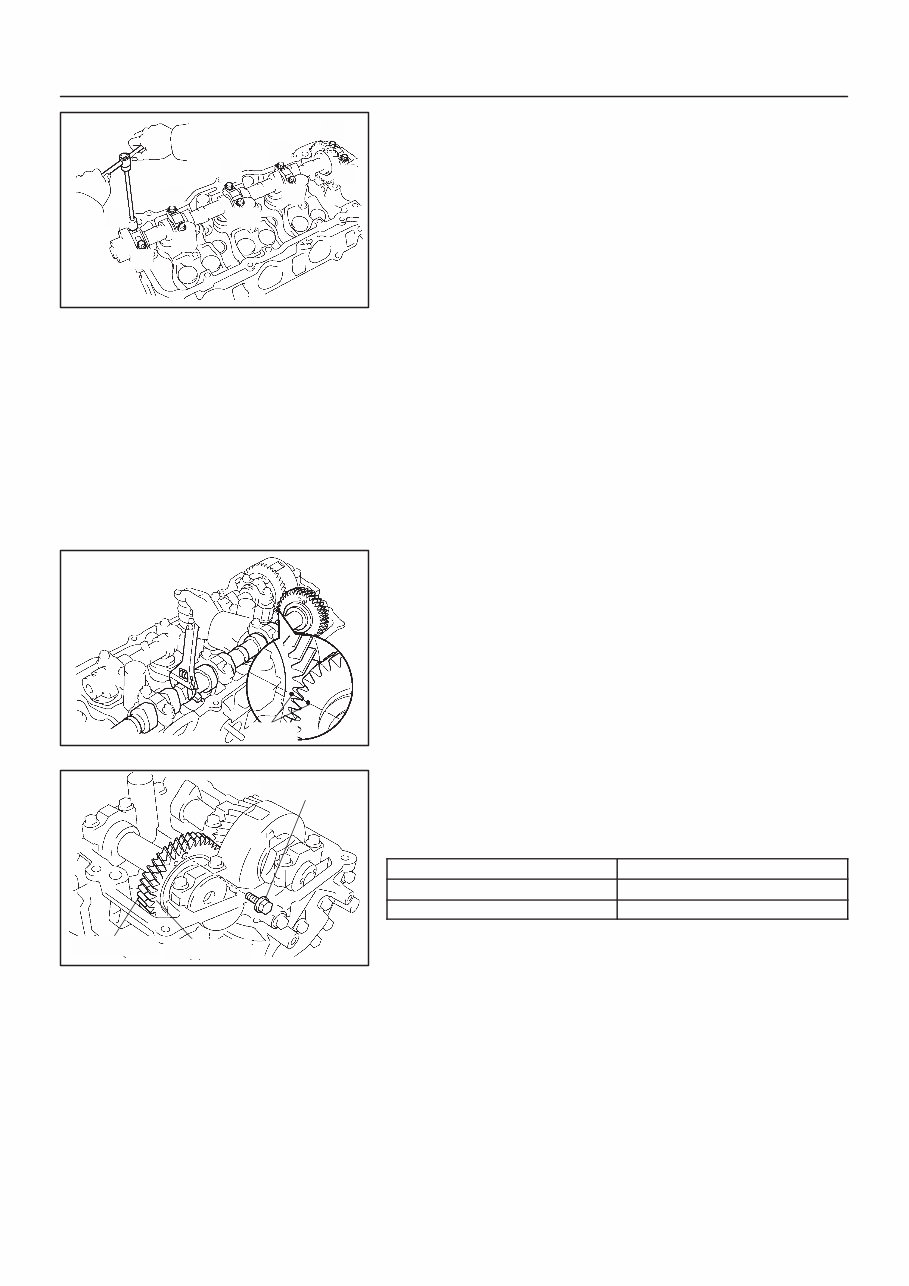
A78535 A78706 Align A78707 Main Gear Sub–Gear Service Bolt A78708 10 1 2 3 4 5 6 7 8 9 14–48 – ENGINE MECHANICAL PARTIAL ENGINE ASSY (1MZ–FE/3MZ–FE) LEXUS RX330/RX300 REPAIR MANUAL (RM1024E) 26. REMOVE WATER PUMP ASSY (a) Remove the 3 bolts and 3 nuts, then remove the water pump and the gasket. 27. REMOVE CAMSHAFT NOTICE: Since the thrust clearance of the camshaft is small, the camshaft must be kept level while it is being removed. If the camshaft is not kept level, damage to the cylinder head or to the camshaft may result. To avoid this, the following steps should be carried out. (a) Align the timing marks (2 dot marks) of the camshaft drive and the driven gears by turning the camshaft with a wrench. (b) Secure the exhaust camshaft sub–gear to the main gear with a service bolt. Torque: 5.4 N⋅m (55 kgf⋅cm, 48 in.⋅lbf) Recommended service bolt Thread diameter 6 mm Thread pitch 1.0 mm Bolt length 16 to 20 mm HINT: When removing the camshaft, make certain that the torsional spring force of the sub–gear has been eliminated by installation of the service bolt. (c) Using several steps, loosen and remove the 10 bearing cap bolts uniformly in the sequence shown in the illustra- tion. Remove the 5 bearing caps and the camshaft. NOTICE: S Do not pry out the camshaft. S Be careful not to damage the portion of the cylinder head receiving the shaft thrust.
A78709 10 1 2 3 4 5 6 7 8 9 A78710 Align A78711 Main Gear Sub–Gear Service Bolt – ENGINE MECHANICAL PARTIAL ENGINE ASSY (1MZ–FE/3MZ–FE) 14–49 LEXUS RX330/RX300 REPAIR MANUAL (RM1024E) 28. REMOVE NO.2 CAMSHAFT (a) Using several steps, loosen and remove the 10 bearing cap bolts uniformly in the sequence shown in the illustra- tion. Remove the 5 bearing caps and the No. 2 camshaft. NOTICE: S Do not pry out the camshaft. S Be careful not to damage the portion of the cylinder head receiving the shaft thrust. (b) Remove the oil seal from the No. 2 camshaft. 29. REMOVE NO.3 CAMSHAFT SUB–ASSY NOTICE: Since the thrust clearance of the camshaft is small, the camshaft must be kept level while it is being removed. If the camshaft is not kept level, damage to the cylinder head or to the camshaft may result. To avoid this, the following steps should be carried out. (a) Align the timing marks (1 dot marks) of the camshaft drive and the driven gears by turning the camshaft with a wrench. (b) Secure the exhaust camshaft sub–gear to the main gear with a service bolt. Torque: 5.4 N⋅m (55 kgf⋅cm, 48 in.⋅lbf) Recommended service bolt Thread diameter 6 mm Thread pitch 1.0 mm Bolt length 16 to 20 mm HINT: When removing the camshaft, make certain that the torsional spring force of the sub–gear has been eliminated by installation of the service bolt.
If you are in need of a repair manual for your 2006 Lexus RX330, look no further. Our accessible repair manual software is the perfect solution for both professional mechanics and DIY enthusiasts. In the past, traditional paper repair manuals were the norm, but our digital format offers a more cost-effective and convenient option.
Whether you are tackling brake repairs, suspension component replacements, engine issues, or standard maintenance, this repair manual software provides comprehensive service information for your vehicle. It covers brakes, engine, suspension, steering, drivetrain, electrical systems, heating, air conditioning, and more.
By utilizing this 2006 Lexus RX330 repair manual software, you can save a significant amount of money on vehicle maintenance. Mechanics often charge high fees for their services, making a DIY approach a cost-effective alternative. The manual is user-friendly and compatible with Windows, Mac computers, smartphones, and tablets, ensuring easy access for all users.