2007 Hyundai Santa Fe (CM) Service & Repair Manual
What's Included?
Lifetime Access
Fast Download Speeds
Offline Viewing
Access Contents & Bookmarks
Full Search Facility
Print one or all pages of your manual
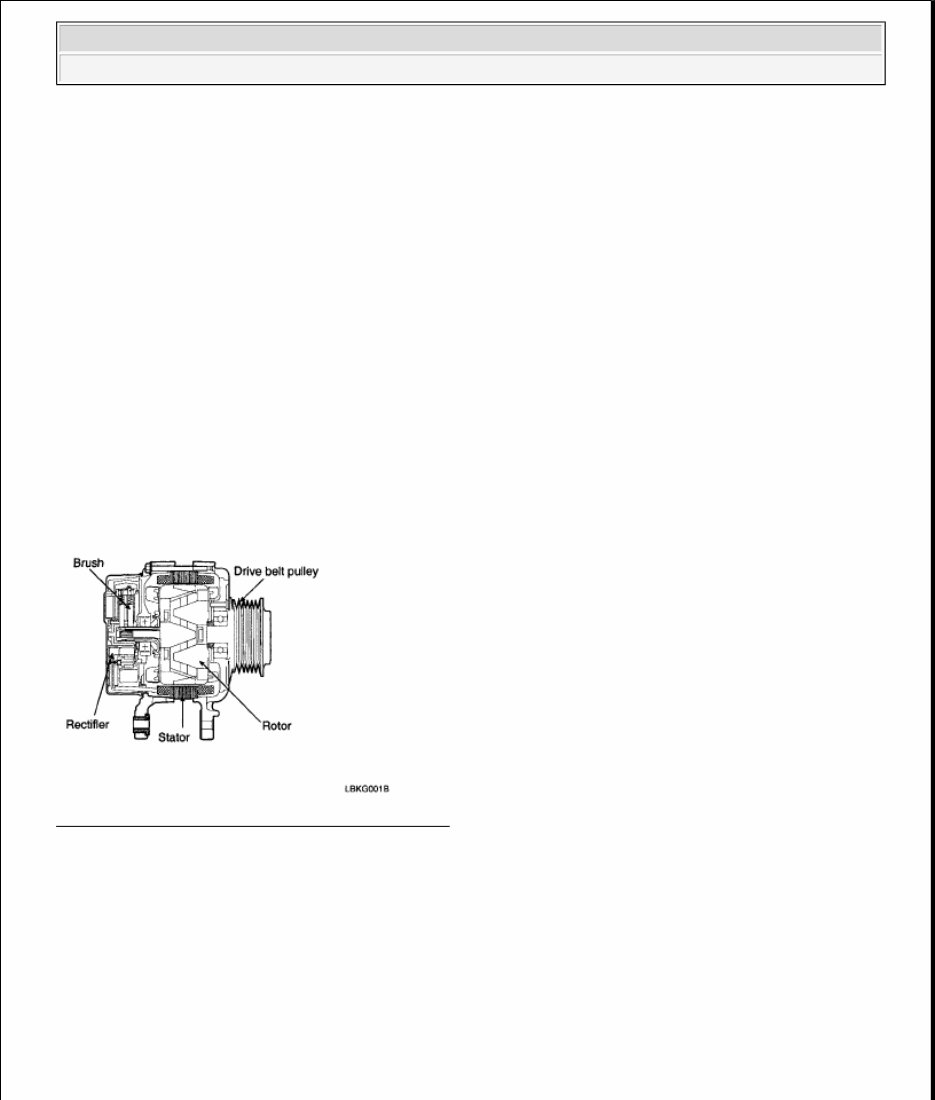
2007 ELECTRICAL Charging System (Engine Electrical System (G6EA-GSL 2.7)) - Santa Fe CHARGING SYSTEM DESCRIPTION The charging system included a battery, an alternator with a built-in regulator, and the charging indicator light and wire. The Alternator has built-in diodes, each rectifying AC current to DC current. Therefore, DC current appears at alternator "B" terminal. In addition, the charging voltage of this alternator is regulated by the battery voltage detection system. The alternator is regulated by the battery voltage detection system. The main components of the alternator are the rotor, stator, rectifier, capacitor brushes, bearings and V-ribbed belt pulley. The brush holder contains a built-in electronic voltage regulator. Fig. 1: Identifying Charging System Part Location Courtesy of HYUNDAI MOTOR CO. ON-VEHICLE INSPECTION CHECK THE BATTERY TERMINALS AND FUSES 1. Check that the battery terminals are not loose or corroded. CAUTION: Check that the battery cables are connected to the correct terminals. Disconnect the battery cables when the battery is given a quick charge. Never disconnect the battery while the engine is running. 2007 Hyundai Santa Fe GLS 2007 ELECTRICAL Charging System (Engine Electrical System (G6EA-GSL 2.7)) - Santa Fe 2007 Hyundai Santa Fe GLS 2007 ELECTRICAL Charging System (Engine Electrical System (G6EA-GSL 2.7)) - Santa Fe
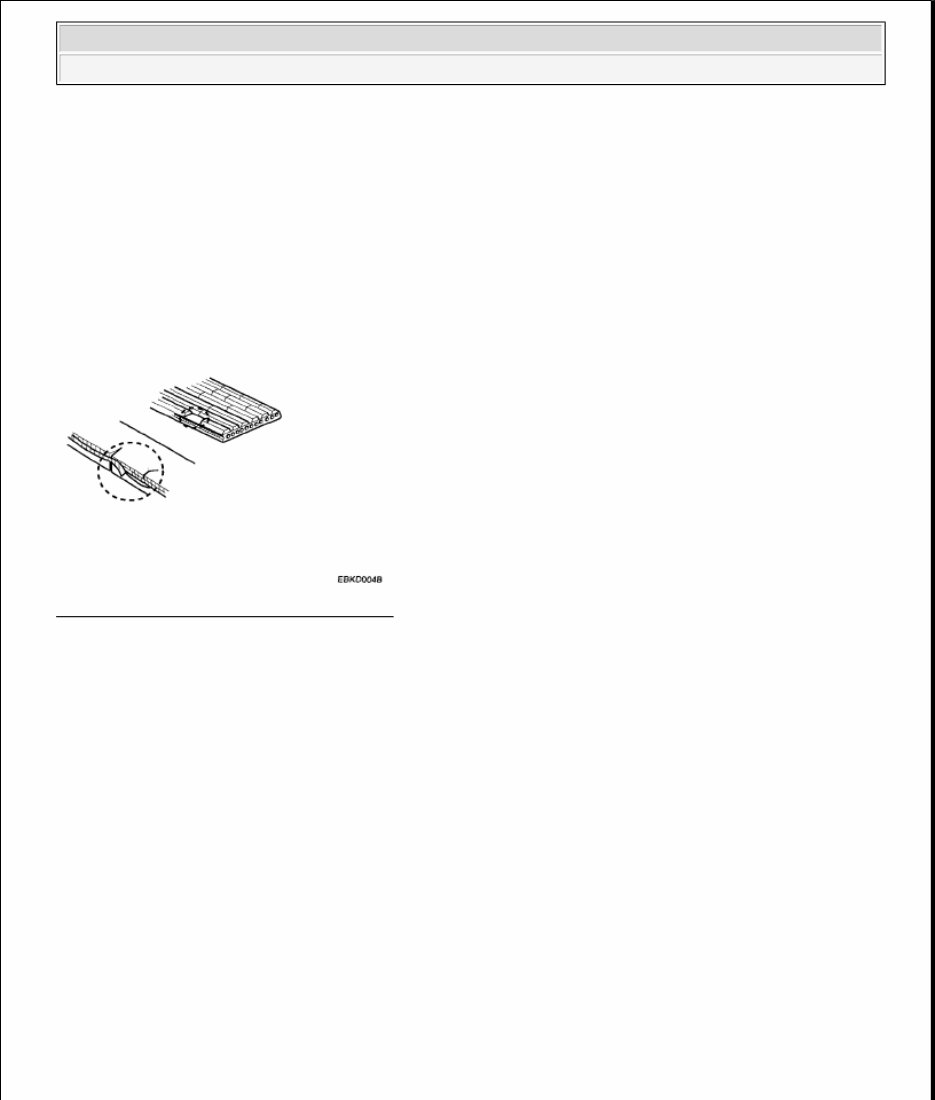
2. Check the fuses for continuity. INSPECT DRIVE BELT Visually check the belt for excessive wear, frayed cords etc. If any defect has been found, replace the drive belt. Fig. 2: Identifying Belt For Excessive Wear Courtesy of HYUNDAI MOTOR CO. VISUALLY CHECK ALTERNATOR WIRING AND LISTEN FOR ABNORMAL NOISES 1. Check that the wiring is in good condition. 2. Check that there is no abnormal noise from the alternator while the engine is running. CHECK DISCHARGE WARNING LIGHT CIRCUIT 1. Warm up the engine and then turn it off. 2. Turn off all accessories. 3. Turn the ignition switch "ON". Check that the discharge warning light is lit. 4. Start the engine. Check that the light is lit. If the light does not go off as specified, troubleshoot the discharge light circuit. INSPECT CHARGING SYSTEM VOLTAGE DROP TEST OF ALTERNATOR OUTPUT WIRE This test determines whether or not the wiring between the alternator "B" terminal and the battery (+) terminal is good by the voltage drop method. NOTE: Cracks on the rib side of a belt are considered acceptable. If the belt has chunks missing from the ribs, it should be replaced. 2007 Hyundai Santa Fe GLS 2007 ELECTRICAL Charging System (Engine Electrical System (G6EA-GSL 2.7)) - Santa Fe
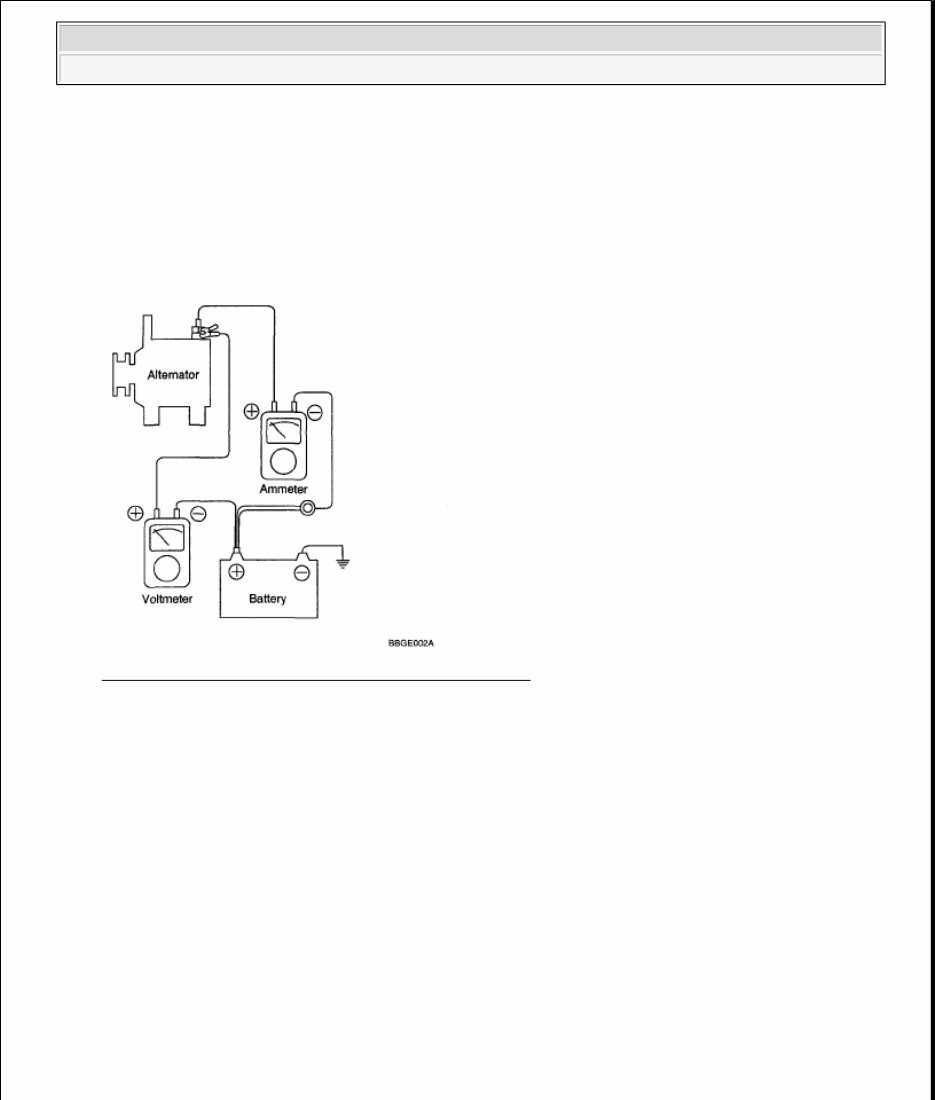
PREPARATION 1. Turn the ignition switch to "OFF". 2. Disconnect the output wire from the alternator "B" terminal. Connect the (+) lead wire of ammeter to the "B" terminal of alternator and the (-) lead wire of ammeter to the output wire. Connect the (+) lead wire of voltmeter to the "B" terminal of alternator and the (-) lead wire of voltmeter to the (+) terminal of battery. Fig. 3: Connecting Alternator, Voltmeter With Battery Courtesy of HYUNDAI MOTOR CO. TEST 1. Start the engine. 2. Turn on the headlamps and blower motor, and set the engine speed until the ammeter indicates 20A. And then, read the voltmeter at this time. RESULT 1. The voltmeter may indicate the standard value. Standard value: 0.2V max 2. If the value of the voltmeter is higher than expected (above 0.2V max.), poor wiring is suspected. In this case check the wiring from the alternator "B" terminal to the battery (+) terminal. Check for loose connections, color change due to an over-heated harness, etc. Correct them before testing again. 3. Upon completion of the test, set the engine speed at idle. 2007 Hyundai Santa Fe GLS 2007 ELECTRICAL Charging System (Engine Electrical System (G6EA-GSL 2.7)) - Santa Fe
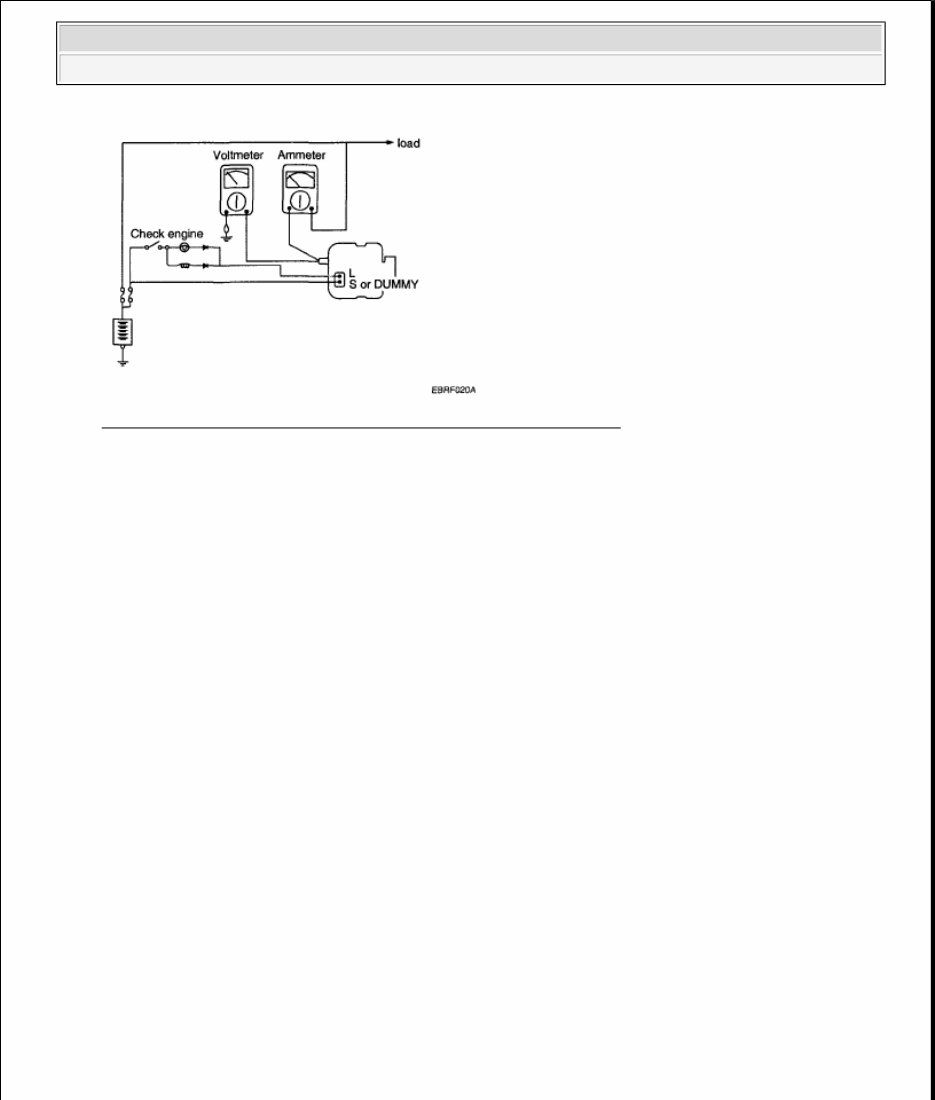
Turn off the headlamps, blower motor and the ignition switch. OUTPUT CURRENT TEST This test determines whether or not the alternator gives an output current that is equivalent to the normal output. PREPARATION 1. Prior to the test, check the following items and correct as necessary. Check the battery installed in the vehicle to ensure that it is good condition. The battery checking method is described in the section "BATTERY ". The battery that is used to test the output current should be one that has been partially discharged. With a fully charged battery, the test may not be conducted correctly due to an insufficient load. Check the tension of the alternator drive belt. The belt tension check method is described in the section "INSPECT DRIVE BELT ". 2. Turn off the ignition switch. 3. Disconnect the battery ground cable. 4. Disconnect the alternator output wire from the alternator "B" terminal. 5. Connect a DC ammeter (0 to 150A) in series between the "B" terminal and the disconnected output wire. Be sure to connect the (-) lead wire of the ammeter to the disconnected output wire. 6. Connect a voltmeter (0 to 20V) between the "B" terminal and ground. Connect the (+) lead wire to the alternator "B" terminal and (-) lead wire to a good ground. 7. Attach an engine tachometer and connect the battery ground cable. 8. Leave the engine hood open. NOTE: Tighten each connection securely, as a heavy current will flow. Do not rely on clips. 2007 Hyundai Santa Fe GLS 2007 ELECTRICAL Charging System (Engine Electrical System (G6EA-GSL 2.7)) - Santa Fe
Fig. 4: Connecting Voltmeter Between "B" Terminal And Ground Courtesy of HYUNDAI MOTOR CO. TEST 1. Check to see that the voltmeter reads as the same value as the battery voltage. If the voltmeter reads 0V, and the open circuit in the wire between alternator "B" terminal and battery (-) terminal or poor grounding is suspected. 2. Start the engine and turn on the headlamps. 3. Set the headlamps to high beam and the heater blower switch to HIGH, quickly increase the engine speed to 2,500 rpm and read the maximum output current value indicated by the ammeter. RESULT 1. The ammeter reading must be higher than the limit value. If it is lower but the alternator output wire is in good condition, remove the alternator from the vehicle and test it. Limit value : 50% of the rated current NOTE: After the engine start up, the charging current quickly drops. Therefore, the above operation must be done quickly to read the maximum current value correctly. NOTE: The nominal output current value is shown on the nameplate affixed to the alternator body. The output current value changes with the electrical load and the temperature of the alternator itself. Therefore, the nominal output current may not be obtained. If such is the case, keep the headlamps on the cause discharge of the battery, or use the lights of another vehicle to increase the electrical load. 2007 Hyundai Santa Fe GLS 2007 ELECTRICAL Charging System (Engine Electrical System (G6EA-GSL 2.7)) - Santa Fe
2007 Hyundai Santa Fe (CM) Service & Repair Manual
Models covered:
Hyundai Santa Fe GLS
Hyundai Santa Fe Limited
Hyundai Santa Fe SE
Engines covered:
2.7L Mu V6
3.3L Lambda V6
The 2007 Hyundai Santa Fe (CM) Service & Repair Manual covers everything you need to maintain and repair the GLS, Limited, and SE models equipped with the 2.7L Mu V6 or 3.3L Lambda V6 engines. Whether you’re keeping up with regular maintenance or tackling bigger jobs, this manual is laid out clearly for pros and DIYers alike.
Inside, you'll find full service procedures for engine work, drivetrain repairs, manual and automatic transmission service, suspension overhauls, brake system repairs, and HVAC system maintenance. There’s also coverage for emission systems, body repairs, power equipment, dashboard components, cruise control, airbags, and more — all organized in a straightforward, easy-to-follow format.
Content overview:
General vehicle information and maintenance schedules
Detailed engine service for 2.7L and 3.3L V6 engines (charging, ignition, starter, fuel systems)
Manual and automatic transmission servicing
Complete drivetrain, axles, and suspension repair
Brake system service, including hydraulic, parking brakes, and EBD
HVAC systems, including heating, ventilation, and air conditioning repair
Electrical system repair, wiring diagrams, and fuse box layouts
Emission control systems and troubleshooting
Body repairs covering bumpers, doors, seats, mirrors, sunroof, and exterior trim
Power systems service for windows, seats, locks, mirrors, and steering
Interior and dashboard components, including lighting, gauges, and audio systems
Cruise control, airbags, keyless entry, and anti-theft systems
Rear suspension and rear differential servicing
Tire pressure monitoring system (TPMS) procedures
Wipers, washer systems, and defogger service
From chasing down an electrical gremlin to servicing the rear differential, this service & repair manual gives you the right information straight from the factory — so you can do it once, do it right, and get back on the road.
Printable: Yes Language: English Compatibility: Pretty much any electronic device, incl. PC & Mac computers, Android and Apple smartphones & tablet, etc. Requirements: Adobe Reader (free)
Recently Viewed
5,521,897Happy Clients
2,594,462eManuals
1,120,453Trusted Sellers
15Years in Business
Price:
Actual Price:
2007 Hyundai Santa Fe (CM) Service & Repair Manual