

Mk1 Grid/Mains IMA Battery Charger of Honda Insight
What's Included?
Fast Download Speeds
Online & Offline Access
Access PDF Contents & Bookmarks
Full Search Facility
Print one or all pages of your manual

Honda Insight Mk1 Grid/Mains IMA Battery Charger.
Input 100-240v AC 50/60hz 0.5A Output 175V DC 350ma Max
Only to be used as directed. Do not open or interfere with this unit. Do not charge with the unit in direct sunlight.
Ensure the ambient temperature is under 25C before charging. Do not leave connected for more than 16 hours. Do not
remove the warning notice on the charger under any circumstances.
This charger is used entirely at the owner’s own risk. No responsibility or liability will be accepted for any injury or
damage caused by its use under any circumstances. Use of this charger is only permitted under the terms of the signed
disclaimer. If you are not completely happy working with high voltages on potentially lethal equipment, then do not
install this charger yourself, but get a competent electrician or other suitable person to do it for you.
High Voltage!
Installation of the charging socket.
Ensure ignition is off and IMA battery switch under the rear cover is in the off position for at least 10 minutes prior to
installation. Note the RED switch lock tab has to be removed to allow the IMA battery switch to be moved.
Remove all the IPU compartment cover star drive and 10mm bolts.
Remove the small 8mm black bolt from IMA Main Battery switch area. This is located to the right of the switch when
looking in from rear of the vehicle.
Remove the right hand side aluminium plate 10mm bolts behind the rear trim, and the 2 or 3 black plastic trim clips
that push into the IPU cover through the plate. Remove the IPU cover.
Check the IMA battery main terminals with a 200V DC meter to ensure no voltage is present.
Remove the nut from the rear of the supplied charging socket and drill a hole through the aluminium of the IPU
compartment to suit the threaded socket. Insert the socket and replace nut. Feed the wires to the IMA battery
connection points avoiding sharp edges and other wires if possible, use tie wraps, cable clips or similar to avoid
chaffing and maintain neatness.

Remove the polystyrene packing from the MDM module on the left hand side.
Remove the earth wire from the Battery to MDM by removing the 10mm painted red bolt on the MDM module and
the plastic cable clip securing the orange earth wire. You need to move this wire to allow access for your hand
between the IMA Battery and Motor Drive Module.
Remove the Negative terminal bolt and fit the supplied ring terminal under the bolt then retighten.
Note. Picture below also shows Positive bolt removed. Ignore this.
Negative Terminal

Note. You do not need to remove the IMA Battery to install the charging socket.
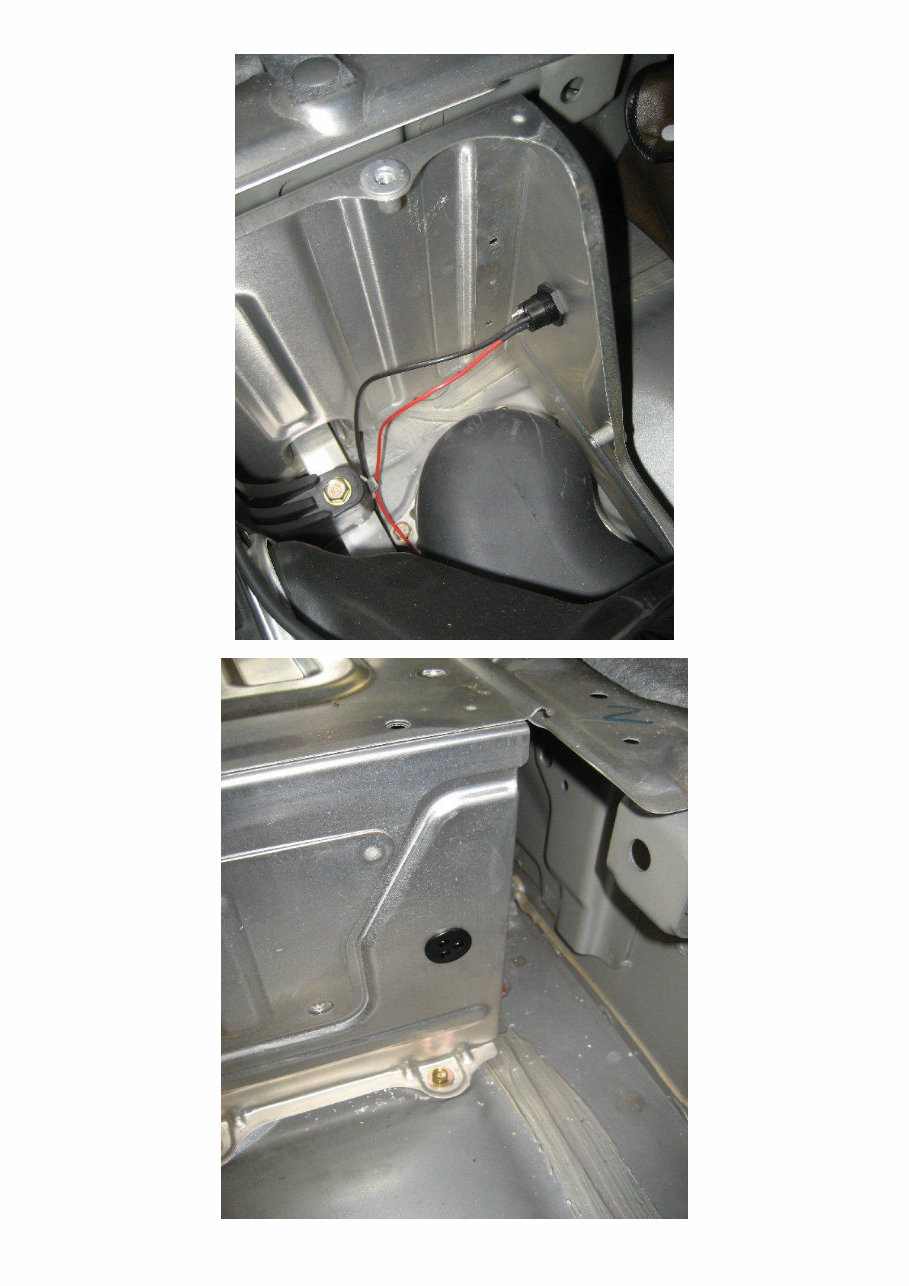
Remove the ¼” spade connector from resistor as indicated below. You need a slim hand for this, and I suggest wear a
rubber glove, keeping your other hand in your pocket. Note the black plastic spade connector has a pip/button which
must be pushed in to release it from the connector. A screwdriver may also be necessary to help ease it off. Push the
supplied ¼” terminal onto the resistor and then push the black spade connector onto the piggy back connector.
Remove This.
Then attach this.
Then re-attach this to piggy
back as shown.

Reassemble in reverse order. Check the tightness of the main negative battery terminal before fitting the IPU
compartment cover. Remember to turn on IMA battery switch when finished!
When should I use the grid charger?
You should use the Grid Charger in the following situations.
1) When you notice deterioration in your IMA battery performance.
2) When you notice an increasing frequency of Recals.
3) When the vehicle has been stored or left unused for more than 7 days.
4) If you receive an IMA code indicating the IMA battery is out of balance.
Note. A Recal (Recalibration) occurs when the detected IMA battery charge and/or voltage level does not match the
vehicles stored capacity (State of Charge Soc) display reading.
A Recal can be Positive (Gauge goes up) or Negative (Gauge goes down).
Negative Recals tend to occur more frequently as the IMA battery ages, deteriorates, or goes out of balance.
Using the IMA Battery Charger.
Do not leave the charger plugged into the charging socket when not in use.
Do not charge with the vehicle ignition on or an IMA error code may result.
Plug the charger into the charging socket before switching on the mains power.
Switch off the mains power before unplugging the charger from the car socket.

Do not leave the IMA battery on charge for more than 16hrs.
Periodically check the charger for excessive heat during charging. If the case is too hot to comfortably touch then
disconnect it immediately and contact the supplier.
Place the charger in the rear compartment when charging away from direct sunlight or excessive heat.
Do not charge when the ambient temperature is higher than 25C or lower than 0C.
How does it work?
The Honda Insight IMA battery is made up of 120 x 6.5ah Nimh (Nickel Metal Hydride) D cells in series to provide a
nominal 144v 4ah usable capacity. The cells are of a special type made by Panasonic, and are able to deal with the
high current 50A charge and 100A discharge cycles. The system is robust and reliable, but the cells can become
unbalanced in use, especially as they age and if the vehicle is left standing unused for more than a few days. This out
of balance condition is caused by the Nimh batteries inherent high self discharge rates. As no two cells are identical,
the weakest cell and /or fastest discharging one becomes the limiting factor in overall battery performance. The
IMA system does try to manage this with Negative & Positive Recals but it is unable to correct the out of balance
condition properly. A Negative Recal occurs when any cell is detected to have dropped below the minimum permitted
voltage, and is used to prevent the cell being over discharged, reversed and damaged.
The grid charger operates by supplying a low current charge of around 350ma to the battery for an extended period.
This long slow charge ensures that any out of balance cells are slowly brought up to their maximum capacity. This
brings them into line with stronger cells in the battery pack. The cells with the most stored charge reach full capacity
first during grid charging, but they then dissipate the excess charge as gentle heating whilst the remaining cells slowly
catch up, until all have reached maximum capacity. The charger current is limited by the power supplies constant
current limiting circuitry. The charger is also protected from overload and overheating by various safety circuits.
After Charging Is Complete.
When charging is complete and the charger has been disconnected, remove fuse 18 from the fuse holder under the
right hand side of the dashboard for 30 seconds and then replace. It is the 5
th
fuse socket (4
th
fuse) along from the left
hand end of the fuse box on the bottom row. There is a little fuse extractor clip in the fuse box which can be used to
pull it out. In the photo below you will see I have left my fuse extractor clip attached to the relevant fuse.
The Indicator Led.
All versions of the charger now contain an indicator led on the side of the unit. This will illuminate if the charger is
turned on whilst it is not connected to the car indicating it is outputting a high voltage. When plugged into a car this
indicator led will be off at first for several hours, and it will not come on until shortly before the charging is finished
and the battery voltage has risen to over 170v. It will then turn off again as charging completes and the battery voltage
falls to the pack fully charged voltage of around 167V.

Turn on the ignition and check the indicated State of Charge on the dash display has fallen to zero. If not check the
fuse you removed and repeat the previous step.
Start the car and allow it to idle or drive it around until a Positive Recal occurs. A Positive Recal is when the State of
Charge display goes up one bar at a time to 19 bars. It can take up to 3 minutes for this to occur from the time you
start the car. You will notice you have no assist during this period, and some charging activity will be shown on the
display as the vehicle works out the battery state of charge.
Once a Positive Recal has occurred and the battery gauge has risen to 19 bars the vehicle should behave normally.
You should notice the IMA battery is now much more lively and reliable.
The effectiveness of Grid Charging is not yet fully understood, but it may significantly improve the life span of a
standard IMA battery, reducing the need for more expensive and complicated battery rebuilds or replacements. In my
opinion it is a very useful investment for long term Insight owners, and I use one on my own three MK1 UK cars.
Many thanks go to all the Insight owners and enthusiasts on the www.Insightcentral.net discussion forum for there
knowledge and contributions to the various grid charging topics. If you have any Insight related queries I highly
recommend you visit the above forum as it contains a huge amount of accumulated knowledge and experience.
Any questions or queries relating to this charger can be sent to me at peter@solarvan.gotadsl.co.uk.
Grid Charger Instructions V1.05 November 2009
You're Reading a Preview
What's Included?
Fast Download Speeds
Online & Offline Access
Access PDF Contents & Bookmarks
Full Search Facility
Print one or all pages of your manual
$32.99
Viewed 90 Times Today


Secure transaction
What's Included?
Fast Download Speeds
Online & Offline Access
Access PDF Contents & Bookmarks
Full Search Facility
Print one or all pages of your manual
$32.99
When installing the Mk1 Grid/Mains IMA Battery Charger for the Honda Insight, it is important to follow these steps:
- Ensure the ignition is off and the IMA battery switch under the rear cover is in the off position for at least 10 minutes.
- Remove all the IPU compartment cover star drive and 10mm bolts.
- Remove the small 8mm black bolt from the IMA Main Battery switch area.
- Remove the right-hand side aluminum plate 10mm bolts behind the rear trim, and the 2 or 3 black plastic trim clips that push into the IPU cover through the plate, and remove the IPU cover.
After these steps, it is important to check for the absence of voltage by examining the IMA battery main terminals with a 200V DC meter. Then, proceed with the following:
- Remove the nut from the rear of the supplied charging socket.
- Drill a hole through the aluminum of the IPU compartment to fit the threaded socket.
- Insert the socket and replace the nut.
- Feed the wires to the IMA battery connection points, avoiding sharp edges and other wires if possible. Use tie wraps, cable clips, or similar to prevent chafing and maintain neatness.
Finally, the next steps involve the removal of polystyrene packing.


