1963-1964 Chevrolet Corvette 305 327 350 396 427 454 Inc Fuel Injection Models Service & Repair Manual
What's Included?
Lifetime Access
Fast Download Speeds
Online & Offline Access
Access PDF Contents & Bookmarks
Full Search Facility
Print one or all pages of your manual
REPAIR & TUNE-UP GUIDE CORVETTE 1963 to 1983 All U.S. and Canadian 305 « 327 • 350 • 396 * 427 • 454 models; including fuel injection President, Chilton Enterprises David S. Loewith Senior Vice President Ronald A. Hoxter Publisher and Editor-in-Chief Kerry A. Freeman, S.A.E. Managing Editors Peter M. Conti, Jr. a W. Calvin Settle, Jr., S.A.E. Assistant Managing Editor Nick D'Andrea Senior Editors Debra Gaffney a Ken Grabowski, A.S.E., S.A.E. Michael L. Grady a Richard J. Rivele, S.A.E. Richard T. Smith n Jim Taylor Ron Webb Director of Manufacturing Mike D'lmperio Editor Tony Molla, S.A.E. 1BOOK ^COMPANY ONE OF THE DIVERSIFIED PUBLISHING COMPANIES, A PART OF CAPITAL CITIES/ABC, INC.
General Information and Maintenance 1 How to Use this Book 2 Tools and Equipment 14 Routine Maintenance and Lubrication Drive Train 226 Driveshaft and U-Joints 227 Rear Axle Tune-Up and Performance Maintenance 3 9 Tune-Up Procedures 4 0 Tune-Up Specifications Suspension and Steering 230 Front Suspension 242 Rear Suspension 253 Steering Engine and Engine Rebuilding 61 Engine Electrical System 88 Engine Service and Specifications Brakes 262 Brake System 269 Drum Brakes 271 Disc Brakes 274 Parking Brake E4 134 Emission Control System and Service 147 Fuel System Service 279 Problem Diagnosis Chassis Electrical 190 Accessory Service 195 Instruments Panel Service 199 Lights, Fuses and Flashers 311 Mechanic's Data 312 Index Clutch and Transmission 206 Clutch 211 Manual Transmission 220 Automatic Transmission 156Chilton's Fuel Economy and Tune-Up Tips 284 Chilian's Body Repair Tips CONTENTS Dl H7 Troubleshooting Emission Controls and Fuel System
Specifications Vehicle Fill in this chart with the most commonly used specifications for your vehicle. Specifications can be found in Chapters 1 through 3 or on the tune-up decal under the hood of the vehicle. Firing Order _______________________ ' _______________________________ , _______________ Spark Plugs: Type ----------------------------------------- ,--------------------------------------------------------- : --------- ' Gap (in.) ___________________________________________________________________ Point Gap (in.)__________________________________________________________________ Dwell Angle (°) _________________________________________________________________ Ignition Timing (°) ______________________________________________________________ Vacuum (Connected/Disconnected) ________________________________; __________ Valve Clearance (in.) Intake ___________________ : ________ Exhaust. Capacities Engine Oil (qts) With Filter Change__________ Without Filter Change _______ Cooling System (qts) ____________ Manual Transmission (pts)_ Type-----------------------_ Automatic Transmission (pts)_ Type----------------------------- Front Differential (pts)_ Type ------------------ Rear Differential (pts)_ Type---------------- _ Transfer Case (pts)_ Type--------------- FREQUENTLY REPLACED PARTS Use these spaces to record the part numbers of frequently replaced parts. PCV VALVE OIL FILTER AIR FILTER Manufacturer ___________. _ Manufacturer ______________ Manufacturer. Part No------------------------------ Part No. _______________________ Part No.____
General Information and Maintenance HOW TO USE THIS BOOK Chilton's Repair & Tune-Up Guide for the Corvette is intended to help you learn more about the inner workings of your vehicle and save you money on its upkeep and operation. The first two chapters will be the most used, since they contain maintenance and tune-up information and procedures. Studies have shown that a properly tuned and main- tained car can get at least 10% better gas mileage than an out-of-tune car. The other chapters deal with the more complex systems of your car. Operating systems from engine through brakes are covered to the extent that the average do-it-yourselfer becomes me- chanically involved. This book will not ex- plain such things as rebuilding the differen- tial for the simple reason that the expertise required and the investment in special tools make this task uneconomical. It will give you detailed instructions to help you change your own brake pads and shoes, replace points and plugs, and do many more jobs that will save you money, give you personal satisfaction, and help you avoid expensive problems. A secondary purpose of this book is a ref- erence for owners who want to understand their car and/or their mechanics better. In this case, no tools at all are required. Before removing any bolts, read through the entire procedure. This will give you the overall view of what tools and supplies will be required. There is nothing more frustrat- ing than having to walk to the bus stop on Monday morning because you were short one bolt on Sunday afternoon. So read ahead and plan ahead. Each operation should be ap- proached logically and all procedures thor- oughly understood before attempting any work. All chapters contain adjustments, mainte- nance, removal and installation procedures, and repair or overhaul procedures. When re- pair is not considered practical, we tell you how to remove the part and then how to in- stall the new or rebuilt replacement. In this way, you at least save the labor costs. Back- yard repair of such components as the alter- nator is just not practical. Two basic mechanic's rules should be men- tioned here. One, whenever the left side of the car or engine is referred to, it is meant to specify die driver's side of ihe car. Con- versely, the right side of the car means the passenger's side. Secondly, most screws and bolts are removed by turning counterclock- wise, and tightened by turning clockwise. Safety is always the most important rule. Constantly be aware of the dangers involved in working on an automobile and take the proper precautions. (See the section in this chapter "Servicing Your Vehicle Safely" and the SAFETY NOTICE on the acknowledge- ment page.) Pay attention to the instructions provided. There are 3 common mistakes in mechanical work: 1. Incorrect order of assembly, disassem- bly or adjustment. When taking something apart or putting it together, doing things in the wrong order usually just costs you extra time; however, it CAN break something. Read the entire procedure before beginning disassembly. Do everything in the order in which the instructions say you should do it, even if you can't immediately see a reason for it. When you're taking apart something that is very intricate (for example, a carburetor), you might want to draw a picture of how it looks when assembled at one point in order to make sure you get everything back in its
2 GENERAL INFORMATION AND MAINTENANCE proper position. (We will supply exploded view whenever possible). When making ad- justments, especially tune-up adjustments, do them in order; often, one adjustment affects another, and you cannot expect even satisfac- tory results unless each adjustment is made only when it cannot be changed by any other. 2. Overtorquing (or undertorquing). While it is more common for overtorquing to cause damage, undertorquing can cause a fastener to vibrate loose causing serious damage. Es pecially when dealing with aluminum parts, pay attention to torque specifications and uti lize a torque wrench in assembly. If a torque figure is not available, remember that if you are using the right tool to do the job, you will probably not have to strain yourself to get a fastener tight enough. The pitch of most threads is so slight that the tension you put on the wrench will be multiplied many, many times in actual force on what you are tight ening. A good example of how critical torque is can be seen in the case of spark plug instal lation, especially where you are putting the plug into an aluminum cylinder head. Too lit tle torque can fail to crush the gasket, causing leakage of combustion gases and consequent overheating of the plug and engine parts. Too much torque can damage the threads, or dis tort the plug, which changes the spark gap. There are many commercial products available for ensuring that fasteners won't come loose, even if they are not torqued just right (a very common brand is "Loctite®"). If you're worried about getting something to- gether tight enough to hold, but loose enough to avoid mechanical damage during assem- bly, one of these products might offer sub- stantial insurance. Read the label on the package and make sure the product is com- patible with the materials, fluids, etc. in- volved before choosing one. 3. Crossthreading. This occurs when a part such as a bolt is screwed into a nut or casting at the wrong angle and forced. Cross thread ing is more likely to occur if access is difficult. It helps to clean and lubricate fasteners, and to start threading with the part to be installed going straight in. Then, start the bolt, spark plug, etc. with your fingers. If you encounter resistance, unscrew the part and start over again at a different angle until it can be in serted and turned several turns without much effort. Keep in mind that many parts, espe cially spark plugs, use tapered threads so that gentle turning will automatically bring the part you're threading to the proper angle if you don't force it or resist a change in angle. Don't put a wrench on the part until it's been turned a couple of turns by hand. If you sud- denly encounter resistance, and the part has not been seated fully, don't force it. Pull it back out and make sure it's clean and thread- ing properly. Always take your time and be patient; once you have some experience, working on your car will become an enjoyable hobby. TOOLS AND EQUIPMENT Naturally, without the proper tools and equipment it is impossible to properly ser- vice your vehicle. It would be impossible to catalog each tool that you would need to per- form each or any operation in this book. It would also be unwise for the amateur to rush out and buy an expensive set of tools on the theory that he may need one or more of them at sometime. The best approach is to proceed slowly, gathering together a good quality set of those tools that are used most frequently. Don't be misled by the low cost of bargain tools. It is far better to spend a little more for better quality. Forged wrenches, 10 or 12 point sockets and fine tooth ratchets are by far pref- erable to their less expensive counterparts. As any good mechanic can tell you, there are few worse experiences than trying to work on a car or truck with bad tools. Your monetary savings will be far outweighed by frustration and mangled knuckles. Begin accumulating those tools that are used most frequently; those associated with routine maintenance and tune-up. In addition to the normal assortment of screwdrivers and pliers you should have the following tools for routine maintenance jobs: 1. SAE (or Metric) or SAE/Metric wrenches—sockets and combination open end/box end wrenches in sizes from % in. (3 mm) to % in. (19 mm) and a spark plug socket ( 13 /ie or % in. depending on plug type). If possible, buy various length socket drive extensions. One break in this department is that the metric sockets available in the U. S. will all fit the ratchet handles and extensions you may already have (¥4, %, and Yi in. drive); 2. Jackstands—for support; 3. Oil filter wrench; 4. Oil filler spout—for pouring oil; 5. Grease gun—for chassis lubrication; 6. Hydrometer—for checking the battery;
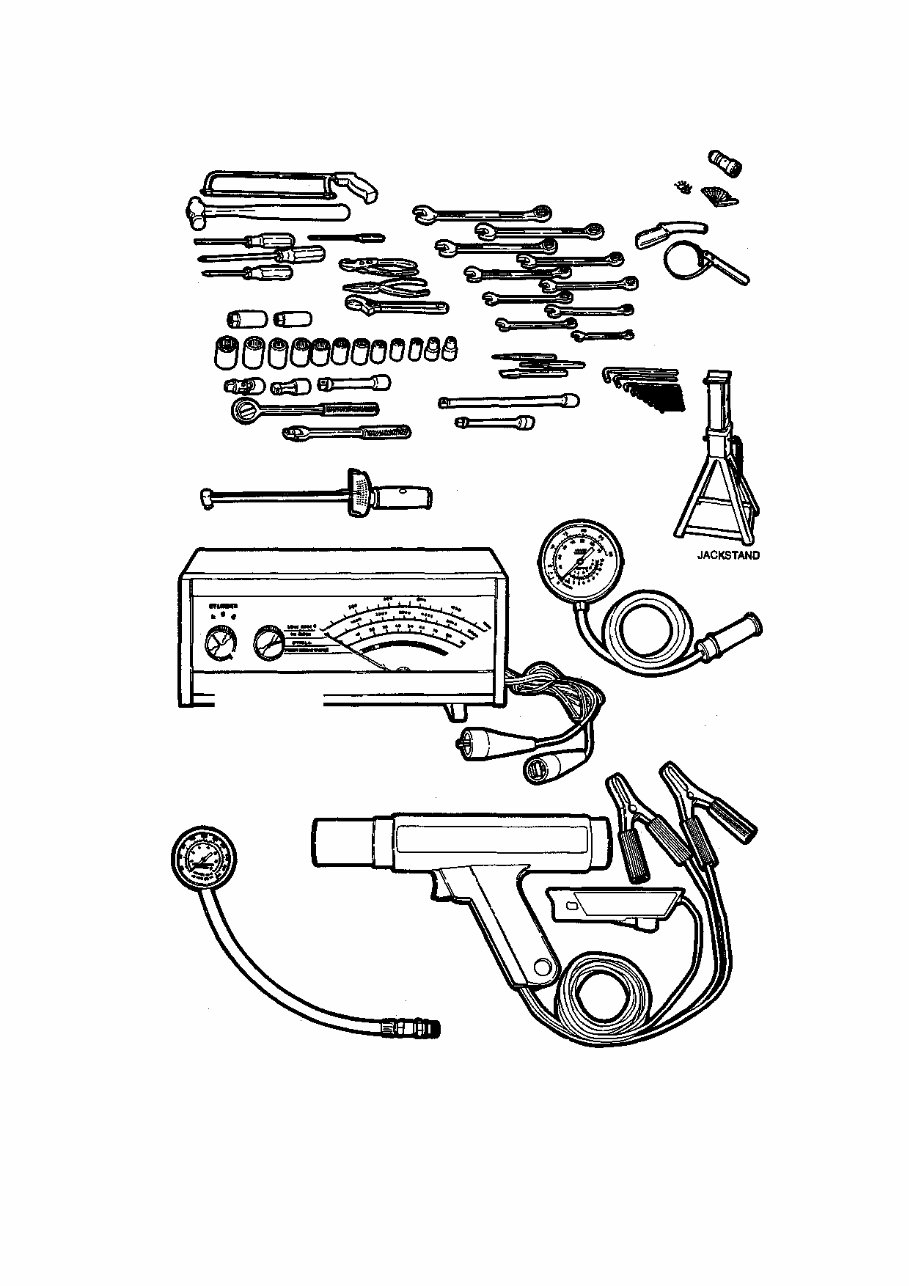
GENERAL INFORMATION AND MAINTENANCE 3 COMPRESSION GAUGE TIMING LIGHT You need only a basic assortment of hand tools and test instruments for most maintenance and repair Jobs FROM TOP: BATTERY TERMINAL TOOL; FEELER GAUGES; OIL SPOUT; FILTER WRENCH ALLEN WRENCHES BEAM-TYPE TORQUE WRENCH VACUUM GAUGE DWELL TACHOMETER u/ DWELL/TACHOMETER
4 GENERAL INFORMATION AND MAINTENANCE 7. A container for draining oil; 8. Many rags for wiping up the inevitable mess. In addition to the above items there are several others that are not absolutely neces- sary, but handy to have around. These in- clude oil dry, a transmission funnel and the usual supply of lubricants, antifreeze and fluids, although these can be purchased as needed. This is a basic list for routine main- tenance, but only your personal needs and desire can accurately determine your list of tools. If you are serious about maintaining your own car, then a floor jack is as necessary as a spark plug socket. The greatly increased util- ity, strength, and safety of a hydraulic floor jack makes it pay for itself many times over through the years. The second list of tools is for tune-ups. While the tools involved here are slightly more sophisticated, they need not be outra- geously expensive. There are several inex- pensive tach/dwell meters on the market that are every bit as good for the average me- chanic as a $100.00 professional model. Just be sure that it goes to at least 1,200-1,500 rpm on the tach scale and that it works on 4, 6 or 8 cylinder engines. A basic list of tune- up equipment could include: 1. Tach-dwell meter. 2. Spark plug wrench. 3. Timing light (a DC light that works from the car's battery is best, although an AC light that plugs into 110V house current will suf fice at some sacrifice in brightness); 4. Wire spark plug gauge/adjusting tools. 5. Set of feeler blades. Here again, be guided by your own needs. A feeler blade will set the points as easily as a dwell meter will read dwell, but slightly less accurately. And since you will need a ta- chometer anyway . . . well, make your own decision. In addition to these basic tools, there are several other tools and gauges you may find useful. These include: 1. A compression gauge. The screw-in type is slower to use, but eliminates the possibility of a faulty reading due to escaping pressure. 2. A manifold vacuum gauge. 3. A test light, volt-ohm meter. 4. An induction meter. This is used for de termining whether or not there is current in a wire. These are handy for use if a wire is broken somewhere in a wiring harness. As a final note, you will probably find a torque wrench necessary for all but the most basic work. The beam type models are per- fectly adequate, although the newer click type are more precise. Special Tools Normally, the use of special factory tools is avoided for repair procedures, since these are not readily available for the do-it-yourself mechanic. When it is possible to perform the job with more commonly available tools, it will be pointed out, but occasionally, a spe- cial tool was designed to perform a specific function and should be used. Before substi- tuting another tool, you should be convinced that neither your safety nor the performance of the vehicle will be compromised. Some special tools are available commer- cially from major tool manufacturers. Others can be purchased from your car dealer. NOTE: Chevrolet special tools referred to in this guide are available through the Service Tool Division, Kent-Moore Corporation, 29784 Little Mack, Roseville, Ml 48066- 2298. In Canada, contact Kent-Moore of Canada, Ltd., 2395 Cawthra Mississauga, Ontario, Canada L5A 3P2. SERVICING YOUR VEHICLE SAFELY It is virtually impossible to anticipate all of the hazards involved with automotive main- tenance and service but care and common sense will prevent most accidents. The rules of safety for mechanics range from "don't smoke around gasoline," to "use the proper tool for the job." The trick to avoiding injuries is to develop safe work habits and take every possible precaution. Do's • Do keep a fire extinguisher and first aid kit within easy reach. • Do wear safety glasses or goggles when cutting, drilling, grinding or prying, even if you have 20-20 vision. If you wear glasses for the sake of vision, then they should be made of hardened glass that can serve also as safety glasses, or wear safety goggles over your reg ular glasses. • Do shield your eyes whenever you work around the battery. Batteries contain sul phuric acid; in case of contact with the eyes or skin, flush the area with water or a mixture
GENERAL INFORMATION AND MAINTENANCE 5 of water and baking soda and get medical at- tention immediately. • Do use safety stands for any undercar service. Jacks are for raising vehicles; safety stands are for making sure the vehicle stays raised until you want it to come down. Whenever the vehicle is raised, block the wheels remaining on the ground and set the parking brake. • Do use adequate ventilation when work ing with any chemicals. Like carbon monox ide, the asbestos dust resulting from brake lining wear can be poisonous in sufficient quantities. • Do disconnect the negative battery cable when working on the electrical system. The primary ignition system can contain up to 40,000 volts. • Do follow manufacturer's directions whenever working with potentially hazard ous materials. Both brake fluid and antifreeze are poisonous if taken internally. • Do properly maintain your tools. Loose hammerheads, mushroomed punches and chisels, frayed or poorly grounded electrical cords, excessively worn screwdrivers, spread wrenches (open end), cracked sockets, slip ping ratchets, or faulty droplight sockets can cause accidents. • Do use the proper size and type of tool for the job being done. • Do when possible, pull on a wrench han dle rather than push on it, and adjust your stance to prevent a fall. • Do be sure that adjustable wrenches are tightly adjusted on the nut or bolt and pulled so that the face is on the side of the fixed jaw. • Do select a wrench or socket that fits the nut or bolt. The wrench or socket should sit straight, not cocked. • Do strike squarely with a hammer—avoid glancing blows. • Do set the parking brake and block the drive wheels if the work requires that the en gine be running. Dont's • Don't run an engine in a garage or any where else without proper ventilation— EVER! Carbon monoxide is poisonous; it takes a long time to leave the human body and you can build up a deadly supply of it in your system by simply breathing in a little every day. You may not realize you are slowly poisoning yourself. Always use power vents, windows, fans or open the garage doors. • Don't work around moving parts while wearing a necktie or other loose clothing. Short sleeves are much safer than long, loose sleeves and hard-toed shoes with neoprene soles protect your toes and give a better grip on slippery surfaces. Jewelry such as watches, fancy belt buckles, beads or body adornment or any kind is not safe working around a car. Long hair should be hidden under a hat or cap. • Don't use pockets for toolboxes. A fall or bump can drive a screwdriver deep into your body. Even a wiping cloth hanging from the back pocket can wrap around a spinning shaft or fan. • Don't smoke when working around gas oline, cleaning solvent or other flammable material. • Don't smoke when working around the battery. When the battery is being charged, it gives off explosive hydrogen gas. • Don't use gasoline to wash your hands; there are excellent soaps available. Gasoline may contain lead, and lead can enter the body through a cut, accummulating in the body until you are very ill. Gasoline also removes all the natural oils from the skin so that bone dry hands will suck up oil and grease. • Don't service the air conditioning system unless you are equipped with the necessary tools and training. The refrigerant, R-12, is extremely cold and when exposed to the air, will instantly freeze any surface it comes in contact with, including your eyes. Although the refrigerant is normally non-toxic, R-12 becomes a deadly poisonous gas in the pres ence of an open flame. One good whiff of the vapors from burning refrigerant can be fatal. HISTORY The 1963 Corvette Stingray is a complete de- parture from the Corvettes which preceded it. The body, frame, and front and rear sus- pensions are all of new design. Engines and transmissions are the only components that were shared with the older models. Stingray body styling evolved from the original Wil- liam Mitchell Stingray sports/racing car which competed in 1959-60. Fiberglass bodywork was retained, but included a steel, reinforc- ing framework around the passenger com- partment. The convertible model, with or without hardtop, was retained and a new body style added, the fastback coupe. Retractable
6 GENERAL INFORMATION AND MAINTENANCE headlights, rotated by two electric motors, were also a new feature for the Corvette. The frame is a ladder type with five cross- members. The wheelbase has been reduced from the 102 in. of previous models to a more compact 98 in., and the rear track shortened by 2 in. This, coupled with component relo- cation, resulted in a 48/52 percent front/rear weight distribution; a marked improvement over the 53 percent front weight bias of ear- lier model Corvettes. Overall body height was reduced by 2 in. Front and rear suspensions are both independent and newly designed for the Stingray. The short/long arm front sus- pension has the upper arm tilted at an angle of 9° for an anti-dive effect under braking. Steering knuckles pivot in ball joints, instead of the king pins and bushings of the early Corvettes. The fully independent rear sus- pension is sprung with a nine-leaf transverse spring. Universal-jointed axle driveshafts transmit power to the wheels. Steering gear is recirculating ball type and the linkage in- cludes a hydraulic damper. Power steering and brakes both became optionally available for the first time on a Corvette. Brake drums were enlarged and the brakes were made self- adjusting. Air conditioning became option- ally available in kte 1963. 1964 saw detail body changes: functional passenger-compartment exhaust vents and elimination of the split rear window on the coupe, removal of the non-functional vents on the hood, and new wheel covers. The Mun- cie four-speed transmission, introduced in mid-year 1963 to repkce the Borg-Warner T- 10, became the optional four-speed. The solid lifter engines received larger intake and ex- haust valves, and horsepower increased from 340 to 365 and from 360 to 375 for the car- buretted and fuel-injected engines respec- tively. Transsistorized, breakerless ignition became optionally available on high perfor- mance engines in 1964. In 1965, the big change was the introduc- tion of four-wheel disc brakes. Braking power and fade resistance were greatly increased over the drum brakes. A flat hood replaced the 1964 hood which had twin indentations and other body changes included restyled wheel covers and functional exhaust vents behind the front wheels. A new version of the 327 cubic inch engine was introduced, the 350 horsepower, hydraulic-cam option. In mid- year, a 396 cubic inch 425 horsepower engine was made available in the Corvette. 396 Cor- vettes were distinguished by the domed hood required for carburetor clearance. Cars equipped with the 396 received a larger front stabilizer bar and the addition of a rear sta- bilizer bar. Side-mounted exhausts with chambered mufflers joined the option list in 1965. The 250, 365, and 375 horsepower engines were dropped in 1966. The 300 horsepower, 327 cubic inch engine became the standard power plant and the standard three-speed transmission was synchronized in all forward gears. The 396 was bored out to 427 cubic inches and offered in two versions, a 425 horsepower and a milder 390 horsepower model. A heavy-duty, four-speed transmis- sion was introduced for use with the high performance 427. Body changes included a new, egg-crate grille, restyled wheel covers, and the addition of backup lights. 1967 body styling changes included a hood scoop on 427 Stingrays, more subdued ex- haust vents on the front fenders, and a center back-up light. Wheels were widened % inch to 6 inches and were slotted. The full wheel covers of former models were discarded for trim rings and center caps. The handbrake was changed to the pull-up type, and relo- cated to the center console. The 300, 350, and 390 horsepower engines remained the same for 1967. A triple-two barrel carburetor set- up was added to the 390 horsepower 427 en- gine which added an additional 10 horse- power. Also, the same carburetor arrange- ment was added to the former 425 horsepower engine along with large port aluminum cyl- inder heads and a matching large port intake manifold. The three-two barrel carburetion also added 10 horsepower to this engine. For the 1968 Corvette, a completely rede- signed body and interior were installed on a basically unchanged chassis. Many of the styling features of the new body had been previewed on the Mako Shark show car. Overall body width and height were re- duced, while front and rear tread increased with the use of one inch wider wheels. The convertible model was retained and the fast- back coupe was replaced with a hardtop model featuring removable roof panels and rear window. Headlights on 1968 and later cars are raised automatically, with vacuum power when the lights are switched on. Wide oval F70-15 tires repkced the 7.75-15 tires of pre- vious years. The two-speed, Powerglide au- tomatic transmission was superseded by the three-speed Turbo Hydra-Matte, a signifi- cant improvement for general driving and
Thank you for considering this comprehensive Service Repair Workshop Manual for the Chevrolet Chevy Corvette 305 327 350 396 427 454 Inc Fuel Injection Models from 1963 to 1983.
This manual is an invaluable resource for both professional mechanics and DIY enthusiasts, covering every service and repair procedure with easy-to-follow step-by-step instructions and detailed illustrations.
By utilizing this manual, you can significantly reduce repair costs by performing maintenance and repairs on your own. The manual is yours to keep forever, allowing you to print specific pages, chapters, or the entire manual. Additionally, it can be conveniently accessed on your tablet or smartphone.
All models, engines, trim levels, and transmission types are comprehensively covered in this high-quality Service Repair Workshop Manual, ensuring that every repair and service procedure is included.
Compatible with all PC and MAC computers, tablets, and mobile phones, this downloadable manual requires only Adobe Reader, which is commonly pre-installed or available for free download.
Upon payment via Visa, MasterCard, or PayPal, the manual will be instantly delivered to the email address provided during checkout, ensuring prompt access to the valuable information it contains.
Customer satisfaction is guaranteed, and with this manual at your disposal, you can confidently tackle any maintenance or repair task for your Chevrolet Chevy Corvette.
Recently Viewed
5,521,897Happy Clients
2,594,462eManuals
1,120,453Trusted Sellers
15Years in Business
Price:
Actual Price:
1963-1964 Chevrolet Corvette 305 327 350 396 427 454 Inc Fuel Injection Models Service & Repair Manual