

Audi B5 S4 Engine Removal Guide
What's Included?
Fast Download Speeds
Online & Offline Access
Access PDF Contents & Bookmarks
Full Search Facility
Print one or all pages of your manual
Audi > B5 Platform > 1996 - 2002
2.7 Liter V6 5V BiTurbo Engine Mechanical, Engine Code(s): APB
10 - Engine - Assembly
Engine, removing and installing
Note:
All cable ties opened or cut during engine removal must be reinstalled at the same
locations.
Remove engine without transmission toward the front.
Drained coolant must be stored in a clean container for disposal or reuse.
Always replace seals and gaskets.
Do not open coolant circulation system.
Removing
First determine whether a coded radio is installed. If so, determine the correct coding.
Switch ignition off and disconnect battery Ground (GND) strap.
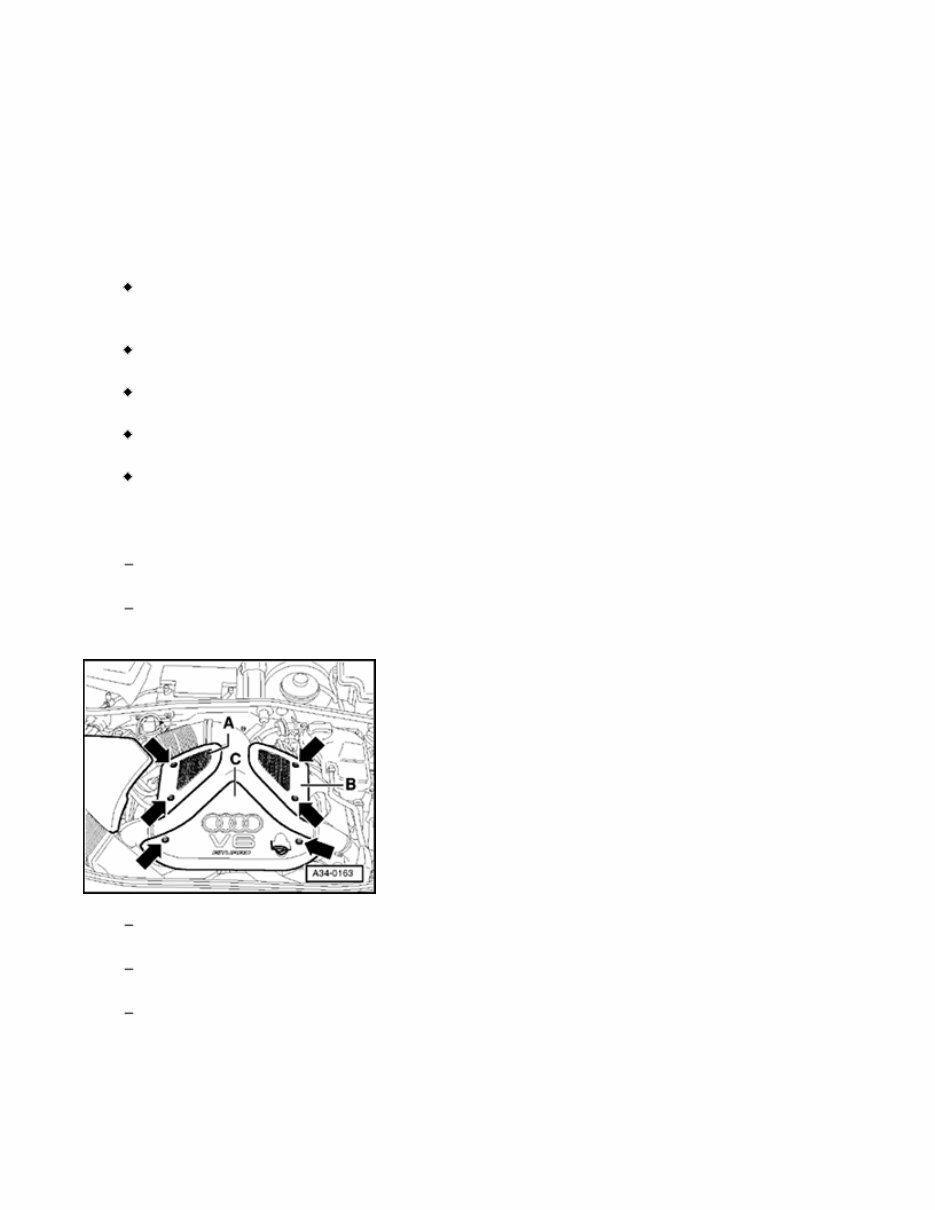
Remove bolts (arrows) and remove engine covers -A- and -B-.
Remove cover above air filter.
Remove plenum cover.
Page 1 of 22 Engine, removing and installing
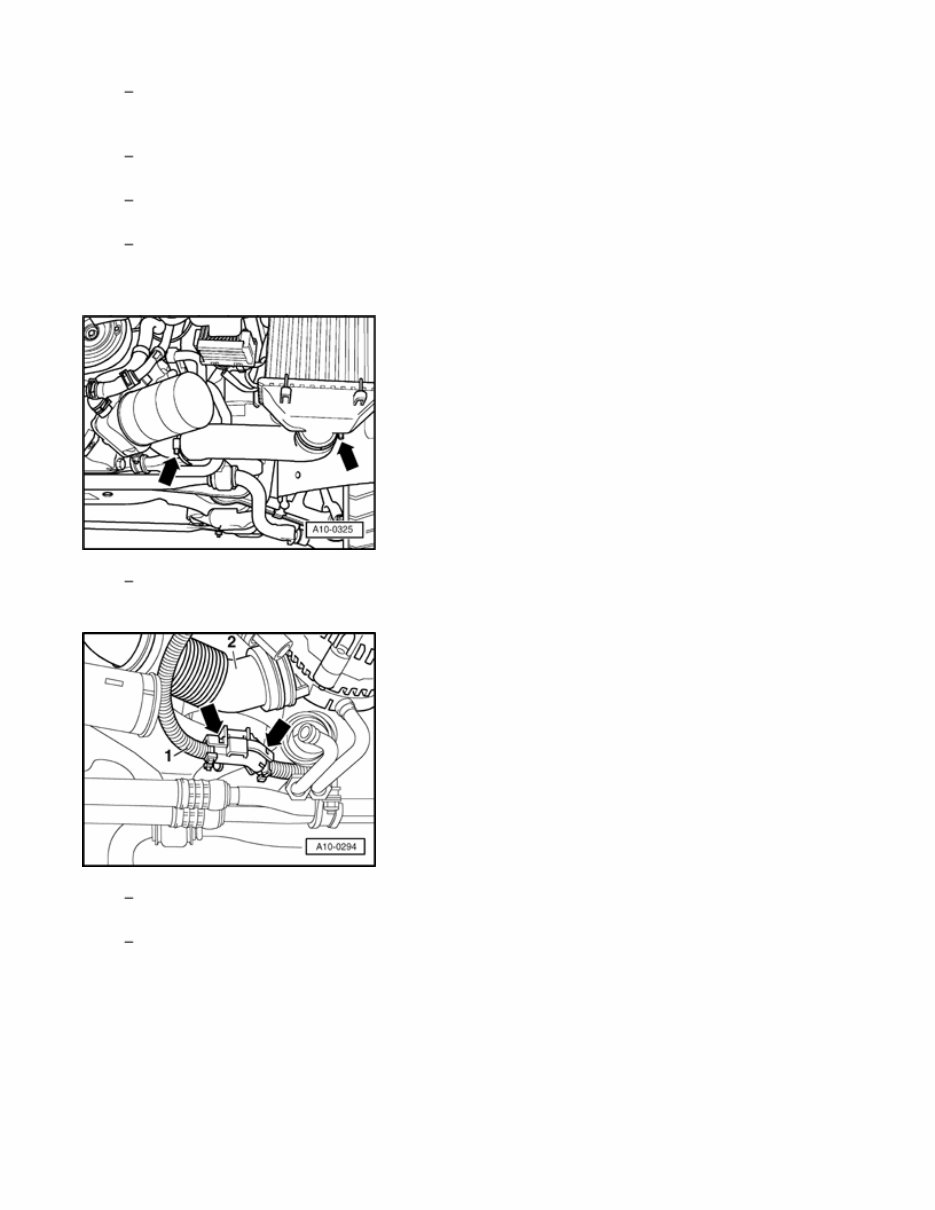
Remove sound-proofing material (arrows).
Remove bracket for sound-proofing at unit support.
Drain engine coolant => page 19 - 19
Remove front bumper:
=> Repair Manual, Body Exterior, Repair Group 63
Remove lock carrier:
=> Repair Manual, Body Exterior, Repair Group 50
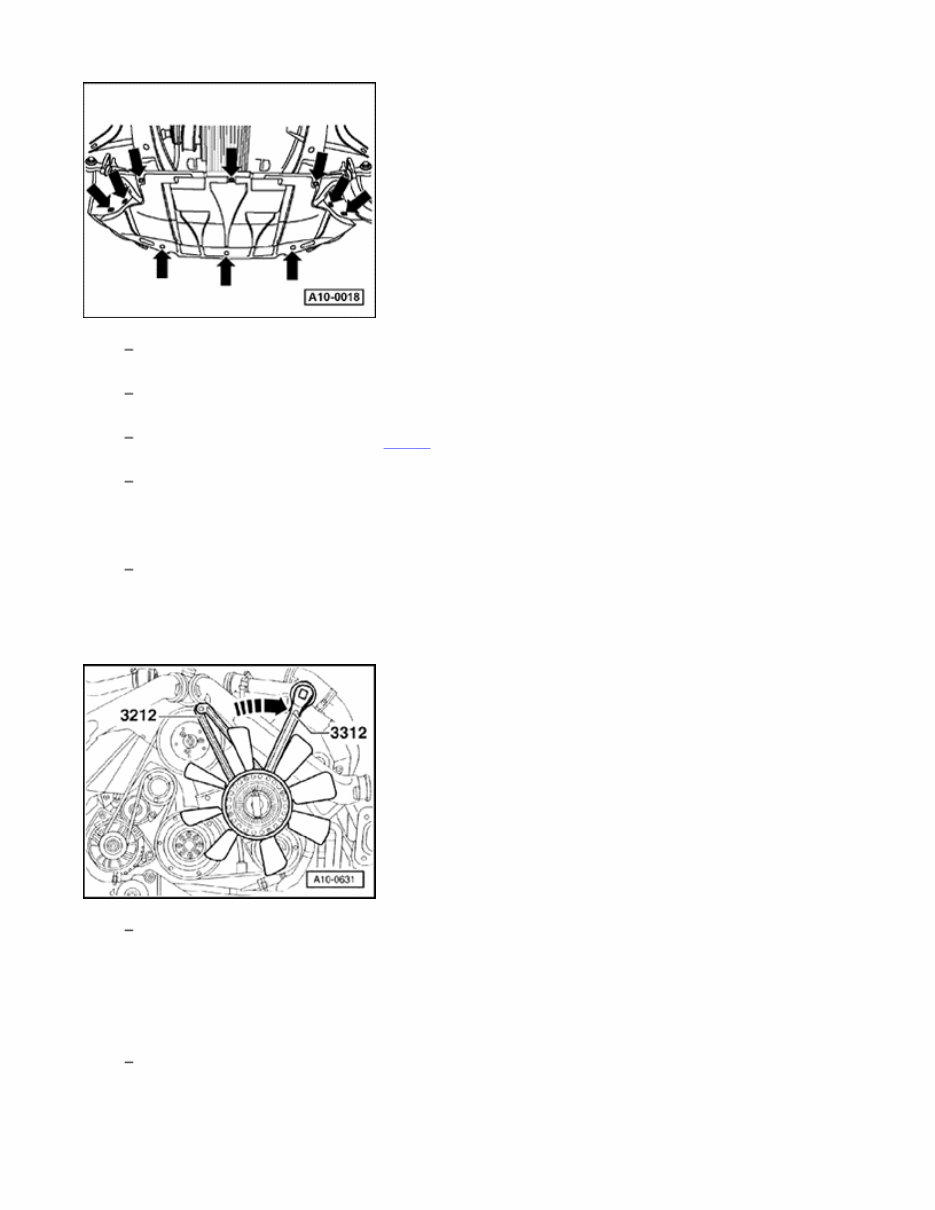
Remove viscous fan counter-hold using 3212 spanner wrench.
Note:
The viscous fan has a left-handed thread.
Mark direction of rotation of ribbed belt
Page 2 of 22 Engine, removing and installing
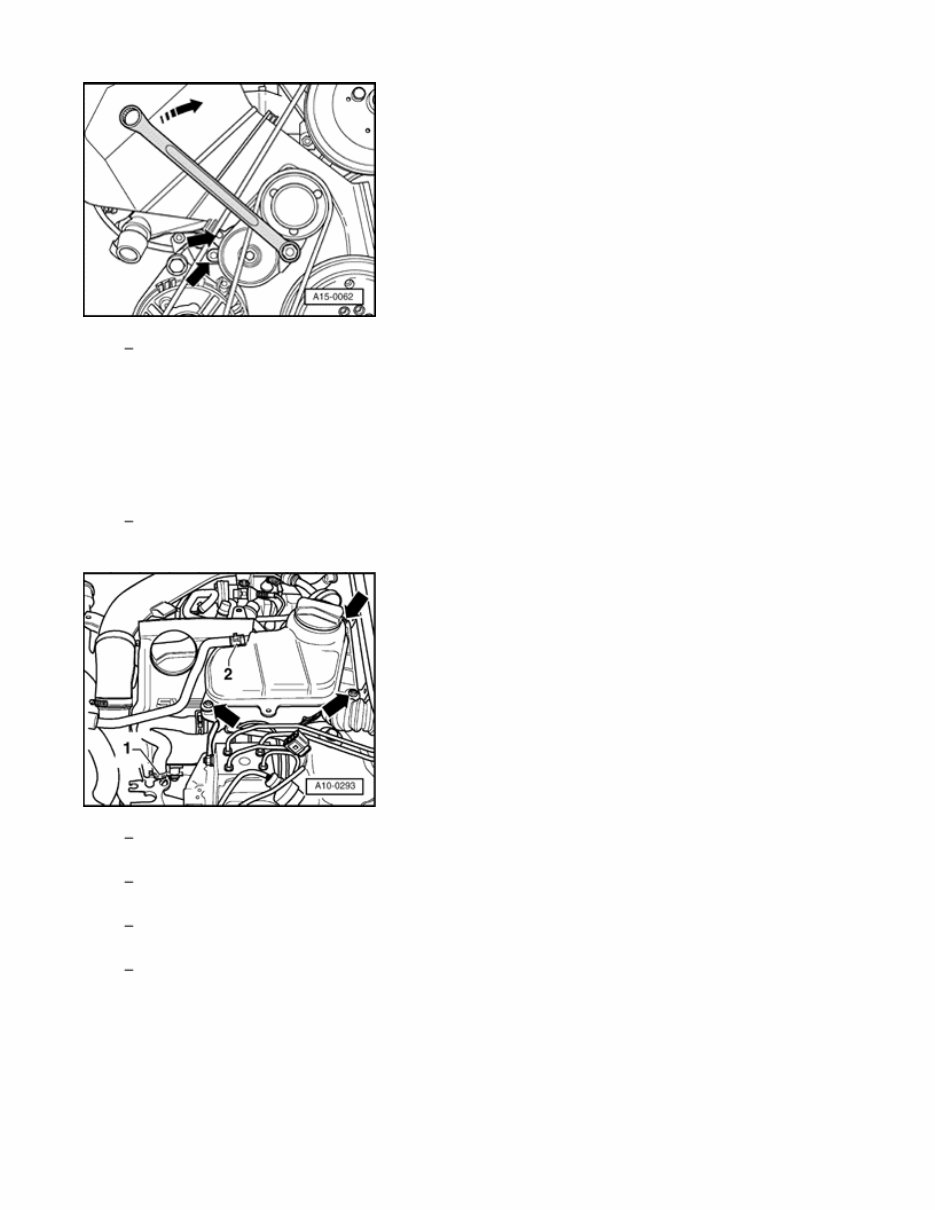
To loosen ribbed belt, turn clockwise using 17 mm box wrench until two holes are
aligned (arrow). Counter-hold in position using 3204 drift.
Note:
Mark direction of rotation of ribbed belt. Reversing the direction in which it runs can ruin
it.
Remove ribbed belt.
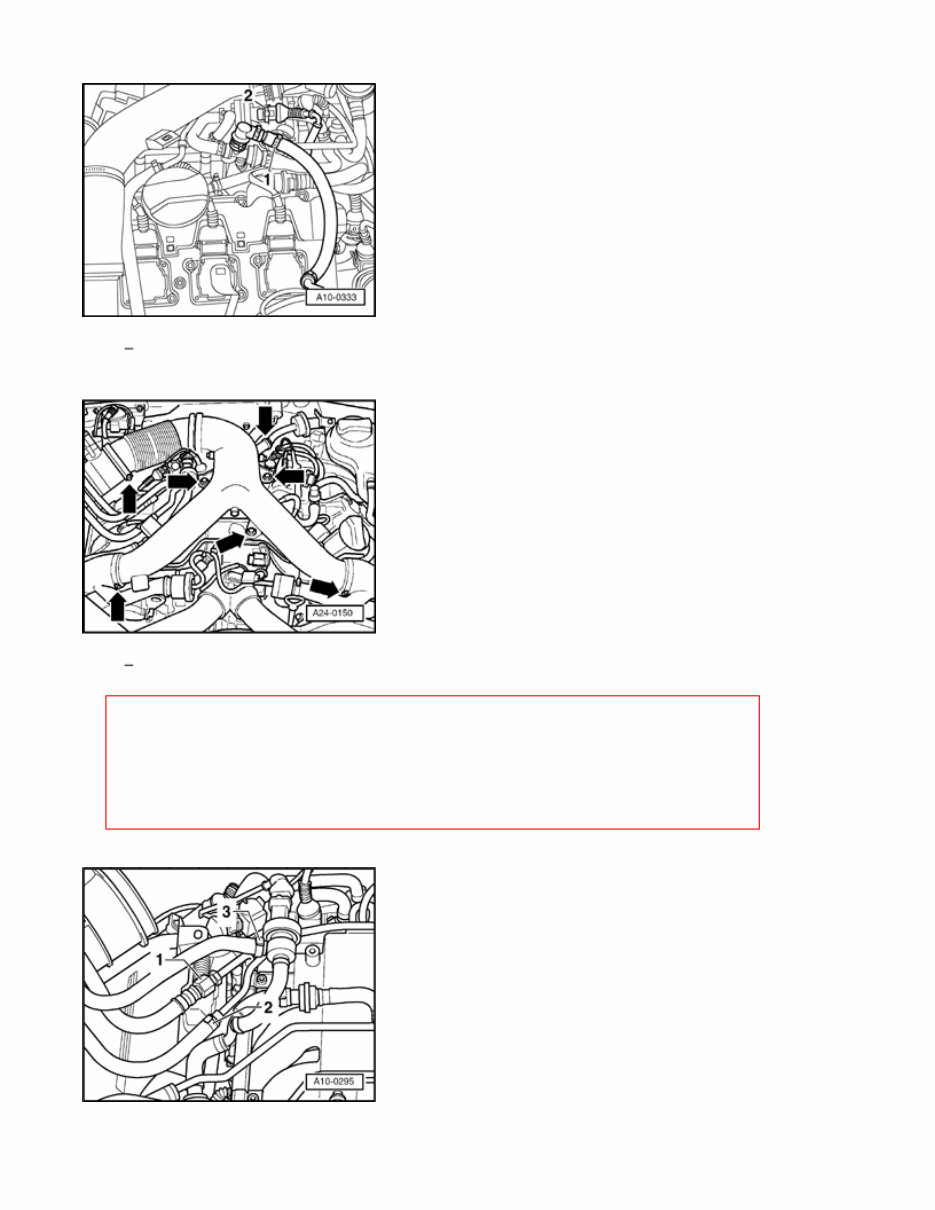
Cut coolant hoses -1- and -2-
Remove coolant reservoir (arrows).
Disconnect connector for coolant level display.
Remove valve cover (cylinder bank 4-6).
Page 3 of 22 Engine, removing and installing
Remove hose -1- to vacuum reservoir.
Remove air distributor (arrows).
WARNING!
Fuel system is under pressure! Before opening the system place a rag
around the connection. Then release pressure by carefully loosening the
connection.
Page 4 of 22 Engine, removing and installing
Disconnect fuel supply and return lines -1- and -2- and move aside.
Remove hose from Evaporative Emission (EVAP) canister purge regulator valve -3-.
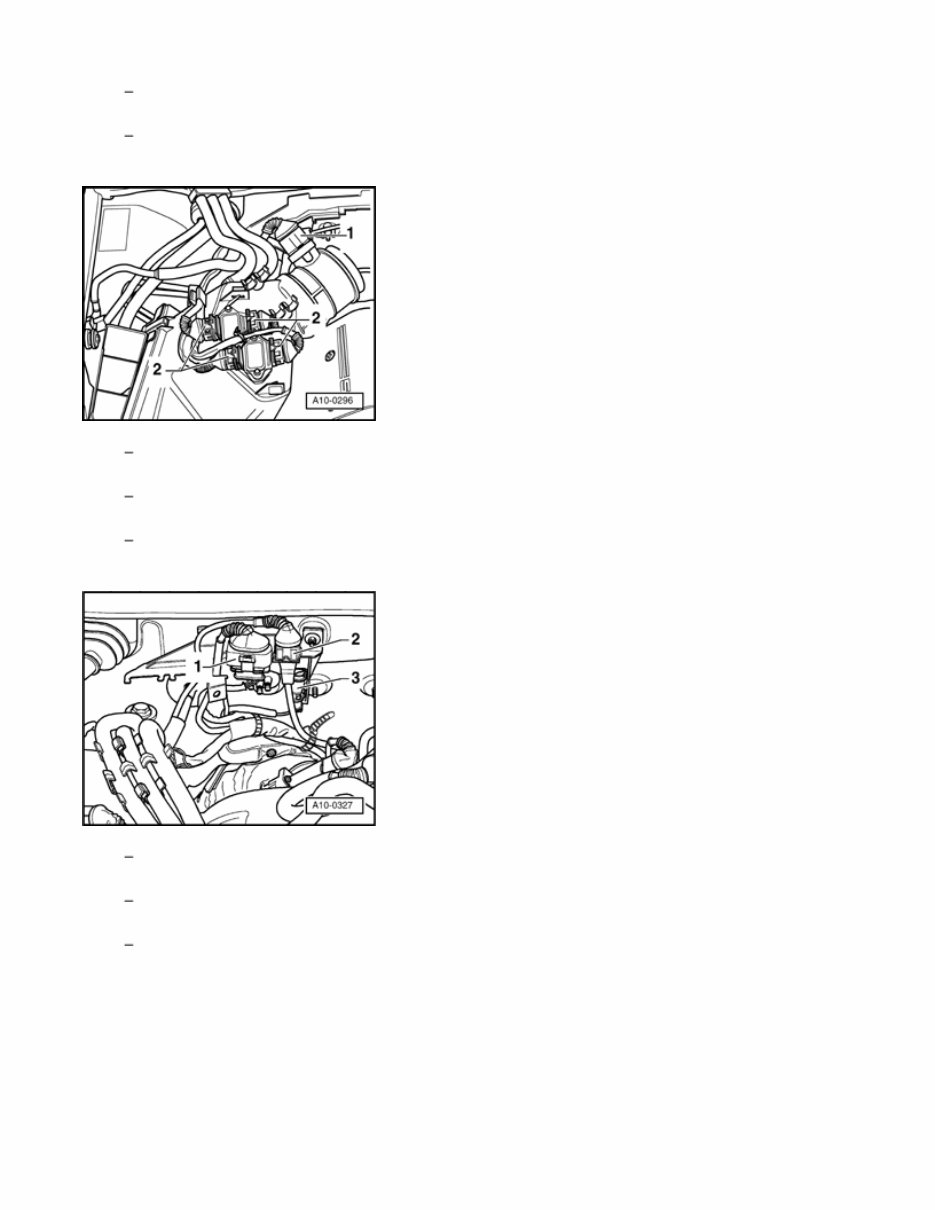
Disconnect connector -1- at Mass Air Flow (MAF) sensor.
Disconnect connectors -2- from power output stage and lay cables aside.
Remove air filter.
Disconnect connector -1- for oxygen sensor at bulkhead.
Disconnect connector -2- for knock sensor.
Disconnect harness connector -3- and move cables clear.
Page 5 of 22 Engine, removing and installing
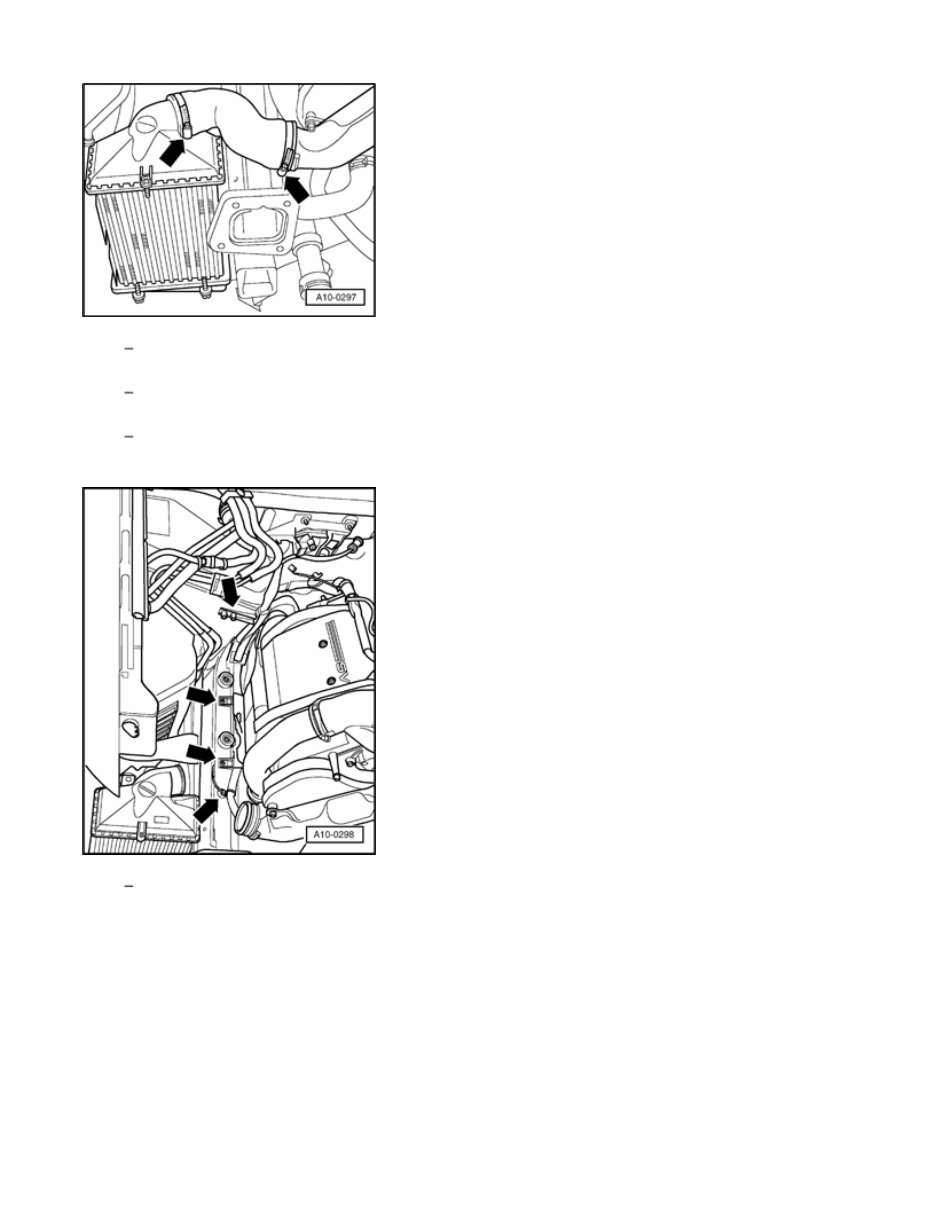
Remove pressure hoses (arrows) from charge air cooler to left and right pressure lines.
Disconnect cable at B+ on battery.
Disconnect B+ battery cable.
Move aside cables to starter together with cable channels (arrows).
Page 6 of 22 Engine, removing and installing
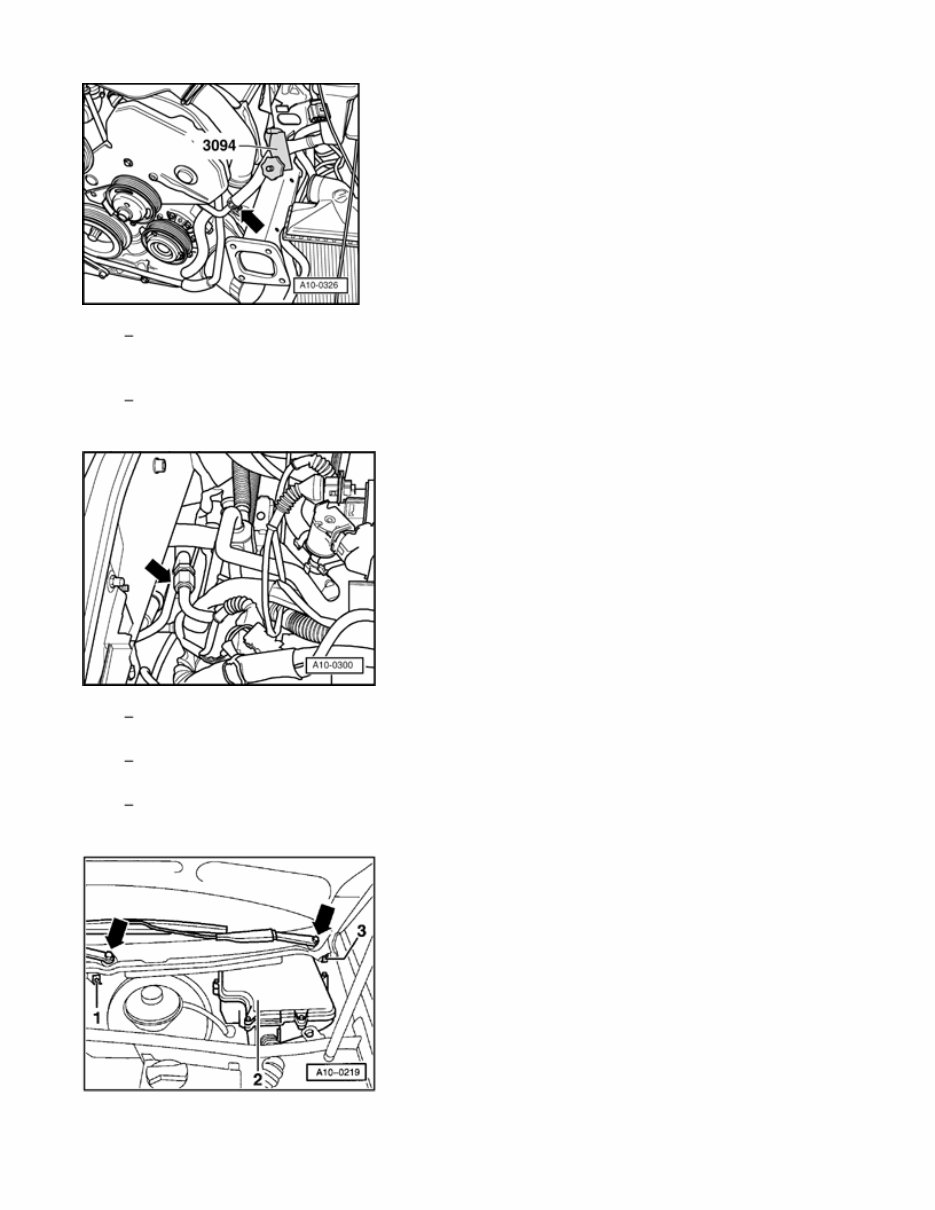
Disconnect hose from power steering reservoir to power steering pump with special tool
3094.
Disconnect power steering hose (arrow).
Disconnect hydraulic line (arrow).
Disconnect harness connector from vehicle speed sensor.
Disconnect harness connector from reverse gear switch.
Page 7 of 22 Engine, removing and installing
Remove wiper arms (arrows).
Disconnect retaining clip -1- at water deflector.
Pull off left and right retaining clips -3- on water deflector.
Remove water deflector.
Remove cover -2- from E-box (electronics box).
Open E-box in plenum.
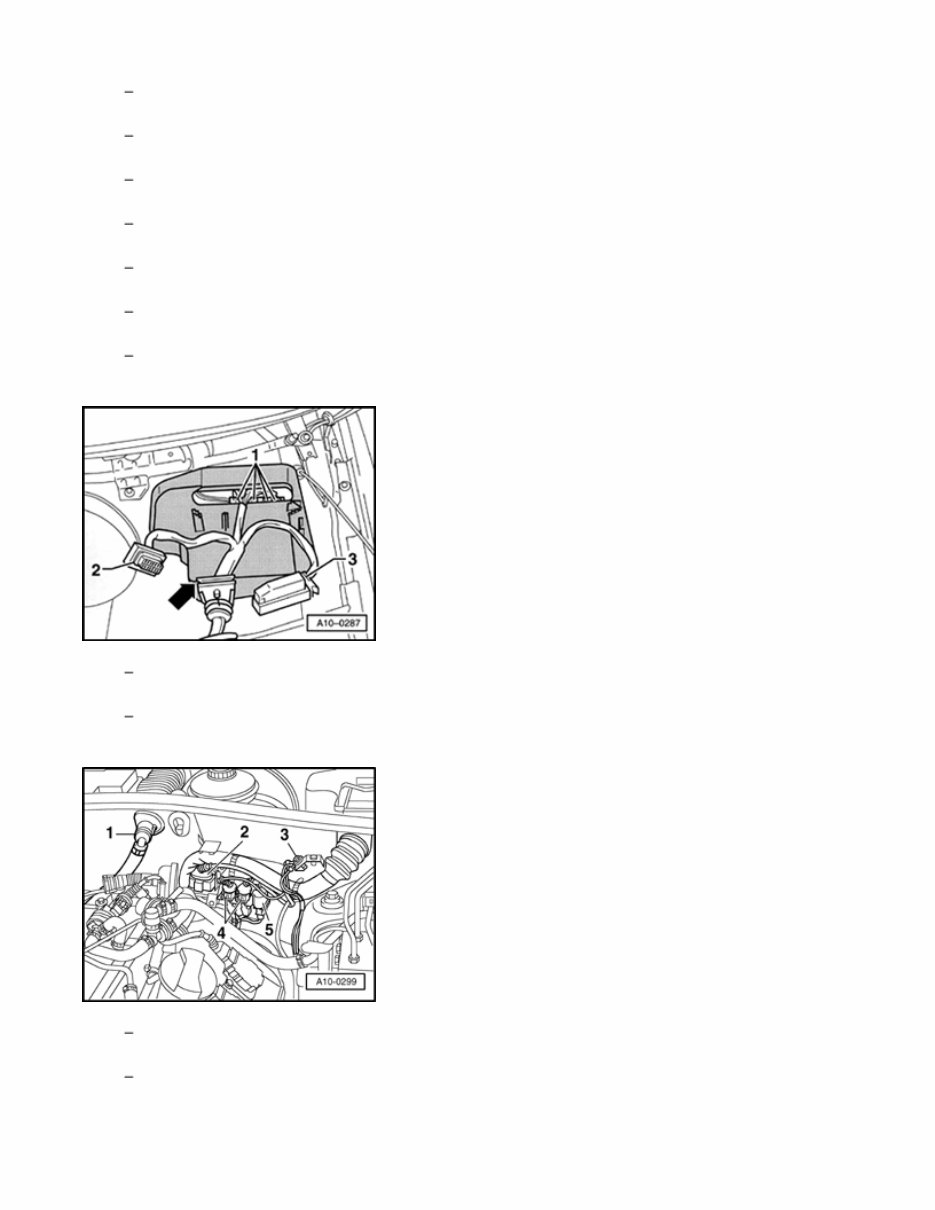
Unclip ECM retaining bracket.
Remove ECM, disconnect harness connectors -2- and -3- and remove.
Disconnect harness connectors -1-.
Remove hose -1- to power brake booster at bulkhead.
Disconnect ground (GND) -3-.
Page 8 of 22 Engine, removing and installing
Disconnect connectors -2- and -5- at bulkhead and remove lower part of connectors
from bracket.
Pull connector -4- out of bracket and move wiring clear.
Remove bracket for harness connector.
Remove both coolant hoses to heat exchanger at engine by un-clipping retaining clips
on flange.
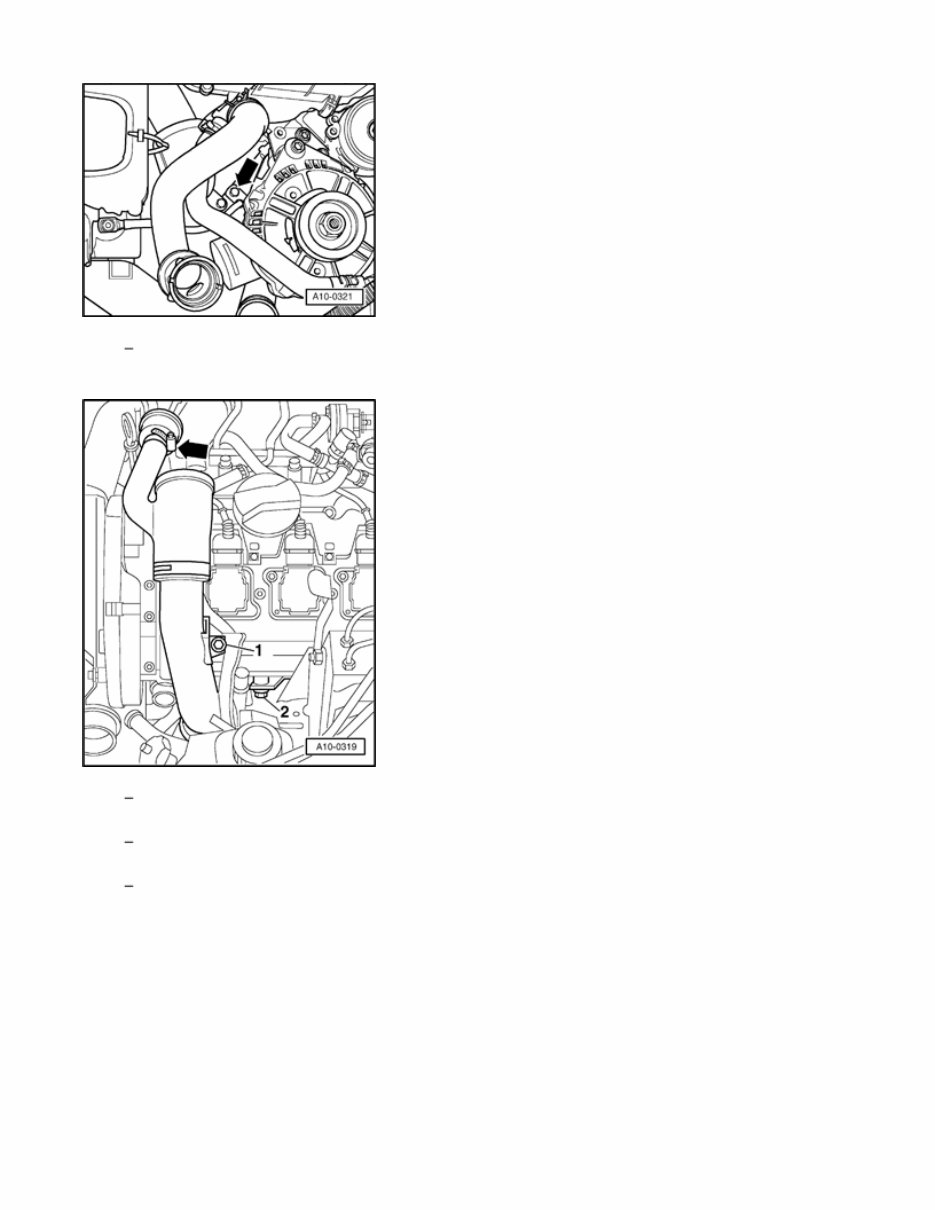
Remove hoses (arrows) from turbocharger to left and right charge air coolers.
Move aside cable -1- to starter by cutting cable tie and un-clipping bracket (arrow).
Remove hose -2- for cooling generator.
Page 9 of 22 Engine, removing and installing
Disconnect ground (GND) (arrow) from engine support.
Remove hose clamp (arrow).
Remove intake manifold -1-.
Remove coolant line -2-.
Page 10 of 22 Engine, removing and installing
You're Reading a Preview
What's Included?
Fast Download Speeds
Online & Offline Access
Access PDF Contents & Bookmarks
Full Search Facility
Print one or all pages of your manual
$27.99
Viewed 76 Times Today


Secure transaction
What's Included?
Fast Download Speeds
Online & Offline Access
Access PDF Contents & Bookmarks
Full Search Facility
Print one or all pages of your manual
$27.99
These manuals are available in digital format, making it convenient to access and use them across different devices. Many mechanics prefer electronic manuals and use them on a laptop while performing maintenance. For those without a laptop, the option to print out specific pages provides a hard copy for reference during work, offering a more efficient alternative to traditional books.
- Service manuals have been a valuable resource for both professional mechanics and DIY enthusiasts for many years. They provide guidance for working on and repairing automobiles, making tasks such as oil changes and other maintenance procedures easily achievable with the help of detailed instructions.
- By utilizing a service manual, individuals can learn and perform tasks that they might otherwise pay a professional to do, saving on inflated service costs and gaining valuable knowledge and skills in the process.
These manuals cover a wide range of topics and components related to car, truck, and motorcycle maintenance and repair, including but not limited to wiring diagrams, sensor assemblies, steering systems, suspension components, engine mechanicals, brake systems, and air conditioning systems.


