FOREVVORD This manual has been prepared to assist you in the proper break-in, daily care, and operation of your new Ford Tractor. It contains information about the many features of the tractor, operator safety precautions, maintenance, and instructions for making minor adjustments. Your tractor has been carefully inspected before leaving the factory and again before leaving your Ford Tractor-Equipment Dealer to assure that it is ready to go. To keep the tractor in this condition, it is important that you maintain and lubricate your tractor as recommended in this manual. The information in this manual applies to the following tractors: 2600 All Purpose 3600 All Purpose and Narrow Orchard 4100 All Purpose 4600 All Purpose, SU, Special Ol'chard and Narrow Orchard Read this manual carefully before operating your tractor, and keep it in a convenient location for later reference. If, at any time, you have a service problem concerning your new tractor, remember that your Ford Tractor-Equipment Dealer has factory-trained sel-vice personnel, Genuine Ford Parts, and the necessary tools and equipment to best satisfy your service needs_ FORD TRACTOR OPERATIONS FORD MOTOR COMPANY ISSUED TO: ISSUED BY: Owner's Name Ford Tractor-Equipment Dealer Mailing Address City City State Zip Code State Zip Code Delivery Date
2 DEAR CUSTOMER-PLEASE READ CAREFULLY The warranty coverage that is extended to your Ford Tractor is explained in the Warranty and Limitation of Liability, Ford Tractors and Equipment form . Your dealer will provide you with a copy of the vvarranty and retain a copy wh ich you have signed . After you read the warranty, ask your dealer to explain any points that you do not understand. For a complete list of the pre·delivery service checks performed by your dealer, refer to PRE- DELIVERY SERVICE on the upper portion of pages 66 and 68 . The copy on page 66 is your record of the service performed, and the copy on page 68, which is to be removed from the manual, is your dealer's record . MAKE SURE THAT YOU AND THE DEALER SIGN BOTH COPIES. After you have operated your tractor for fifty hours, take the manual and your tractor to your dealer. He will then perform the factory recommended 50-HOUR SERVICE as listed on the lower portion of pages 66 and 68 - without charge - except for lubricants, hydraulic oil, or filters replaced as part of normal maintenance. MAKE SURE THAT YOU AND THE DEALER SIGN BOTH COPIES. A vehicle identification plate is located on the inside of the right hood panel. The numbers on the plate,. are important should your tractor require future service . For your convenience, have your dealer record the numbers in the appropriate space below.
CONTENTS Page Safety Precautions 4 Controls and Instruments 5 seat, light, and engine controls 6 brake controls 9 transmission and P.T.D. controls 10 hydraulic lift controls 11 Operation 13 break·in procedures 14 starting the engine 14 stopping the engine 16 operating transmission and P.T.D. 16 towing the tractor 17 operating differential lock 17 operating belt pulley 18 operating hydraulic lift system 18 lift linkage and drawbar 22 wheel tread sett ings 26 tractor weighting 32 Lubrication and Maintenance 37 lubrication and maintenance chart 38 fuels and lubricants 39 fuel and lubricant service procedures 40 general maintenance 50 tractor storage 57 Specifications 59 Pre-Delivery and 50-Hour Service 66 3
4 SAFETY PRECAUTIONS The following precautions are suggested to help prevent accidents. THE TRACTOR 1. Familiarize yourself with the controls before attempting to operate the tractor . 2. Use an approved roll bar and seat belt for safe operation. If your tractor is not equipped with a roll bar and seat belt, see your Ford Tractor-Equip- ment Dealer. 3. Keep the tractor brakes in good operating con- dition. 4. Do not allow an open flame near the fuel tank or battery. 5. Use the handholds and step plates when getting on and off the tractor. 6. Always use the seat belt when the roll bar is in- stalled. Do not use the seat belt if the roll bar is removed from the tractor. 7. Do not permit anyone but the operator to ride on the tractor. OPERATING THE TRACTOR 8. Do not start the engine while standing beside the tractor. Always sit in the tractor seat when starting the engine. 9. Do not bypass the safety starter switch. Consalt your Ford Tractor-Equipment Dealer if your safety starter controls malfunction. 10. Do not get off the tractor while it is in motion. 11. Shut off the engine and apply the parking brakes before getting off the tractor. 12. Do not park the tractor on a steep incline. 13. Use the flasher warning lamp when traveling on public roads both day and night unless prohibited by law. 14. Do not run the tractor engine in a closed building without adequate ventilation. Exhaust fumes are very dangerous. 15. Always use the drawbar for pull-type work. Do not pull from any other part of the tractor since it may tip backward. Whenever you see this symbol it means: 16. If the front end of the tractor tends to rise, install front end or front wheel weights. Do not operate the tractor with a "light" front end. 17. Always set the hydraulic selector lever in position control when attaching equipment, transporting equipment, and when no equipment is attached . 18. Do not leave equipment in the raised position. DRIVING THE TRACTOR 19. Watch where you are gOing-especially at row ends, on roads, and around trees. 20. Drive the tractor at speeds compatible with safety, especially when operating over rough ground, crossing ditches, slopes, and when turning. 21. Use care when operating on steep slopes to main- tain adequate stability. 22. Avoid operating the tractor near ditches, banks, and holes. 23. Keep the tractor in gear when going down hill. 24. If the tractor is stuck, back out to prevent up- setting the unit. If logs are used to increase traction, place them behind the rear wheels and back out the tractor. OPERATING THE P_T.O. 25. When operating P.T.O. driven equipment, shut off the engine and wait until the P.T.O. stops before getting off the tractor and disconnecting the equip- ment. 26. Do not wear loose clothing when operating the power take-off, or when near rotating equipment. 27. When operating stationary P.T.O. equipment, always apply the tractor parking brake and block the rear wheels front and back. 28. Do not install or remove a belt while the belt pulley is in motion . 29. Do not clean or adjust P.T.O. driven equipment with the tractor engine running. 30. Make sure the P.T.O. shield is installed when using P.T.O. driven equipment, and always replace the P.T.O. shaft cap when the P.T.O. is not in use. A ATTENTION! BECOME ALERT! YOUR SAFETY IS INVOLVED!
CONTROLS and INSTRUMENTS Before operating your new tractor, familiarize yourself with the location and function of all the controls and instruments described on the following pages . The instruments and warning lights are centrally located so you can tell at a glance when the tractor is operating properly. The warn ing lights also warn you of trouble before it becomes a serious problem. Know your controls and instruments to assure Safe Operation 5
--CONTROLS AND INSTRUMENTS---------- SEAT, LIGHT AND ENGINE CONTROLS TRACTOR SEAT Your new Ford tractor is equipped with a pan seat, Fi g- ure 1, a deluxe contoured seat, Figure 2, or a super com- fort seat, Figure 3_ Pan Seat - The seat can be moved forward and back for maximum comfort. Remove the attaching nuts, Figure 1, and position the seat as desired. The seat also can be tilted back. Deluxe Contoured Seat - The seat can be moved up and back, or down and forward by loosening the height ad- justment nuts shown in Figure 2 (2 nuts on each side). The seat can also be moved forward or back without changing its height by loosening the nuts at the base of the seat and sliding the seat in either direction. To adjust the seat for flotation, turn the flotation ad- justment knob right for a firm ride, or left for a soft ride, Figure 2. Tilt the seat back when not in use to protect it from the weather. NOTE: If your tractor is equipped with a seat belt a latch under the front edge of the seat must be released before the seat can be tilted back. 1. Attac hing Nuts 6 Figure 1 Pan Seat Figure 2 Deluxe Contoured Seat 1. Flotation Adjustment Knob 3. Height Adjustment Nuts 2. Seat Belt Super Comfort Seat - The super comfort seat, Figure 3, can be moved forward and back (4), up and down (3), and the suspension adjusted with the knob (2). Figure 3 Super Comfort Seat 1. Super Comfort Seat 3. Seat Back Adjustment Nuts 2. Wei ght Adjustment Knob 4. Seat Track Latch
ROLL OVER PROTECTI VE STRUCTURE ( ROPS ) Tractors equipped wi th ROPS are al so equipped wi th a seat be l t. CAUTION: Always use the seat belt when the tractor ;s equipped with a RaPS. DO NOT use the seat belt if the RaPS is re- moved from the tractor. CAUTION: DO NOT attach chains or ropes to the roll bar for pulling purposes since the tractor can tip backward. Always pull from the tractor drawbar. Be careful when driving through door openings or under low overhead objects. Make sure there is sufficient overhead clearance for the roll bar. DRAWBAR ADJUSTING THE SEAT BELT To lengthen the belt, tip the buckle end down and pull on the buck le until the ends can be joined. To shorten the belt, buckle it, then pullan the loose end until the belt is snug . If the seat belt is to be cleaned, use soap and water. Do not use carbon tetrachloride, naptha, etc., as these will weaken the webbing. Also, for the same reason, do not bleach or dye the webbin g. FLASHING WARNING LIGHT Your new Ford Tractor is equipped with a flashing warning light, Figure 4. Push the switch on the lamp housing to turn the light on or off. The li ght switch (10), Figure 5, must be on before the flasher will operate . Figure 4 Flashing Warning Light 1. Flashing Warning Light 2. Swi tch IMPORTANT: For your protection, use the flasher warn- ing light when traveling on public roads both day and night unless prohibited by law. Figure 5 I nstrument Panel 1. Alternator Warning Light 7. 2. Fuel Gauge 8. 3. Ta. chometer 9. 4. Hour Meter Key-Starter Switch Hand Thronle Diesel StoplGasoline Choke Control 5. Coolant Temperature Gauge 10. Light Switch 6. Oil Pressure Warning Light 7
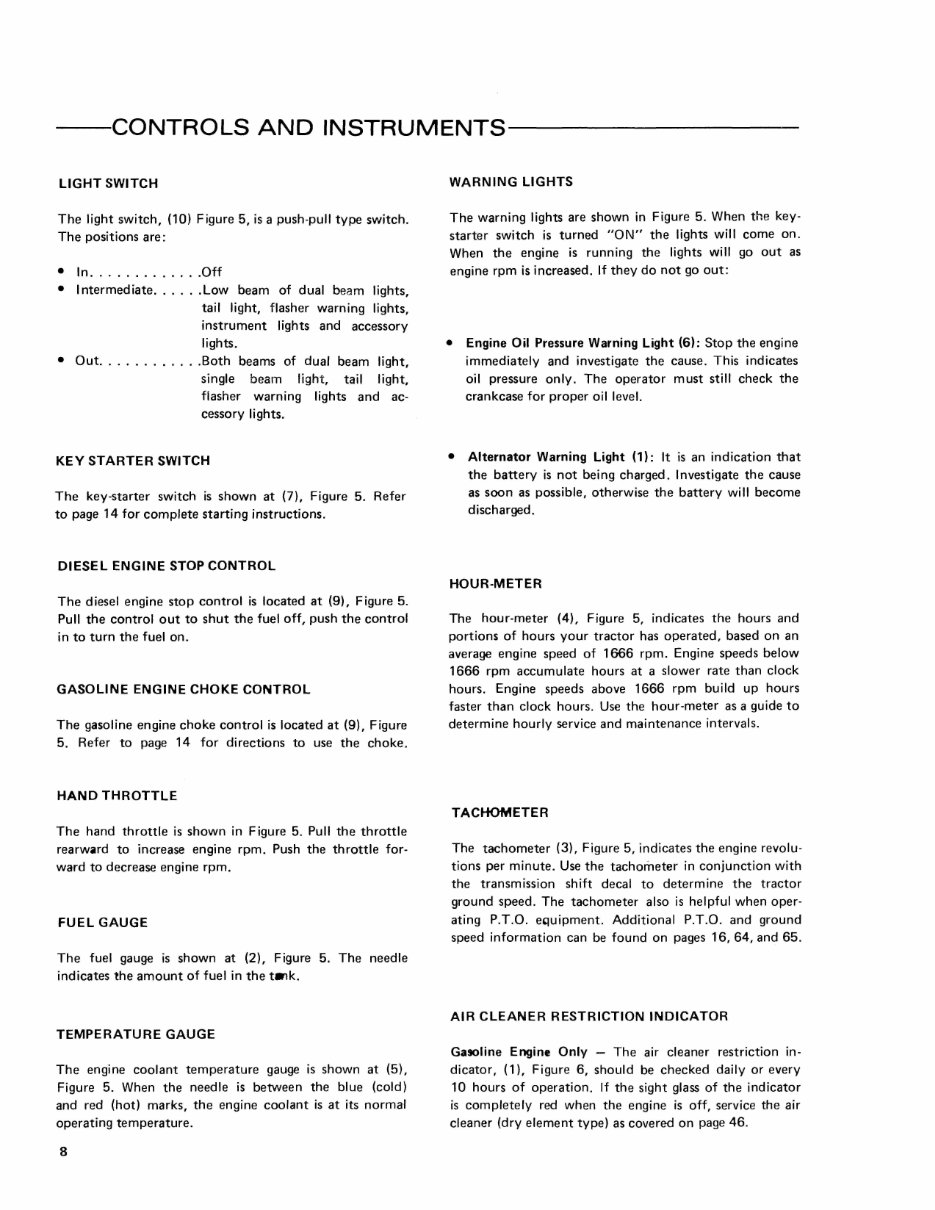
--CONTROLS AND INSTRUMENTS--------- LIGHT SWITCH The light switch, (10) Figure 5, is a push-pull type switch. The positions are: • In ............. Off • Intermediate ...... Low beam of dual beam lights, tail light, flasher warning lights, instrument lights and accessory lights. • Out ............ Both beams of dual beam light, single beam light, tail light, flasher warning lights and ac- cessory lights. KEY STARTER SWITCH The key-starter switch is shown at (7), Figure 5. Refer to page 14 for complete starting instructions. DIESEL ENGINE STOP CONTROL The diesel engine stop control is located at (9), Figure 5. Pull the control out to shut the fuel off, push the control in to turn the fuel on. GASOLINE ENGINE CHOKE CONTROL The gasoline engine choke control is located at (9), Figure 5. Refer to page 14 for directions to use the choke. HAND THROTTLE The hand throttle is shown in Figure 5. Pull the throttle rearward to increase engine rpm. Push the throttle for- ward to decrease engine rpm. FUEL GAUGE The fuel gauge is shown at (2), Figure 5. The needle indicates the amount of fuel in the t.,k. TEMPERATURE GAUGE The engine coolant temperature gauge is shown at (5), Figure 5. When the needle is between the blue (cold) and red (hot) marks, the engine coolant is at its normal operating temperature. 8 WARNING LIGHTS The warning lights are shown in Figure 5. When the key- starter switch is turned "ON" the lights will come on. When the engine is running the lights will go out as engine rpm is increased. If they do not go out: • Engine Oil Pressure Warning Light (6): Stop the engine immediately and investigate the cause. This indicates oil pressure only. The operator must still check the crankcase for proper oil level. • Alternator Warning Light (1): It is an indication that the battery is not being charged. Investigate the cause as soon as possible, otherwise the battery will become discharged. HOUR-METER The hour-meter (4), Figure 5, indicates the hours and portions of hours your tractor has operated, based on an average engine speed of 1666 rpm. Engine speeds below 1666 rpm accumulate hours at a slower rate than clock hours. Engine speeds above 1666 rpm build up hours faster than clock hours. Use the hour-meter as a guide to determine hourly service and maintenance intervals. TACHOMETER The tachometer (3), Figure 5, indicates the engine revolu- tions per minute. Use the tachometer in conjunction with the transmission shift decal to determine the tractor ground speed. The tachometer also is helpful when oper- ating P.T.O. equipment. Additional P.T.O. and ground speed information can be found on pages 16, 64, and 65. AIR CLEANER RESTRICTION INDICATOR Ga90line Engine Only - The air cleaner restriction in- dicator, (1), Figure 6, should be checked daily or every 10 hours of operation. If the sight glass of the indicator is completely red when the engine is off, service the air cleaner (dry element type) as covered on page 46.
Ford Tractor 4600 Service Repair Manual contains a comprehensive maintenance schedule and detailed repair procedures essential for professional mechanics and DIY enthusiasts alike.
The index of this service manual includes:
GENERAL INFORMATION
PERIODIC MAINTENANCE
ENGINE
FUEL SYSTEM
COOLING SYSTEM
ELECTRICAL SYSTEM
CHASSIS
SERVICES INFORMATION
EMISSION CONTROL INFORMATION
This complete Service Repair Manual provides detailed information and instructions necessary for vehicle repair, maintenance, and future upkeep. It is a reliable source of information for gaining in-depth knowledge about the vehicle and preventing potential issues.
Specifically written for both do-it-yourselfers and experienced mechanics, this manual offers step-by-step instructions based on complete machine disassembly, accompanied by numerous photos and illustrations to guide through each service and repair procedure.
Product Details:
File Format: .PDF
Language: English
Specifications: Fully Printable
Zoom IN/OUT: YES
Delivery: Instant
Requirements: Adobe Reader
Compatible: All Versions of Windows & Mac
This service manual is a valuable resource for maintaining and repairing the Ford Tractor 4600, ensuring satisfaction guaranteed.