


Chapter
1. General Information.........................Page 1
2. Periodic maintance and service.......Page 4
3. Engine..............................................Page 23
4. Fuel and Lubrication System...........Page 37
5. Electrical System.............................Page 48
6. Servicing Information........................Page 62
This service manual has been specially prepared to provide all the necessary information for the
proper maintenance and servicing of VENTO Zip r3i Scooter.
This manual contains an introductory description on VENTO Zip r3i and procedures for
Inspection/Service and overhaul of its main components. This Manual is intended those who have
enough knowledge and skills for servicing of VENTO vehicles. Without such knowledge and skills
you should not attempt servicing by relying on this manual only. Instead, please contact your nearly
authorized VENTO motorcycle dealer.
Service Manual
Table of Contents
Rev. 1 Date
01/05/2004
CHAPTER 1
1-1 GENERAL INFORMATION
TYPE & IDENTIFICATION
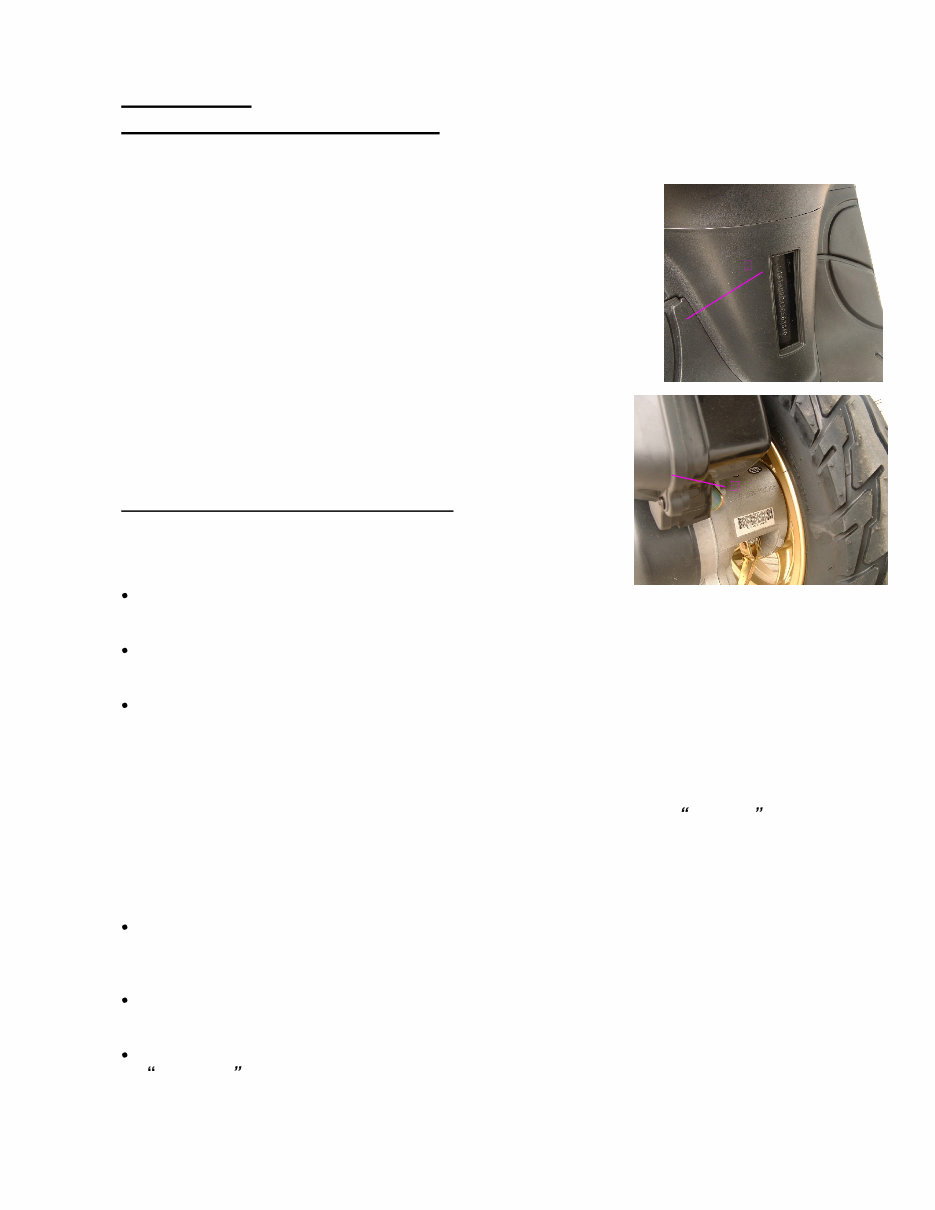
FRAME NUMBER
FRAME NUMBER is Engraving on the steel tube of frame as shown in figure.
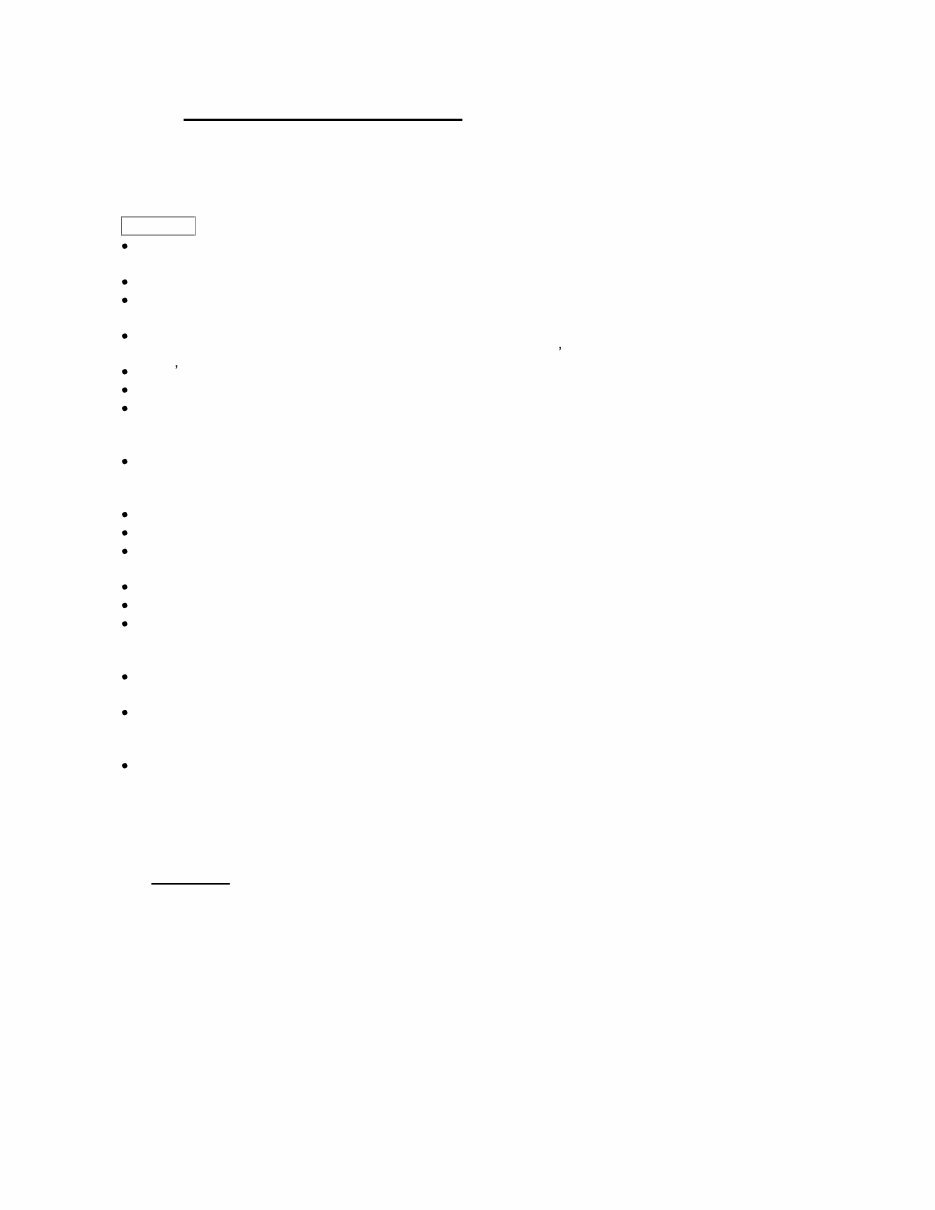
ENGINE NUMBER
ENGINE NUMBER is Engraving on rear side
Crankcase Shown figure.
Both FRAME NUBER AND ENGINE NUMBER are designed
Specially for registration your scooter and for spare part
Orders.
FUEL AND ENGINE OIL RECOMMENDATION
Be sure to use specified fuel and engine oil.
Some specifications are as follows:
FUEL
Gasoline should be Unleaded, the octane number must be 85 ~95 or more.
ENGINE OIL
For engine lubrication, you can use specified high quality two-stroke engine oil (without
being diluted).
GEAR OIL
Use high quality, all-purpose SAE10W/40 Gear oil for this scooter. Make sure that the Engine
oil/Gear oil what you are using should come under API classification.
BREAK-IN PROCEDURES
During manufacture only the best possible materials are used and all machined parts are finished
to a very high standard but it is still necessary to allow the moving parts to BREK-IN before
subjecting the engine to maximum stresses. The future performance and reliability of the engine
depends on the care and restraint during its early life.
General requirements are as follows
Limit break-in speed
At the first 1000 ms (630 miles mileage use throttle opening less than 1/2.
Up to 1600 Kms 1000 miles mileage use throttle opening less than 3/4.
Upon reaching an odometer reading of 1600 kms (1000 miles) you can subject the motorcycle
to full throttle operation.
Do not maintain constant engine speed for on extended time period during any portion of the
BREAK-IN period, try to vary the throttle position.
1-2 GENERAL INFORMATION
PRECAUTIONS AND GENERAL INSTRUCTIONS
GENERAL PRECAUTIONS:
WARNING
Proper service and repair procedures are important for the safety of the service mechanic and the
reliability of the vehicle.
When two or more persons are working together, pay attention to the safety of each other.
When it is necessary to run the engine indoors, make sure that the exhaust gas is forced outwards
and ventilation should be proper.
When working with toxic or flammable materials, make sure that the area you work in is well
ventilated and that you follow all off the material manufacturer s instructions.
Don t use gasoline as a cleaning agent.
After servicing the motorcycle check all lines i.e. fuel, oil and brake lines for leaks.
Whenever you remove Oil seals, Gaskets, packing, O-rings, Locking washers, Cotter pins, Circlips,
and certain other parts as specified, are sure to replace them with ones. Also before installing these
new parts be sure to remove any left out material from the mating surfaces.
Never reuse a circlip, when installing a new circlip, take care not to expand the end gap larger than
required to slip the circlip the shaft. After installing a circlip, always ensure that it is completely
seated in its groove and securely fitted.
Do not use self- locking nuts a few times over.
If parts replacement is necessary, replace the parts with VENTO Genuine parts or their equivalent.
When removing parts that are to be reused, keep them arranged in an orderly manner so that they
may be reinstall in proper order and orientation.
Always use special tools when required.
Always use specified lubricant, bond& sealant.
While removing the battery, disconnect the Negative terminal / Cable first then Positive terminal /
Cable and when reconnecting the battery, connect the Positive terminal / Cable first then
Negative terminal / Cable.
During Service to electrical parts, if no need of battery power then, please disconnect the Negative
terminal / Cable of the battery.
During tightening of Cylinder head and crank case bolts and nuts start with larger diameter and
ending with smaller diameter, from inside to outside diagonally, with the specified tightening torque
values.
After reassembly, recheck parts for tightness and operation.
REPLACEMENT COMPONENTS
Be sure to use genuine VENTO spare parts or their equivalent. Genuine VENTO components are high
quality parts, which are designed specially for VENTO vehicles.
CAUTION
Scooter/motorcycle may damage by using non genuine parts or parts that is not equivalent to
VENTO parts and will be affecting performance also.

1-3 GENERAL INFORMATION SPECIFICATIONS
DIMENSIONS AND NET WEIGHT
Overall Length.......................1620mm
Overall Width...........................625mm
Overall Height.......................1010 mm
Wheelbase.............................1170mm
Ground Clearance......................90mm
Dead Weight................................78kg
CHASSIS
Front shock absorber
Telescopic, Coil spring, without oil damped.
Rear shock absorber
Swing arm type Coil spring, with oil damped.
Steering angle
48º (toward the left\toward the right)
Front Tire size................................3.50-10
Rear Tire size.................................3.50-10
Front brake Disc................................. 160
Rear brake Drum................................ 110
ENGINE
Type.....................Two-stroke, Air Cooled
Intake system.........................Reed valve
No. of Cylinder........................................1
Bore.............................................40.0mm
Stroke..........................................39.6mm
Displacement........................................49.8CC
Compression Ratio............................6.9:1
Carburetor.................................Side draft
Air cleaner..........Dual polyurethane foam
Starting System
Electric start & Kick pedal for Manual Start.
Lubricating System
Auto lubrication, by Oil Pump
ELECTRICAL
Ignition System.......................Electronic
CDI
Ignition Timing......................15
0
at 5000 RPM
Spark Plug.........................NGK/R/BR8HSA
Storage Battery....................YUASA/YB4L-4
Battery Capacity.............................12V-4Ah
Magneto..................................................AC
Fuse..................................................10Amp
Headlight............................12V 35 / 35 Watt
Turn Indicators (X4)...................12V / 3
Watt
Tail light/stop light.......................12V /
5Watt
Meter light..................................12V / 3Watt
Oil level Indicator light...............12V / 3 Watt
Tran signal Indicator light...........12V / 3Watt
High beam Indicator light............12V/3 Watt
CAPACITY
Fuel Tank........................................5.2L
Engine Lubricating Oil Tank............1.0L
Gear Oil...........................................0.1L
TRANSMISSION
Clutch System
Dry shoe, Automatic, Centrifugal Type
Gears shifting mechanism
Automatic Primary Reduction 1
Gear Reduction ratio
The first gear ...................3.692(48/13)
The second gear .............3.000(36/12)
Drive System...................V-Belt driv

Rev no.01/ page 6of 128
CHAPTER 2
PERIODIC MAINTENANCE AND SERVICE
Contents
Periodic maintenance and service schedule................................5
Storage battery.............................................................................7
Service and adjustment procedures.............................................9
Cylinder head nut and exhaust pipe bolt .....................................9
Cylinder head and cylinder ..........................................................9
Spark plug ...................................................................................10
Air cleaner....................................................................................11
Fuel level line...............................................................................12
Throttle cable...............................................................................12
Engine idle speed.........................................................................12
Oil pump.......................................................................................13
Gear oil.........................................................................................14
Braking..........................................................................................15
Tire................................................................................................17
Steering ........................................................................................17
Front shock absorber ...................................................................18
Rear shock absorber ....................................................................18
Vehicle bolts and nuts ...................................................................18
Rev no.01/ page 7of 128
2-1 PERIODIC MAINTENANCE SCHEDULE
The chart below lists the recommended intervals for all the required periodic service work necessary to keep
the motorcycle operating at peak performance and economy. Mileages are expressed in terms of Kilometer,
Miles and time for your convenience.
Note:
More frequent servicing may be performed on motorcycles that are used under bad road condition.
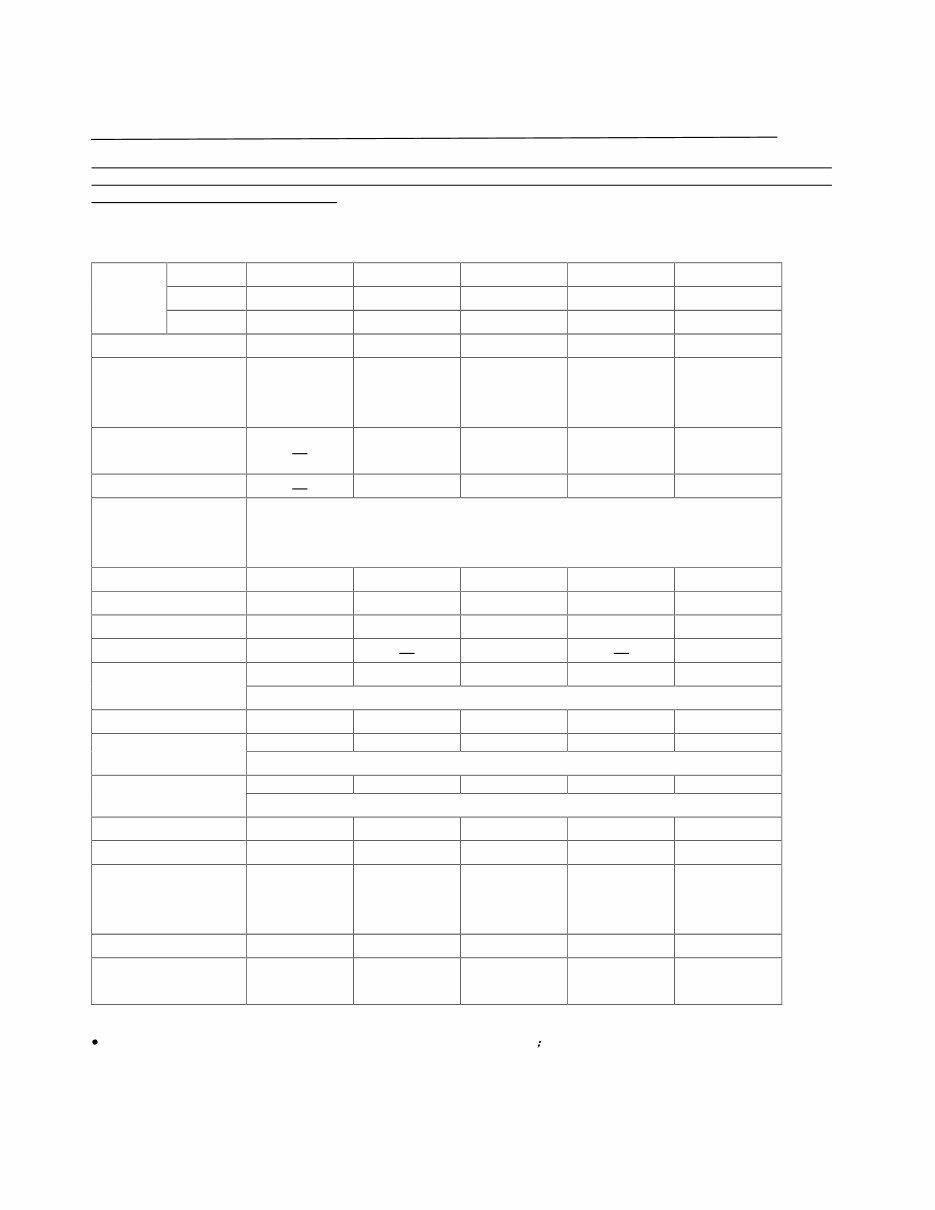
PERIODIC MAINTENANCE CHART
Miles 630 3780 7560 11340 15120
Kilometer 1000 6000 12000 18000 24000 Interval
Months. 2 12 24 36 48
Storage battery I
I I I I
Cylinder head nut
and exhaust pipe
bolt
T
T T T T
Cylinder head and
cylinder
C C C C
Spark plug
C R C R
Air cleaner
Inspect & Clean every 3000 Kms (1890 miles)
Replace every 12000 Kms(1750 Miles)
Idle speed (rpm)
I I I I I
Throttle cable play
I I I I I
Oil pump
I I I I I
Gear oil I R R
I I I I
I
Fuel line
Replace every 4 years
Brake
I I I I I
I I I I I
Brake hose
Replace every 4 years
I I I I I
Brake fluid
Replace every 2 years
Steering
I I I I I
Front fork
I I I I I
Rear shock
absorber
I I I I I
Tire
I I I I I
Vehicle body bolts
and nuts
T
T T T T
Note:
I=inspect clean adjust lubricate or replace if necessary
A=adjust C=clean R=replace T=tighten
Rev no.01/ page 8of 128
2-2 PERIODIC MAINTENANCE PROCEDURE
BATTERY INSPECTION AND CHECKING PROCEDURE
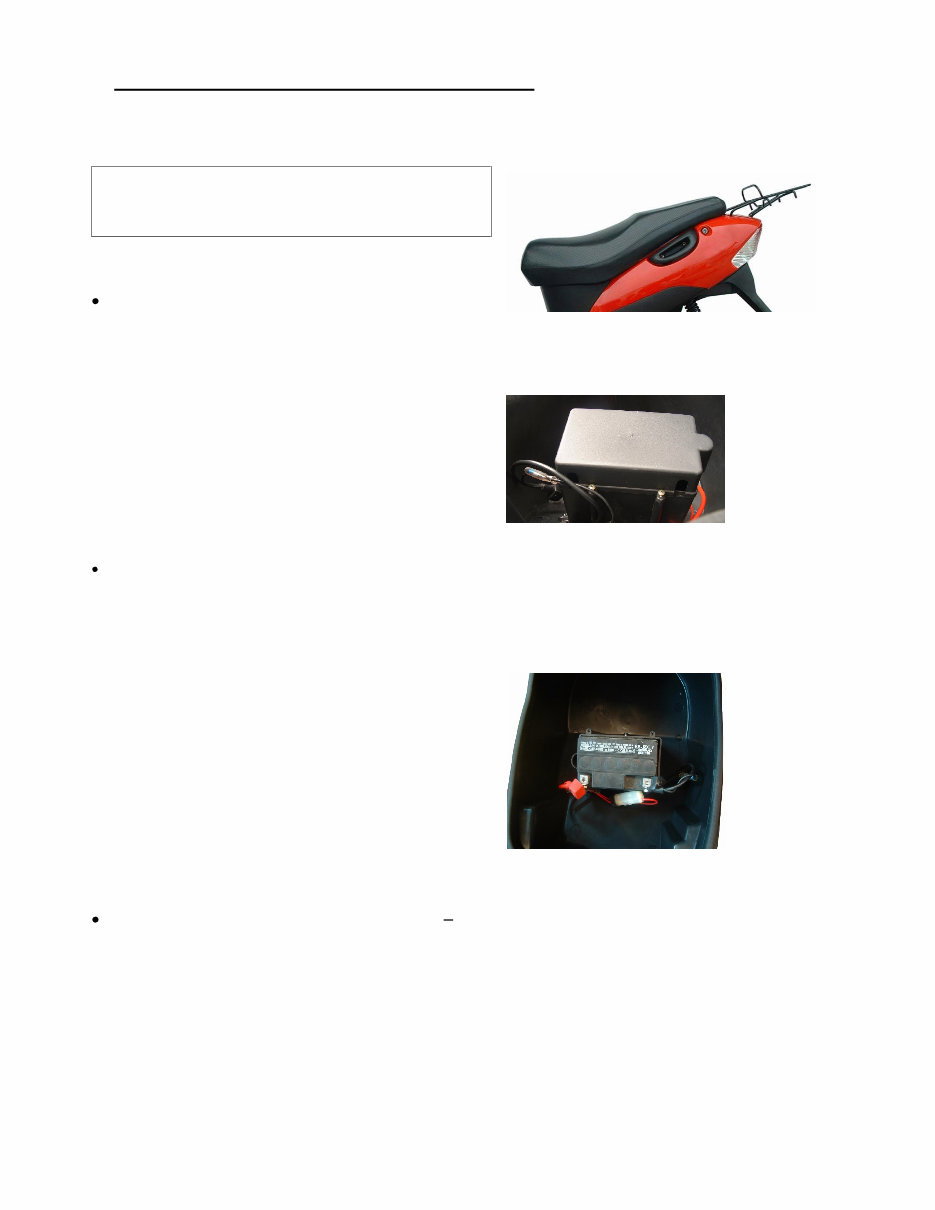
Storage Battery
Inspect at initially 1000Kms 630 miles 2
months and every 6000 Kms 3780 miles 12
months.
Open seat, and then remove the battery box cap in
theMiddle of helmet box.
Disconnect Negative terminal / Cable first then Positive terminal / Cable of Battery.
Measure the voltage between the +ve and ve terminal of Battery charge the Battery if the
voltage is below the specified limit.

Rev no.01/ page 9of 128
BATTERY TESTING PROCEDURE
Remove the battery from the Motorcycle/Scooter. Connect the battery on load tester ensuring Red lead of
tester to (+ve) and Black lead to (-ve) terminal of battery. Check the terminal voltage of battery. It should
be 12~14.5 Volts. Press the push button on the tester and watch the voltmeter reading on load. The
battery voltage should not drop down less than 9 volts; this indicates that the battery is perfect to take load
of self-starter motor. Check the specific gravity of each cell should not be less than 1.220.Put the battery
on charge, if required and carry out load test.
Diagnose the nature of failure as under:
BATTERY CELL DEAD TEST: On load if battery voltage is found less than 9.5Volt and one or more cell
shows specific gravity less than 1.220 then change the battery.
OPEN CIRCUIT: During the charging of battery does not pickup the charge. In any of the above case,
replace the battery.
RECOMDED BATTERY LOAD TESTER: MAKE ELAK, MODEL: ---BCT7
CAUTION: During Inspection, if the battery on the vehicle is found defective, before replacing with
a new battery, it is important to check the battery charging circuit.
BATTERY CHARGING CIRCUIT TEST
The MAGNETO generated AC current, which is rectified into DC current by Voltage Regulator .It, is
automatically charging the battery depending upon condition of the battery, load and engine rpm.
Regulator is connected in parallel to the circuit. Hence this type of system is called PARALLEL LOAD
REGULATOR .
Connect DC Voltmeter and DC Ammeter, start the engine with fully charged good battery. The
Voltage Regulator output is as follows.
Battery charging current range in between 0.6 Amp to 2Amp.
The engine speed @ 5000 rpm with headlamp on condition.
Battery terminal charging voltage > 11.5 V at any load condition (depending upon the
condition of battery)
NOTE 1
Incase charging output is less than 0.6 Amp or more than 2.0Amp then replace the Voltage Regulator with
new one and recheck.
NOTE 2
AMMETER: ------Series connection inline with positive battery wire to measure DC Amp.
VOLTMETER: ---Parallel connection between positive & negative terminal of the battery to measure DC-
Volts.
Rev no.01/ page 10of 128
IMPORTANT TIPS ON BATTERY
SPECIFIC
GRAVITY
The Specific Gravity of fully charged battery should be 1.220~1.240
Use Hydrometer to check each cell of battery.
WARNING Remove negative terminal first, then positive terminal.
If the battery is corroded by sulfur. Please exchange it. If the terminal
of the battery has too much precipitate, please exchange it.
CHARGING Charging is necessary at less than 1.220 Specific Gravity for old
battery. It changes according to electrolyte temperature.
Connect positive terminal of charger to positive battery wire &
negative terminal of charger to negative battery wire.
CHARGING
CURREENT
For 2.5 Ah battery the charging current should be Maximum 0.25Amp.
For 6.0 Ah battery the charging current should be Maximum 0.6Amp.
CHARGING TIME For new battery 8-12 hrs.
For old battery 12-14 hrs.
WARNING Always open all the caps of battery before charging.
Keep flames & sparks away from the battery.
Turn ON or OFF Switch at charger & not at battery terminal
Don t charge the battery, if electrolyte temperature is more than 45ºC.
Do not quick charge the battery.
INSTALLATION Connect positive terminal first, then negative terminal.
BATTERY
CAPACITY
12Volt- 6Ah YTX7A-BS/YUASA
RECOMMENDED
BATTERY
CHARGER
Make: ELAK Model C1/48
RECOMMENDED
HYDROMETER
Make: THIMSON Model: 108
NOTE Always top up battery with the distilled water up to the maximum
level (Never use Acid to top up the old battery).
Always ensure new battery is being charged in cold condition after
filling with the electrolyte.
Always ensure that battery breather tube is not clogged, crimped
or bent. Breather tube should be properly routed.
Incase if Motorcycle/ Scooter is not being used for longer
period, then first charge the battery fully & then connect only
positive terminal to Motorcycle /
You're Reading a Preview
What's Included?
Fast Download Speeds
Online & Offline Access
Access PDF Contents & Bookmarks
Full Search Facility
Print one or all pages of your manual
$31.99
$41.99
Vento ZIP R3I Scooter Full Service & Repair Manual 2004-Onwards
Viewed 82 Times Today

What's Included?
Fast Download Speeds
Online & Offline Access
Access PDF Contents & Bookmarks
Full Search Facility
Print one or all pages of your manual
$31.99
$41.99

Secure transaction
What's Included?
Fast Download Speeds
Online & Offline Access
Access PDF Contents & Bookmarks
Full Search Facility
Print one or all pages of your manual
- This complete factory service repair workshop manual is available for instant access on your computer, tablet, or smartphone.
- It covers all repairs, servicing, and troubleshooting procedures with detailed photos and diagrams.
- Professional mechanics and technicians use this manual, which contains step-by-step instructions and highly detailed exploded diagrams and pictures.
- You have the option to print out a single page or the entire manual.
- This manual can be used on multiple computers without any limitations or trial periods.
- There is no expiry date or renewal fee; you can use this manual for life.
- It is fully compatible with Windows and MAC computers.
For more information, please click the button below.


